Whether you’re new to owning a sailboat or not, you have likely put some thought into painting your boat yourself. It is important to keep your boat well painted as it can save you a lot of money in the long run. It can also save you a lot of money if you choose to paint your boat yourself.
Whether or not this is the first time you have painted your boat, you will still find this article useful. It has lots of tips and tricks for making sure you get the job done and get it done well. Hiring a professional may be easier, but there is a sense of pride and accomplishment in doing it yourself. If you use this article as a reference, you can’t go wrong.
Table of contents
Why is it important to paint your sailboat?
Painting your boat is not just an excuse to put some creative flair into your boat, it is an important process in keeping the boat safe. Safe from salt, safe from barnacles, and safe from damage. The paint acts as a vital protective layer, without it your boat will be vulnerable to all kinds of damage. If you have a wooden hull, this protective layer will keep the wood from rotting. It can also plug any minuscule holes that might allow sea life and salt to make its way into the body of the boat.
There is also, of course, the added benefit of having a boat that looks good . A boat is a point of pride and should be treated as such. Having a glossy looking boat is something to be proud of. Most boats are not painted far above the waterline, so it is even an opportunity to make your boat stand out. Some people also believe that painting a boat brings good luck. Unless of course, you paint it green, green is thought to bring bad luck. Whether or not you believe that is up to you.
What are the benefits of painting your boat yourself?
When it comes to painting your boat there are only two options. Hire a professional boat painting contractor, or bite the bullet and do it yourself. They both have their pros and cons, of course, but there is so much more to be gained by doing it yourself. First of all, painting your boat yourself is just as fun as it is difficult. Learning to paint is a valuable life skill that you won’t regret learning as early on in your sailing career as possible. If you can learn to paint your boat now, you will save yourself a small fortune in the long run.
Hiring a contractor is expensive, to say the least, it may be faster and easier overall, but the extra cost can make it simply not feasible. Or simply unappealing. If this is the first time you are painting your sailboat you will need to make a one-off purchase of all the equipment needed for prepping, painting, and finishing the boat. After these one-off purchases are out of the way, you will only need to buy paint and new rollers the next time. Even if you need to buy all the equipment brand new, it can be cheaper than hiring someone else to do the job for you.
How often do you need to paint your sailboat?
The general rule of thumb for painting your boat is that it will need bottom paint about once a year. This is when you will need to take the boat completely out of the water and give it a fresh new coat. If your boat spends all of its time in the water, it certainly needs painting at least once a year. The saltwater is so corrosive that you shouldn’t let your boat go without a fresh coat of bottom paint for more than 2 years. Even if your boat only spends half its time in the water, and the other half on land, you will find that its best to keep its coat topped up.
The top paint, or the above waterline paint, doesn’t need painting anywhere near as often. It isn’t in direct contact with the seawater so it simply isn’t going to get eroded down as much. The salty sea spray can still be damaging over time so this paint should be re-done every 3 years. It can be more or less frequent depending on use and personal preference. Some people like to do above waterline paint yearly, with the rest of their boat, but it isn’t necessary.
What are the best paints to use for your sailboat?
There are plenty of great brands of paint out there, in various colors and shades, so you won’t struggle for choice. There are some things you might want to look for in your paint . For example, you may have noticed that a lot of boats tend to have red hulls. This isn’t just a fashion statement, and while red is supposed to bring luck this isn’t the main reason either. The reason is that this red/orange paint is perfect for added protection along the bottom of your boat.
This red/orange paint is interestingly chosen because it is, of course, traditional; but mostly because of its copper. The copper is actually what gives the paint its red/orange color.
Copper is perfect for the bottom of your boat for several reasons. First, copper acts as a biocide. It stops worms from making their way into the hull if your boat is wooden. If it is metal or fiberglass, it still has the benefit of stopping barnacles and other sea life from attaching themselves deep into the hull of the boat. Copper is also strong enough to hold up to scraping.
Scraping is when you scrape barnacles and other sea life off the hull of your boat. Scraping is an important part of keeping your boat in good condition. It is important to check with the marina or port authority whether or not you are allowed to scrape. If you scrape without permission you may find yourself on the receiving end of a hefty fine. The reason is that they don’t want you introducing invasive species on to the marina floor. This is mostly a problem when you are coming from somewhere vastly foreign, not sailing from New York to Chicago for example.
How many coats of paint does a sailboat need?
When painting your boat it’s a good idea to think about how many coats of paint you are going to need. There is no exact number that is needed, it is mostly to do with how well protected your boat needs to be and how much time you have on your hands. Every coat takes time and attention to detail.
If you choose to do four coats of paint it is going to be time-consuming but very well protected. That being said, the minimum number of coats is two. One is not enough. If your boat only spends part of the time in the water, two to three coats are plenty.
If you are someone who lives on their boat full-time, or at least most of the time, you may want to do more coats. Three, maybe even four, might be ideal here. The reason is that first, your boat is going to experience way more wear and tear than one that is just an ocean part-timer. And second, taking out your boat (which is also your home) is a giant hassle. It is a tedious process, so doing it as infrequently as possible is probably in your best interest. More coats last longer. When you are sailing from place to place, finding somewhere to take your boat out of the water and perform this maintenance is inconvenient. You want to be doing it as little as possible.
What safety precautions do I need to take when painting my sailboat?
All paint can be toxic when inhaled. Even if it is “non-toxic” paint it is going to be harmful to your lungs. They aren’t meant to inhale anything but air, even non-toxic paint is going to be bad for them. This is why it is important to wear a face mask.
Your mask should be specifically for painting, not surgical masks or other cheap medial masks. They are not going to be strong enough, with a fine enough air filter. Whether you feel the need to wear eyewear is up to you during the painting process.
Before the painting begins, when you are scraping and sanding, it is a good idea to wear some goggles to keep debris and splinters out of your eyes. It is also a good idea to wear gloves. You don’t want to rough your hands up too much, they need protection from not only the paint but splinters and sharp pieces of metal.
Painting a boat can be dangerous work. Without taking the proper safety precautions you are putting yourself at unnecessary risk. This safety equipment costs just a few bucks and is equally important as any of the other tools needed to paint your boat.
What tools do I need to paint a boat?
There is more to painting your boat than just using paint and a brush . You will also need tough sandpaper , potentially an angle grinder or welder , paint, primer , brushes, paint rollers , paint thinner , and solvent. You will need to make sure you have all of these things before you start painting. You can pick any of these items up at a boating goods store.
It is a good idea to bring some buckets with you for filling with water, both for rinsing off your boat and your brushes. All of your safety equipment needs to be brought too.
If this is your first time painting your boat yourself, you may find you need to buy all of these things at once. That can be a lot to stomach when its all in one go, luckily, most of these tools and equipment can be reused. Besides, it is still going to be far cheaper than hiring someone to do it for you. All of this equipment is an investment in your boat.
How to paint a sailboat
Whether this is the first time you have painted your boat or not, you may find some of the tips in this next section useful. Painting your sailboat may be tricky at first, but over time you will get the hang of it. The problem with painting your boat is that it can be a very expensive mistake if you get it wrong.
It is important to read this guide carefully, take your time, and make sure you do the job properly. It may be slow going at first, speed will come over time. Once you have gathered all of your safety equipment and tools you are ready to get started.
The workspace
First of all, you need to ensure you have the right workspace. You cant paint your boat in the water so you are going to need to find somewhere to do your work. This is easy enough if you don’t live on your boat full time, take the boat to your house and do your painting on the driveway. If this isn’t an option because you don’t have space or live on your boat full time, you are going to need to rent somewhere. There are typically places affiliated with the marina that you can use. In some cases, these even come with a majority of the equipment you will need. This, of course, drums up the price a bit, but that’s unavoidable.
Your workspace needs to be well ventilated, or you risk making yourself very sick. Both from paint fumes, rubbing alcohol fumes, and fine matter from when you sand the hull down. This means painting your boat in your garage, if it even fits, is not always the best idea. If you do decide to paint outside, it is important to consider the chance of rain. Of course, your boat is pretty waterproof, but once you begin sanding rain might damage the wood if left to sit there.
Before you do anything else, it is important to look your boat over fully from top to bottom. You are looking for any bumps, scrapes, cracks and general damage. This damage is not going to be noticeable while the boat is in the water, so just before you paint it is one of the only times you get to have a close look. Once you have made note of all this damage, it is time to get to work repairing it. Depending on just how severe this damage is, you may want to get help with this next stage.
All of this damage needs to be repaired before anything else can take place. Painting over these damaged areas is just going to hide the problem temporarily, the next time it comes to painting you will find they are far worse. If you don’t deal with this now, they are going to snowball into complicated and expensive repairs.
After your repairs are done it is time to start sanding. This is very time consuming as you need to do it three times. Per coat. First, take the 600 grit sandpaper and make your way around the boat. It is best to use electrical tape to mark out a section at a time so you don’t keep losing your place. After you have finished with the 600 grit sandpaper, it is time to move on to 800, then 1200. This process is important so you will be painting on as smooth a surface as possible. It is then a good idea to wipe the surfaces of the boat down with a damp cloth to remove any of the dust and flakes of metal/wood. Otherwise, you end up painting over them.
You could wash the boat down with a hose but you want to avoid getting the boat unnecessarily wet now that the hull has lost its protective layer. If you are sanding down a boat with a copper paint bottom, you may find the sanding process difficult. Just do your best, it doesn’t need to be 100% perfect. It is important to get as much of the old paint off as possible. Your new paint won’t adhere to the old paint as well as it would to the boat hull itself.
Putting on a layer of primer is not 100% necessary but it is recommended. The idea is that you want your topcoat to adhere to the boat as well as possible, a layer of primer can help you do that. The primer needs to be painted on evenly all over the boat. If you only feel like doing below the waterline, that is fine too. It will save you a lot of time. Putting on the layer of primer is not the most time-consuming part, it is mostly the sanding down that you will have to do. You will need to sand down using the 600 grit paper, then the 800, then 1200. Just like last time. Your layer of primer needs to be as smooth as possible for the maximum adhesion.
Now comes the paint. It is recommended to do at least two layers of paint. One undercoat and one top. Some people choose to go as far as two layers of primer, two layers of undercoat, and three layers of topcoat. This is going to be very time consuming, remember you will need to sand down three times between each layer of paint. You can paint using a brush if you like but is far easier to use a roller. It is also far easier if you employ someone to help you with this stage. It could be your spouse, child, friend, or anyone. It doesn’t need to be a paid professional. It can take a long time to go through this process. Especially if you are effectively doing 8 layers of paint (including primer).
The fastest way to paint, especially if you are on your own, is to use a sprayer. They are easy to use, with a little practice. If you haven’t used one before you may find that you struggle to get an even coat. You should always paint in vertical stripes, not horizontal. Additionally, it is a good idea to have someone following after you with a small brush doing small touch-up jobs. Any unevenness will need to be sanded down and repainted. The whole painting process can take a week if you aren’t efficient.
Take pictures
It is a good idea to take pictures throughout the whole process. This is for future reference. For example, if you take pictures of the boat when you are assessing it for damage, you can compare them to after you have repaired or sanded the trouble spots down. If you cant see the trouble spots still, great! If you can, it will help you keep an eye on them after you have painted too. It’s a good idea to catalog all of these areas if they start to become regular problems you may want to have your boat looked at by a mechanic. You might also like to have a before and after picture for your blog, or just as a personal memento.
Hopefully, you now have all the theory needed to paint your boat. There is a lot more that goes into painting your boat than simply grabbing some paint and a brush. It takes planning, practice, and attention to detail. If you follow this guide you will have no trouble at all. If this is your first time painting your boat, don’t be disheartened if it takes a lot longer than you expected. Speed will come with time, it is far more important to get the job done right than get it done quickly. If you put the work in you will be painting like a pro in no time at all.
Related Articles
I've personally had thousands of questions about sailing and sailboats over the years. As I learn and experience sailing, and the community, I share the answers that work and make sense to me, here on Life of Sailing.
by this author
Repairs and Maintenance
Most Recent
What Does "Sailing By The Lee" Mean?
October 3, 2023
The Best Sailing Schools And Programs: Reviews & Ratings
September 26, 2023
Important Legal Info
Lifeofsailing.com is a participant in the Amazon Services LLC Associates Program, an affiliate advertising program designed to provide a means for sites to earn advertising fees by advertising and linking to Amazon. This site also participates in other affiliate programs and is compensated for referring traffic and business to these companies.
Similar Posts
How To Choose The Right Sailing Instructor
August 16, 2023
Cost To Sail Around The World
May 16, 2023
Small Sailboat Sizes: A Complete Guide
October 30, 2022
Popular Posts
Best Liveaboard Catamaran Sailboats
December 28, 2023
Can a Novice Sail Around the World?
Elizabeth O'Malley
4 Best Electric Outboard Motors
How Long Did It Take The Vikings To Sail To England?
10 Best Sailboat Brands (And Why)
December 20, 2023
7 Best Places To Liveaboard A Sailboat
Get the best sailing content.
Top Rated Posts
Lifeofsailing.com is a participant in the Amazon Services LLC Associates Program, an affiliate advertising program designed to provide a means for sites to earn advertising fees by advertising and linking to Amazon. This site also participates in other affiliate programs and is compensated for referring traffic and business to these companies. (866) 342-SAIL
Painting your boat not only enhances its visual appeal but also protects it from the damaging effects of saltwater, sunlight, and other elements. Whether you have a sailboat, powerboat, or kayak, the principles of boat painting remain largely the same.
Assessing your boat's condition
Before you begin, evaluate your boat's current condition. Inspect the hull for any damage, scratches, or rust that may need to be addressed before painting. Make a list of necessary repairs and tackle them first.
Gathering the right tools and materials
To paint your boat successfully, you'll need a range of tools and materials, including paintbrushes, rollers, sandpaper, masking tape, drop cloths, and, most importantly, the appropriate marine paint.
Preparing the boat surface
Proper preparation is the key to a successful paint job. Start by cleaning the boat's surface thoroughly to remove dirt, grease, and old paint. Sand the surface to create a smooth and clean canvas for the new paint to adhere to.
Applying primer
Priming is a crucial step to ensure good paint adhesion and durability. Apply a marine-grade primer that is compatible with the paint you've chosen. Allow it to dry thoroughly as per the manufacturer's instructions.
Read our top notch articles on topics such as sailing, sailing tips and destinations in our Magazine .
A man taking care of his ship.
Check out our latest sailing content:
The most popular catamarans of 2023, explore tuscan archipelago in one week, skippered boats: how to pack for a yachting holiday, boat rental with skipper: everyone can go to sea, skippered boats: myths about sailing, sail from lefkada for 14 days. where to, what not to miss when visiting lefkada, skippered boats: step-by-step boat rental, where and why to sail from lefkas marina, don’t panic: handling maritime emergencies, skippered boats: how to choose a boat, the best sailing routes from biograd na moru, yachting away from ourselves: a voyage to inner peace, sail to the 7 most beautiful sights in greece, skippered boats: how to put together a crew, skippered boats: the most popular yachting destinations, what skipper's licence do i need, skippered boats: what you can experience when yachting, from lefkada or corfu to paxos and antipaxos, discover the paradise of paxos and antipaxoss, skippered boats: typical day on board, skippered boats: what it actually looks like on a boat, discover corfu: sailing adventure in the ionian, sextant and navigation: survival without gps, 5 best sailing routes in the bahamas, skippered boats: how much does a boat holiday cost, yachting guide to the bahamas, the ultimate yacht cleaning kit, introduction to chartering with a skipper, traditional sailor tattoos: meaning of the swallow, choosing the right paint.
Selecting the right type of marine paint is essential. There are different types of boat paint available, such as antifouling paint, topside paint, and bottom paint. Choose the one that suits your boat's needs and your intended use.
Applying the paint
Start by applying the paint to the boat's surface using a paintbrush or roller. Use long, even strokes, working from one end to the other. Be mindful of the weather conditions, as extreme temperatures and humidity can affect the paint's drying process.
Applying additional coats
For best results, you may need to apply multiple coats of paint. Follow the manufacturer's recommendations for drying times between coats. Applying multiple thin coats is often better than one thick coat.
Drying and curing
Allow the paint to dry completely before launching your boat into the water. The curing time can vary depending on the type of paint and environmental conditions. Follow the paint manufacturer's instructions for specific guidance.
Final touches and cleanup
After the paint has dried, remove any masking tape and clean your tools and equipment. Inspect your boat's finish for any imperfections, and make any necessary touch-ups.
Painting a boat requires careful planning, preparation, and attention to detail, but the results can be incredibly rewarding. Not only will your boat look like new, but it will also be better protected against the elements, ensuring many more enjoyable days on the water.
Whether you're a DIY enthusiast or a boat owner looking to maintain your vessel's beauty and functionality, this step-by-step guide on how to paint a boat will help you achieve a professional and long-lasting finish. So, roll up your sleeves, gather your materials, and give your boat the makeover it deserves. Happy painting!
So what are you waiting for? Take a look at our range of charter boats and head to some of our favourite sailing destinations.
I am ready to help you with booking a boat for your dream vacation. Contact me.
Denisa Nguyenová
Refitting a Sailing Yacht: Painting the Interior
February 24th, 2016
Yacht Refit
Refitting an old yacht can be a tiring and never ending story. That´s what they´ve told me when I was proudly telling my story of having bought a 40 year old ship. And endless black hole. An ever hungry money-destroying machine. Well. To be honest, it is an ever hungry thing, but up to now I cannot say a single bad thing about a ship´s refit. May it be because I am sitting up to 10 hours in front of my computer screen staring at ones and zeroes – for compensation, at the weekends being absorbed completely by a work that demands real craft and hand´s work. I just love doing refit work on my ship. Just as last weekend, when I´ve finished another small milestone. Painting the interior completely white. I am so proud.
When I´ve bought her it was instantly clear to me that I would have to refurbish her interior due to the fact that no less than four previous owners had laid hands on the boat and over the time her internal outfitting was a bit worn off. Besides: When you move into a new flat, what´s the first thing you do? You paint the walls in fresh white. And that´s what I am working on since January for some 21 net hours of working. On Sunday I´ve made a huge leap forward: The first of three layers of yacht white has been applied.
Painting the internal Gelcoat Surfaces
Painting Gelcoat is a chunk of work. First step was to empty the boat and clean it thoroughly (here´s the complete article on that first milestone) and then it´s a backbreaking session to grind down the Gelcoat surface, break it up so that the new paint can find grip on the surface and sink in deeply to form a whole new hardened surface. Sanding the boat was a painstaking task since the production of hazardous fine dust poses a threat to one´s health (here´s my test of breathing masks ) and it produces an awful lot of dust to get rid of afterwards.
Nevertheless, after some weekend´s work it all was done and I was able to move to the next step: Priming . I don´t think it is that necessary when painting internal surfaces but I wanted a perfect finish so I opted to go the extra mile. Some three big cans of International´s Pre Kote (blue) went into the whole ship and it was not until I´ve had applied two layers of Pre Kote varnish and let it dry out properly when I could move on to finally paint the whole thing white. I was so excited to see the outcome of my work and after having accomplished that step too I can only say: I am so, so, so much proud, I can´t barely find words. Finally everything begins to fall into place.
Product Test: International Toplac
No experiments here and my product of choice was another can (five of them all in all) of International Toplac. As far as I know it is the omnipotent varnish for utilization both for the inside and the outside above waterline. I went for the high glossy finish . The linecard of Toplac comprises 21 colors all in all with three different shades of White. There´s White 001 which is a rather hard tone and suits an Emergency Room well, but not a yacht I think. Then there´s White 905 which has a rather pearl-like effect which reminded me personally of Eighties´ Lingerie Style and – in between – a shiny friendly and soft White 545 which I opted for.
The big test was the fore cabin which I was priming and painting in white prior to the rest of the boat to have all my work tested here. Since all the Gelcoat surfaces of the forecastle will be covered either by upholstery or wood in the end, possible fails wouldn´t weigh in too much so it was good to have a trial of my craftsmanship and material here first . And what should I say? After having done two of three layers of white here, the outcome is just marvelous (besides, here´s an article on how I plan to go on with the fore cabin). Next up was the lavatory and the small entryway between saloon and fore cabin.
I may proudly state that the lavatory of my Kings Cruiser 33 is the smallest WC I´ve ever had the pleasure to put my butt onto. Nevertheless it´s a crucial part of the boat, especially when go sailing with my wife and children. So I was keen on getting a smooth and clean, yet inviting atmosphere here. Seeing it painted in white – without producing a single nose – is a big hit in my eyes. Can´t wait to see this room completed with a new pumping toilet, a solution for the then shut sink which will be converted into additional stowage, a new mirror and – if measurements will allow – a whole new (yet tiny) skylight. Speaking of noses …
Choosing the right Brush(-Sizes)
I don´t use a spray pistol since I think that´s a bit oversized for my project. Buying or renting equipment, getting it clean again for this relatively small area was too much work here for my personal taste. And I remember my first steps as a teenager when I was into modelling when I also tried to airbrush my Messerschmidts and Spitfires – it turned out to be a bad idea. I guess I am not the best sprayer in town. Nevertheless, it´s a different story with brushes . I do achieve quite satisfying results with just brushing the areas – with the help of the ease of flow of the paint itself. I could spot the tiny rills made by the bristles of the brush with the priming colors, but not so with the actual white paint. It´s a clean, smooth and spotless surface. Mostly.
What I did discover too was that apparently slender brush sizes work better in terms of the quality of the finish. It seems that wide brushes do not produce smooth surfaces in the end although cutting working time. So I would recommend to go for the longer process and opt for a smaller brush (I chose a width of 1,5 centimeters) to achieve the best possible results here. Having painted the saloon completely and braking my back again in the pantry I cramped myself into the very aft edge of the quarter berth to apply the paint there as well. All was done after some 5 hours of work. Jeez! That back hurts now …
Painting two more Layers
I guess the best finish is achieved when Toplac is applied in three layers all in all. So after letting dry everything through thoroughly I will sand the surface off a bit, clean it again (with Acetone and sticky disposable tissue to collect the dust) and grab my brush to apply the second layer only to do the same – this time from fore cabin all the way down aft to the rear end of the quarter berth to paint the third and final layer. Then it´s done. I can´t believe another milestone will be reached!
My wife was asking me why I do invest so much work and time in this simple task. She is right from her standpoint: Most of the areas I am painting white now will be covered later, most of them by wood or cushion. But you know, I do know that under the seating everything is just fine. And that´s a feeling I do really, really, really enjoy.
Next steps in my Yacht Refit-Program
So what´s up for the upcoming steps? I recently started two projects here: The first one will be the new decking made of Teak imitation (here´s a complete article on that topic) and so I´m going to make the patterns and take measurements for the production of the new decking. Second is the re-wiring and complete refit of the electric system of my Kingscruiser, which will be done with the help of yacht electrician Thomas Tschechne (another fine article on that one here). Until then it´s some 12 working hours to go to get the shiny new white onto the Gelcoat (and the Danboline into the bilge as well). Stay tuned, cheers.
Visit our Popular Forums
Monohull Sailboats
Multihull Sailboats
Powered Boats
General Sailing
Antares Yachts
Fountaine Pajot
Lagoon Catamarans
Cruising Business
Boat Classifieds
General Classifieds
Crew Positions
Commercial Posts
Vendor Spotlight
Life Aboard a Boat
Provisioning: Food & Drink
Families, Kids, & Pets Afloat
Recreation, Entertainment, & Fun
Boat Ownership & Making a Living
Liveaboard's Forum
Seamanship, Navigation & Boat Handling
Seamanship & Boat Handling
Training, Licensing, & Certification
Health, Safety, & Related Gear
Rules of the Road, Regulations, & Red Tape
Engineering & Systems
Const. / Maint. / Refit
Product / Service Reviews
Electronics: Comms / AV
Electrical: Batts / Gen / Solar
Lithium Power Systems
Engines & Propulsion
Propellers & Drive Systems
Plumbing / Fixtures
Deck Hdw: Rigging / Sails
Aux. Equipment & Dinghy
Anchoring & Mooring
Photo Categories
Member Galleries
Life Onboard
Sailing in the Wind
Power Boats
Cruising Destinations
Maint. & Boat Building
Marine Life
Scuba Diving & Divers
General Photos
Recent Photos
Listing Categories
African Cats
view more »
Crew Wanted
Crew Available
Enhance Your Account
Meet the Mods
Meet the Advisors
Signup for The Daily Cruiser Email
> >
Please support our sponsors and let them know you heard about their products on Cruisers Forums.
09-12-2019, 14:44
stores on what to use on my sides. They seem to agree that a good quality latex is good and that the important factor is gloss or semi-gloss is best for a humid . Which they recommend for bathroom walls and kitchen areas with higher exposure to steam, etc. Does anyone have experience that disputes this and would say to stick with base paints? Does anyone use interior latex with good results? The issues are clean up and expense. Obviously, I don't need much UV protection for the interior. Is a a factor?
09-12-2019, 16:33
Boat: Building a Max Cruise 44 hybrid electric cat
sides. They seem to agree that a good quality latex is good and that the important factor is gloss or semi-gloss is best for a humid environment. Which they recommend for bathroom walls and kitchen areas with higher exposure to steam, etc. Does anyone have experience that disputes this and would say to stick with base paints? Does anyone use interior latex with good results? The issues are clean up and expense. Obviously, I don't need much UV protection for the interior. Is a environment a factor?
10-12-2019, 03:40
Boat: Custom Swedish Vindö 50 (35 ft)
... it's harder, more durable and easier to clean. Preferably an alkyd enamel exterior porch paint if you want and durable.
Matt
10-12-2019, 03:50
Boat: 01 Catana 401
in the cabin with latex. It makes me want to do bad things to him! It probably looked ok for a few months then started peeling off is small unmanageable pieces and going chalky.
10-12-2019, 03:52
Boat: TRT 1200
10-12-2019, 03:56
stall over 20-years ago. It's held up fairly well, a couple of peeled patches but that's likely due to poor prep, not the paint.
Elsewhere in the interior, I've used Rustoleum which works fine but limited color selection. Latex paint has come a long way. I wouldn't hesitate to use it. Oil based paint is no longer readily available in the US (Rustoleum and paints being exceptions) due to VOC content so R&D has gone into latex based paints. It has come a long way and is perfectly suited to a boat interior. Most probably already know this, but low-lusger finishes hide imperfections better than high gloss finishes.
Another option that I recently used to paint an exterior concrete patio surface is a Behr (Home Depot) "epoxy" product that is inexplicably based. I think it's intended for garage floors. Goes on very hard but the finish may be matte.
Finally, if water based is the concern, I'll observe that 20-years ago I refinished my floor on my with a 2-part water-based sealer that has held up very well despite obvious abuse of water and heavy traffic.
to follow along
10-12-2019, 03:57
Boat: Building a Max Cruise 44 hybrid electric cat
boat (Valspar from Lowes)- wife insisted on no gloss- and the characteristics to gloss enamel are the same.
Matt - Youtube Vlog -
10-12-2019, 04:00
Boat: Columbia 36
CabinCoat is a "marine" paint marketed specifically for boat interiors. It is a latex paint. Three times the cost of quality latex house paint, but no different. I bought a quart in off white to try it out on my 36. After seeing what it is I went to Home Depot and had them match the color in a quality "bathroom" latex to finish the job. About six years later they both are holding up well, no issues. The only downside I see with latex is it doesn't level out as well as enamel, you always will have brush or roller marks. I was painting the fake laminate that has a little texture to it anyway, so I carefully rolled it out with a foam roller leaving an even stipple effect. Looks good, way better than the aged, dark fake laminate.
10-12-2019, 10:37
Boat: Luders 33 - hull 23
10-12-2019, 10:47
. Not a fan of Brightsides myself. I find name brand outdoor paints great. Rustoleum (non primer) paints are especially good IME. - Elmore Leonard
10-12-2019, 11:38
Boat: Luders 33 - hull 23
. Not a fan of Brightsides myself. I find name brand outdoor paints work great. Rustoleum (non primer) paints are especially good IME.
10-12-2019, 12:03
coats that can be used once you sand the latex off. Being there done that.
10-12-2019, 12:44
Boat: Nantucket Island 33
10-12-2019, 12:52
Boat: Building a Max Cruise 44 hybrid electric cat
paint! Rock hard, easy to clean, doesn't stain, insanely to any surface and pretty affordable.
Matt - Youtube Vlog -
10-12-2019, 13:44
. I used on my ceiling over gloss enamel after fully sanding it. Three years no issues and no mildew. Its worth $45 a qt!
,
Thread Tools
Rate This Thread
:
Posting Rules
post new threads post replies post attachments edit your posts is are code is are are are
Similar Threads
Thread
Thread Starter
Forum
Replies
Last Post
macvette
Construction, Maintenance & Refit
4
01-12-2013 19:05
mfsykes
Construction, Maintenance & Refit
1
13-11-2013 13:11
widget55
Construction, Maintenance & Refit
43
25-06-2013 05:48
sneuman
Construction, Maintenance & Refit
18
11-11-2011 08:00
- - - - - - -
Privacy Guaranteed - your email is never shared with anyone, opt out any time.
Forum Listing
Marketplace
Advanced Search
About The Boat
Gear & Maintenance
Painting Boat Interior
SailNet is a forum community dedicated to Sailing enthusiasts. Come join the discussion about sailing, modifications, classifieds, troubleshooting, repairs, reviews, maintenance, and more!
I too went with an oil-based exterior trim paint and have been happy with the results on my boat. I wanted it glossy because, in my experience, the gloss tends to diminish over time and it reflects light well in notoriously under-lit boats. If you start with a satin finish it will be dimmer inside to begin with but, preferences vary. Even Don Casey says you can get away with this cost-savings measure and as soule says, I've got a half gallon left over from a gallon that cost half what a quart of a marine paint would have cost me! and the advantage to that is that, should you need to do further coats, touch-up, or repaint you're not looking at another large budget expense and therefore more likely to do it.
Zephyr88 said: DO NOT USE TWO PART PAINTS ON YOUR INTERIOR. DO NOT USE TWO PART PAINTS ON YOUR INTERIOR. The iso's in the catalyst WILL harm you. I've spoken to a spray painter now a crab fisherman, also to another ex-spray painter now an auto parts salesman. They both had horror stories of people using two part paints (this includes two part varnishes) in enclosed areas without air feed respirators (normal respirators do not stop iso' being absorbed by the lungs). It also turns out you absorb more iso's through your skin than what you breath in. I would suggest using a good enamel paint, remember the white enamels will not keep their bright white. Read the can on brightsides by international. If its cool (less than 20 C) don't use more than 5% thinners, use the propriotory thinners as mineral turps contains too many impurities and will muddy the finish. Make sure you have good air flow through the cabin, set up a large fan in the companionway and open all of the hatches and ports. A good quality respirator will do a good job when using single part paints. Good painting Zephyr Click to expand...
?
175.5K members
Top Contributors this Month
Step-by-Step Guide: How to Paint a Sailboat with Acrylics
Alex Morgan
Painting a sailboat with acrylics can be a rewarding and enjoyable artistic endeavor. Whether you are a beginner or an experienced artist, this article will provide you with a comprehensive guide to creating a stunning sailboat painting using acrylic paints.
To begin with, you will need specific materials and tools to ensure a successful painting process. These include acrylic paints in various colors, a set of brushes suitable for acrylic painting, a palette for mixing colors, a canvas or painting surface, a water container for cleaning brushes, a palette knife for texture, and a reference image or sketch of a sailboat.
Before you start painting, it is essential to prepare the surface properly. This involves cleaning the surface to remove any dust or debris, and then applying a layer of primer or gesso to create a smooth and even base for your paint to adhere to.
To achieve the desired result, it is important to understand and practice basic techniques for painting with acrylics. This includes learning how to mix colors to create different shades and tones, how to layer and blend colors to add depth and dimension, and how to create texture and detail in your sailboat painting.
Once you are familiar with the techniques, you can follow a step-by-step guide to painting a sailboat. This includes sketching the sailboat outline, blocking in the background colors, adding base colors to the sailboat, adding details and highlights, and refining the painting to ensure a polished and professional look.
To complete your sailboat painting, don’t forget the finishing touches and sealing the artwork to protect it and enhance its longevity. We will share some tips and tricks to help you master the art of painting a sailboat with acrylics, allowing you to express your creativity and create beautiful marine-inspired artworks. So gather your materials and get ready to set sail on your artistic journey!
Key takeaway:
Using acrylic paints and appropriate tools is essential for painting a sailboat. Acrylic paints are versatile and easy to work with.
Properly preparing the surface by cleaning and applying primer or gesso ensures a smooth painting surface.
Understanding basic techniques such as color mixing, layering, blending, and creating texture and detail is important for painting a realistic sailboat.
Following a step-by-step guide helps in achieving a well-executed sailboat painting.
Finishing touches and sealing the painting enhance its longevity and protect it from damage.
Tips and tricks such as using reference images or sketches and refining the painting contribute to a successful acrylic sailboat painting.
Materials and Tools Needed for Painting a Sailboat
Are you ready to set sail on a creative painting journey? This section has all the juicy details about the materials and tools needed to paint a stunning sailboat with acrylics. We’ll dive into the vibrant world of acrylic paints , the magic touch of different brushes , the perfect palette for mixing colors, the ideal canvas or painting surface, the essential water container and palette knife , and the importance of having a reference image or sketch. Get your creative gears ready, because we’re about to embark on an artistic adventure !
Acrylic Paints
When painting a sailboat with acrylic paints , it is crucial to choose the right type of acrylic paint . Consider the following factors when selecting acrylic paints :
– Quality : Opt for high-quality acrylic paints for vibrant and long-lasting colors.
– Color range : Look for brands that offer a wide range of colors, including various shades of blue for painting the sky, water, and sails of the sailboat.
– Opacity : Consider the opacity of the acrylic paints . Some colors are more opaque, allowing for solid coverage, while others are more transparent, allowing for layering and glazing techniques.
– Drying time : Check the drying time of the acrylic paints . Faster drying paints are great for quickly building layers, while slower drying paints allow for more blending and wet-on-wet techniques.
– Brand reputation : Research and choose acrylic paints from reputable brands known for their quality and consistency.
Pro-tip : Before starting your painting, it’s recommended to do a small color swatch test to see how the colors appear on your chosen canvas or painting surface. This will help you make any necessary adjustments before committing to the final artwork.
When painting a sailboat with acrylics, the right brushes are crucial for achieving desired results. Here is a list of brushes to consider:
1. Round brushes: Perfect for creating fine details like rigging and small waves. They come in various sizes, from small for intricate work to larger for broader strokes.
2. Flat brushes: Ideal for creating straight lines and sharp edges. Great for painting sails, the horizon, or other flat surfaces on the sailboat.
3. Fan brushes: Excellent for creating texture like foliage or water splashes. Can also blend colors and create soft, feathery strokes.
4. Filbert brushes: Versatile brushes for both fine details and broader strokes. Particularly useful for painting the hull and larger areas.
5. Detail brushes: Perfect for adding intricate details and highlights. Allows for precise control in adding fine lines, textures, and highlights.
Fact: Using the right brushes not only makes painting a sailboat easier but also enhances the overall quality of your artwork. Experimenting with different brush shapes and sizes can help achieve different effects and add depth to the painting.
When painting a sailboat with acrylics , a palette is essential for effectively mixing and organizing colors. A palette serves as a flat surface where you can arrange and blend paints.
Canvas or Painting Surface
Choosing the right canvas or painting surface is crucial for a successful sailboat painting with acrylics. The size and material of the canvas are important factors that affect the outcome of the painting.
A larger canvas allows for more details and a grander composition, while a smaller canvas is more manageable and quicker to complete. The most popular canvas materials are cotton , linen , and polyester .
Cotton canvas is affordable and suitable for beginners. Linen canvas , though more expensive, offers a smoother surface and better longevity. Polyester canvas is a synthetic option that is resistant to moisture. Regardless of the material you choose, it is important to prime the canvas with gesso or primer before painting.
This creates a smooth and stable surface for the acrylic paints, resulting in better color vibrancy and a longer-lasting artwork. When selecting a canvas or painting surface, consider your artistic vision and preferences to create a stunning sailboat painting with acrylics.
Water Container and Palette Knife
The sub-topic “ Water Container and Palette Knife ” in the article “ How To Paint A Sailboat With Acrylics ” can be represented in a table format:
A container used for cleaning brushes and diluting acrylic paints. It can be a small cup or jar with a wide opening.
A flat, blunt tool with a flexible blade used for mixing colors, applying paint, creating texture, scraping off mistakes, and adding fine details.
Using a water container is essential in acrylic painting to keep your brushes clean and prevent paint from drying. The container should be filled with clean water and changed when dirty to ensure a constant supply of clean water for rinsing and thinning paint.
The palette knife is a versatile tool for mixing colors directly on the palette. Its flat blade is perfect for scraping and lifting paint, allowing for experimentation with color combinations and creation of various textures in artwork. The palette knife can be used to apply paint directly to the canvas for precise and controlled brushwork.
By having a water container and palette knife in your painting toolkit, you’ll be equipped to efficiently and creatively work with acrylic paints, bringing your sailboat painting to life.
Reference Image or Sketch
When painting a sailboat with acrylics, having a reference image or sketch is crucial for accuracy and capturing the essence of the subject. The reference image serves as a visual guide, helping artists understand the structure, proportions, and details of the sailboat.
To create a reference image or sketch, start by selecting a clear and high-resolution photograph of the sailboat. It should showcase the desired angle and composition for the painting. Then, use a pencil or grid method to transfer the main outlines and important features onto your canvas or painting surface.
The reference image or sketch acts as a roadmap throughout the painting process. It helps artists determine the placement of the sailboat, the position of the sails, the shape of the hull, and other details. By referring to the image or sketch, artists can ensure accuracy and achieve a realistic representation of the sailboat.
Remember to use the reference image or sketch as a guideline rather than strictly copying it. Allow yourself to add your own artistic interpretation and style to make the painting unique. Experiment with colors, textures, and brushwork to bring the sailboat to life on your canvas.
With a well-prepared reference image or sketch, artists can confidently paint a sailboat with acrylics, capturing its beauty and spirit in their artwork.
Preparing the Surface for Painting
Preparing the surface is a crucial step in painting a sailboat with acrylics . In this section, we’ll discover the necessary techniques to ensure a smooth and long-lasting finish. First, we’ll explore the importance of cleaning the surface thoroughly. Then, we’ll dive into the significance of applying primer or gesso before starting the actual painting process. These essential steps will set the foundation for a successful sailboat painting adventure. So let’s get our brushes ready and make that canvas shine!
Cleaning the Surface
When preparing to paint a sailboat with acrylics, it is essential to follow these important steps for cleaning the surface:
1. Begin by using a soft brush or cloth to remove any dust or debris from the surface. This step is crucial for ensuring proper adhesion of the paint.
2. In case there are stains or dirt that cannot be removed using a brush, gently clean the area with mild soap and water. It is important to avoid harsh chemicals as they may cause damage.
3. Prior to painting, it is necessary to eliminate any peeling or flaking paint. This can be done by carefully smoothing the surface using sandpaper or a scraper.
4. After the cleaning and preparation process, it is recommended to apply a layer of primer or gesso. This will create a smooth surface, enhancing color saturation and durability.
Remember to take your time and handle the surface gently during the cleaning process to prevent any damage. Properly cleaning and preparing the surface guarantees a beautiful painting that will last for a long time.
Applying Primer or Gesso
Applying primer or gesso is necessary for preparing the surface before painting a sailboat with acrylics . It creates a smooth base for the paint, improving the quality and durability of the artwork.
To apply primer or gesso:
Clean the surface: Remove dust, dirt, and grease using a soft cloth or brush.
Choose the right primer or gesso: Use acrylic gesso , which dries quickly and works well with acrylic paints.
Prepare the primer or gesso: Stir it thoroughly and thin with water if needed, following the manufacturer’s instructions.
Apply the primer or gesso: Use a brush or palette knife to apply an even layer, covering the entire area to be painted.
Allow drying time: Let the primer or gesso dry completely, which usually takes 1-2 hours, but may vary based on the product and environment.
Applying primer or gesso creates a strong foundation for your sailboat painting, ensuring vibrant colors and good adherence to the surface. It also prevents unwanted paint absorption into the canvas or other surfaces. Follow the manufacturer’s instructions for best results.
Understanding Basic Techniques for Painting a Sailboat
Discover the vibrant world of sailboat painting as we delve into the fundamental techniques that bring these majestic vessels to life. From mixing colors to layering and blending, and even creating texture and detail, we’ll explore the artistry and skill required to capture the essence of a sailboat on canvas. Get ready to embark on a creative journey as we unlock the secrets of painting a sailboat with acrylics !
Mixing Colors
When mixing colors in acrylic painting, there are techniques to achieve the desired result.
– Start with the primary colors : red, blue, and yellow. These are the foundation for all other colors.
– Use a color wheel to understand color relationships. Opposite colors on the wheel, such as blue and orange, create contrast when mixed.
– Experiment with different color ratios to create shades and tints. Adding more blue to yellow creates a green shade , while adding more yellow to blue creates a green tint .
– Gradually add small amounts of one color to another, mixing and blending until the desired hue is achieved.
– Consider the effect of adding white or black to a color. Adding white creates a lighter shade , while adding black creates a darker shade .
– Take note of the drying time of acrylic paints, as the color may slightly shift once dry. Let the mixed colors dry before making adjustments.
– Clean brushes thoroughly between color mixing to avoid contamination and achieve accurate colors.
By understanding these mixing techniques, you can confidently create a wide range of colors for your sailboat painting. Experiment and explore different combinations to achieve unique and vibrant results.
Layering and Blending
Layering and blending are pivotal techniques in the realm of acrylic painting. Employ the following strategies to attain the desired effect:
– Emphasize layering: Begin by applying thin coats of paint and gradually intensify the color and texture in order to exercise better control over the varying shades and values.
– Master the art of wet-on-wet blending: Meld hues by applying wet paint atop another still wet layer, resulting in seamless transitions and smooth gradients.
– Harness the power of dry brushing: Utilize a minimal amount of paint with a dry brush to fashion texture and highlights, which is ideal for incorporating intricate details.
– Embrace glazing: Introduce translucent layers of paint onto dry layers to yield depth and radiance, thereby permitting subtle variations in color and an atmosphere-like aura.
– Achieve blending with a palette knife: Directly mix and blend colors on the painting surface using a palette knife, imbuing the artwork with texture and dimension.
Experiment with these techniques to ascertain the most effective approach. The combination of layering and blending can augment the depth, dimension, and opulence of your acrylic paintings, thereby enabling you to create captivating sailboat masterpieces.
Creating Texture and Detail
Creating texture and detail is essential when painting a sailboat with acrylics . These techniques enhance the depth and visual interest of the artwork. To achieve texture, it is recommended to utilize methods such as dry brushing , sponging , or palette knife strokes.
Implementing these techniques effectively can add texture not only to the sails , water , but also to the boat as a whole.
One approach to create texture on the sails is by using the dry brush technique. This involves applying a small amount of paint to a dry brush and gently brushing it onto the canvas. By doing so, a rough and textured appearance is achieved, giving the impression of fabric on the sails. To replicate waves and ripples on the water, consider using a palette knife to apply thick, undiluted paint with a scraping motion.
Adding intricate details is crucial in bringing the sailboat to life. Using fine brushes and thin paint, you can incorporate intricate elements such as rigging , ropes , and various features on the boat. Paying close attention to these details will greatly enhance the realism and overall quality of the painting.
Don’t be afraid to experiment with different techniques and brushes in order to achieve the desired textures and details. Remember, practice and patience are key when mastering the art of creating texture and detail in sailboat paintings.
Fun Fact: Incorporating texture and detail in a painting can give the artwork a three-dimensional appearance, captivating viewers.
Step-by-Step Guide to Painting a Sailboat
Master the art of painting a sailboat with acrylics with this step-by-step guide.
We’ll take you through the process, from sketching the sailboat to refining the final touches.
Discover how to block in the background, add base colors, and bring your sailboat to life with details and highlights.
With these expert tips and techniques, you’ll be able to create a stunning sailboat painting that showcases your artistic skills.
Get ready to embark on a creative journey and immerse yourself in the world of sailboat artistry.
Sketching the Sailboat
To begin sketching the sailboat before painting with acrylics, follow these steps:
1. Take a blank canvas or painting surface.
2. Take a look at the reference image or sketch of the sailboat.
3. Recognize the basic shapes and proportions of the sailboat, including the hull , sails , and mast .
4. Use a pencil or charcoal to create a light outline of the sailboat on the canvas. Begin with simple shapes and lines.
5. Pay close attention to the positioning and size of various elements, such as the sails and the angle of the mast.
6. Add more intricate details to the sketch, such as windows, ropes, or flags. It is important to ensure accurate proportions and perspectives.
7. Erase any unnecessary lines or mistakes while refining the sketch. Focus on capturing the overall shape and composition.
8. Once you are satisfied with the sketch, go over the lines with a fine-tipped pen or marker to define them. Alternatively, you can use a dark pencil.
9. Review the sketch to make sure it accurately represents the sailboat and the desired composition.
10. The sketch is now ready to serve as a guide for painting the sailboat with acrylics.
By following these steps, you can create a detailed and accurate sketch of a sailboat before starting the painting process.
Blocking in the Background
Blocking in the background is an important step in painting a sailboat with acrylics. It establishes the composition and sets the tone for the rest of the painting. Here is a step-by-step guide on how to block in the background :
1. Choose the colors for the background based on the atmosphere and mood you desire. Soft blues and greens create a calm and serene scene, while bold and contrasting colors produce a dramatic and vibrant effect.
2. Apply the background colors onto the canvas with a large brush, starting from the top and working your way down. Use broad strokes to cover the entire background area.
3. Block in the basic shapes and forms of any objects or elements that will be part of the background, such as the sky, clouds, trees, or distant land .
4. Focus on capturing the general shapes and colors rather than intricate details. Use loose and expressive brushstrokes at this stage.
5. Blend the colors together where they meet to create a smooth transition. Use a clean, damp brush to softly blend the edges.
6. Step back and assess the overall look and feel of the background. Make necessary adjustments to the colors or shapes to ensure it complements the rest of the painting.
By following these steps, you can effectively block in the background of your sailboat painting and set the stage for the rest of your artwork.
Blocking in the background has been used by artists for centuries to establish the foundation of a painting. It creates depth, atmosphere, and a harmonious composition. Whether it’s a landscape, still life, or sailboat painting, blocking in the background is an essential part of the painting process, allowing artists to develop their vision and bring their artwork to life.
Adding Base Colors to the Sailboat
To effectively add base colors to the sailboat when painting with acrylics, adhere to the following instructions:
1. Begin by preparing your palette with the necessary base colors for the sailboat. This includes utilizing blue for the water, white for the sails, and brown for the wooden parts.
2. Use your brush to apply the first base color to the appropriate areas of the sailboat. For larger areas, employ broad strokes , while smaller details require finer strokes .
3. Layer each base color onto its respective area of the sailboat, ensuring smooth and even coverage. Add additional coats as needed.
4. When necessary, seamlessly blend the base colors together. This can be achieved by gently mixing the colors with either a clean brush or a palette knife, resulting in a gradual gradient .
5. Throughout the painting process, refer to your chosen image or sketch to ensure accurate color placement and shading.
6. Before proceeding to add details and highlights to the sailboat, allow the base colors ample time to dry completely .
By following these steps attentively, you will lay a solid foundation for your sailboat painting by effectively and accurately incorporating the base colors.
Adding Details and Highlights
When adding details and highlights to a sailboat painting with acrylics , consider techniques that enhance the realism and quality of the artwork.
1. Use a smaller brush size .
2. Mix the appropriate colors .
3. Apply thin layers of paint.
4. Focus on light and shadows.
5. Use a dry brush technique for highlights .
6. Add finer details with a fine liner brush .
7. Step back and assess the painting regularly.
Following these guidelines, artists can create depth and dimension in their sailboat paintings while capturing the essence of light and highlighting important elements of the subject.
Refining the Painting
To refine a sailboat painting with acrylics, the first step is to assess the sailboat’s composition and proportions. It is important to adjust as necessary in order to accurately represent the sailboat. Once the basic structure of the sailboat is in place, it is time to refine the details. This can be done by adding fine lines, curves, and shading for depth.
To make the painting more visually appealing, highlights should be added to catch the light, such as on the sail edges and hull. In order to achieve a realistic effect, it is important to blend colors seamlessly. After the sailboat itself is refined, attention should be turned to the background. Evaluate and enhance the background colors to ensure they complement the sailboat. If necessary, improve the water texture and depth to add more dimension to the painting.
To truly bring the painting to life, consider adding additional details like seagulls or waves. After all the refinements have been made, step back and evaluate the final painting. Make any touch-ups or adjustments as necessary to perfect the artwork. The process of refining the painting is crucial for capturing the beauty and intricacies of a sailboat with acrylics. These final touches will truly make the artwork special and bring it to life.
Finishing Touches and Sealing the Painting
To complete the sailboat acrylic painting, follow these steps for the finishing touches and sealing :
1. Remove any masking tape or painter’s tape used to create clean lines.
2. Inspect the painting for touch-ups or additional details. Use small brushes and acrylic paint to carefully add necessary final touches.
3. Allow the painting to dry completely before proceeding to sealing.
4. Use a varnish or sealant specifically made for acrylic paintings. Apply a thin, even coat using a soft brush. Follow the manufacturer’s instructions .
5. Let the varnish dry completely, which typically takes several hours.
6. Inspect the painting for any missed areas during the sealing. Touch up these spots with more varnish .
7. Consider applying a second coat of varnish for extra protection and a glossier or matte finish. Follow the manufacturer’s instructions and let each coat dry completely.
8. Once the painting is fully sealed and dry, you can frame or display it as desired.
By following these steps, you can add the finishing touches and seal your acrylic sailboat painting to protect and enhance its appearance.
Tips and Tricks for Painting a Sailboat with Acrylics
Here are some practical tips and tricks for painting a sailboat with acrylics:
1. Prepare your workspace by covering it with newspaper or a drop cloth to avoid paint splatters or spills.
2. Start by sketching the sailboat outline on your canvas using a pencil as a guideline.
3. Mix your acrylic paints on a palette to achieve the desired colors for the hull, sails, and details.
4. Use a larger brush to paint the background and base colors of the sailboat. Apply thin layers of paint and let each layer dry before adding another.
5. Once the base colors are dry, use a smaller brush to add details like windows , ropes , and flags . Pay attention to the intricate features of the sailboat.
6. Create depth and dimension by adding shadows and highlights . Use lighter shades for areas that catch the light and darker shades for areas in shadow.
7. To add texture to the water surrounding the sailboat, use a palette knife or dry brush technique for a more realistic and dynamic look.
8. Allow the painting to dry completely before adding final touches or varnish to protect it.
By following these tips and tricks, you can create a beautiful sailboat painting with acrylics.
Some Facts About How To Paint A Sailboat With Acrylics:
✅ Acrylic paint is commonly used for painting sailboats due to its versatility and quick drying time.
✅ Sailboat paintings created with acrylics can capture the vibrant colors of the water and sky.
✅ Using different brush techniques and layering, artists can create texture and depth in their sailboat paintings.
✅ Acrylic paints are available in a wide range of colors, allowing artists to accurately depict the details of a sailboat.
✅ To protect the finished sailboat painting, artists often apply a varnish or sealant to ensure its longevity.
Frequently Asked Questions
Faqs for “how to paint a sailboat with acrylics”, q: how can i cancel my contracts or subscriptions with youtube.
A: To cancel your contracts or subscriptions with YouTube, you can visit the “Verträge hier kündigen” section on YouTube. This section provides information and instructions on how to terminate your agreements with YouTube.
Q: Can I participate in testing new features on YouTube?
A: Yes, you can! YouTube offers an opportunity for users to test new features before they are widely released. Simply go to the “Neue Funktionen testen” section and follow the instructions to opt-in for testing new features on YouTube.
Q: Where can I find the guidelines and safety measures for using YouTube?
A: You can find the guidelines and safety measures for using YouTube in the “Richtlinien & Sicherheit” section. This section provides detailed information on YouTube’s community guidelines, rules against harassment and hate speech, and other safety measures to ensure a positive and secure experience on the platform.
Q: What information does the NetzDG Transparenzbericht on YouTube provide?
A: The NetzDG Transparenzbericht on YouTube offers information about the company’s compliance with the NetzDG law in Germany. It provides transparency reports related to efforts in combating illegal content and hate speech on the platform.
Q: How does YouTube work? Can you provide an overview?
A: YouTube is a video-sharing platform where users can upload, view, and interact with videos. In the “Wie funktioniert YouTube?” section, you can find a comprehensive overview of how YouTube works, including instructions on creating an account, uploading videos, and engaging with other users.
Your email address will not be published. Required fields are marked *
Save my name, email, and website in this browser for the next time I comment.
Latest posts
The history of sailing – from ancient times to modern adventures
History of Sailing Sailing is a time-honored tradition that has evolved over millennia, from its humble beginnings as a means of transportation to a beloved modern-day recreational activity. The history of sailing is a fascinating journey that spans cultures and centuries, rich in innovation and adventure. In this article, we’ll explore the remarkable evolution of…
Sailing Solo: Adventures and Challenges of Single-Handed Sailing
Solo Sailing Sailing has always been a pursuit of freedom, adventure, and self-discovery. While sailing with a crew is a fantastic experience, there’s a unique allure to sailing solo – just you, the wind, and the open sea. Single-handed sailing, as it’s often called, is a journey of self-reliance, resilience, and the ultimate test of…
Sustainable Sailing: Eco-Friendly Practices on the boat
Eco Friendly Sailing Sailing is an exhilarating and timeless way to explore the beauty of the open water, but it’s important to remember that our oceans and environment need our protection. Sustainable sailing, which involves eco-friendly practices and mindful decision-making, allows sailors to enjoy their adventures while minimizing their impact on the environment. In this…
Zhukovsky International Airport
Zhukovsky International Airport, formerly known as Ramenskoye Airport or Zhukovsky Airfield - international airport, located in Moscow Oblast, Russia 36 km southeast of central Moscow, in the town of Zhukovsky, a few kilometers southeast of the old Bykovo Airport. After its reconstruction in 2014–2016, Zhukovsky International Airport was officially opened on 30 May 2016. The declared capacity of the new airport was 4 million passengers per year.
Sygic Travel - A Travel Guide in Your Pocket
More interesting places
Privacy Policy
STOCK 360° TRAVEL VIDEOS
telepon avia tour
JAKARTA – SINGAPORE | SQ 951 CGK - SIN 05.25 - 08.10 SINGAPORE - HANOI | SQ 192 SIN - HAN 09.15 - 11.30 Hari ini para peserta berkumpul di Bandara Internasional Soekarno-Hatta untuk bersama-sama melakukan penerbangan menuju Ha Noi . Selamat datang di Vietnam! Sebuah negara di Asia Tenggara yang memiliki berbagai sejarah dan keindahan alam yang sangat menarik untuk dikunjungi. Bersama AVIA TOUR Anda akan menikmati perjalanan yang akan membawa kesan dan pengalaman yang tak terlupakan selama di Vietnam. Setibanya Anda akan diajak untuk mengunjungi Ho Chi Minh Complex, dimana terdapat Ho Chi Minh Mausoleum (tutup setiap Senin & Jumat). merupakan tempat peristirahatan terakhir Ho Chi Minh, pemimpin Vietnam yang paling ikonik dan populer, yang dikenal oleh rakyatnya sebagai 'Paman Ho', Kemudian menuju Ho Chi Minh’s stilt house yang merupakan tempat tinggal President Ho Chi Minh dari tahun 1958 hingga 1969. Dilanjutkan city tour Kota Hanoi mengunjungi One Pillar Pagoda, Temple of Literature yang merupakan universitas tertua di Vietnam & Hanoi Old Quarter, Anda bisa melihat area yang menarik perpaduan arsitektur Vietnam, toko toko kuno dan berbagai jajanan kaki lima yang menjual barang-barang kerajinan tangan seperti sutra, pernis, kertas, suvenir, lukisan. Setelah itu menikmati santap malam sebelum diantar menuju hotel. Hotel : Lenid / London/ Thang Long Opera / Muong Thanh Central Hanoi atau setaraf *4
HANOI - HALONG BAY Perjalanan Anda hari ini dilanjutkan menuju Ha Long Bay yang ditetapkan UNESCO sebagai Natural World Heritage pada tahun 1994, selama 4 jam perjalanan menuju Halong Bay, Anda akan melihat pemandangan keragaman Desa Vietnam Utara dan sawah yang indah. Setibanya Anda akan diajak untuk menyusuri Ha Long Bay menggunakan kapal selama kurang lebih 4 jam untuk menikmati keindahan pulau – pulau yang ada disini seperti Dog Rock dan Incense Burner Island . Anda juga akan diajak mengunjungi Thien Cung Cave dimana Anda dapat melihat ribuan stalaktit dan stalakmit yang indah dihiasi warna-warni lampu neon. Santap siang hari ini di kapal sambil menikmati keindahan Halong Bay. Kemudian diberi waktu bebas untuk berbelanja di Ha Long Night Market , disini Anda dapat berbelanja berbagai macam souvenir khas Vietnam seperti tas, gantungan kunci, lukisan dan lain-lain. Hotel : Halong Plaza/ Halong / Mithrin / Song Loc atau setaraf *4
HALONG BAY - HANOI HANOI - DANANG BY DOMESTIC FLIGHT Hari ini Anda akan diantar menuju bandara untuk melakukan perjalanan menuju Danang dengan pesawat domestik. Setibanya di Danang, Anda akan langsung diantar menuju hotel untuk beristirahat. Hotel : Eden Danang / Mandila Beach / Balcona atau setaraf *4
DANANG - BA NA HILLS - DANANG Pagi ini Anda akan langsung diajak menuju Ba Na Hills Station dengan menggunakan cable car yang pernah mendapatkan penghargaan dari Guiness Book of Record di 2009 sebagai non stop cable car tertinggi dan terpanjang, sekitar 15 menit menuju Ba Na Hills dengan cable car Setibanya di station pertama Anda akan diajak mengunjungi taman bunga Le Jardin D'Amour yang cantik dan Tak ketinggalan Anda akan diajak mengunjungi jembatan ikonik Golden Bridge yang merupakan jembatan dengan dua tangan raksasa yang seakan-akan menopang jembatan tersebut, Anda bisa menikmati pemandangan Kota Danang dari jembatan ini . Kemudian Ling Ung Pagoda . Usai berkunjung di area station pertama Anda akan melanjutkan kunjungan ke station berikutnya dengan cable car untuk mengunjungi Villas of French - kawasan bergaya Perancis yang sangat menarik dan memiliki banyak spot yang instagramable, Setelahnya Anda berkesempatan untuk mengunjungi Vong Nguyet Villa dimana terdapat ruang penyimpanan anggur. Anda juga bisa bermain di taman indoor Fantasy Park . Kemudian kembali turun dengan cable car Anda akan menikmati keindahan kota Danang dari atas dan dapat melihat The Peak Of Chua Mountain (1,487m). Selesai tour di Ba Na Hills, kembali ke Kota Danang untuk beristirahat.
DANANG - HOI AN - DANANG Acara hari ini Anda akan menuju kota tua Hoi An untuk mengunjungi ikon wisata dari kota ini, yaitu Japanese Covered Bridge - jembatan merah tua bernuansa Jepang yang dibangun pada tahun 1593 dimana dulunya berfungsi sebagai penghubung antara komunitas Jepang & Tiongkok pada masa itu. Jembatan ini tidak seperti jembatan pada umumnya, karena memiliki atap dan di tengah jembatan terdapat kuil, Setelahnya mengunjungi Chinese Assembly Hall & Temples dan tak lupa untuk berbelanja di Han Market & Con Market . Bermalam di Danang
DANANG - SINGAPORE SQ 171 DAD-SIN 11.50 - 15.50 SINGAPORE - JAKARTA SQ 964 SIN-CGK 17.20 - 18.05 Hari ini Anda akan diantar menuju bandara untuk penerbangan kembali menuju Tanah Air. Dengan demikian berakhirlah rangkaian perjalanan Anda bersama AVIA TOUR , semoga membawa kesan manis bagi Anda. Sampai jumpa pada acara tour lainnya. Terima kasih.
Note: * Karena keterbatasan hotel & flight, susunan acara dapat berubah disesuaikan dengan hotel dan flight yg confirmed. * Regulasi tour dapat berubah sewaktu-waktu mengikuti peraturan dari pemerintah
HANOI CITY TOUR - HALONG BAY - BA NA HILLS - FRENCH VILLAGE - GOLDEN BRIDGE - HOI AN ANCIENT TOWN - JAPANESE COVERED BRIDGE
Ticket pesawat udara p.p. kelas ekonomi (non-endorsable, non-refundable & non-reroutable berdasarkan harga group / promosi).
Airport tax International, fuel surcharge, dan tax lainnya (dapat berubah sewaktu-waktu).
Penginapan di hotel berdasarkan 2 (dua) orang dalam 1 kamar (twin sharing).
Acara tour, transportasi dan makan sesuai yang tercantum dalam acara perjalanan. (MP – Makan Pagi; MS – Makan Siang; MM – Makan Malam).
Berat maksimum sebesar 20kg untuk 1 bagasi atau sesuai dengan peraturan maskapai penerbangan yang digunakan; dan berat maksimum 7 kg untuk 1 handbag kecil untuk dibawa ke kabin pesawat atau sesuai dengan peraturan maskapai penerbangan yang digunakan.
Domestik Tiket Hanoi - Danang
Tour Leader dari AVIA TOUR.
Asuransi perjalanan GROUP cover Covid-19 (usia tertanggung maksimal 69 tahun).
Anda Butuh Bantuan?
Hubungi kami untuk bantuan atau informasi lebih lanjut melalui line telepon
021 - 2450 8899
atau online form yang kami sediakan melalui tombol dibawah ini
Specialist Shop & Services
Avia Tour & Travel
Downtown Walk
Salsa food city.
Ground Floor 218 A
tour services, travel services, hotel reservation, car rental and other travel services
021 2931 0386
where to park
Parkir B, GF
Hi, Avians!
Mau menikmati pesona alam dan budaya Zhangjiajie Fenghuang dengan pemandangan menakjubkan? atau jelajahi Furong Ancient Town yaitu kota kuno yang penuh dengan sejarah dan arsitektur yang memukau? Bisa dong!
Bisa melihat keajaiban alam di Chongging Wulong, dengan formasi batuan unik dan pemandangan spektakuler atau bisa juga nih berkunjung ke Jinfo Mountain yaitu gunung yang punya pemandangan yang indah banget, loh!
Yuk, ikut trip 8 hari jelajahi keindahan China dengan harga terjangkau!
Harga mulai dari Rp 12 Juta-an untuk periode keberangkatan di bulan September - Desember 2024.
Kamu juga bisa mendapatkan:
Potongan langsung hingga Rp 5 Juta*
Cicilan 0% hingga 6 bulan*
Tunggu apalagi? Sebelum kehabisan mendingan booking seat kamu sekarang! Hubungi outlet terdekat untuk info lebih lanjut dan pemesanan Web www.avia.travel Hotline (+6221) 4223-838 Ticketing (+6221) 2598-8888 Whatsapp (+62) 811-8883-818 Aviatour, Your Travel Solution.
Explore Facilities
Shuttle Bus
Download E-magz
Leasing Inquiry
Friendship Card
Avia tour summarecon mal bekasi - bekasi, jawa barat.
Kontak / Tanya Jawab
Merupakan salah satu jasa tour & travel di Kota Bekasi. Kantor ini menyediakan berbagai macam paket liburan, wisata dan trip. Paket sudah termasuk tiket pesawat/kapal, akomodasi, transfortasi, makan, penginapan dan tour guide / pemandu wisata. Tersedia juga penjualan tiket pesawat dan laut.
Segera kunjungi tour travel terdekat ini untuk informasi lainnya seperti harga paket dan harga tiket.
Jam buka / kerja: Senin: 10:00 AM - 10:00 PM, Selasa: 10:00 AM - 10:00 PM, Rabu: 10:00 AM - 10:00 PM, Kamis: 10:00 AM - 10:00 PM, Jumat: 10:00 AM - 10:00 PM, Sabtu: 10:00 AM - 10:00 PM, Minggu: 10:00 AM - 10:00 PM
Avia Tour Summarecon Mal Bekasi beralamat di Summarecon Mall Bekasi GF No.136 Jl. Boulevard Ahmad Yani Blok M, RT.006/RW.002, Marga Mulya, Kec. Bekasi Utara, Kota Bks, Jawa Barat 17142, Indonesia.
Avia Tour Summarecon Mal Bekasi dapat dihubungi melalui kontak nomor telepon (021) 29572397
Kode pos dari Avia Tour Summarecon Mal Bekasi adalah 17142
Website Avia Tour Summarecon Mal Bekasi dapat di akses online melalui http://www.avia.travel/
- Arie Tour - Bekasi, Jawa Barat
- Tour & Travel Gift Bekasi - Bekasi, Jawa Barat
- RH Tour & Travel - Bekasi, Jawa Barat
- Asankaloka Riapindo Tour Travel - Cirebon, Jawa Barat
- Fadila Travel - Cirebon, Jawa Barat
4 Musim jepang
Tempat Wisata
Tour dan Lainnya
Budaya Lokal
Fakta & Data
Rumah di Jepang
Jasa Pengiriman
Transportasi
Tips & Trik
Pengiriman Uang
Metode Pembayaran
Tabungan & Pengeluaran
Rumah Sakit & Klinik
Perawatan Diri
Bencana Alam
Masjid & Tempat Ibadah
Gaji & Benefit
Daftar Nomor Telepon Penting Selama Liburan di Jepang, Informasi…
Home
Liburan ke Jepang
Tour dan Lainnya
Daftar Nomor Telepon Penting Selama Liburan di Jepang, Informasi Layanan Darurat sampai Fasilitas Kesehatan
Selama berada di Jepang, tentu kita tidak ingin hal buruk terjadi. Namun, tidak ada salahnya menyimpan nomor telepon penting di Jepang.
Mulai dari nomor telepon untuk pelayanan darurat, informasi wisatawan, informasi penerbangan, informasi barang hilang, sampai pelayanan kesehatan.
Nomor telepon yang tertera di bawah ini sebagian besar melayani dalam Bahasa Inggris. Simak nomor penting di Jepang berikut.
Baca juga: Cara Memanggil Layanan Ambulans di Jepang saat Kondisi Darurat
Kompas.com Play
TTS Eps 137: Yuk Lebaran
TTS Eps 136: Takjil Khas di Indonesia
TTS Eps 135: Serba Serbi Ramadhan
Games Permainan Kata Bahasa Indonesia
TTS - Serba serbi Demokrasi
TTS Eps 130 - Tebak-tebakan Garing
TTS - Musik Yang Paling Mengguncang
Related to tour dan lainnya.
5 Barang Penting buat Lindungi Kulit dari Sinar UV Saat Musim Panas
Aturan Pelihara Anjing di Jepang, Vaksin Rabies dan Tanam Mikrocip
Cara Bawa Kucing atau Anjing Peliharaan ke Jepang, Ikuti 8 Langkah Impor Ini
Prakiraan Cuaca di Kyoto pada 13-19 Juli 2024, Suhu Panas Mencapai 34 Derajat Celsius
Update Prakiraan Cuaca di Osaka pada 12-18 Juli 2024, Kemungkinan Hujan Tinggi
Update Prakiraan Cuaca di Nagoya pada 11‐17 Juli 2024
Update Prakiraan Cuaca di Tokyo pada 10-16 Juli 2024
Update Prakiraan Cuaca di Hokkaido pada 9-15 Juli 2024
Update Prakiraan Cuaca di Kyoto pada 6-12 Juli 2024, Hari Berawan dan Hujan!
Most popular.
Ohayo Jepang
Australia Special
Australia & New Zealand
Consortium China
Consortium Your Holiday
Middle East
West Europe
Attractions
62-21 422 3838
62-21 422 3888
[email protected]
Tour Australia Special Africa America Asia Australia & New Zealand China Consortium China Consortium Your Holiday Europe Middle East West Europe
Other Package Attractions Cruise Car Hire
Documents Visa Passport
About Avia About Us Brochures Blog F.A.Q
HATI-HATI TERHADAP PENIPUAN!!
AVIATOUR tidak memiliki kerjasama dengan instansi tertentu dalam hal penyediaan tiket dan proses recruitment karyawan, Kami menghimbau Bapak & Ibu sekalian untuk berhati - hati terhadap segala jenis penipuan yang mengatasnamakan AVIA TOUR
Untuk info lebih lanjut silakan menghubungi kami di: 021 422 3838/3888 atau email ke: [email protected]
Jl. Bungur Besar No. 45 Jakarta 10610 - INDONESIA
Operational Hours
Close period.
Mal Kelapa Gading 1 Ground Floor #168 Jl. Bulevar Kelapa Gading Blok M Kelapa Gading Permai, Jakarta 14240 INDONESIA
Summarecon Mal Serpong Ground Floor - 218A Jl. Boulevard Gading Serpong Tangerang 15810 - INDONESIA
Emporium Pluit Mal Lt.2 Unit. 23 Jl. Pluit Selatan Raya Jakarta Utara 14440 - INDONESIA
Gandaria City LG Floor #52 Jl. Sultan Iskandar Muda, Kebayoran Lama Jakarta Selatan 12240 - INDONESIA
Asia menjadi tujuan favorit wisata dari seluruh dunia. Tidak hanya menawarkan tempat-tempat indah , biaya perjalanan di wilayah ini juga relatif murah. Tak cuma biaya wisata yang murah, Asia Tenggara juga menawarkan segudang tempat menarik untuk berbagai kegiatan wisata. Kawasan wisata alam dengan pemandangan yang indah hingga tempat wisata modern yang dilengkapi dengan casino telah tersedia di kawasan ASEAN.
Perjalanan Anda di Thailand kali ini akan terasa sangat menakjubkan dengan perpaduan dari melihat indahnya bunga matahari ditambah dengan mengunjungi bangunan bergaya Eropa yang menarik ! Avia Tour memberikan pengalaman…
JAKARTA - TAIPEI - YILAN - HUALIEN Taiwan jika dilihat dari segi pariwisatanya sangat menarik untuk dikunjungi, jika anda ingat China pastinya ingat Taiwan, dan seperti negara lain yang berada…
Perjalanan Anda di Negeri Sakura ini akan menjadi kenangan yang tak terlupakan karena Anda akan disuguhkan pemandangan dan pengalaman yang sangat menarik di Jepang ! Anda dapat berkesempatan menuju NIHONDAIRA…
Perjalanan Anda kali ini akan sangat berkesan menuju Vietnam, dari utara hingga selatan. Anda akan diajak menikmati pemandangan alam dan juga wisata sejarah selama di Vietnam. Tour kali ini sangat…
Thailand atau yang biasa dikenal dengan Negeri Gajah putih adalah destinasi yang menarik untuk dijelajahi. Pengalaman Anda akan semakin sempurna dengan mengunjungi Frost Magical Ice yang merupakan sebuah kompleks patung…
Nikmati liburan Anda bersama AVIA TOUR yang akan memberikan Anda pengalaman tak terlupakan. Pada perjalanan kali ini, Anda akan diajak mengunjungi "Shirakawago Village" yang merupakan salah satu desa tertua di…
Korea Selatan adalah salah satu destinasi favorit di Asia Tenggara, negara yang indah dan kaya akan budaya. Budaya zaman kuno pun tetap hidup berdampingan dengan teknologi yang maju. Dikenal juga…
Luasnya benua Asia dengan karakter tersendiri pada setiap negara membuat kita memahami kayanya akar budaya Asia di setiap bagiannya. Mulai dari negara berkembang hingga modern, kita akan dapat melihat bukan hanya alam serta budaya, namun gaya hidup yang sangat beragam dan berkarakter pada setiap destinasi. Alasan utama untuk berlibur di Asia:
Banyaknya destinasi yang sangat menarik namun ekonomis dengan jarak yang relative dekat dari Indonesia. Opsi berlibur yang efisien serta berkualitas, terutama dengan perkembangan pesat banyak negara di Asia yang sekarang memiliki sangat banyak atraksi baru.
Wisata kuliner beragam serta eksotis sebagai benua yang memiliki banyak sumber rempah dan menghasilkan rasa yang orisinil setiap negara, atau bahkan daerah di dalam negara itu sendiri.
Inspirasi alam serta arsitektur dengan gaya hidup berbeda di setiap tempat, namun terasa seperti rumah dengan banyak pintu, dari akar yang serupa.
Everyone got a story to tell, and different experiences that have been faced. Not only from our point of view, these travellers review about Asia tour is here to help us earn your trust.
FAR EAST ASIA CRUISE CELEBRITY SOLSTICE
Belanja, makan, jalan. Puas banget sih kalo keliling, malah seru di yang deket-deket kaya Bangkok ato Malay, karna jadi bisa banyak banget yang dikunjungin. Waktunya nabung lagi deh buat next trip!
INC PT. TRANS INTRA ASIA GOES TO KOREA
Unforgettable, karena aku berhasil ngelamar pacarku di liburan ini di Jepang saat musim Sakura.Thank you Avia Tour!
FAR EAST ASIA MARINER OF THE SEAS
Oppa! Kawaii desu! Sawadeekrap! Aku udah ambil berbagai paket buat ke berbagai destinasi di Asia dan tetap ga bosan-bosan. Kenapa harus mahal-mahal kalau yang di sekitar kita aja begitu indah?
Although a picture describes a thousand words, some story and experiences are better described in detail.
Not only fulfilling for the eyes, but also ensuring you to be certain before you head on to travel. For you people who experience wanderlust, to understand your destination, to know the adventure that is about to come, head to the blog for more information.
kami akan merespons Anda dalam 1x24 jam hari kerja.
untuk masalah urgent, Anda bisa menghubungi kami di:
The Unique Burial of a Child of Early Scythian Time at the Cemetery of Saryg-Bulun (Tuva)
<< Previous page
Pages: 379-406
In 1988, the Tuvan Archaeological Expedition (led by M. E. Kilunovskaya and V. A. Semenov) discovered a unique burial of the early Iron Age at Saryg-Bulun in Central Tuva. There are two burial mounds of the Aldy-Bel culture dated by 7th century BC. Within the barrows, which adjoined one another, forming a figure-of-eight, there were discovered 7 burials, from which a representative collection of artifacts was recovered. Burial 5 was the most unique, it was found in a coffin made of a larch trunk, with a tightly closed lid. Due to the preservative properties of larch and lack of air access, the coffin contained a well-preserved mummy of a child with an accompanying set of grave goods. The interred individual retained the skin on his face and had a leather headdress painted with red pigment and a coat, sewn from jerboa fur. The coat was belted with a leather belt with bronze ornaments and buckles. Besides that, a leather quiver with arrows with the shafts decorated with painted ornaments, fully preserved battle pick and a bow were buried in the coffin. Unexpectedly, the full-genomic analysis, showed that the individual was female. This fact opens a new aspect in the study of the social history of the Scythian society and perhaps brings us back to the myth of the Amazons, discussed by Herodotus. Of course, this discovery is unique in its preservation for the Scythian culture of Tuva and requires careful study and conservation.
Keywords: Tuva, Early Iron Age, early Scythian period, Aldy-Bel culture, barrow, burial in the coffin, mummy, full genome sequencing, aDNA
Information about authors: Marina Kilunovskaya (Saint Petersburg, Russian Federation). Candidate of Historical Sciences. Institute for the History of Material Culture of the Russian Academy of Sciences. Dvortsovaya Emb., 18, Saint Petersburg, 191186, Russian Federation E-mail: [email protected] Vladimir Semenov (Saint Petersburg, Russian Federation). Candidate of Historical Sciences. Institute for the History of Material Culture of the Russian Academy of Sciences. Dvortsovaya Emb., 18, Saint Petersburg, 191186, Russian Federation E-mail: [email protected] Varvara Busova (Moscow, Russian Federation). (Saint Petersburg, Russian Federation). Institute for the History of Material Culture of the Russian Academy of Sciences. Dvortsovaya Emb., 18, Saint Petersburg, 191186, Russian Federation E-mail: [email protected] Kharis Mustafin (Moscow, Russian Federation). Candidate of Technical Sciences. Moscow Institute of Physics and Technology. Institutsky Lane, 9, Dolgoprudny, 141701, Moscow Oblast, Russian Federation E-mail: [email protected] Irina Alborova (Moscow, Russian Federation). Candidate of Biological Sciences. Moscow Institute of Physics and Technology. Institutsky Lane, 9, Dolgoprudny, 141701, Moscow Oblast, Russian Federation E-mail: [email protected] Alina Matzvai (Moscow, Russian Federation). Moscow Institute of Physics and Technology. Institutsky Lane, 9, Dolgoprudny, 141701, Moscow Oblast, Russian Federation E-mail: [email protected]
Shopping Cart Items: 0 Cart Total: 0,00 € place your order
Ayo mengeksplor Pulau Hainan atau yang bisa disebut sebagai Hawaii nya China atau Oriental Hawaii karena pemandangan pantai dan objek wisata yang menarik, Anda diajak mengunjungi Nanshan Cultural & Tourism Zone. Anda bisa melihat salah satu patung Dewi Kwan Yin tertinggi di dunia. Serta menungjungi objek wisata yang menarik lainnya dengan harga terjangkau.
JAKARTA – SANYA JT2781 CGK SYX 17.50 - 23.05 Pada hari ini, kita akan berkumpul di Bandara Soekarno Hatta untuk terbang menuju kota Sanya . Sesampainya di Sanya, kita akan dijemput menggunakan bus dan menuju hotel untuk beristirahat. Hotel : Sanya Yabulun Health & Wellness Holiday Hotel or similar
SANYA Setelah sarapan, tur menuju Tempat Pemandangan Daxiao Dongtian (tidak termasuk kereta/mobil derek tamasya) , berdasarkan sumber daya ekologi pesisir tropis, lingkungan alam , budaya dan konotasi sejarah dan budaya, kawasan wisata ini telah membangun enam kawasan wisata dan lebih dari 50 tempat pemandangan . Dengan budaya Tao, budaya umur panjang, dan budaya Naga Laut Cina Selatan sebagai jalur utama, kawasan wisata ini memberikan pengalaman wisata yang komprehensif seperti komposisi layanan, penelitian sains populer, rekreasi pantai, tur udara dan pengalaman laut , dan telah dinilai sebagai atraksi wisata nasional.
Kemudian mengunjungi Nanshan Buddhism Cultural & Tourism Zone (tidak termasuk kereta/mobil derek tamasya) . Patung tertinggi Kwan-Yin dengan tinggi 108 meter di dunia. Fitur utama dari zona ini adalah 3 sisi patung Guan Yin Buddha, Buddhist Temple, pemandangan darat dan laut yang spektakula.
Toko Wajib : Latex Hotel : Sanya Yabulun Health & Wellness Holiday Hotel or similar
SANY A Setelah sarapan , tur menuju Yalong Bay Beach . Zona wisata nasional Yalong Bay Beach terletak di tempat pemandangan marina tropis terbaik di pinggiran timur Sanya, bernama sebagai “ Oriental Hawaii ” . Berbentuk bulan sabit , memiliki pantai berkeping-keping sepanjang tujuh rib u meter dengan pasir halus. Dilanjutkan menuju Haitang Bay Houhai Fishing Village yang lerletak di tanjung belakang Teluk Haitang, pantai di pinggir desa menghadirkan struktur geografis bulan sab it yang unik. Ini jantung para peselancar d i seluruh dunia, pemandangan laut bergaya segar, toko selancar berwarna-warni, minivan yang diubah menjadi bar kecil, d inding grafiti bergaya sendiri. Anda dapat memukau "lingkaran teman" Anda dengan ketukan acak.
Setelah makan siang , akan mengunjungi Phoenix Ridge (termasuk kereta gantung) , sebagai tempat wisata nasional, puncak utamanya adalah sekitar 400 meter di atas permukaan laut , merupakan puncak tertinggi di pusat kota Sanya, merupakan satu-satunya tempat yang dapat melihat pemandangan penuh 4 teluk besar Sanya (Sanya Bay, the size of the East China Sea, Yulin Bay, Yalong Bay) dan pemandangan 360 ° lokasi terbaik di Sanya. Kawasan pemandangan ini memperkenalkan kereta gantung tercanggih di dunia. Pemandangan udara terbaik kereta gantung, dikenal sebagai kereta gantung kota berpemandangan laut pertama di Asia.
Toko Bamboo Charcoal Hotel : Sanya Yabulun Health & Wellness Holiday Hotel or similar
SANYA Setelah sarapan, mengunjungi Dadong Sea Tourism Zone , berlokasi di antara pelabuhan Yulin dan Luhuitou di kota Sanya . Sanya Dadonghai Tourist Attraction adalah dinilai sebagai tempat pemandangan tingkat 4A, simbol dari Sanya dan salah satu 40 pemandangan terbaik di China Lalu tur dilanjutkan menuju The End of The Earth (tidak termasuk bus tamasya) , ini adalah objek wisata pertama d i Provinsi Hainan selama 35 tahun & objek wisata tingkat nasional. Setelah makan malam, transfer ke Bandara Internasional Sanya Phoenix.
Toko Wajib : Chinese Herb
SANYA - JAKARTA JT 2780 SYX CGK 00.05 - 03.10 Tiba di Jakarta, Terima kasih atas partisipasi Anda dalam tour ini. Sampai jumpa di acara tour berikutnya. Tour tambahan ( Optional Tour ) yang mungkin diadakan selama perjalanan (harga perkiraan).
Note : Waktu dan tempat dalam itinerary disesuaikan dengan kondisi yang akan ditentukan Tour Leader &Guide tanpa mengurangi tempat yang akan dikunjungi ** PRODUCT INI ADALAH CONSORTIUM, MENGGUNAKAN CHARTER FLIGHT, TIDAK BISA EXTEND **
Berat maksimum sebesar 15kg untuk 1 bagasi atau sesuai dengan peraturan maskapai penerbangan yang digunakan; dan berat maksimum 5 kg untuk 1 handbag kecil untuk dibawa ke kabin pesawat atau sesuai dengan peraturan maskapai penerbangan yang digunakan.
Air mineral 1 botol per orang per hari (kecuali pada saat acara bebas).
Tour Leader dari INDONESIA
Asuransi perjalanan GROUP (usia tertanggung maksimal 69 tahun).
Kunjungan 3x Toko Wajib : Latex, Bamboo & Herb
Melalui pelayanan yang menyeluruh dalam segala aspek, anda tidak perlu mengurus banyak hal dan menjadikan liburan anda seperti sebuah pekerjaan. Kami akan melakukannya untuk anda sehingga anda dapat menikmati setiap momen tanpa masalah.
Kami mengetahui bahwa kepentingan anda lebih utama dari program apapun yang dapat kami tawarkan. Penyediaan layanan yang terbaik bagi setiap pribadi menjadi prinsip kami dalam menyempurnakan perjalanan anda.
Pengalaman dan jam terbang kami telah membuktikan bahwa kepuasan pelanggan yang terus kembali serta berbagai hal yang kami lewati menjadi dasar kami dalam memberi yang terbaik dan selalu siap memberi solusi bagi anda.
Memori dan cerita perjalanan anda adalah prioritas utama bagi kami. Kami memastikan keseluruhan proses liburan anda berjalan baik dan tak terlupakan.
visa own arrangement / visa on arrival / visa not required, please contact us for more details
Lorem ipsum dolor sit amet, consectetur adipisicing elit,
AVIA TOUR OFFICE. Avia Head Office +628118883818 Jl. Bungur Besar No. 45 Jakarta 10610 - INDONESIA. Avia Mal Kelapa Gading ... Hubungi kami untuk bantuan atau informasi lebih lanjut melalui line telepon. 62-21 422 3838 62-21 422 3888. atau online form yang kami sediakan melalui tombol dibawah ini. CONTACT US. REQUEST BROCHURE.
62-21 422 3888. atau online form yang kami sediakan melalui tombol dibawah ini. CONTACT US. paket tour ke,Indonesia leading tour and travel agency, travel agent in Jakarta providing domestic Indonesia and international airlines tickets, hotels, tours arrangements, incentives, corporate travel, visa and passport arrangements, one stop solution ...
Kami tunggu kedatangannya Avians! 🙌🏻 Hubungi outlet terdekat untuk info lebih lanjut dan pemesanan Web www.avia.travel Hotline (+6221) 4223-838 Ticketing (+6221) 2598-8888 Whatsapp (+62) 811-8883-818 Aviatour, Your Travel Solution.
Avia Tour, Jakarta, Indonesia. 74,795 likes · 55 talking about this · 873 were here. From our origins as a leisure travel agent in 1999, PT. Fiwi Lestari Internasional (AVIATOUR) has evolved to...
paket tour ke,Indonesia leading tour and travel agency, travel agent in Jakarta providing domestic Indonesia and international airlines tickets, hotels, tours arrangements, incentives, corporate travel, visa and passport arrangements, one stop solution for all travel.
Pendaftaran peserta tour dapat melalui telepon & email yang tercantum di dalam website www.avia.travel. Harga tour, visa, airport tax, fuel surcharge dapat berubah sewaktu-waktu dengan/tanpa pemberitahuan terlebih dahulu, jika terjadi perubahan nilai tukar (kurs) atau kenaikan tarif penerbangan.
Bersama AVIA TOUR Anda akan menikmati perjalanan yang akan membawa kesan dan pengalaman yang tak terlupakan selama di Vietnam. ... Hubungi kami untuk bantuan atau informasi lebih lanjut melalui line telepon. 021 - 2450 8899. atau online form yang kami sediakan melalui tombol dibawah ini.
product. tour services, travel services, hotel reservation, car rental and other travel services. Phone. 021 2931 0386. where to park. Parkir B, GF
Avia Tour Summarecon Mal Bekasi beralamat di Summarecon Mall Bekasi GF No.136 Jl. Boulevard Ahmad Yani Blok M, RT.006/RW.002, Marga Mulya, Kec. Bekasi Utara, Kota Bks, Jawa Barat 17142, Indonesia. Berapa kontak nomor telepon Avia Tour Summarecon Mal Bekasi? Avia Tour Summarecon Mal Bekasi dapat dihubungi melalui kontak nomor telepon (021) 29572397
Namun, tidak ada salahnya menyimpan nomor telepon penting di Jepang. Mulai dari nomor telepon untuk pelayanan darurat, informasi wisatawan, informasi penerbangan, informasi barang hilang, sampai pelayanan kesehatan. Nomor telepon yang tertera di bawah ini sebagian besar melayani dalam Bahasa Inggris. Simak nomor penting di Jepang berikut.
62-21 422 3888. atau online form yang kami sediakan melalui tombol dibawah ini. CONTACT US. paket tour ke asia,Indonesia leading tour and travel agency, travel agent in Jakarta providing domestic Indonesia and international airlines tickets, hotels, tours arrangements, incentives, corporate travel, visa and passport arrangements, one stop ...
In 1938, it was granted town status. [citation needed]Administrative and municipal status. Within the framework of administrative divisions, it is incorporated as Elektrostal City Under Oblast Jurisdiction—an administrative unit with the status equal to that of the districts. As a municipal division, Elektrostal City Under Oblast Jurisdiction is incorporated as Elektrostal Urban Okrug.
Cities near Elektrostal. Places of interest. Pavlovskiy Posad Noginsk. Travel guide resource for your visit to Elektrostal. Discover the best of Elektrostal so you can plan your trip right.
Burial 5 was the most unique, it was found in a coffin made of a larch trunk, with a tightly closed lid. Due to the preservative properties of larch and lack of air access, the coffin contained a well-preserved mummy of a child with an accompanying set of grave goods. The interred individual retained the skin on his face and had a leather ...
Hotels near Electrostal History and Art Museum Hotels near Park of Culture and Leisure Hotels near Statue of Lenin Hotels near Museum and Exhibition Center Hotels ...
62-21 422 3888. atau online form yang kami sediakan melalui tombol dibawah ini. CONTACT US. about us,Indonesia leading tour and travel agency, travel agent in Jakarta providing domestic Indonesia and international airlines tickets, hotels, tours arrangements, incentives, corporate travel, visa and passport arrangements, one stop solution for ...
[email protected] . aviatour. aviatour. aviatour.travel. 628118883818. promo,Indonesia leading tour and travel agency, travel agent in Jakarta providing domestic Indonesia and international airlines tickets, hotels, tours arrangements, incentives, corporate travel, visa and passport arrangements, one stop solution for all travel.
Forums New posts Unanswered threads Register Top Posts Email
What's new New posts New Posts (legacy) Latest activity New media
Media New media New comments
Boat Info Downloads Weekly Quiz Topic FAQ 10000boatnames.com
Classifieds Sell Your Boat Used Gear for Sale
Parts General Marine Parts Hunter Beneteau Catalina MacGregor Oday
Help Terms of Use Monday Mail Subscribe Monday Mail Unsubscribe
Interior paint
Thread starter mjmercer19248
Start date Mar 27, 2017
Hunter Owner Forums
Ask A Hunter Owner
mjmercer19248
Guys, Need to refinish my cabin. Looking for a good durable paint. Not sure if I should use a gelcoat or a two part epoxy or something else. A couple of things to keep in mind: I have a shower in the head so whatever I use it must be durable/waterproof. There are many areas of repair. Epoxy, bondo, fiberglass. Whatever I use must be compatable. Ideas?
A high quality exterior house paint is very suitable for interior boat paint. Have the paint person at Lowes or Home Depot add the anti-mildew/mold treatment to the paint that is often added for bathroom use. I've done this with several boats and had great results. The real work is the prep-work. Make sure all of your surfaces are very clean before painting.
VanIslandGuy
I have used interlux bilge coat to finish some interior access boards that were very pourous open wood on my previous boat. It took several coats, but the results were outstanding. It is really bullet proof stuff. Maybe try the smallest can of it you can find and paint an unseen test area to see if you like the results. The nice thing about it is that it can paint over metal, wood, or fibreglass allowing you to have a constant finish throughout. http://www.yachtpaint.com/LiteratureCentre/bilgekote-info-usa-eng.pdf
Any acrylic house paint will do well. Plenty of choices on color and gloss level plus you can get smaller size cans at any hardware store. Your interior dosnt get much uv or submerged conditions so don't over think it.
The key to a good finish is in the prep. It's the least satisfying and the most work, but it makes all the difference between a great job and something that maybe might pass if you don't look close. Use quality products, there the least expensive in the long run. Some people may have good luck with the big box store brands, but there cheaper for a reason, and that reason is usually quality. Get a product that designed for your application and follow the instruction on the label. Don't cut corners, You'll pay for it if you do .
Hunter Ad Bot
DianaOfBurlington
I strongly recommend Pettit EasyPoxy semi-gloss white, with which I did my boat. Very easy to apply, very easy to clean, not expensive, looks like a million bucks. I would stay (far) away from any household product from places like HoDePo for any seagoing yacht. The best solution is the product that knows its market and is made to keep customers in that market happy. Behr house paint isn't going to do that for your boat.
Every time I get a new sailboat I always go in and wax and buff the inside. It is a pain but it looks great and the cost is little.
DianaOfBurlington said: ...I would stay (far) away from any household product from places like HoDePo for any seagoing yacht. The best solution is the product that knows its market and is made to keep customers in that market happy. Behr house paint isn't going to do that for your boat. Click to expand
Any thoughts on painting the interior plastic bulkheads and headliners?
SwitchintoglideIII
Skip Lowes and Home Depot and go to Sherwin-Williams and get some oil base paint. Pick up an assortment of white color cards and choose the one that is the closest match.
This site uses cookies to help personalise content, tailor your experience and to keep you logged in if you register. By continuing to use this site, you are consenting to our use of cookies. Accept Learn more…
Boat interior makeover. For less than $200 this family renovated all
Interior of our 51ft yacht with beautiful painting by Nelson artist
How to paint a sailboat deck ~ Lapstrake boat diy
Not Quite Seasoned, but Very Well Salted: Painting the Hull
Diy sailboat restoration ~ my Ledge
VIDEO
the sail boat is empty 😢
SailBoat Super speed and easy painting / Acrylic Painting for Beginners
Painting a Sailboat in Watercolor. 😊 #art #artist #watercolor #sailboat #sketchbook
Sailing / Painting Sailboat in an Open Sea
Oil painting Seascape with sailboat Part 1
Sailboat Seascape Acrylic Painting for Beginners / Sunset Acrylic Painting / Michelle Art
COMMENTS
What paint to use on inside wall of a boat?
For onto 20 years now in my own boats, and boats I've built for customers, for interior painting I've used (and will continue to use) a good quality ACRYLIC Latex enamel in semi gloss. Note the emphasis on Acrylic. I also use Zinzer 1-2-3 primer.. Used to use a different one (Kilz), but I've had it bubble with condensation.
Painting the inside
480. Catalina C-320 Washington, NC. Feb 23, 2009. #11. House Paint We painted the interior of our old Cal 27-T/2 with white semi-gloss Exterior Latex house paint with a mildewcide additive in 2001 after spraying the interior with house cleaner mixed with bleach and then pressure washing (obviously, empty the boat first).
How To Paint A Sailboat: A Complete Guide
After you have finished with the 600 grit sandpaper, it is time to move on to 800, then 1200. This process is important so you will be painting on as smooth a surface as possible. It is then a good idea to wipe the surfaces of the boat down with a damp cloth to remove any of the dust and flakes of metal/wood.
Painting Boat Interior
If you're going to be painting the interior of a boat, you'll probably want to prime the fiberglass and wood. As LLVS said, prep work is the key to a long-lasting paint job. In most cases, the prep work is the bulk of the work, not the actual painting. Be careful if you choose to use a two-part polyurethane paint, as the catalyst in them is ...
Painting our Sailboat interior WHITE
Follow along for real time updates on insta @cruisingmeraki Buying a budget Bluewater sailboat means there is inevitably going to be a lot of projects! Come ...
Step-By-Step Guide: How To Paint A Sailboat Like A Pro
1. Paint: Choose a marine-grade paint that is specially formulated for boat surfaces to ensure long-lasting durability. 2. Primer: Apply a suitable primer to create a smooth and uniform surface for the paint to adhere to. 3. Brushes and Rollers: Use high-quality brushes and rollers designed for marine applications. 4.
Mastering sailboat painting: Tips and techniques
Whether you have a sailboat, powerboat, or kayak, the principles of boat painting remain largely the same. Assessing your boat's condition. Before you begin, evaluate your boat's current condition. Inspect the hull for any damage, scratches, or rust that may need to be addressed before painting. Make a list of necessary repairs and tackle them ...
Don't paint your nuts (DIY Interior Paint Job)
The DIY sailboat interior paint job episode. KEEP US SAILING!Support us and gain early acc... We're painting the inside of our boat, it's not complicated right? The DIY sailboat interior paint job ...
Sailboat Interior Re-Paint
Sailboat Interior Re-Paint. Thread starter npaulay; Start date Jun 3, 2020; Forums. Forums for All Owners. Ask All Sailors. npaulay. Apr 14, 2020 20 Windstar 27 Seattle Jun 3, 2020 #1 Hello, I'm in the process of refinishing the interior of my 27' sailboat. I've almost completed sanding of the interior which was just painted fiberglass and some ...
Refitting a Sailing Yacht: Painting the Interior
Painting Gelcoat is a chunk of work. First step was to empty the boat and clean it thoroughly (here´s the complete article on that first milestone) and then it´s a backbreaking session to grind down the Gelcoat surface, break it up so that the new paint can find grip on the surface and sink in deeply to form a whole new hardened surface.
Sailboat Interior Painting Easy Prep Tips ️
TSP Is A Heavy Duty Cleaner That Easily Deglosses, Degreases and Dewaxes Those Uneven Sufaces That Are Very Difficult To Sand, And It's No-RinseThose Liquid ...
Painting Interior
Registered User. Join Date: May 2010. Posts: 1. Painting Interior - What Kind Is Necessary ? I have recently bought a clipper marine 21' sailboat and am interested in doing comsmetic work on it. I am interested in starting on the interior with painting.
Another Fantastic Interior Remodel on an Old Sailboat
9595 posts · Joined 2007. #4 · Oct 4, 2020. Matter of taste.. Wood interiors are vestiges from when boats were not being made with fiberglass. Wood is a sensible material for trim regardless of what the joinery panels are made from. It can be contrast wood color/grain or painted as the (plywd) panels are.
Interior Paint
Location: Muskegon, Mi. Boat: Columbia 36. Posts: 1,243. Re: Interior Paint. Interlux CabinCoat is a "marine" paint marketed specifically for boat interiors. It is a latex paint. Three times the cost of quality latex house paint, but no different. I bought a quart in off white to try it out on my Columbia 36.
Painting Catalina fiberglass interior
41. Catalina 22 Bottom of the ocean. Aug 9, 2010. #1. Hey guys! I'm in the process of painting my entire boat inside and out. I've spent the last few days sanding the outside of the boat and applied the first coat of primer yesterday. Today, the second primer coat goes on, and then Wednesday we will apply Interlux Brightside paint (Medium Blue ...
Painting Boat Interior
Painting Boat Interior. Jump to Latest Follow SailNet is a forum community dedicated to Sailing enthusiasts. Come join the discussion about sailing, modifications, classifieds, troubleshooting, repairs, reviews, maintenance, and more! 21 - 22 of 22 Posts. 1 2. S. sailaway21 · Owner, Green Bay ...
Step-by-Step Guide: How to Paint a Sailboat with Acrylics
Blocking in the background is an important step in painting a sailboat with acrylics. It establishes the composition and sets the tone for the rest of the painting. Here is a step-by-step guide on how to block in the background: 1. Choose the colors for the background based on the atmosphere and mood you desire.
House Painters & Painting Companies in Elektrostal'
Search 51 Elektrostal' house painters & painting companies to find the best house painter for your project. See the top reviewed local house painters in Elektrostal', Moscow Oblast, Russia on Houzz.
Painting Interior Fiberglass: tips
649. Catalina 315 Muskegon. Jun 10, 2024. #2. Definitely do not paint it. Compound and polish it. Assuming you can remove it from the boat to work on it, it should be an easy job. It'll look better than paint and there will be no paint to ever fail. If you're not handy with a buffing wheel and the techniques used to get good results, try ...
Zhukovsky International Airport
Zhukovsky International Airport, formerly known as Ramenskoye Airport or Zhukovsky Airfield - international airport, located in Moscow Oblast, Russia 36 km southeast of central Moscow, in the town of Zhukovsky, a few kilometers southeast of the old Bykovo Airport. After its reconstruction in 2014-2016, Zhukovsky International Airport was officially opened on 30 May 2016.
location catamaran lagoon
Atlas Yacht Sales. Atlas Yacht Sales is the Authorized Lagoon Catamaran Dealer and Jeanneau Sailboat dealer for Florida east coast and Puerto Rico. Our offices are located in Prime Marina Coconut Grove, Bahia Mar Fort Lauderdale, Comachee Cove St Augustine and Marina Puerto del Rey, Fajardo, PR. ... Lagoon 42 2024 Location: Saint Petersburg ...
Best 15 Paint and Wall Covering Professionals in Elektrostal ...
Search 59 Elektrostal', Moscow Oblast, Russia paint and wall covering professionals to find the best paint or wall covering professional for your project. See the top reviewed local paint and wall covering professionals in Elektrostal', Moscow Oblast, Russia on Houzz.
Interior paint
Jan 19, 2010. 12,479. Hobie 16 & Rhodes 22 Skeeter Charleston. Mar 27, 2017. #2. A high quality exterior house paint is very suitable for interior boat paint. Have the paint person at Lowes or Home Depot add the anti-mildew/mold treatment to the paint that is often added for bathroom use. I've done this with several boats and had great results.


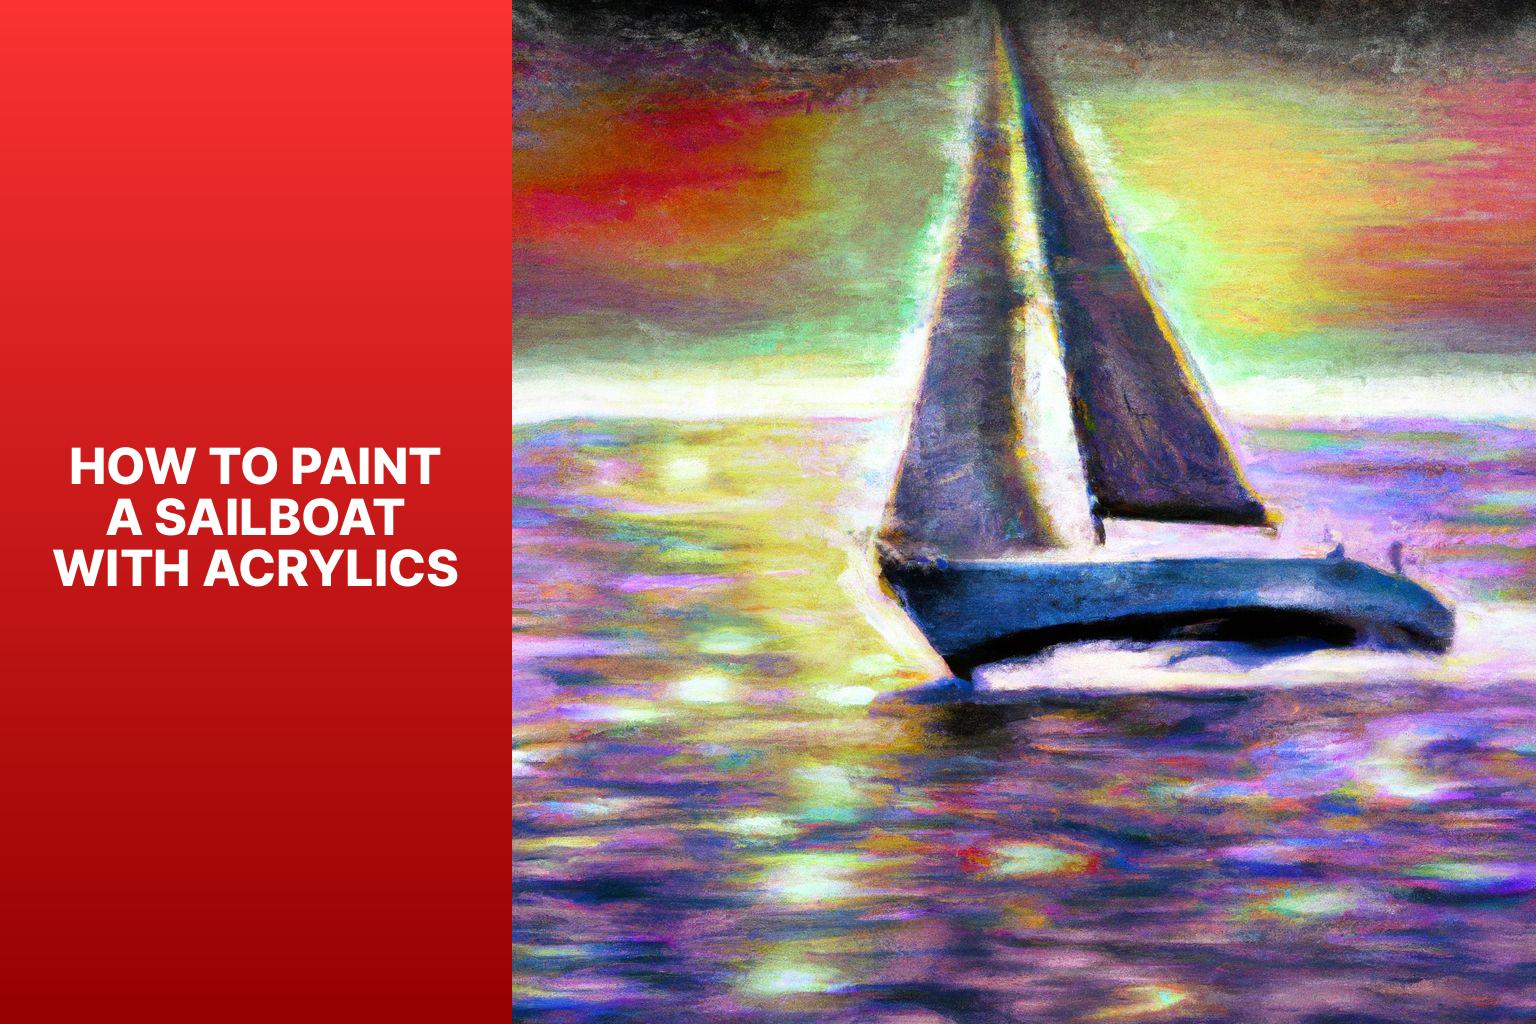


IMAGES
VIDEO
COMMENTS
For onto 20 years now in my own boats, and boats I've built for customers, for interior painting I've used (and will continue to use) a good quality ACRYLIC Latex enamel in semi gloss. Note the emphasis on Acrylic. I also use Zinzer 1-2-3 primer.. Used to use a different one (Kilz), but I've had it bubble with condensation.
480. Catalina C-320 Washington, NC. Feb 23, 2009. #11. House Paint We painted the interior of our old Cal 27-T/2 with white semi-gloss Exterior Latex house paint with a mildewcide additive in 2001 after spraying the interior with house cleaner mixed with bleach and then pressure washing (obviously, empty the boat first).
After you have finished with the 600 grit sandpaper, it is time to move on to 800, then 1200. This process is important so you will be painting on as smooth a surface as possible. It is then a good idea to wipe the surfaces of the boat down with a damp cloth to remove any of the dust and flakes of metal/wood.
If you're going to be painting the interior of a boat, you'll probably want to prime the fiberglass and wood. As LLVS said, prep work is the key to a long-lasting paint job. In most cases, the prep work is the bulk of the work, not the actual painting. Be careful if you choose to use a two-part polyurethane paint, as the catalyst in them is ...
Follow along for real time updates on insta @cruisingmeraki Buying a budget Bluewater sailboat means there is inevitably going to be a lot of projects! Come ...
1. Paint: Choose a marine-grade paint that is specially formulated for boat surfaces to ensure long-lasting durability. 2. Primer: Apply a suitable primer to create a smooth and uniform surface for the paint to adhere to. 3. Brushes and Rollers: Use high-quality brushes and rollers designed for marine applications. 4.
Whether you have a sailboat, powerboat, or kayak, the principles of boat painting remain largely the same. Assessing your boat's condition. Before you begin, evaluate your boat's current condition. Inspect the hull for any damage, scratches, or rust that may need to be addressed before painting. Make a list of necessary repairs and tackle them ...
The DIY sailboat interior paint job episode. KEEP US SAILING!Support us and gain early acc... We're painting the inside of our boat, it's not complicated right? The DIY sailboat interior paint job ...
Sailboat Interior Re-Paint. Thread starter npaulay; Start date Jun 3, 2020; Forums. Forums for All Owners. Ask All Sailors. npaulay. Apr 14, 2020 20 Windstar 27 Seattle Jun 3, 2020 #1 Hello, I'm in the process of refinishing the interior of my 27' sailboat. I've almost completed sanding of the interior which was just painted fiberglass and some ...
Painting Gelcoat is a chunk of work. First step was to empty the boat and clean it thoroughly (here´s the complete article on that first milestone) and then it´s a backbreaking session to grind down the Gelcoat surface, break it up so that the new paint can find grip on the surface and sink in deeply to form a whole new hardened surface.
TSP Is A Heavy Duty Cleaner That Easily Deglosses, Degreases and Dewaxes Those Uneven Sufaces That Are Very Difficult To Sand, And It's No-RinseThose Liquid ...
Registered User. Join Date: May 2010. Posts: 1. Painting Interior - What Kind Is Necessary ? I have recently bought a clipper marine 21' sailboat and am interested in doing comsmetic work on it. I am interested in starting on the interior with painting.
9595 posts · Joined 2007. #4 · Oct 4, 2020. Matter of taste.. Wood interiors are vestiges from when boats were not being made with fiberglass. Wood is a sensible material for trim regardless of what the joinery panels are made from. It can be contrast wood color/grain or painted as the (plywd) panels are.
Location: Muskegon, Mi. Boat: Columbia 36. Posts: 1,243. Re: Interior Paint. Interlux CabinCoat is a "marine" paint marketed specifically for boat interiors. It is a latex paint. Three times the cost of quality latex house paint, but no different. I bought a quart in off white to try it out on my Columbia 36.
41. Catalina 22 Bottom of the ocean. Aug 9, 2010. #1. Hey guys! I'm in the process of painting my entire boat inside and out. I've spent the last few days sanding the outside of the boat and applied the first coat of primer yesterday. Today, the second primer coat goes on, and then Wednesday we will apply Interlux Brightside paint (Medium Blue ...
Painting Boat Interior. Jump to Latest Follow SailNet is a forum community dedicated to Sailing enthusiasts. Come join the discussion about sailing, modifications, classifieds, troubleshooting, repairs, reviews, maintenance, and more! 21 - 22 of 22 Posts. 1 2. S. sailaway21 · Owner, Green Bay ...
Blocking in the background is an important step in painting a sailboat with acrylics. It establishes the composition and sets the tone for the rest of the painting. Here is a step-by-step guide on how to block in the background: 1. Choose the colors for the background based on the atmosphere and mood you desire.
Search 51 Elektrostal' house painters & painting companies to find the best house painter for your project. See the top reviewed local house painters in Elektrostal', Moscow Oblast, Russia on Houzz.
649. Catalina 315 Muskegon. Jun 10, 2024. #2. Definitely do not paint it. Compound and polish it. Assuming you can remove it from the boat to work on it, it should be an easy job. It'll look better than paint and there will be no paint to ever fail. If you're not handy with a buffing wheel and the techniques used to get good results, try ...
Zhukovsky International Airport, formerly known as Ramenskoye Airport or Zhukovsky Airfield - international airport, located in Moscow Oblast, Russia 36 km southeast of central Moscow, in the town of Zhukovsky, a few kilometers southeast of the old Bykovo Airport. After its reconstruction in 2014-2016, Zhukovsky International Airport was officially opened on 30 May 2016.
Atlas Yacht Sales. Atlas Yacht Sales is the Authorized Lagoon Catamaran Dealer and Jeanneau Sailboat dealer for Florida east coast and Puerto Rico. Our offices are located in Prime Marina Coconut Grove, Bahia Mar Fort Lauderdale, Comachee Cove St Augustine and Marina Puerto del Rey, Fajardo, PR. ... Lagoon 42 2024 Location: Saint Petersburg ...
Search 59 Elektrostal', Moscow Oblast, Russia paint and wall covering professionals to find the best paint or wall covering professional for your project. See the top reviewed local paint and wall covering professionals in Elektrostal', Moscow Oblast, Russia on Houzz.
Jan 19, 2010. 12,479. Hobie 16 & Rhodes 22 Skeeter Charleston. Mar 27, 2017. #2. A high quality exterior house paint is very suitable for interior boat paint. Have the paint person at Lowes or Home Depot add the anti-mildew/mold treatment to the paint that is often added for bathroom use. I've done this with several boats and had great results.