- Fishing Gear
- Lessons Learned
- All Fishing Kayaks
- Convertible
- Fly Fishing
- Foreign Brands
- Pedal Driven
- Fishing SUPS

Kayak Sails | 9 Ways to Catch The Wind in 2023
- by Chris Klenner
- March 2, 2021 January 16, 2023

Yearghhhh me Maties! So yer keen on sailing the low seas arrre yargh? Well then you’ve come to the right place.
Paddlers have long sought means to stop paddling. In fact the paddle is one of the most regretted inventions in all of human history. Sure it gets you across the water but ugh! It didn’t take long for our ancestors to figure out that using the wind was a helluva lot easier than rowing. Just like ancient mariners modern kayakers have long searched for easier methods to move across the water with less effort.
That search has yielded some awesome innovations. Carbon fiber hydrodynamic paddles, pedal driven propulsion systems, and high-tech electric motors are some of the biggest game-changers introduced to personal watercraft in the last thirty years. While these advancements are great they still come at a cost of extra weight, energy, and cash. Wind is powerful, plentiful, and free (on good days) and so continues to inspire would be mariners to try their hand at sailing.
Before we go any further you should note that sailing a kayak isn’t an easy undertaking. Ready to go kayak sails aren’t cheap and installing a kayak sailing kit takes some fairly serious DIY skills. Still, if you’re committed to jibbing and tacking like the scurvy jack-tar yer argh then read on below to learn more about the best kayak sails options available today.
Downwind Sails
Downwnd kayak sails can jibe all day, but they got no tack. These kayak sails are good for going one direction only; whereas a true sail kit can sail make headway into the wind. Downwind kayak sails are typically inexpensive, easy to install, and less of a hassle than a true kayak sail kit. The downside is that you’ll still have to paddle at least half the trip.
Advanced Elements Sailkit

True kayak sailing kits are awesome for long voyages in high winds. But it takes extra time to set up, breakdown, and man underway. If you’re looking for a more casual kayak sail option to save a paddle back then a downwind kayak sail is pretty affordable. These kayak sails offer paddlers a quick and easy way to capture the power of the wind without serious modifications. On a windy day these sails can save you from paddling at least half the trip.
One of the better downwind kayak sails is the Advanced Elements Sailkit . An internal aluminum spring frame enables rapid deployment, similar to expanding car windshield visors. Two opposing lanyards can be tied down to cleats near the cockpit. While an aft facing carabiner hooks to a bow-mounted d ring to help the sail keep it’s shape, and from flying off the boat. Three translucent panels provide visibility with the sail up. The kayak sail folds up into a small bag that can easily fit under your seat or in a bag.

Sea Eagle QuikSail

The Sea Eagle QuikSail is a universal rapid-deploy sail kit specially designed for inflatable kayaks. Two four foot aluminum poles criss-cross and wedge into the space between an inflatable kayak’s side pontoons and floor. Unfolded the total sail area measures 14 square feet which can push along your air-filled yak along at 7 knots (~8.5 mph), which is really zipping. After the wind dies down the Quiksail quickly folds up to store fore and aft deckside along the pontoon. At just 2 lbs this is an extremely lightweight accessory that won’t bite into your gear quota.
It should be noted that the QuikSail is a niche product designed for experienced paddlers running a specific inflatable setup. This sail works best with your feet braced against the base of the poles; so you need to be low in boat with an inflatable or padded kayak seat. At the same time you’ll also need to steer using your paddle. Finally it’s incredibly helpful, almost necessary, to have mid-ship d-rings to attach sail supporting lanyards.
If you’re running a rig that meets these criteria than the Sea Eagle QuikSail is an excellent choice. At $150 it’s a tad on the expensive side. But it’s easily justified thanks to its high speed and quality construction. We guarantee your arms will be thanking you when you catch a free ride back to port.
If you’ve seen any of the “People Are Awesome” video compilations on YouTube then you’re probably familiar with parafoil and hydrafoil kites. These kites are designed to provide sufficient lift to pull kiteboarders along the water. On occasion adventurous paddlers have decided to try their hand at pulling a yak with line and kite; to varying degrees of efficacy.
There are several issues present in kitesailing a kayak. Foremost it’s only good for going downwind; so it can be useful for a quick ride back if you started upwind. The larger issue is control. Successfully keeping your bow and kite pointed in the same direction takes masterful coordination and skill. Lose control for a second and you could quickly end up in the drink.
Finally kite’s have the annoying proclivity to tangle up in fishing lines quite easily. And not every model is re-launchable from the water; so if you crash a kite then you’re SOL. Prepare to spend the next hour reeling in and packing all that kite line floating on the water.
Overall we don’t recommend kite sailing for kayak anglers; it’s simply not worth the effort. Touring paddlers will fare better; but it’s still a challenging endeavor that’s going to take a lot of practice. If you’re truly committed to giving it a shot then check out the Mentor below.
Prism Mentor 3.5

The Prism Mentor 3.5m Trainer is a power kite; and as such will take considerable skill to control effectively. Trainer kites are great for kayaks because they’re much more forgiving than intermediate and advanced type models. It’s still strong enough to drag you off your feet. But it won’t send you flying thirty feet up in the air.
The Prism Mentor comes with everything you need to fly. It packs neatly into a small bag which is perfect for keeping in a crate or hull bin. Most importantly the Mentor floats and is water launchable. Just tug on the center line to right it and pull back to re-launch. The Mentor is available in 3.5 square meter (37.5 square feet) and 2.5 square meter variant.
This kite is a serious piece of equipment. And it’s a steep barrier to entry for something that may not work great on your boat. If you want a proxy to test first consider buying an acrobatic kite and play around with it on land. You’ll get a sense of how difficult incorporating a kayak kite will be without the full investment.
True Kayak Sail Kits
Unlike downwind kayak sails the following sail packages are trans-formative kits that can serve as a true alternative to paddling. We define True Sail Kits as ones that have the ability to sail against the wind – also known as tacking. These kits all require a bit more pocket change and a fair degree of skill to use properly.
It’s also worth noting that these kits can require some serious modifications to your boat. So be prepared to drill some holes. Also as sails radically change your kayaks balance you may want to consider adding some extra stability with either leeboards or outriggers. These may be essential depending on your setup.
If you’re going to talk about sailing kayaks then you’ve got to talk about Hobie. Hobie was known for making some of the best personal sailcraft in the business before they had a reputation for high-end pedal drives. Decades of experience and innovation have positioned Hobie as one of the premier brands for fishing kayaks They’re also the only mass-producer of sailing kayaks.
Mirage Adventure Island

The Hobie Mirage Adventure Island, and its sister tandem version, are the only out of the box sailing kayaks currently available. Hobie also offers smaller sized catamarans like the iconic Hobie 16 or the rotomolded Wave, but these aren’t exactly kayaks (strictly speaking).
The Mirage Island is a beast of a boat. Weighing in at close to 200 lbs and comes standard with a 6m sail on a 5m mast. Twin amas keep everything upright and the integrated mirage pedal drive won’t leave you stranded on a breezeless day. When the wind is whippin’ though the Adventure Island is capable of topping out around 12 knots; which is hauling for a wind-driven vessel. If you’re front running a storm in the adventure island then hold on, because you’re in for a ride.
The Mirage Adventure Island comes with everything you need to start sailing on day one. It’s not cheap. The solo version retails for $5,299. And the tandem previously held the record as the most expensive kayak available at $7,499. That might seem expensive, but when you consider the upfront and operating costs of even a small 15-20′ sailboat the Adventure Island is much more attractive.
Hobie Mirage Sail Kit

Current Hobie owners can easily add wind power to their kayak with the addition of the Hobie Sail Kit . This ~2 square meter sail mounts on a 2 piece aluminum mast that stands 10′ tall off the deck. The upper portion is made of durable dacron fabric while the lower half is composed of translucent mylar so you can still see where you’re headed. We highly recommend grabbing the furling kit along with the sail so you can roll up the sail in a jiffy. This feature is hugely important if you have any intention of staying still at some point during your voyage.
This kayak sail works so well in part because of its high quality construction, but also due to its seamless integration with Hobie Kayaks. The mast seats in a built in accessory port on compatible models. The mirage pedal drive improves tracking while the rudder can be controlled with one hand, leaving the other free to manage the sheet (i.e. sail rope).
Paired with a mirage pedal drive the Hobie Mirage kayaksail kit offers adventurous paddlers a means to cover large areas of water and then finely tune their position. If you’re a current Hobie owner seeking more adventure in your outings then the Hobie Sail Kit is your best bet. Sure it’s not cheap, but this is one upgrade definitely worth the sheckles.
Balough Sail Design

There are few kayak sailing kit manufacturers better known than Balough Sail Design (BSD). They’ve earned a reputation for producing some of the best and most complete kayak sailing kits in the industry. These aren’t downwind do-hickeys, but full blown sail-kits that can tack and jibe into the wind like larger sail craft. BSD has a diverse product line that caters to canoes, long haul trekkers, and even foldable kayaks. One of their most popular kayak sail kits for hardshells is the Batwing.
The BSD Batwing features a hangglider inspired airfoil that’s perfect for small and narrow craft. Full tapered fiberglass battens prevent flogging and the proprietary “Zippy Reefer” system makes reefing the spinnaker effortless. The sail and mast are mounted to the hull and attached to the Balough Outrigger Stabilizer System (BOSS) for stability. The BOSS is a fine-tuned outrigger system that connects the main sail to dual hydrodynamic amas via aluminum tubes and hardware. These amas provide extra stability and security during sailing and turning.
Adding a BSD sail kit to your arsenal isn’t a cheap proposition. The 32 sqft BSD Batwing sail with BOSS system and accompanying hardware goes for ~$1,650 which makes it by far the most expensive option on our list. But, it’s still considerably less expensive than picking up an Adventure Island or a small sloop. If you’re a serious kayak sailor and looking to make some serious expeditions then BSD should definitely be on your short list.
Chesapeake Light Craft

Bespoke hand-made kayaks are functional works of art that represent the cumulative total of a builders passion, skill, and patience. Watch a few videos of a cedar-strip canoe being built and you’ll quickly realize that it takes a certain type of person to pull off such an ambitious project. If you’re the type who dreams of woodworking and envies scratch built vessels than the Chesapeake Light Craft (CLC) sail kit might be for you.
CLC caters to both amateur and professional boat-builders and is an invaluable resource for any paddler undertaking a DIY kayaking project. Their kayak sail kit is one of the biggest, powerful, and comprehensive options available for radically transforming your kayak or canoe. After you’ve finished installing this kit your vessel will be well equipped for long-trek journeys and expeditions.
The kit comes with CNC cut parts and hardware to add two amas for extra stability and a sail between 45 and 70 square feet. The 70 sqft sail is a behemoth that requires strategic reinforcement to accommodate a 15’+ mast. CLC kits are highly customizable and labor intensive – it’s nowhere near a “plug and play” solution for kayak sailing, and that’s Ok – these kits are made for paddlers seeking peak performance and aesthetics. Check out CLC to drool over some of the best looking sailing kayaks you’ll ever see. They’re also a great resource for hard to find sailing hardware and DIY boat plans.
Falcon Kayak Sails

The folks behind Falcon Kayak Sails have designed one of the most popular kayak sail kits on the market for both amateur and advanced paddlers. The founding partners, based out of Perrysberg, Ohio, were tired of cumbersome and oversized sails commercially available. So they decided to make it better and fine tuned it on the windy waters of Lake Eerie. The result is an incredibly strong, lightweight, and compact sail that strikes a fine balance between full blown sail conversion and downwind runner.
The Falcon sail is available in two sizes (1m 2 and 1.4m 2 ) and weighs a mere 4 lbs along with rigging and hardware. This incredibly light weight is accomplished through the use of a carbon fiber mast and boom and durable plastic connectors. Sailcloth is made from Dacron, a proprietary fabric from Dupont that’s closely resembles polyester (PET) in composition. PET sails benefit from less stretch, greater UV resistance, and drys very quickly.
Most impressively the Falcon sail assembles and disassembles in less than 30 seconds. Sails can be customized in a myriad of colors at no extra charge. Falcon Sails also quality assurance by double checking hardware compatibility with your specific kayak model. The all in price for the 1m2 kit is just $625 which is extremely reasonable. Whether your sailing from South America to Miami , or just going out for a quick tour, the Falcon Sail is a excellent option.
Flat Earth Kayak Sails

Kayak Sails aren’t the sole providence of paddlers in the Northern Hemisphere. Our friends down under have learned a thing or two paddling the Tasmanian Sea. The fine folks at Flat Earth Kayaks have fine-tuned their kayak sail kits through extensive testing in the wild waters off New South Wales. The result is a robust and capable kayak sail system well suited for ocean bound paddlers.
Currently Flat Earth Kayaks (FEK) offers two different models for touring style kayaks; the Footloose 80 and three different sizes of their trademark Tradwind Sail. These junk-rig style sails are well suited for small watercraft because they can take a beating and are easily controlled. A single line provides simple control capable of big tacks and precise adjustments. A bespoke flexible mast mount and custom mounting hardware, along with detailed instructions, make installation and operation accessible for even the greenest yakker.
FEK sail kits are attractive for ocean kayakers especially because of their consistent iterative improvement and attractive pricepoint. Most kits are sub-$600 for for sail and hardware while providing the same strength and durability of kits twice the price. If you’re constantly in the salt and looking for a proper sail rig than don’t pass up a chance to check out Flat Earth Kayaks.
Pacific Action Sails

Crab Claw sails are aptly named for their distinctive shape. They’ve been a mainstay in Austronesian sailing for centuries. These sails have historically been favored for moving both large/slower barge like vessels as well as more nimble outrigger canoes and proas. This sail design is one of the most efficient simple designs (excluding modern spinnakers) and has long been favored for its ease of use and construction.
Pacific Action sails has brought the crab claw design into the modern kayaking era with their sail kit. With a dual spar design and no fixed mast the PA sail quickly deploys and retracts with just one line. Out of the wind the twin spars group together and can be secured to the side of the gunwale. The absence of a fixed mast provides another distinct advantage with regards to installation. Rather than mounting into the top deck the kit can be installed with tensioning straps that hug the hull – which means you don’t have to put any holes in your boat.
PA offers sail kits in 1, 1.5, and 2.2 sqm sizes that range from $380 to $470 AUD. These kits are especially well suited to sit on top style kayaks thanks to their reliance on pre-existing tie downs and hull-hugging mount. Owners of Stealth, Viking, and Ocean kayaks should have the PA sail kit at the top of their list for low effort, max yield sails.
Overview on The Best Kayak Sails
Whether you’re a part time paddler or an expedition angler a kayak sail can add an extra dimension to your outings. Catching the wind offers an eco-friendly way to boost your range and keep your arms fresh. The wind might not be as reliable as a small outboard or an electric motor. But by sailing you’re taking part in a human tradition dating back to the beginnings of civilization. And it gives you a great excuse to talk like a pirate. Share your sailing kayak photos with us and stay safe out there yer scurvy buccaneers!
Welcome to Falcon Kayak Sails!
Here at Falcon Sails, LLC our focus is making the best kayak sail kits on the market. Our product, knowledge and service will lead you to an amazing kayak sailing experience. Our kayak sail kits include everything you need and are easy to install on any kayak. You can have amazing sail performance and simplicity in a compact, light weight kit.
A complete Falcon Sail with rigging kit weighs only 3.5 pounds and can be rigged at the launch site in 30 seconds. An efficient air foil shape provides maximum sailing potential on all angles of attack. You can actually sail up wind. The Falcon Kayak Sail rig can be lowered and secured to your deck in seconds (without going to land) and raised in seconds when you are ready.

Our sails are made of the best sail cloth available and our carbon fiber mast stiffness makes it so increased wind equates to bursts in speed, not lost potential. Even with this great performance, they are as easy to handle as any kayak sail on the market. Our goal is to provide kayakers who are looking for performance features in a lightweight, compact and easy to use kit.
We are so confident you will be impressed, we provide a 30 day money back guarantee on everything we sell. If you have any questions about kayak sails or kayak sailing, give us a call or send us an email. We will be happy to answer all your kayak sailing questions!
FalconSails on Facebook
Home » LIST of WOODEN BOAT PLANS – By Michael Storer » Drop-in Outrigger Plan for Canoes & Kayaks (some dinghies) Sailing Videos
Drop-in Outrigger Plan for Canoes & Kayaks (some dinghies) Sailing Videos
The drop in outrigger can transform many unstable canoes, narrow dinghies and some kayaks into a stable platform for fishing or diving or convert your boat into a formidable sailing outrigger or trimaran sailing canoe .
- Turn a Canoe or Kayak into a formidable sailing boat or a super stable fishing platform. Drop in Outrigger Plan info here.
- Whizz Along in Armchair Comfort – or – the Ideal Fishing Platform (paddle/motor)
- Diving or Snorkelling Platform
- All Components under 10lbs
- Everything removes from the original boat easily
- 2 sheets ply
Specification
Hull length 2350 Beam 290 Hull Depth at middle of hull 265 Hull Depth from line joining bow and stern measured perpendicular to keel 340mm
NEW Mini Outriggers – click here for information.
These smaller and simpler outriggers are designed to be kept above the water most of the time. But if a gust hits it gives the sailor of a canoe or narrow dinghy with a bit more time to react by easing the sheet (first!) and/or hiking out.
The “Drop in Outrigger” design explained below is bigger for full time sailing on the outrigger.
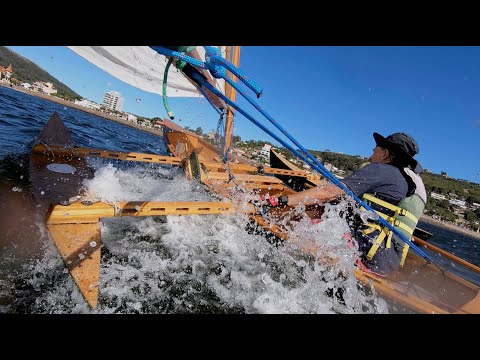
The first time I worked on this concept we took an elegant Strip Planked REDBIRD canoe and fitted it with this outrigger system. All components are light and easily removable. And as with our other sailing canoe work very well.
With the additional stability we were able to cram on a significant amount of sail in a simple Lateen Rig. – about 7.5 sq metres (80 sq ft) for real sailing performance. One of the advantages of the lateen rig is that the sail can be a backyard manufactured item. We made ours out of a blue plastic tarpaulin – I think the total sail cost was about $40. The Lateen even if cut completely flat develops a useful driving shape when loaded up by the wind.
The boat whipped along nicely and did not require a leeboard when the leeward hull was well immersed and the speed was maintained. Try to point high and low speed combined with leeway counters upwind progress. But point at 70 degrees and the speed greatly exceeds the upwind speed of a normal monohull and leeway reduces.
Unfortunately I don’t have any pics of Mr Webb’s Fabulous Redbird under full sail – but it was great fun. The photos of the black outriggers here are on Daniel Caselli’s Eureka Canoe in Uruguay.
Video 1- of the drop in outrigger Plan conversion of a canoe or dinghy into a fast stable sailing trimaran
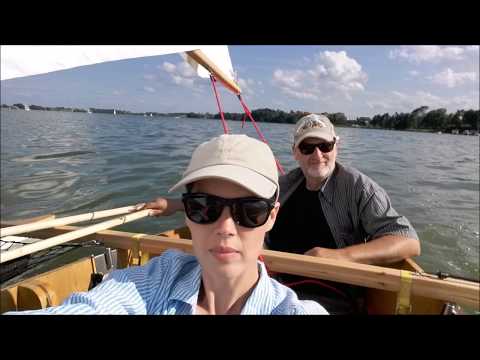
The Bolger designed Teal is a lovely simple dinghy, but it can be an exciting handful in stronger winds. Video below: Jan Cudak added the outriggers to turn the Teal into a very pleasant stress free sailing outrigger.
You also see the little 12ft dinghy is sailing way faster than the original design.
It had a surprising turn of speed and was quite exciting to sail.
This applies the dynamics of Proa, Trimaran and outrigger design to an existing boat.
Loads on the structure are limited by the modest ama volume. As the amas are loaded up speed is increased. However, when the load starts getting closer to the design strength of the crossbeams the amas start submerging. Thus providing feedback to ease the sail and back off.
With larger outrigger hull designs which do not submerge it is the load in the main hull of crew and gear along with platform weight that set the loads on the crossbeams. As this can vary it means the crossbeams have to be heavier to carry unanticipated loads.
We also have plans for other sailing canoes
Additional free pack for plan purchasers – basic sail and crossbeams for low Freeboard canoes
Portability of the lightweight drop in outrigger components
None of the components weigh more than 10 pounds (4.5kg).
Some downsides from the conversion – not serious but so you know.
The only downside was that the Redbird canoe hull, being a brilliant straight line paddling boat, just refused to go round corners easily – it just refused to tack through the wind.
Either it had to be assisted by someone with a paddle – or the tack was completed by the boat picking up a little bit of speed in reverse then steered out with reverse rudder. Not a big problem at all – and the speed in a straight line made it all very worthwhile!!
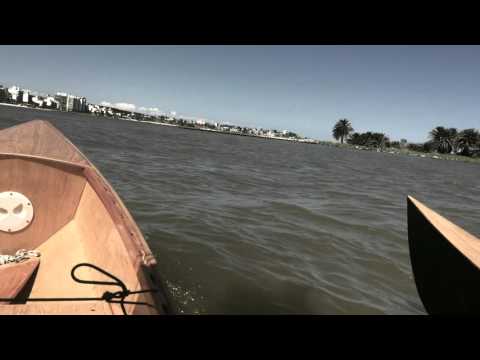
This depends on the characteristics of the original hull. If it is easy to turn the trimaran will too. Here one of my Quick Canoes with the the drop in outrigger components inside the hull for transport.
Outrigger hull construction is simple
The hulls are simple stitch and glue. Two panels, timber around the sheer and an epoxy fillet and glass along the keel line.
The crossbeams are simple laminations and look light and simple on the boat.
The hulls attach to the crossbeams with butterfly nuts. Crossbeams are lashed into the canoe hull. The attachment point for lashings is a doubler glued to the canoe hull with a deck eye (saddle bolted through.
For sailing versions the upper mast partner is built into the forward crossbeam and the mast steps on a simple block glued to the bottom of the boat.
Any relatively narrow hull (under 3ft, 1.2m) is suitable, whether a canoe, kayak or rowboat. The crossbeams can be extended for wider boats by increasing the length of the flattish section in the middle. But there are limits as the distance between the gunwale of the main hull and the furthest point of the crossbeam should not exceed 1200mm .
In other words, the steering characteristic of the whole shebang is defined by the main hull.
The owners use it for holidays – it all roofracks easily because of the light weight – and for fishing.
There have been a couple of these built to make a canoe into an excellent fishing platform. For that purpose they used a small outboard (2 or 3hp pushes a canoe along quite quickly) attached to a bracket on one of the crossbeams. The outer hulls provide an extra level of safety as they are watertight.
Fitting a single outrigger hull only makes a tacking proa. The ends without the outrigger hull should project about 12 to 18″ (300 to 400mm) outside the gunwale and the two ends tied together with a piece of timber so they can’t move relative to each other.
The hulls and crossbeams can fit some small dinghies particularly if they are quite narrow and not too long.
The other advantage is that like the “drop-in kayak rig” when the outriggers are removed from the hull there is only the small block of wood acting as a mast step still attached to the canoe.
Because of the potential speed and power of sailing versions we recommend a rudder be fitted to the main hull. Steering it with a paddle would just be too much work! While a simple rudder makes things easy.
Powering with a Small outboard or Electric Trolling motor
Recommended power is a couple of horsepower maximum or an electric trolling motor with a couple of deep cycle batteries will give a good few hours moderate speed motoring.
It is possible for a motor or paddling configuration to use one hull only – a one sided outrigger canoe. But the ends of the crossbeam without a hull have to have a tie bar between the ends. This might potentially make a nice diving platform. The outboard could be attached to the rear crossbeam close to the hull.
This outrigger canoe project below was to make a too unstable boat much more stable for outings and diving in the Philippines.
There are two free additions to the plan in a package available to purchasers. Email me with evidence of purchase.
- A flatter curve to the crossbeam for canoes and kayaks with lower freeboard.
- Drawings for an integrated sailing rig with mast supported by front crossbeam. This includes a sail design for polytarp or you can purchase a sail from our sailmaking arm;
Link for sails for Drop in Outrigger plan from our Really Simple Sails
Drop-in outrigger sails are available from reallysimplesails.com
About John P.
One Man's Blog
Specialization is for Insects.
CatamaYak: How to Build a Kayak Catamaran

August 14, 2013 By John P.
We happen to own four identical kayaks, we bought the Equinox 10.4 kayaks at Costco, and we started working on ways to hack them to make them even better! First, I hacked a motor onto my kayak , and then I thought I’d give it a shot and see if we could build a catamaran out of a couple of em.
The CatamaYak Concept
When we go out on the water there is usually a group of us. Some are faster than others, and some just enjoy a leisurely time on the lake. We wanted to be able to turn a couple of kayaks into a floating relaxation station and give it a motor so that a couple of people could simply sit back and relax while still being able to tag along.
The CatamaYak needed to have a few important characteristics:
- be light and easy to assemble at the lake
- be extremely waterproof and not get slippery
- be durable enough to take a pounding from the waves
- be rigid enough to deal with the forces encountered
Given the design considerations I took a few measurements and drew up a quick sketch of the components and how I imagined they would fit together.

If you are going to design your own there are a few important things to keep in mind.
- The bow (nose) of the kayak is generally narrower than the stern (rear). So don’t just make the front and rear crossbeams the same length or it will look funny and not perform as well.
- You could substitute wood 2x4s for PVC in my design, but its not going to last as long and its going to flex and expand as it takes on water. Its also going to be a LOT heavier.
- If you intend to add a motor like I did you must make sure that the distance between the two kayaks in the center is sufficient for the motor to turn 360 degrees without the blades hitting the side of the watercraft.
The Kayak Catamaran Parts List
Everything I used for this experiment came from Lowe’s. I’m sure you could also find it at Home Depot or other home improvement stores.
- 3 – 10′ sections of 2″ PVC pipe
- 4 – 2″ PVC T sections
- 4 – 2″ PVC end caps
- PVC cleaner and cement
- 1 – 18″ x 72″ wood board
- 4 – 2″ stainless steel U bolts with lock nuts and washers
- 4 – 5″ stainless steel eye bolts with lock nuts and washers
- 1 – 8′ 2×4 (or a couple of 8″ scraps)
- 2 – 8″ 5/8×16 bolts with lock nuts and washers
- 4 – Ratcheting straps
I also needed a rubber mallet, wrenches, a drill, a set of drill bits, and a table saw. You could do without the table saw by having the store cut the wood for you.
Building the Kayak Catamaran
The first thing I did was set the two kayaks beside one another and lay the crossbeam PVC pipes on top of it. This allowed me to take measurements and make sure my design was roughly accurate.

It turns out that the exact finished dimensions worked perfectly for my kayaks and particular brand of trolling motor (Minn Kota 30 pound unit). See the design sketch above if you have Equinox 10.4 kayaks and want to exactly duplicate this build.
I then cut all the PVC pipes and dry fit the pieces. I used my table saw to cut the PVC, but you could use a hacksaw and do it by hand, or you could use a reciprocating saw or basically anthing with a blade long enough to go through 2″ of PVC. Its a very soft material so its easy to cut – but keep your cut very straight as you go. The pieces won’t fit properly if the cuts are all crooked.

Then it was time to attach the pieces. First, you must start with the rectangular center frame, and you have to be VERY careful when assembling this piece to make sure you get it extremely straight!
I carefully cleaned and cemented each fitting and lightly attached a T union to one end of the support frame. I then VERY QUICKLY laid it on the flat piece of wood to make sure the T’s were pointing straight. After a little adjusting I took a rubber mallet and pounded the T’s on as far as they would go.

You’ll know when the pieces are fully inserted because there is a little ridge in each connector or end cap that won’t let the pipe go any farther. So you don’t need to worry that you put it in too far. In fact, if you follow my design its extremely important that all PVC is assembled as tightly as possible for proper fit and structural integrity.
If done right you can look inside the T fitting and see there are no gaps and some of the cement is pretty much sealing all the way around the tube where they meet.

First glue up both end pieces, then attach the two long PVC supports to one end, and follow up by attaching the other end piece – which will require you to glue up two pipes at the same time. Work quickly as the PVC cement drys fast! And remember – HAMMER EVERYTHING TOGETHER WITH A RUBBER MALLET!
After that you’re in the home stretch. Time to glue on the cross beam pieces. These are the most critical joints so make sure they are very clean and you have plenty of cement. You don’t want these to break on the water! Also, notice again that in my design the front and rear are different lengths. Here is a photo showing just one side glued up.

Once you’ve finished connecting all the PVC joints and adding end caps, you can lay the frame back down on your kayaks and begin attaching the connecting hardware. First up, the wooden platform needs to be connected on top. This serves two purposes. First, it provides a lot of torsional rigidity. And secondly, it gives you a spot where you can put stuff!
I used 4 long eye bolts pointing upwards to connect the wood to my PVC frame by drilling down through the wood and directly through the center of each of the 4 T-connectors in the corners. By using the eye bolts it gives connection points in each of the 4 corners that can be used for lashing things to the top, or could even be used for lifting / hanging the platform.

You’re going to attach 4 eye bolts pointing downward from the end of each crossbeam. These are going to be used for connecting the ratcheting strap to hold the kayaks in place.

The other end of the strap mounting is a U bolt mounted directly on the platform. Make sure and leave enough room that the ratchet can be entirely on top when its mounted securely. This does a couple of things, but most importantly it allows you to ratchet it up a little while on the water if it loosens up, which it will do a bit when it gets wet. I’ve already proven out this point on the Lake, so don’t skip it.

You’re about done at this point! Now if you intend to mount a motor on it you need to add a wood block that will fit it. I accomplished this by cutting two 2×4″s down to 8″ wide. These were attached with several stainless steel screws and an L bracket (found near the fencing stuff in the lumber department) for some added rigidity. I wanted to make sure there was NO flex with the motor so all of the power translated to forward momentum instead of any wiggle in the mount.

At this point you should be done and ready to simply slip a ratcheting strap under each mounting point, front and rear, on both Kayaks and secure them tightly.
We took the double Kayak Catamaran out on the lake for the day and it performed FAR better than I ever expected! The little 30 pound Minn Kota trolling motor was able to EASILY push the watercraft! By the way, you need to really watch the video I did about the single Kayak motor mount in order to see how to wire it up and which battery to use, etc. But even with the little trolling motor battery I used we were out on the lake messing around with the motor in use for over an hour and only used 20% of the battery life.

Not only was this rig able to easily push and steer the CatamaYak, but we were able to even TOW both of the other Kayaks without any issue! Amazing.

A couple of last little things. You’ll see in all of the photos that the wood panel in the middle is exposed untreated wood. That’s because we bought some special textured extremely waterproof paint to cover it with, but I didn’t do it before the first trip out to the lake. We’ll be painting it for long term durability soon.

Finally, if you do this, you’re technically changing your kayak into a home built motor boat. And in Texas, and probably most states, you’re going to have to register it as a watercraft. It costs like $30 in Texas to do it, but be warned that if the lake police come by you could be ticketed for taking this on the water without registration. So make sure you’re covered so you don’t worry about it.
Oh, and be prepared for a LOT of attention on the water! Because no one has ever seen anything like this before so they’ll all want to be checking it out!
So, that’s it! I hope you guys enjoy the hack / build. Let me know if you have any questions in the comments below and I’ll help as best I can. This is a project that you can build in just a couple of hours if you have the right tools, and the entire cost was around $100 including PVC, wood, bolts, paint, etc. So that’s a pretty good value!

John P. is a former CEO, former TV Show Host, and the Founder and Wizard behind Texas Metal Works . You can find him on Twitter , Facebook and LinkedIn . Feel free to send shoutouts, insults, and praise. Or Money. Money is good.
May 11, 2016 at 9:30 pm
This is awesome! I am with Robert on the straps..confused about the role of the U bolts. I thought the ratchet strap hooked back to the platform eye bolt. Please clarify. By the way John, why did you take yours apart?
May 12, 2016 at 10:32 am
I used the u-bolts on the platform so that the base of the ratchets could lay flat against the wood once everything was tightened up. This way when you’re on the water you can use one hand to ratchet it tighter if need be.
You may be able to use the same I look somewhere and put both ends of the ratchet on it. You just want to make sure that you have enough room for the straps to Route Around everything and still be accessible when you’re on the water. It could be fairly disastrous to have anything separate with your stuff on that Central platform. It would pretty much just think…
I disassembled mine because I wasn’t going to register it as a watercraft, and it takes up too much room in the garage for something I’m not using constantly. If we had a lake house I would have definitely left it hooked up. It was great! :-)
December 14, 2015 at 5:37 pm
This is something I have been wanting to do for a long time. Great instructions. One thing that isn’t clear to me is how the ratchet straps attach to the u-bolts. Could yo show a top view picture to make it easy to see? Thanks.
January 5, 2016 at 10:59 pm
Sorry Robert, I took it apart a while back so I can’t take a photo any more. But since the ratcheting straps have hooks on them, as long as you get them hooked into the eye bolt and just tighten them up, they’ll stay! :-)
April 10, 2015 at 10:53 am
Great modification! I have 2 identical Perception Sport Pescador 120 kayaks and this has definitely inspired me to build a similar setup. I also own a Hobie Adventure island and love the extra space gained from the trapoline sides between the kayak and the amas (just like your wooden platform has done). You could also add additional cargo space to the void formed between the wooden platform and the front of the two kayaks from a lightweight water repellent material. Great work, thanks for sharing!
July 14, 2014 at 9:27 am
I wanted to say thank you for posting this project. My son is handicapped and i had wanted to take him our on my kayaks and could not imagine how to make it safe for him to enjoy. This is perfect. We even got a thumbs up from the Vessel Assist Boat Crew on our Maiden Voyage. The stability is amazing even in Lake Washington with the chop and larger motorized vessels. Your measurements were spot on for our boats. High Five! Would love to share a pic. This has opened up a whole new world to a boy and his dog. Thank you!
July 23, 2014 at 11:30 pm
Yeah! I’m so happy to hear that this was helpful! :-)
August 15, 2013 at 8:33 am
That definitely seems easier than I thought.
August 14, 2013 at 2:40 pm
I was going to say if John built it a Catastrophe but it looks pretty good. Cali has large feet or John has small ones. :)
August 14, 2013 at 1:10 pm

Do It Yourself Kayak Sails, A Guide and Resources

I have to be adamant before I start explaining some of the other do-it-yourself kayaks sail instructions that creating a kayaks sail yourself can be dangerous if you accidentally puncture something within your kayak or you do not correctly weigh the kayaks sail it could either cause your kayak to flied or your kayak to tip over. Make sure that you take all of the safety considerations and be very careful when you’re creating your own kayaks sail.
If you do choose to go ahead and create one there are a bunch of different options out there on the net that have given different guides on how to create kayak sails today were going to run through one guide that we have found to be one of the best out there. You can find the whole video at the very bottom of the page or you can follow along with the write up we’ve made of the guide itself.
A summary of what you will need to do from the do it yourself kayak sail video available at the bottom of the article.
- Joining the pipes is a 1 ½ inch elbow 90

- Place the pipe shown on the tarp and cut the tarp with scissors 6 to 8 inches larger along

- lines, don’t glue the elbow role on the tarp to mass then tap on the elbow tightly

- be sure that the grommet ring faces outwards

- add lots of strong glue to the tarpon pipe and just tightly rollup the left side about wonderful wrap around the pipe set something on top to hold it down until the glue dries

- Boom is 4 ½ feet long

- all seems were glued then sewed with simple parachute core

- boom slides over eyebolt the pipe is drilled both sides for a parachute cord to secure it to the mast/ sail

- melt holes in the tarp with a hot Phillips screwdriver I use the lighter to heat it
- tie the tarp to the mast in a few key places to hold the sail in place

- the mast sail is made out of two pieces of wood with one that had a hole drilled into it for attachment you wanted to fit right over the edges of the canoe.
- I use the eye ring holders so you could tie it to the hooks and attach the two pieces of PVC together.

- The PVC pipe fits right through the hole that was drilled from the outlet.
- Some of the clips I used were a cut piece of 1 inch PVC spread and heated with a blow dryer to shape a lot of the work but they still looked nice
- the bottom cut outs need to be cut to fit the boat laid them over the rails and draw lines to Mark and Chip out the groves

- use the bolts as thumbscrews and do not pierce the pipe so you can easily put the pipe into the hole in the kayak area
- for the holder you can use a small scrap piece of 2 x 4 and outline the pipe over it so you know where to cut the hole

- if you don’t have a whole saw you can use a regular sought and cut around your lining you can then use a hammer and screwdriver to carve out the hole
- cut 1 inch of PVC baseplate pipe about seven or 8 inches long
- you can then cut the 2 x 4 in half and tap in the pipe into the whole
- the 1 ½ inch pipe will then sit on top of the baseplate over top of the 1 inch and it can freely rotate

- you can then based the plate with fiberglass and a finishing cloth matting the glass in the pipe too
Again I want to stress safety when building your kayak sail, make sure you are using your tools properly and your kayak sail works perfectly and is tested before going out too far on the water.
For the full do it yourself kayak sail guide go ahead and check it out here. Also be sure to take a look at our guide of the best kayak sails available here.
Want to buy a sail instead of doing it yourself? Check out our top pick below.
Our top choice again was the feelwind kayak sail kit.
Coming in at a perfect budget-friendly price this sail is precisely what you want if you’re looking to save money and still take up the sport.
The FeelWind sail has been around for a while, and it’s always excelled as one of the most convenient options when looking for a kayaks sail. It is by no means advanced it’s very similar to a parachute merely pulling you and doesn’t let you have too much maneuverability, but it is a perfect sail to get you started. If you’re thinking about getting started with the sport, this is the recommended model for beginners that don’t want to deal with too much installation and hassle/learning.
https://kayakingjournal.com/jwqi
How helpful was this article?
Were Sorry This Was Not Helpful!
Let us improve this post!
Please Tell Us How We Can Improve This Article.
Related Posts
- The Best Kayak Sail On Sale – What You Really Need To Know!
- Homemade Kayak Sail (DIY)
- Kayak Sail Plans
- Top 5+ Best Tandem Kayak of 2022 | Brand (BKC, Hobie, etc.)
Can You Make a Kayak Into a Sailboat?
Kayaking is a popular water activity that allows you to explore rivers, lakes, and even the open sea. But have you ever wondered if it’s possible to turn your kayak into a sailboat? Well, the answer is yes!
With a few modifications and the right equipment, you can transform your kayak into a sailing vessel. In this article, we will discuss the steps involved in converting your kayak into a sailboat and explore the benefits of this exciting endeavor.
Why Convert Your Kayak into a Sailboat?
Enhanced Speed: One of the primary reasons to convert your kayak into a sailboat is the increased speed it offers. By harnessing the power of the wind, you can effortlessly glide through the water at higher speeds than paddling alone would allow.
Improved Efficiency: Sailing uses less energy compared to kayaking, allowing you to cover longer distances with minimal effort. This makes it an ideal choice for adventurers who want to explore vast bodies of water or embark on multi-day expeditions.
The Conversion Process
To convert your kayak into a sailboat, follow these simple steps:
Step 1: Selecting the Right Kayak
Stability: Look for a kayak with good stability as it will help ensure better handling when sailing in varied wind conditions. Open Cockpit: An open cockpit design is preferable as it provides more space for sailing equipment and easier access for maneuvering.
Rudder Compatibility: Check if your kayak has provisions for attaching a rudder system. A rudder helps with steering and maintaining control while sailing.
Step 2: Installing the Sail
Sail Type: Choose a sail that is appropriate for your kayak’s size and intended use. Sails come in various shapes, sizes, and materials, so consider factors like wind conditions and your level of experience. Mast Placement: Install a mast step or mount at the center of your kayak to support the mast. Ensure it is securely fastened to prevent any wobbling or shifting during sailing.
Boom and Rigging: Attach a boom to the mast to hold the bottom edge of the sail. Use rigging lines and fittings to secure the sail and adjust its angle relative to the wind.
Step 3: Adding Stability
Air Tubes: To enhance stability, attach inflatable air tubes or outriggers to both sides of your kayak. These flotation devices will provide extra buoyancy and prevent tipping over in strong winds.
Rudder System: Install a rudder system if your kayak doesn’t already have one. A rudder helps with steering control, especially when sailing against the wind or in crosswind conditions.
Tips for Safe Sailing
- Check Weather Conditions: Before setting sail, always check weather forecasts to ensure safe sailing conditions. Avoid venturing out into strong winds or unfavorable weather.
- Practice Sailing Skills: Familiarize yourself with basic sailing techniques and maneuvers before heading out on longer trips. Practice tacking, jibing, and adjusting sail trim for optimal performance.
- Safety Equipment: Always wear a personal flotation device (PFD) when kayaking-turned-sailing and carry essential safety equipment such as a whistle, a signaling device, and a marine-grade first aid kit.
Disclaimer: It’s important to note that modifying your kayak into a sailboat may void its warranty. Additionally, it’s crucial to have adequate knowledge of sailing techniques and safety measures before attempting any kayaking-to-sailing conversions.
In conclusion, transforming your kayak into a sailboat can open up new possibilities for exciting adventures on the water. Not only does it offer enhanced speed and efficiency, but it also allows you to explore larger bodies of water with ease.
Just remember to follow the conversion process carefully, prioritize safety precautions, and enjoy the thrill of sailing in your modified kayak!
9 Related Question Answers Found
How do you turn a kayak into a sailboat, can you turn any paddle board into a kayak, can you launch a kayak from a boat ramp, how do you pick yourself into a kayak, can you put a kayak on a vw jetta, can you convert any sup into a kayak, can you paddle board in a kayak, can you make your own kayak, can you bring your own kayak to wekiva island.

Emma Gibson
- New Sailboats
- Sailboats 21-30ft
- Sailboats 31-35ft
- Sailboats 36-40ft
- Sailboats Over 40ft
- Sailboats Under 21feet
- used_sailboats
- Apps and Computer Programs
- Communications
- Fishfinders
- Handheld Electronics
- Plotters MFDS Rradar
- Wind, Speed & Depth Instruments
- Anchoring Mooring
- Running Rigging
- Sails Canvas
- Standing Rigging
- Diesel Engines
- Off Grid Energy
- Cleaning Waxing
- DIY Projects
- Repair, Tools & Materials
- Spare Parts
- Tools & Gadgets
- Cabin Comfort
- Ventilation
- Footwear Apparel
- Foul Weather Gear
- Mailport & PS Advisor
- Inside Practical Sailor Blog
- Activate My Web Access
- Reset Password
- Pay My Bill
- Customer Service

- Free Newsletter
- Give a Gift
How to Sell Your Boat

Cal 2-46: A Venerable Lapworth Design Brought Up to Date

Rhumb Lines: Show Highlights from Annapolis

Open Transom Pros and Cons

Leaping Into Lithium

The Importance of Sea State in Weather Planning

Do-it-yourself Electrical System Survey and Inspection

Install a Standalone Sounder Without Drilling

When Should We Retire Dyneema Stays and Running Rigging?

Rethinking MOB Prevention

Top-notch Wind Indicators

The Everlasting Multihull Trampoline

How Dangerous is Your Shore Power?

DIY survey of boat solar and wind turbine systems

What’s Involved in Setting Up a Lithium Battery System?

The Scraper-only Approach to Bottom Paint Removal

Can You Recoat Dyneema?

Gonytia Hot Knife Proves its Mettle

Where Winches Dare to Go

The Day Sailor’s First-Aid Kit

Choosing and Securing Seat Cushions

Cockpit Drains on Race Boats

Rhumb Lines: Livin’ the Wharf Rat Life

Re-sealing the Seams on Waterproof Fabrics

Safer Sailing: Add Leg Loops to Your Harness

Waxing and Polishing Your Boat

Reducing Engine Room Noise

Tricks and Tips to Forming Do-it-yourself Rigging Terminals

Marine Toilet Maintenance Tips

Learning to Live with Plastic Boat Bits
- Sailboat Reviews
Kayaks for Cruising Sailboats
Sit-in kayaks offer the best overall features, inflatables fit the bill on smaller boats..
Selecting the ideal tender is like picking the ideal sailboat-it depends on what you want. Within the universe of tenders are kayaks, and the diversity within this subset is just as great, with options ranging from inexpensive inflatables to pedal-drive fishing machines. Knowing we could not possibly test every kayak on the market, we focused on familiar brand names, and tested models from each maker with the hopes of answering a simple question: what kayaks best meet the specific needs of a sailor.
We tested all of the kayaks described in this review, and they represent some of the more prominent manufacturers in this field. However, there are dozens of other designs available, and many will share similar characteristics to the ones we tested. Here are some specifications to consider when shopping.
Weight. Less weight means easier hoisting, and to some extent, easier paddling. The average inflatable boat weighs around 100 pounds, and except for the pedal kayaks, all the hulls that we tested tip the scales at less than half of that. The rigged weight of the pedal kayaks ranges from about 85 to 100 pounds, including the removable drive units, which add about 15 pounds and can be loaded separately.

Length. Greater length generally means more speed and more carrying capacity, but only if you are paddling hard enough to reach hull speed. For most cruisers, speed doesn’t matter greatly, since you are usually anchored near what you plan to explore. More length also adds more wetted surface, more weight, and storage problems.
Beam. Greater beam means more stability, but also lower speed and less efficient paddling. It is often required to offset the higher center of gravity that comes as a result of a high seat location.
Keel. Long boats with a pronounced keel track straight, and short boats with a smooth bottom, meander as you paddle. But long keels turn sluggishly, a nuisance when exploring inside marinas and mangrove mazes. In the surf, steering responsiveness is vital. Inflatables use a rubber aft skegs and hybrid hard kayaks have retractable skegs. Inexperienced paddlers often prefer kayaks that just go straight, while more experienced paddlers prefer to maintain control with minor correction strokes.
Seat height. Seat height is just as important to stability as beam. A high seat may be comfortable, but may be unstable in a beam sea or steep wake. Sit-in kayaks place your bottom just 1 to 2 inches from the keel, whereas sit-on kayaks can be 8 to 12 inches above the bottom. The higher seats make sight fishing easier, but this comes at the price of stability.
Seat comfort. Test the boat wearing the life jacket you intend to wear. A high seat back can be more comfortable, but it can interfere with some lifejackets. Paddling-specific lifejackets feature thin flotation on the back, larger armholes, and a high cut for better comfort while paddling. This is an important consideration if you foresee rough water, where a conventional lifejacket (non-inflatable) is preferred. Only one kayak we tested, the Aspire, has adjustable seat back height.
Stability. The stability rating in the adjacent table is an average of two tests: initial stability, or how far the boat will heel before it flips; and what we call functional stability, how the boat reacts to a fast turn or steep wake or wave.
Hull Material. Since our focus was on economical models, all of our rigid hull kayaks were thermo-molded polyethylene, a cheap durable material, though not as light and stiff as more expensive fiber reinforced plastic (FRP) models. Among inflatables, all the models were coated polyester (PVC), although the quality of the material varied greatly.
Paddles . Since paddles are often purchased separately, we did not include them in the test rating, but our testers did have some favorites. How you use the paddle can have a great impact on performance (see adjacent article Paddle Performance).
What We Tested
After scouring the market it became clear that the field divided itself into two main types of kayaks:
Sit-In. Traditional kayaks have a sit-in design. These offer moderate weight, great stability and strength, good weather protection, and impressive seaworthiness in experienced hands. We focused on a recreational kayaks 9-10.5 feet long rather than true sea kayaks. A ten-footer is more practical for most sailors, due to reduced length, weight, and ease of boarding from an anchored sailboat (sea kayaks tend to be skinny and tippy, making boarding from a boat difficult). We tested sit-in kayaks from Perception and Wilderness Systems.
Sit-on-top. Sit-on-top kayaks are popular among novices, because of the concern that one could get trapped inside during a capsize (a fear that is largely unfounded), and because re-boarding a sit-on kayak from the water is easier. The downside of a sit-in kayak is that your bottom is often wet. If the seat is raised, you are more exposed to cold, wet, or rough weather. Sit-on kayaks are usually slightly heavier and slower to paddle that sit-in kayaks because of the wide, flat bottom required to provide adequate stability. We tested sit-on kayaks from Ocean Kayak and Hobie.
These categories were further split into three subsets:
Inflatable kayaks. We tested inflatable kayaks from Walker Bay, Sterns, Hobie, and Advanced Elements.
Pedal kayaks. Pedal-drive systems have offered a breakthrough for explorers and anglers who like to keep their hands free. We tested pedal kayaks from Hobie and Perception.
Folding kayaks . We are still working on a full evaluation of folding kayaks and will be reporting on these in the spring. We are interested in hearing from owners. Some brands include Klepper ( www.klepperamerica.com/ ),
Long Haul ( www.longhaulfoldingkayaks.com/ ), Oru-kayak ( www.orukayak.com/ ), and others.
How We Tested
All of our tests took place on the water. Our baseline was an objective evaluation of paddling behavior on the Chesapeake Bay in both calm and choppy conditions. Although we could not test all of the boats side-by-side, we did bring the Wilderness Systems Aspire along each time as a reference point. Experienced and novice paddlers participated in all of our tests.

Observations
Durability is hard to judge, because it depends on the intended use. Most hard kayaks can bounce off river rocks and docks with only cosmetic damage. Inflatables and pedal-drive boats are generally more vulnerable to abuse, but they can put up with quite a bit of banging. We took smaller and inflatable kayaks aboard for testing, while the larger pedal boats were tested from shore. Some of the inflatables were clearly more ruggedly built than others. Here are some more specific details testers noted:
Thigh braces. Much of the stability of any kayak in waves comes from your ability to control the boat with your hips and feet. With a sit-in kayak, the feet are on sturdy foot braces and the thighs bear against padded thigh braces.
Better kayaks, such as the Aspire, include perfectly fitted thigh lifters under the seat to offer excellent control. Whitewater kayaks and slender sea kayaks are fitted with foam pads around the hips to further improve control. Recreational kayaks often lack these straps, but both inflatable and rigid kayaks can be fitted with thigh brace straps. None of the sit-on kayaks we tested were fitted with thigh braces, but in those cases, we often rigged a temporary set using rope. Thigh braces can be purchased as an accessory for $25-$45. Obviously, they can’t be used when pedaling a pedal kayak.
The Walker Bay Airis Sport became powerful and responsive when fitted with simple rope braces. You should be able to vigorously rock a kayak with your hips-this ensures effective power transfer and stability in waves. Walker Bay and Ocean Kayak offers thigh straps as accessories, and there are many aftermarket vendors.
All-day comfort. Hard kayaks generally have an edge over inflatables because they tend to feature better footrests and backrests. Sit-in or sit-on kayaks are about the same in terms of comfort, but getting the right fit is like picking a shoe. Our testers rated the Aspire and the Hobie Sport as the most comfortable overall.
Efficiency. Novice paddlers have an inefficient paddle stroke, using elbows, wrists, and arms to provide the power; for them, pedal power can be far better for covering long distances. Experienced paddlers have a more efficient stroke, using core muscles instead of arms, and can maintain a stead pace for long periods without fatigue. Pedal-powered boats must be wide and heavy for stability, and this offsets some of the efficiency of leg power. It also makes them much slower when paddled
Maneuverability. If you like nosing around the back corners of marinas and deep inside marshes, paddling is more efficient.
Inflatable Kayaks
Ranging from big-box store models that are little more than heavy-duty toys, to serious high-pressure inflatables, these may be the only practical option for smaller boats. Downsides include vulnerability to puncture and UV exposure, and the time to inflate-some of the models we tested required a daily top-off pump. Another downside is quality control.
There are countless inflatable boat factories around the world, and the quality of construction varies greatly. Our testers focused only on familiar brands with certification from the National Marine Manufacturers Association (there is an equivalent ISO standard), but we still we found a wide differences in durability and warranty coverage. A key detail that marks a better boat is the inflation PSI for the floors chambers. Higher PSI means a stiffer, and generally better-built boat.

Walker Bay Airis Series
With a long history of building practical tenders, Walker Bay has used their air-web high pressure inflatable technology to create two extremely light and suitably stiff kayaks-the Sport, and the smaller Play-that are truly in a different category from lower pressure inflatables. Both models are sit-on kayaks.
The Sport is two pounds heavier and 26 inches longer than the Play. The Play is great for surf, but the Sport has more capacity, better tracking, and strikes us as the better choice for sailors. Equipped with optional (highly recommended) thigh braces, the sit-on Sport is powerful and responsive, a pleasure to paddle even in waves and chop. A deluxe backrest is available as an option.
During on-the-water testing, it felt a little unstable and tentative, but when we added thigh braces it came alive. Its lightness and rigidity allowing it to tackle rough conditions energetically. It takes only five-minutes to set up. If you do manage to capsize, reboarding from the water was easy.
Bottom line: We found the Walker Bay Sport to be fun and light. It is our Best Choice inflatable kayak.
Stearns Sea Eagle 330
The least expensive kayak in our test, the Sea Eagle is better than what you might expect for less than $250, but it lags far behind the high-pressure inflatables in our test. Our testers found the hull when inflated to the relatively low specified PSI of 1.1 pounds was too soft to paddle efficiently. Sea Eagle has two other lines of kayaks with higher-pressure hulls, the FastTrack (3.2 psi), and the RazorLite (10 psi) that look more promising, but we have not tested these yet.
The SE 330 is stable and cheap, and with a second seat installed, it is one of the least expensive ways to get two people to shore. None of the other makers had kayaks in this price range that can do this.
Bottom line: This is our cheapest option, but its one step above a beach toy compared to the others in this category. Its not much fun to paddle and construction is light, but we imagine it will sell like hotcakes after what happened in Houston.

Advanced Elements Advanced Frame Sport Kayak
Advanced Elements has nearly a dozen models of inflatable boats to choose from, and several of them have low-pressure (2 psi) hulls stiffened with metal tubes to provide rigidity. The Sport model is one of the least expensive in its lineup.
The metal reinforcements suggested that this sit-in inflatable would be a stiff boat, but the high-density drop-stitched floor was soft, and the keel was ineffective, causing the boat to wander. (Advanced Elements has other inflatable models, like the 4.5-psi Airfusion Elite, which may perform better.)
On the plus side, it was quite stable, and the owners we interviewed were very fond of their boats. Because of the metal reinforcing elements, set-up takes longer than other inflatables (at least ten minutes) and requires a flat space.
Bottom Line: Modest performance coupled with an entry-level price makes this our Budget Buy in inflatable kayaks.

Traditional SIT-IN Kayaks
The preferred choice for serious paddlers, sit-in kayaks can cover a lot of water in the right hands. Getting the right fit is more important than it is for sit-on kayaks, so be sure to give your choice a good test run.
Perception Impulse
A longtime player in the kayak market and an innovator of the plastic kayak, Perception sells dozens of models, including tandems, stand up paddleboards, and a hybrid SUP/kayak it calls the Hi-Life. The simple, sit-in Impulse is a modestly priced recreational model. It features an impressive combination of lightness and good speed for such a short boat. It is much faster than most kayaks in its class. The seat is comfortable, and there are no extra compartments to keep clean. Perception made their name with white water kayaks, and weve bashed rocks with this one through many miles of easy rapids. Its tough. Weve also used it as tender for seven years on one of our test boats.
Bottom Line: This rugged no-nonsense kayak is our Budget Buy in the category of traditional kayaks.
Wilderness Systems Aspire 105
The retractable skeg technically places this kayak in the crossover category, bridging recreational and easy whitewater capabilities. Increased rocker and a flat bottom allow fast turning, and a full bow helps it ride over waves. When the skeg is lowered, it tracks straight.
The downsides to this model are its increased weight, and slightly slower paddling, although it is still faster than the inflatable or sit-on kayaks. The seat includes advanced adjustments not typically found in recreational kayaks (seatback height and angle, and angle/height of the seat bottom), making for true all-day comfort, and allowing positions that are comfortable for both laid-back cruising and vigorous paddling in waves.
The low seating position and flat bottom make for incredible stability, making it suitable for fishing and photography. Wilderness Systems is also known for its whitewater kayaks, which have survived countless collisions with rocks and boulders.
Bottom Line: Comfort and performance make this our Best Choice for sit-in kayaks.

Sit-on kayaks are best suited for warmer waters where the paddler doesn’t mind being a little wet, or is in and out of the water a lot-sailboat to reef to beach.

Although testers found the Frenzy from Ocean Kayaks to be too uncomfortable for long cruising and not particularly fast, it is compact and capable in rough water, particularly when fitted with thigh braces. Weve enjoyed this Frenzy playing in the surf and snorkeling reefs. Solid foot rests molded into the hull offer a firm bracing
Bottom line: Best Choice in the sit-on category.

Hobie has a wide range of models, including some cool sailing models that weve reviewed in the past. Most of their models, however, are priced well above the $800 target we set for non-pedal kayaks. The Hobie Lanai is a compact entry-level boat that benefits from Hobies wide dealer support and variety of accessories.
The stackable design would be an advantage to a sailing club looking to add to their fleet, but it offers little else that sets it above the rest. It has a cargo area with a bungee tie-down and a padded seat. We liked the simple ruggedness of the boat, but its just a little heavy compared to others in the field.
Bottom line: Recommended.
Pedal drives
Kayaks are pretty simple boats, consisting of a hull, seat, and paddles. Pedal-drive kayaks have a drive mechanism that is well engineered but complex. The Perception Pilot system resembles a sail drive powered by bicycle pedals. Reverse is a matter of peddling backwards. The Hobie Mirage drive consists of two fins that flap like penguin flippers. Both systems need a rudder to steer, and the propulsion drive can be either folded up against the hull (in the Hobie) or retracted (in the Perception) for shallow-water paddling.
Because you are using your powerful leg muscles, the miles melt away. An experienced paddler can nearly keep up with a pedal boat, but it will take practice and stamina. Pedal kayaks are particularly handy for the fishermen, photographers, bird-watchers or anyone who wants their hands free underway.
Pedal kayaks are less maneuverable than conventional types. They are also less stable, but mainly because a paddle, when extended, helps with stability.
Although these are rugged drive systems, some of the small components are vulnerable, particularly in salt water. The Hobie system, for example, features a stainless drive chain that is susceptible to corrosion in saltwater. Youll want a spare for extended cruising. Several owners we interviewed described repairs to the drives. During one of our tests a small part broke off.
We tested three pedal boats, one from Perception and two from Hobie, but only the Hobie Sport was light enough to be easily hoisted aboard.
Hobie Mirage Outback
Designed for stability, this kayak is remarkably fast under pedal power-testimony to the efficiency of the Mirage drive system. The substantial beam, weight, and elevated seating position make this a comfortable boat for all-day fishing, but we had our doubts as how it would fare in waves because of the high seat. At 95 pounds, its a noticeably more bulky compared to the Sport.
Bottom line: The best of the bunch for flat-water fishing. Recommended for the serious angler.
Hobie Mirage Sport
At 70 pounds, the Mirage Sport is still heavy, but the mass is manageable under pedal power. Maneuvering is sluggish compared to a paddle kayak, and launching and retrieving requires a few extra steps. The rudder must be folded up, the drive removed, and youll still need a halyard to haul it over the side. Hobie has introduced an upgraded seat that lifts you about three inches above the floor, but the older-style seat offers more stability. This is the most paddle-friendly of the peddle-powered range, though it is maneuvers sluggishly.
Bottom line: Recommended. Light and compact, this is the most sensible pedal drive for sailors that we tested.

Perceptions Pilot drive is basically a foot-powered sail drive. Testers found the motion natural and the stability reasonable. Although the drive is more awkward to remove, testers liked that it could be easily tipped up in shallow water, and reversing by peddling backwards was easier than shifting into reverse with the Mirage drive.
Bottom Line: This is a nifty setup for the fisherman, but a little too much boat for most average sized cruisers.
Conclusions
Personal preferences play a big role in any dinghy decision, and kayaks are no exception. Each of the kayaks that our testers recommended excel at one or more basic needs of the cruising sailor: transportation, exercise, fishing, or exploring. Some of the decisions will depend on the climate you sail in. We welcome any comments from owners on their experience with specific kayaks.
The higher-grade inflatables, especially the Airis, are delightfully light, easy to store, and paddle well in all conditions-perfect for exercise, exploring, even a bit of wave riding in warm waters. The well-designed hard kayaks, however, are more responsive and offer better durability over the long haul.
Sit-in kayaks deliver superior seaworthiness and protection for the four-season paddler who wants to keep his seat dry. Sit-on kayaks offer fun in the sun and easier reboarding from the water, should you decide to take a swim or snorkel break.
Pedal drive is great for fishing and sailors with shoulder problems, as long as you can accept the added weight, maintenance, and assembly time. In the interest of compactness and simplicity, our testers generally preferred paddle kayaks over pedal for long term cruising. A paddled kayak is also more stable in rough water.
Our testers were unanimously in favor of the sit-in style of kayak. Although you may have different preferences than they do, we recommend at least trying a conventional sit-in style paddle kayak before making buying. Certainly, other kayak designs can better meet specific needs, but its hard to argue against the overall utility of a design thats been around for more than 5,000 years.

- Choosing a Paddle and an Efficient Stroke
- Advanced Elements
- Aquabound Paddles
- Ocean Kayak
- Wilderness Systems
RELATED ARTICLES MORE FROM AUTHOR
11 comments.
Another consideration: Safety. Sit-in kayaks are easy to climb back on if you roll over and find yourself in the water. Unless you are very athletic and have specific training, righting a swamped a sit-in kayak, bailing and climbing back in to it is nearly impossible.
Oops, I meant sit-on kayaks are easier to climb back on than sit-ins after a rollover. Sorry
Interesting article as I was looking for an inflatable kayak. Unfortunately, the recommended Walker Bay kayak seems to no longer be available. It wasn’t until I tried to find the kayak that I realized the article was from 2017 and not updated. Why are you sending out the article as if it is current information when it is 4 years old?
Yes, I agree. I’ve spent the last two hours looking for the deluxe seatback for my Airis Sport – not realizing this article was 4 years old. It’s very disappointing to find that Airis is no longer made but it explains why I was having so much trouble.
We have been cruising Mexico for 5 years with the Hobie I-11s peddle kayak/SUP, Did 10 miles today,5 back into 15kts and 1-2 foot slop. In and out of caves with the reverse drive,over submerged rocks 4” deep. Yes priced up there but also a good work platform, if you would like more info and pictures just email me. John [email protected]
We use a 14′ inflatable from AIRE as our tender. Great company and product. Terrific support also. Almost impossible to roll over, self bailing and good for 2 people with gear. Stores easily aboard our Jeaneau 42DS. Anyone looking for a kayak will do well checking with AIRE. Should have been considered for the article. Robert Fegan
For “foldable” kayaks be sure to check out Pakayak ( https://pakayak.com ). 14’2” sea kayak that breaks down into 6 pieces that nest like Russian dolls into a bag about 3.5’ x 2’ x 1.5’ They’ve had Covid related production issues are are behind on shipping, but they’re getting rave reviews. They are on the expensive side but not too far off comparable single piece sea kayaks of similar size. I ordered mine last April… it was supposed to be delivered yesterday but the snow has delayed FedEx. I plan to carrying mine aboard my Tartan 37.
One of the functions of a cruising tender is to haul people, gear, and supplies to and from the boat. Most of the kayaks in this review seem woefully inadequate for that task. I have an inflatable Sea Eagle 380 that has a reported load capacity of 750 pounds. It is very stable and its drop stitched high pressure floor is ridged enough to stand up in. With its removable hard skeg it tracks reasonably well. At about $1000 it’s not cheap, but it is well made and very versatile.
I suggest you do a separate review of inflatable kayaks. In my experience they are superior in almost every respect to rigid hull kayaks as tenders. More stable, easier to re-board if one should ever capsize, greater capacity, less potential for causing injury and damage when launching and retrieving, easier to repair if they are ever damaged, light weight, flexible enough to be stowed on deck in narrow or irregular spaces, can be deflated for compact stowing, and most are self bailing, which is an advantage if you decide to tow part of the time. I have a couple, including an Airis, which is no longer sold. Aire, Sea Eagle, Aquaglide, Advanced Elements, Innova/Gumotex are among many reputable, high quality brands.
I was planning to get a kayak – but first I got a set of inflatable SUPs – one for the captain and two (small and light kid models) for the crew. Haven’t looked back – really wonderful for fun and exploration and so, so portable. Only drawback: in a breeze you might have to kneel or sit to reduce windage (yes, like a kayak 😉
I recently shopped for an inflatable kayak to serve as an easily deployed tender. The Aire double is perhaps the best designed for this use, but in the end I bought a Maverick II from NRS (Northwest River Supply) for its quality construction and Hypalon material (now called Pennel Orca). In the sun and heat of the Sea of Cortez PVC boats are essentially disposable after two or three years. The Maverick works well and can carry a lot of supplies. I fitted a bow D ring for towing/tying up and added rope thigh braces. It is a whitewater boat and requires relatively skilled paddling and an efficient forward stroke, but a good choice for the right paddler. It is expensive but should last–I am still using a Hypalon Avon dinghy I purchased in 1987–hard to assemble and needs attention but the material is still good after all those years in Baja.
LEAVE A REPLY Cancel reply
Log in to leave a comment
Latest Videos

Island Packet 370: What You Should Know | Boat Review

How To Make Starlink Better On Your Boat | Interview

Catalina 380: What You Should Know | Boat Review
- Privacy Policy
- Do Not Sell My Personal Information
- Online Account Activation
- Privacy Manager
How to Make
A kayak sail: a step-by-step guide, best options and reviews.
As you probably know, having a kayak sail will make your kayaking experience easier and more enjoyable. But, you may know that kayak sails are not cheap, and they can cost you around 100+ bucks. If you don’t want to spend that much money and still want a decent sail, you have come to the right place.
Here, I am going to teach you how to make a kayak sail. This would be very helpful for you to make a sturdy sail at home.
In order to help you make your own kayak sail, I’m going to write a step-by-step guide.
How to Make a Kayak Sail: Summary
How to make a kayak sail.

A sail is a great addition to your kayak and can make it much easier to get around. Making a sail for your kayak is actually pretty simple if you have the right materials. All you need is to follow the steps given below.
Things Needed for Making a Kayak Sail:
Here are some things you will need while making a kayak sail.
- Medium Size Sewing Machine
- Sturdy Sewing Thread
- 1 * Small Plastic Fabric Sheet
- 1 * Tent Fabric
- 2 * Strong PVC Pipes
- 1 * Small PVC Pipe
- 5-10 Feet Bag Strap
- 2-4 Bungee Cords
- Strong Glue
- 4 * Strong Ropes
Step #1: Take Measurements of the Kayak
Take measurements of your kayak to determine which size of sail is best for you. Measure the length, width, and height of your kayak. If you have a rudder on your kayak, measure that as well.
The sail needs to be long enough to reach from side to side, so you’ll need to know how wide it is. You’ll also need to know its length (from front to back).
The ideal size of sail would be the length of your kayak and the width of the area where you will be installing the sail.
Step #2: Cut the Fabric according to the Size
When you have taken the measurements and decided on the size of the sail, you will need to cut down the fabric according to the required size.
The tent fabric will be installed on the upper side of the sail, so cut it according to the size. Similarly, the plastic sheet fabric will be installed on the bottom side of the sail. So, cut it accordingly.
After that, set both of the fabrics to each other and cut them again in a V shape. This will be the final fabric you will install with the pipes.
Step #3: Sew the Sides of the Fabric
Now, you will have to sew the sides of the fabric and make room for the pipes. The room for the pipe should be not too loose and not too tight. Sew it in a way that the pipes smoothly go inside and fit there.
Step #4: Install Pipes into the Fabric
After sewing the sides of the fabric, install the pipes into the fabric and apply glue on the pipes before inserting them into the fabric.
The glue will ensure the pipes wouldn’t come out easily, making the sail stronger. After installing the piper, you will have to wait for the glue to dry. For this, I recommend you to wait at least 2-3 hours and keep the sail in direct sunlight.
This will quickly dry the glue, making the kayak sturdy enough to withstand air blows.
Step #5: Join Big Pipes with a Smaller One
After successfully installing the pipes (which can be found in your local Home Depot or Lowes), you will need to joint the smaller pipe with the bigger ones, creating a triangle. For this, you will need 2 or more elbows that will help you successfully join the pipes with each other.
Step #6: Install it On the Kayak with Bungee Cords
Now the mainframe of the sail is ready. So, you will have to install it on your kayak with the help of bungee cords and bag strap fabrics.
For this, try binding the sail frame with the kayak with the help of bag strap fabric and install the bungee cords with the hooks to support the sail.
This will make the sail stand on the kayak, but it’s not ready yet.
Step #7: Make Use of Ropes
The final thing would be to strengthen the sail with the ropes. You will have to make use of the ropes to install the sail on your kayak properly. Bind the ropes on all sides of the sail and then bind them with the hooks given on the kayak.
So, this is how you can make and install a DIY Kayak Sail at home without spending much money.
Final Words
A Kayak sail may not be essential for the survival of a human being while going on the water. However, these sails help them in crossing rivers, lakes, and oceans. So, this is how you can easily make a kayak sail. You just need to gather the above-mentioned things and follow the steps; you will be able to make any size of sail within a few hours.
I hope these steps will help; please leave your comments below if you found this guide helpful. If you have any confusion in mind regarding these steps, you can also share that with me in the comments.
I will try to answer you within a few hours.
How do sails on kayaks work?
Sail is used to harness the wind and propel a vessel across the water. As waves travel from the direction of the wind, they have a tendency to push the sailboat in its wake.
The sail must be positioned at an angle in order for it to best harness the wind. This angle is created by adjusting the tension on ropes that are attached to each corner of the sail.
So, in short, sailing on a kayak works by harnessing the energy in the form of wind power, which allows this form of transportation to move quickly and easily through the water.
Can you sail a kayak?
Sure, you can sail a kayak. Whether it’s for extreme competition or simply for pleasure, these boats are easier to sail than you might think. The best thing about kayaking is that there is no real experience necessary. You can do it as long as you are willing to give it a try and not be afraid to get your hands a little wet.
How fast can a sailing kayak go?
Sailing kayaks are designed for speed and top performance. Back and forth paddling is replaced with sailing, as you cover miles of water effortlessly. A quick look at the world record will tell you that traveling at over 20kph over a long period is possible.
But, an average speed of a sailing kayak can be between 10 to 20 mph depending on various factors like the size of the kayak, water types, wind speed, etc.
Besides that, kayaks are considered one of the fastest vessels in the world. They are narrow, with a sharp prow, and typically feature two side-mounted rigid sails acting as an extension of the hull that is controlled by a single tiller that can move in either direction.
The kayak’s high maneuverability and speed make it extra useful on rivers, which account for a large part of the planet’s surface area.
Does sail make a kayak faster?
Yes, sail makes a kayak faster if it’s used in an appropriate way. As mentioned above, if you install the sail in a way that the wind pushes it harder, then it will also push the kayak, making your kayak faster on the waters.
Do homemade sails are better than market purchased?
Home-made sails have a lot of advantages over market-purchased ones. Firstly, a chain sewn sail can be custom tailored for your boat. Secondly, a chain sewn fabric will last longer than the commercial ones.
Thirdly, in case the company which produced your sails is not around anymore, or if the sail broke, you would have to buy a new one by spending more money.
That is why homemade sail is always better than market purchased.
Why are kayak sails expensive?
Kayak sails are a little pricey. But you’ll be paying for performance and quality construction. The more comfortable and durable the kayak sail is, the better it will last and cost more money.
Can you kayak in 10 mph winds with a homemade sail?
Of course, if you make a sale with the best materials, you can take your kayak in front of 10+ mph winds easily.

About the Author - Jay Schwartz:
Hey there kayak lovers! I’m Jay Schwartz , the author here at Kayak Guidance ! You know water sports – you know me! My life is all about it. Kayaking, Paddleboarding, Fishing, Snorkeling and so much more. I love to share my passion and knowledge with all of you.
More to Learn About Kayaks!

What to Look For When Buying a Used Kayak? Complete Guide

Do You Need a License to Kayak In Minnesota?

What Is Oil Canning on a Kayak? Reasons, Prevention, and Fixes

How to Ship a Kayak Across Country? Step-By-Step Guide

Are Walmart Kayaks Any Good? Walmart Kayaks Review

How Much Wind is too Much for Kayaking?

What To Do If You See An Alligator While Kayaking? Know Now!

Where to Kayak In Florida Without Alligators

Can Dogs Go On Inflatable Kayaks Without Them Breaking?
About the author:.
Hey there kayak lovers! I’m Jay Schwartz, the author here at Kayak Guidance ! You know water sports – you know me! My life is all about it. Kayaking, Paddleboarding, Fishing, Snorkeling and so much more. I love to share my passion and knowledge with all of you.
Do Kayaks Need to Be Registered in Colorado?
Welcome to KayakGuidance.com! If you’re looking to have some fun outdoor water adventures, then you have come to the right place. We help our readers find the best kayaks and water related equipment to help you have the best time of your life whenever you are engaging in water activities.
Privacy Policy
Affiliate Disclosure
© 2024 Kayak Guidance
This site is a participant in the Amazon services LLC associates program, an affiliate advertising program designed to provide a means for sites to earn advertising fees by advertising and linking to Amazon.com.
- Canoe Sailing
- Kayak Sailing
- Dinghy Sailing
- Snark Car-Topping Sailboats
- Canoe Stabilizers (Outriggers)
- Rowboat & Porta-Bote Sailing
- Parts and Accessories
- Boats (without sail rigs)
- Motor Mounts
- Portage Carts
- Small Outboards
- Specialty Boats
- Shopping Guide
- Testimonials

Add Sailing Power & Excitement To Your Canoe!
Many Options and Accessories Available O nly from SailboatsToGo!
From Cruising World magazine: Read about a family's Missouri River sailing adventure with our rig
Clamp-on sail rig converts your canoe into a sailboat in minutes. Fun & practical. Available stabilizer outriggers (pontoons on arms) to prevent tipping. Fast, portable, and comfortable. Canoe sailing is a popular sport with a long history. This modern rig makes it easy and hassle free. Rig folds to less than 4-foot-long package for easy storage. Plenty of room for passengers. No damage to canoe. How-to-sail instructions included. It sails crosswind, downwind and tacks into the wind.
Canoes make great sailboats, why?
UPGRADES AND OPTIONS: CLICK HERE TO LEARN ABOUT AND ORDER WITH YOUR KIT
Only at SailboatsToGo: Two sail sizes with 15 different sail patterns and colors . Plus exclusive Options, Upgrades, and Accessories not available anywhere else such as our larger sail upgrade available with your standard kit order which upgrades to a larger sail for greater speed!
More Info Options & Accessories FAQs Reviews Sailing Videos Portability
Featured Items
Enjoy the thrilling power of nature's own wonderful wind. Feel that power in the tug of the sail on the rope in your hand, and the throb of the steering oar in your other hand as its blade knifes through the rushing water. You make slight adjustments of steering-oar angle and the sailing canoe instantly responds like a well-trained roping horse. See your outrigger pontoon swooshing in the water like a little torpedo, sending a miniature wake out behind it. Sailing your canoe, you'll enjoy the quiet of a motorless boat -- the only sound is the bump, bump, bump of the canoe hull against the water as it slaps the waves.
Co-owners Jim Luckett and Rob Michael are passionate about extremely portable sailing. If you need assistance shopping, sailing advice, or have a boat not listed on our site, call or email us! ([email protected]; 1-978-263-7598).
Explore this website for many pages of photos, videos and written information about sailing canoes. This page has our canoe sailing product catalog at the very bottom of the page. There’s lots to explore. Enjoy!
Contact Us : Call 1-888-Joy-Sail or 1- 978-263-7598. Email: [email protected]
General Ordering Information and Return Policy
Sailing Safety Tips
*Terms: We will provide telephone technical support and accept returns for refund less round trip shipping within 30 days of delivery. Returns must be complete, unmodified, in like-new condition, with original packaging.
All parts are Warranteed for 1 year from date of purchase.
** Shipping prices quoted are for within the continental United States only. Please email [email protected] to receive a quote for shipping to your international location. Please include your shipping address, and the product(s) your are interested in purchasing.
- Personal Watercraft
- Pontoon Boat
- Canoe and Kayak Trailers
- Canoe and Kayak Kits
- Part Finder (NEW)
- Canoe & Kayak Trailer Kits
- Brake Hardware
- Bunks & Mounting
- Lighting & Wiring
- Tires & Wheels
- Tongue Jacks
- Winch Hardware
- Documentation
- Used Trailers
- VIN & Title
- Warranty Registration
- Dealer Terms
- Dealer Orders
- New Dealer Application
- Dealer Locator
- Register / Log in
Trailer Parts and Accessories
Canoe/kayak trailers, find a com-fab dealership, canoe and kayak trailer kits, a smart option for all enthusiasts.

Our newest line of products feature a variety of setup options for converting existing trailers into canoe and kayak trailers! Most personal watercraft, jon boat, and other marine trailers are compatible with our system, even if they aren't Com-Fabs! Best of all, the attachment is not permanent and allows you to switch your trailer back to its previous setup whenever you desire. If you have questions about setup or compatibility, feel free to contact us .
- Fits on 1.5", 2" or 3" square or rectangular tubing
- Kits and bracing available for 2, 3, 4 or 6 canoe or kayak setups
- Uprights in 24", 30", 40", 48", 60" or 66" available depending on model
- 2x2x11 gauge upright bracing
- Crossbeams in 48" (top mount), 60" (kayak), or 80" (canoe) available
- 2x2x14 gauge crossbeams with steel channels for added stability
*Note: Canoe/Kayak kits have been updated. They now feature dual steel rings on each side of the crossbeam with available plastic protective padding.*
This is a Trailer Conversion Kit only and DOES NOT include a trailer
Canoe/Kayak Kit Setup Instructions PDF
- 480x12 Wheels
- Bunks and Mounting
- Canoe Trailer Adapter Kit
- Canoe Trailer Kit
- Kayak Trailer Adapter Kit
- Kayak Trailer Kit
- Tires and Wheels
- Universal Canoe Trailer Kit
- Universal Kayak Trailer Kit

2 Capacity Canoe/Kayak Conversion Kit
Brand Com-Fab
is backordered. We will ship it separately in 10 to 15 days.
Universal canoe/kayak trailer conversion kit for up to 2 canoes or 2 kayaks without plastic protective covering.
One size fits all trailer kit:
- Designed to hold 2 kayak/canoes
- Adjustable crossbeam placement to fit a wide range of needs and preferences
- Fits on 1.5", 2", 3" rectangular and/or square tubing where applicable
- 2x2x11 gauge upright bracing for universal fit
- 2x2x14 gauge cross braces
This is a conversion kit only and requires a trailer to mount.
Click the following link for Assembly Instructions
https://cdn.shopify.com/s/files/1/1557/3371/files/Canoe_Kayak_Kit_Assembly_Instructions.pdf
Specifications
Kayak Setup - CFKIT-KAY(2)
- 2x 24" Uprights
- 2x 60" Crossbeams with Strap Assist and End Caps
- 2x Mounting Bracket - 2" Channel w/ 1/2" Hexagonal Holes
- 4x Zinc Bolt and Nut to Tighten Crossbeam to Mounting Bracket
- 4x Zinc U Bolts with Washer and Nut for Securing Crossbeams
- 4x Galvanized U Bolts with Washer and Nut for Securing Uprights to 1.5" & 2" Tubing
- 4x Galvanized U Bolts with Washer and nut for Securing Uprights to 3" wide Tubing
- 4x Turned Eye Bolts for use with Tie Downs
- 8x Galvanized Lock Nuts for locking in Eye Bolts
Canoe Setup - CFKIT-CAN(2)
- 2x 80" Crossbeams with Strap Assist and End Caps
- 4x Zinc U Bolts with Washer and Nut for Adjusting and Securing Crossbeams
- 4x Turned Eye Bolts for Securing Tie Downs
- 8x Galvanized Lock Nuts for Securing Eye Bolts

3 Capacity Canoe/Kayak Conversion Kit
Canoe/kayak trailer conversion kit for up to 3 kayaks or 3 canoes without plastic protective covering.
- Designed to hold 3 kayaks/canoes
- Fits on 1.5", 2", 3" rectangular and/or square tubing where applicable.
- 2x2x11 gauge upright bracing for universal fit.
This is a conversion kit only and requires a separate trailer to mount.
Kayak Setup - CFKIT-KAY(3)
- 2x 30" Uprights
- 2x 48" Crossbeams with Strap Assist and End Caps
- 4x Mounting Bracket - 2" Channel w/ 1/2" Hexagonal Holes
- 8x Zinc Bolt and Nut to Tighten Crossbeam to Mounting Bracket
- 8x Zinc U Bolts with Washer and Nut for Securing Crossbeams
- 8x Turned Eye Bolts for use with Tie Downs
- 16x Galvanized Lock Nuts for locking in Eye Bolts
Canoe Setup - CFKIT-CAN(3)

4 Capacity Canoe/Kayak Conversion Kit
Universal canoe/kayak trailer conversion kit for up to 4 kayaks or 4 canoes without plastic protective covering.
- Designed to hold 4 regular sized kayaks or canoes - Fits on 1.5", 2", 3" rectangular and/or square tubing where applicable. - 2x2x11 gauge upright bracing for universal fit. - 2x2x14 gauge cross braces with stability slides, preventing side-to-side movement. (Optional)
4 Capacity Normal Kayak Kit - CFKIT-KAY(4S)
- 4x 60" Crossbeams with Strap Assist and End Caps
4 Capacity Tall Kayak Kit - CFKIT-KAY(4T)
- 2x 40" Uprights
4 Capacity Normal Canoe Kit - CFKIT-CAN(4S)
- 2x 40" Uprights
- 4x 80" Crossbeams with Strap Assist and End Caps
4 Capacity Tall Canoe Kit - CFKIT-CAN(4T)
- 2x 48" Uprights
* The tubing size of the trailer will determine which U Bolts will be needed to secure the uprights to the frame

6 Capacity Canoe/Kayak Conversion Kit
Canoe/kayak trailer conversion kit for up to 6 canoes or 6 kayaks without plastic protective covering.
- Designed to hold 6 regular sized canoes/kayaks
- 2 x 2 x 11 gauge upright bracing for universal fit.
- 2 x 2 x 14 gauge cross braces
6 Capacity Normal Kayak Kit - CFKIT-KAY(6S)
- 2x 48" Uprights
- 6x 60" Crossbeams with Strap Assist and End Caps
- 6x Mounting Bracket - 2" Channel w/ 1/2" Hexagonal Holes
- 12x Zinc Bolt and Nut to Tighten Crossbeam to Mounting Bracket
- 12x Zinc U Bolts with Washer and Nut for Securing Crossbeams
- 12x Turned Eye Bolts for use with Tie Downs
- 24x Galvanized Lock Nuts for locking in Eye Bolts
6 Capacity Tall Kayak Kit - CFKIT-KAY(6T)
- 2x 60" Uprights
6 Capacity Normal Canoe Kit - CFKIT-CAN(6S)
- 6x 80" Crossbeams with Strap Assist and End Caps
6 Capacity Tall Canoe Kit - CFKIT-CAN(6T)
- 2x 72" Uprights

Square Tubing Plug for 2" Square Tubing (10-14GA)
$5.99 $1.25.
2x2 Square Tubing Plug for 10-14 GA
This item is used on Pontoon Winch Stands & Canoe/Kayak Crossbars and Uprights. It may also be used in other applications utilizing 2" square tubing.
This item is part of these kits:
- 2 Capacity Canoe/Kayak Kit
- 3 Capacity Canoe/Kayak Kit
- 4 Capacity Canoe/Kayak Kit
- 2 Canoe + 2 Kayak Kit
- 6 Capacity Canoe/Kayak Kit
MODEL: CFCAP-2X2(10-14GA)

Angler Kayak Trailer Bunk Mounting Kit
This kit contains all of the materials necessary to mount a bunk on one of our canoe or kayak trailers. The kit contains:
2 – 3/8”-16 x 2.06” x 2.88” Zinc U-Bolt 2 – 4" x 1" x .25" Zinc Flat Plate 2 – Galvanized Angular Swivel Bracket 4 – 3/8"-16 Serrated Zinc Flange Nut
4 – 5/16" x 1-1/2″ Galvanized Hex Head Lag Screw

AstroSlicks Plastic Padding for Canoe/Kayak Trailers and Kits
Brand Com-Fab Trailers

4.80x12 C Load Range Bias 12IN Series 07 Gun Metal V-Spoke 545 Hole Pattern Aluminum Tire/Wheel Assembly
4.80x12 Gun Metal V-Spoke 545 Hole Pattern Aluminum Tire & Wheel Load Range C; Bias
This is the tire and wheel used on the PWT1100AL model and optional for PWT-800, PWT-1000, PWT-1100, and PWT-2212 black powder coated and galvanized trailer models. Speed rating 81 mph.
Customer Service
Find your nearest dealer, part selector.
- Return Policy
- Privacy Policy
- Terms and Conditions
- Terms of Service
- Refund policy
IMAGES
COMMENTS
6004. The Any Kayak upwind Sail Rig with Stabilizers. Upwind sail rig for almost any kayak -- inflatable or rigid; also fits the Stearns inflatable canoe, or the Tote-N-Boat folding canoe. Attaches using straps. Makes your kayak into a complete sailboat, including leeboards, mast,sail, spars, rigging, and steering.
1/ Simple Canoe and Kayak Sail Rig for basic sailing. With this rig it is possible to add sailing ability to go with and against the wind. 2/ Canoe and kayak sail rigs for downwind only. There are auxiliary canoe and kayak sails for (usually) seakayaks that are used to propel the boat downwind only to save paddling effort and cover serious ...
This neat trimaran-conversion kit, first introduced in 1995, has been built in vast numbers. ... SailRig 40: A 40sq.ft sail is more than enough for fast sailing in solo kayaks and canoes. SailRig 55: The 55sq.ft sail is a good fit for most double kayaks, or for pushing single kayaks a little harder.
Call or email him! Contact Me: 1-888-Joy-Sail or 1- 978-263-7598. Email:[email protected]. Any Kayak Sail Kit with Inflatable Pontoons - Item 6001. Sailing Kayak: Sea Eagle 420X Explorer. With great upwind performance this Kayak Sailing Rig can add another dimension to the enjoyment of your kayak! Easy strap-on design with bolt-on option.
The result is an incredibly strong, lightweight, and compact sail that strikes a fine balance between full blown sail conversion and downwind runner. The Falcon sail is available in two sizes (1m 2 and 1.4m 2 ) and weighs a mere 4 lbs along with rigging and hardware.
Convert your ordinary kayak into a sailing rig for under a hundred bucks. Detailed description and plastic welding demonstration. GeoCities website at the en...
Standard size for kayak sailing are 7.5 to 15 square feet. Can be difficult to retrieve quickly on the water. Advantages: Easily rigged for hands-free operation, lightweight, compact and inexpensive, colorful and fun to fly. Parafoils catch a lot of wind and fly lower in the sky than most types of kites, giving them effective forward pulling ...
Welcome to Falcon Kayak Sails! Here at Falcon Sails, LLC our focus is making the best kayak sail kits on the market. Our product, knowledge and service will lead you to an amazing kayak sailing experience. Our kayak sail kits include everything you need and are easy to install on any kayak. You can have amazing sail performance and simplicity ...
Video and edit by Daniel Caselli - Uruguay. The drop in outrigger can transform many unstable canoes, narrow dinghies and some kayaks into a stable platform for fishing or diving or convert your boat into a formidable sailing outrigger or trimaran sailing canoe.. Turn a Canoe or Kayak into a formidable sailing boat or a super stable fishing platform.
Step one: Attach the sail mast to your kayak by threading it through a hole or on a mount on the deck of your boat. Secure it in place with straps or bolts. Step two: Install the boom (the horizontal beam that holds the bottom of your sail in place) with hooks or clamps.
Troling motor: https://www.youtube.com/watch?v=OxcHqwVZf2IFoldable kayak: https://www.youtube.com/watch?v=KH08YQet1FoItalian channel: https://www.youtube.com...
Order online or by phone: 1-978-263-7598. Sail kits & accessories for virtually any canoe, kayak, rowboat or dinghy! Affordable, Portable, Capable on Tacks and Quick to setup. Call of email for latest Sea Eagle sale prices -- we can't update our website fast enough! There are some great deals.
This kayak to sailboat conversion is well done and makes for an interesting project. But even if you're not going to be hitting the water on one of your own, the construction techniques are a…
Tracing the 17-year evolution of CLC's kayak sailing conversion will illustrate the challenges and compromises involved. The CLC SailRig Mark I. CLC SailRig Mark I on a CLC Tred Avon Double. CLC's first kayak sailing rig, from 1995, was an attempt to turn a kayak into a serious sailboat without despoiling the kayak. The carefully proportioned ...
4 - 2″ stainless steel U bolts with lock nuts and washers. 4 - 5″ stainless steel eye bolts with lock nuts and washers. 1 - 8′ 2×4 (or a couple of 8″ scraps) 2 - 8″ 5/8×16 bolts with lock nuts and washers. 4 - Ratcheting straps. I also needed a rubber mallet, wrenches, a drill, a set of drill bits, and a table saw.
A summary of what you will need to do from the do it yourself kayak sail video available at the bottom of the article. Joining the pipes is a 1 ½ inch elbow 90. Place the pipe shown on the tarp and cut the tarp with scissors 6 to 8 inches larger along. lines, don't glue the elbow role on the tarp to mass then tap on the elbow tightly.
The Conversion Process. To convert your kayak into a sailboat, follow these simple steps: ... In conclusion, transforming your kayak into a sailboat can open up new possibilities for exciting adventures on the water. Not only does it offer enhanced speed and efficiency, but it also allows you to explore larger bodies of water with ease. ...
Best Overall: Hobie Mirage Sail Kit. Sail Dimensions: 20.25 sq. ft | Weight: 12 lbs 8 oz. Taking home the top spot as the best kayak sail in its class, the Hobie Mirage Sail Kit is the model of choice for enthusiastic kayak sailors. Unlike most other kayak sails on the market, the rugged Dacron-based Hobie Mirage is designed to provide you with ...
Item 2021 rig on Sea Eagle 420X kayak. 799.00 Shipping** 40.00: Add to Cart: Check Out: 2023: SVX500 adaptor Substitute parts to make item 2021 sail kit suitable for SVX500 (17-foot kayak). Order this item only in combination with item 2021, in order to make item 2021 suitable for sailing the SVX500 kayak. (Email us for more info if you want this piece by itself.)
We focused on a recreational kayaks 9-10.5 feet long rather than true sea kayaks. A ten-footer is more practical for most sailors, due to reduced length, weight, and ease of boarding from an anchored sailboat (sea kayaks tend to be skinny and tippy, making boarding from a boat difficult).
Step #1: Take Measurements of the Kayak. Take measurements of your kayak to determine which size of sail is best for you. Measure the length, width, and height of your kayak. If you have a rudder on your kayak, measure that as well. The sail needs to be long enough to reach from side to side, so you'll need to know how wide it is.
conversion kit for canoe rig to kayak Convert our canoe sail kit to kayak sailing -- includes side rails with extensions, leeboard mounts on the side rails, foam blocks, straps and extensions. ... Kayak sail kit options, upgrades and accessories page: Click Here. 149.00 Shipping** 15.00: Add to Cart: Check Out: 9002:
4 Capacity Canoe/Kayak Conversion Kit. Universal canoe/kayak trailer conversion kit for up to 4 kayaks or 4 canoes without plastic protective covering. One size fits all trailer kit: - Designed to hold 4 regular sized kayaks or canoes - Fits on 1.5", 2", 3" rectangular and/or square tubing where applicable.