- Forums New posts Unanswered threads Register Top Posts Email
- What's new New posts New Posts (legacy) Latest activity New media
- Media New media New comments
- Boat Info Downloads Weekly Quiz Topic FAQ 10000boatnames.com
- Classifieds Sell Your Boat Used Gear for Sale
- Parts General Marine Parts Hunter Beneteau Catalina MacGregor Oday
- Help Terms of Use Monday Mail Subscribe Monday Mail Unsubscribe

Please explain self bailing for me
- Thread starter scottstef
- Start date Oct 11, 2020
- Oday Owner Forums
- Day Sailers
I recently picked up a 1971 O’Day javelin. Can someone please explain how the self bailing works and what plugs I need? In the cockpit is a drain that drains straight through the bottom of the hull. When the boat is in the water without a plug in the cockpit it fills the cockpit with eater. There is also a drain in the transom that will fill the bulge with water if it is not plugged. my question is if both of these holes should be plugged or to keep water out? How does the self bailing work if they are plugged? I wouldappreciate any guidance because I am wondering how I can leave the boat in a slip without it sinking. Attached are picks of the drains. Thanks in advance.
Attachments

Self bailers usually have some sort of rubber one way valve involved, either an internal flapper or external duck bill. They prevent water entering when the boat is stopped and allow it to drain when moving. Sea-Dog Line Thru-Hull w/Scupper TH Marine Supplies Duckbill Scupper

You need a few removable plugs like for a sink at home. You'll have to learn to live with the fear when it rains that you'll find your boat swamped. I had bailers in my Bandit 15. They worked pretty well when the boat was moving smartly. The suction created by the water passing the hole sucks out incidental water from spray or whatever. Mine had a closure mechanism which only worked so -so. I dragged that boat up on a beach to empty the water more times than I'd like to think about. Finally after Hurricane Bob stove the hull in on the trailer, I glassed over the holes and never looked back. There are all kinds of plastic bottles that can be formed into bailers.

Automatic Bailers | West Marine

That drain in the bottom should have a little floaty ball in it that would stop water from entering at rest but open when underway to let water drain out of the boat.. It is not as "floaty as a hollow ball but an elastomer ball that is just a bit positively buoyant.. I have no idea who made those or if the ball is available.. EDIT: These are kinda "iffy" and always should be plugged if the boat is going to be in the water for a while unattended.
So can I simply cut a hole in the cockpit deck large enough to put an 8” cover plate on it and a put a bilge pump in it? If I do that I can put a drain hole in the cockpit deck and then just drain all water into bilge and have it pump itself out when it gets full.

scottstef said: So can I simply cut a hole in the cockpit deck large enough to put an 8” cover plate on it and a put a bilge pump in it? If I do that I can put a drain hole in the cockpit deck and then just drain all water into bilge and have it pump itself out when it gets full. Click to expand

scottstef said: I recently picked up a 1971 O’Day javelin. Can someone please explain how the self bailing works and what plugs I need? In the cockpit is a drain that drains straight through the bottom of the hull. When the boat is in the water without a plug in the cockpit it fills the cockpit with eater. There is also a drain in the transom that will fill the bulge with water if it is not plugged. my question is if both of these holes should be plugged or to keep water out? How does the self bailing work if they are plugged? I wouldappreciate any guidance because I am wondering how I can leave the boat in a slip without it sinking. Attached are picks of the drains. Thanks in advance. Click to expand
- ds1man-oday.pdf 530.5 KB Views: 310

Sunbird22358
That Self-Bailer is the older "DePersia" Brand unit, also used on that vintage DS II. Newer boats have a plastic version that is basically the same as the one used on the SUNFISH. The drainplug in the transom is used to drain any bilgewater after boat is hauled out and MUST be plugged while boat is in the water. Replacement drainplugs with the flange can be purchased at most good marine stores or maybe better yet, at D&R Marine www.drmarine.com D&R is owned and run by Rudy Nickerson who was the Parts Dept. Manager for O'DAY from 1973-89. He now sells replacement part for our boats. The DePersia bailer originally had a screw-in plug to seal it when you don't want water to come in, but those were often lost on older boats. Based on my DS II, you can leave the plug out of that and only about a gallon or so water will come in at rest with no one aboard, and any rain water will easily drain out. While sailing, the bailer will suck water out due to suction formed by the water flowing past the scoop under the boat. I have the newer plastic bailer fitting and leave it open while moored and insert a rubber stopper into the top hole while sailing to stop water from coming in. There should be 2 plastic inspection ports in the cockpit sole (floor) located near the forward end of the cockpit, those can be used to access the CB pivot bolt, but also to bail out any bilge water that may collect while boat is in water. You can use a sponge to bail or insert a typical tube-type bilge pump (they look kind of like an old-fashioned bicycle tire air pump). I happen to have a good diagram of how that bailer is supposed to work and have attached it. I wil lalso attach a picture of the newer plastic one, D&R sells those, but not cheap! (around $50).

Have you ever seen or know where I can get a replacement drain plug like what’s in the pic? I rebuilt my self bailer with a custom cut washer and a replacement ball and seal for a sunfish and it works. Just want to get the boat to 100% for some reason.

- This site uses cookies to help personalise content, tailor your experience and to keep you logged in if you register. By continuing to use this site, you are consenting to our use of cookies. Accept Learn more…
Log in or Sign up
You are using an out of date browser. It may not display this or other websites correctly. You should upgrade or use an alternative browser .
Inexpensive, DIY auto-bailer solutions for small sailing dinghies
Discussion in ' Boat Design ' started by laukejas , Aug 9, 2019 .
laukejas Senior Member
Hi, A few days ago I was discussing with a good sailor friend of mine, about the possible solutions for constructing an auto-bailer for small home-made dinghies with traditional cockpits (no sandwitch floor or open transom). As we see it, there are two ways of getting that water out (be it from spray, capsize, rain, etc.) 1. Floor-mounted auto-bailer; 2. Flaps in the transom. Now, for the first option, there are commercially available auto-bailers that utilize the negative pressure under the hull when the boat is underway, like Elvstrom: ... which are ridiculously expensive. And then there are small bailers like the one used in Laser class: ...which have a small opening and are only suitable for very small cockpit volumes. So, me and my friend are considering, is it at all possible to make an effective, watertight, and sturdy enough bailer like the Elvstrom, in typical garage workshop conditions? Could such a thing be made without specialized sheet bending machinery? Or could it be made from some other materials instead, maybe even 3D-printed? Have any of you ever built such a thing? The second option, flaps on the transom, would be much easier to build, as it is a simple door that can be kept shut with a piece of string or some simple lock, opening only one way. Just a piece of plywood on hinges and some rubber to make it watertight. Problem is, since a typical sailing dinghy has considerable rocker, the transom flaps would stop being effective at some point, because the water would accumulate at the lowest point in the hull (midships), rather than reaching the transom. My friend argues that the remainder of the water in the cockpit could be get rid off by trimming the boat (shifting crew weight aft), so that the hull bottom would be tilted downwards towards the transom, and the water would flow there and reach the flaps. That sounds reasonable to me, with one caveat. When the boat is underway, especially at higher speeds, waterflow separates from the transom (semi-planning), and as such, the suction cannot occur. The water would have to slowly flow out on it's own, with the boat being at a very awkward trim angle. Not good during racing. Also, the hull, especially the rocker curve, must be designed in a way that would make it possible to get the water all the way to the transom flaps by trimming it the boat, which might be a limiting factor in the over design. These are the two options we have discussed. Do you know of any other auto-bailer solutions? Or have you ever seen or built a DIY version of an Elvstrom bailer?
jehardiman Senior Member
Any class rules or hull projection restrictions? Yes, there are simple fixed educator designs, but most require a bung. BTW, Elvstrom bailers are dangerous, and I've got the scars to prove it!
jehardiman said: ↑ Any class rules or hull projection restrictions? Yes, there are simple fixed educator designs, but most require a bung. BTW, Elvstrom bailers are dangerous, and I've got the scars to prove it! Click to expand...
Blueknarr Senior Member
A drink I had awhile back had home made bailers. It was a small diameter tube bent to be parallel to hull. A simple cork was stuffed into it to prevent refilling. Mostly worked well. Sometimes the cork was accidentally dislodged.
Blueknarr said: ↑ A drink I had awhile back had home made bailers. It was a small diameter tube bent to be parallel to hull. A simple cork was stuffed into it to prevent refilling. Mostly worked well. Sometimes the cork was accidentally dislodged. Click to expand...
No. It was flush on the inside. Bent to point aft on the exterior. Probably created turbulence.
Blueknarr said: ↑ No. It was flush on the inside. Bent to point aft on the exterior. Probably created turbulence. Click to expand...
Squidly-Diddly Senior Member
I'd like something cheap, lightweight and simple that doesn't require or involve any new holes in the hull, mostly to suck water out of the seat of my SOT kayak. I'm imagining some sort of flexible pump that works either by stomping (rocking) with foot or even with buttocks (when seated in kayak). Pumping action would send water over the side by means of flexible tube. Ideally, it might have TWO pickup tubes that would work if EITHER one was in water, the 'dry' one not hurting the pumping too much, so once "rigged" could be counted on to suck the last little bits of water regardless of which tack you were on, or if water was collecting in more than one spot. It would be about like a Whoopie-Cushion. https://www.amazon.com/2CHILL-Whoop...56&hvtargid=aud-801381245258:pla-798330328255 Foot operation might be improved by sandwiching the thing between the floor and a small flat object. Whoopie says "self inflating". Beef up that feature and it would automatically suck and fill with water, then you apply force and pressure to pump, repeat. The most important feature would be that it wouldn't be a "feature" of the boat, just another thingy you could use on any boat. Of course, that wouldn't be a true SELF baler, but I wouldn't mind exploring the "over the gunnel tube" concept as a true self baler that used sucking generated by a trailed tube with suction-maximizing terminus. I figure most of the need for baler would also be when the boat is moving fairly fast. Not sure how all this would function but it does remind me of another question: The guy that invented the Bag-Pipes...what was he REALLY trying to make???
messabout Senior Member
The Sunfish bailer is dead simple and it works well enough. It consists of a small clam shell like protrusion with the open part aimed aft. A plug in the inside of the boat seals it when not in use. Sure it makes some turbulence but I suspect that it does not create a measurable amount of drag. By the time the fluid flow gets to the point of extraction the flow is already turbulent except at very slow boat speed. My preference is transom flaps. I never had any trouble with them on my Windmill, Thistle, and several odd ball sail boats. I used plexi glass or similar transparent flaps. I could easily see what was happening at the transom which might be useful for fore/aft trim adjustments.
Squidly-Diddly said: ↑ I'd like something cheap, lightweight and simple that doesn't require or involve any new holes in the hull, mostly to suck water out of the seat of my SOT kayak. I'm imagining some sort of flexible pump that works either by stomping (rocking) with foot or even with buttocks (when seated in kayak). Pumping action would send water over the side by means of flexible tube. Ideally, it might have TWO pickup tubes that would work if EITHER one was in water, the 'dry' one not hurting the pumping too much, so once "rigged" could be counted on to suck the last little bits of water regardless of which tack you were on, or if water was collecting in more than one spot. It would be about like a Whoopie-Cushion. https://www.amazon.com/2CHILL-Whoop...56&hvtargid=aud-801381245258:pla-798330328255 Foot operation might be improved by sandwiching the thing between the floor and a small flat object. Whoopie says "self inflating". Beef up that feature and it would automatically suck and fill with water, then you apply force and pressure to pump, repeat. The most important feature would be that it wouldn't be a "feature" of the boat, just another thingy you could use on any boat. Of course, that wouldn't be a true SELF baler, but I wouldn't mind exploring the "over the gunnel tube" concept as a true self baler that used sucking generated by a trailed tube with suction-maximizing terminus. I figure most of the need for baler would also be when the boat is moving fairly fast. Not sure how all this would function but it does remind me of another question: The guy that invented the Bag-Pipes...what was he REALLY trying to make??? Click to expand...
portacruise Senior Member
Battery powered pump with a water pressure sensing switch and the intake at the lowest shaped spot, where the water will accumulate.
BlueBell . . . _ _ _ . . . _ _ _
I agree with Porta, a small bilge pump, a small lithium battery. Solar or not. Just take it home and charge it. Perhaps less drag in the long run...
Electric solutions are surely possible, but I wanted to investigate the mechanical ones more in this thread Something like Elvstrom, only homemade, would be ideal, if it's possible to build without leaking and without any permanently protruding parts on the outside of the hull.
- Advertisement:
laukejas said: ↑ I had that kind of idea. I had an air pump that looks very much like the one in your link. Unfortunately, when I tried it on water, it just didn't work. Well, it kind of did - but it would fill extremely slowly, because the water is much more viscous. I suppose a water pump of this kind would have to be designed somewhat differently, but I've never been able to source one. Click to expand...
Inexpensive hull construction materials
24' Cuddy + (Re)Design = A DIY Sports Coupe?!
Cheapest DIY Bugout Sailboat
DIY sails, rigging, daggerboards for kayak - reasonable expectation for sailing to weather?
14' Aluminum boat 1953 Commander we think. DIY Strip down & repair
DIY Dinghy with Laser 4.7 sails
"Current Situation" DIY Efficient Solar/Electric Powered Newport 17 Project
Simplest Pocket-size DIY Boat Ever
DIY power barge
Hull shape/DIY plans recomendations for planning 16' 40Hp boat?
- No, create an account now.
- Yes, my password is:
- Forgot your password?

× You are using an outdated browser. Please upgrade your browser to improve your experience.

Shopping Cart
Your cart is currently empty..
Sunfish Bailer Complete
Product Details
Laser Performance Part #91026
This complete Sunfish auto bailer assembly is a plug and play replacement for your old leaky bailer.
- Threaded Top Cap
- Bailer Housing
- Bailer Ball w/ Seal
- Bailer Plug
Note : Some Sunfish racers prefer to leave out the O-Ring and instead use silicone between the hull and bailer assembly. This gives you a tighter fit to the hull for a more streamlined bailer installation.
The staff of the Dinghy Shop diligently works with its suppliers and product manufacturers to ensure correct and updated pricing, information and availability of the products offered for sale. Occasionally, errors may be made -- we regret, but are not liable for these errors. Additionally, prices and specifications are subject to change.
Copyright © 2024 Dinghy Shop. | Ecommerce Shopping Cart Software by Miva, Inc.

- Forum Listing
- Marketplace
- Advanced Search
- All Topics Sailing
- General Sailing Discussions
- SailNet is a forum community dedicated to Sailing enthusiasts. Come join the discussion about sailing, modifications, classifieds, troubleshooting, repairs, reviews, maintenance, and more!
Sun Fish auto bailer
- Add to quote
I have a minifish which apparently uses the same auto bailer as the sunfish; it is leaking a cup or two of water per outing; I have it unthreaded and have been told to use silcone sealant; I am assuming around the gaskets? not the threads? any ideas; if this doesn't work out I can get a new part for about $60, thanks

You could use a silicone caulk for this. I wouldn't. Silicone can be messy to work with and if you have to take the self bailing scupper out again you will have to fight the silicone to do so. I'd recommend Butyl tape for this application. Easy to use, easy to clean up. In fact I'd use Butyl tape for all through deck penetrations on a Sunfish/Minifish hull. You can find it at most RV stores or Need Butyl Tape ?? Photo Gallery by Compass Marine at pbase.com

is this the one you have? only two cups of water in a sailfish after a day of sailing . you are just not trying hard enough. Laser Performance Sunfish Bailer, sunfish,housing w/ball http://coliesail.com/sunfish-bailer-balls.html

I think he means inside the hull, not the cockpit The problem with the Minifish, it is the lowest part of the hull (aside from the CB) so anytime you run it up on a beach or lay it on the lawn, it takes a lot of abuse

My dinghy takes in so much water I have to keep an eye on my waterline so that it does not sink. Mostly through cracks in the centerboard box and hull to deck joint (I often bury it in the water).
the OP asked about the auto bailer. mine had a auto bailer in the cockpit and a drain plug for the hull. if it is the hull drain then put some grease on the gasket to help it seal.
I was trying to say that it sounds like his autodrainer is leaking where it meets the hull and letting water inside the hull, not into the cockpit. It will need to be removed and rebedded
Do you have any photos of the existing sealant? If it was already silicone, it will be hard to get anything else to stick nicely, and probably not worth the effort to change. In that case I'd use Lifecaulk(a blend of silicone and polyurethane and rated for below waterline usage). If it wasn't bedded with silicone before, I'd use 4000uv. I would use a thin layer of the sealant on both sides of the gasket(if it doesn't come with any guidelines saying no, since some gaskets don't work well with sealant), and also portion of the threaded portion that would be penetrating the hull.
Was it something like 1973 when the Sunfish went to the smaller bailer size?
- ?
- 173.8K members
Top Contributors this Month


Your shopping cart is empty!
Sunfish, Auto Bailer (13/16 Inch), 91026
, 91026")
- Description
- Reviews (0)
The bailer is mounted in the bottom of the cockpit and automatically drains excess water out of the cockpit. It is easily opened and closed with the rubber cap.
- This bailer fits newer style boats (1973-present) with a 13/16'' thread length
- The 13/16'' is the length of the cap
- Old # 79260
Write a review
- Brand: SERO Innovation
- Product Code: SUN-91026
0 reviews / Write a review
Related Products

The Sunfish Bible
By Will White, Derrick Fries and Larry Lewis.Three books in one: The Sunfish Book, Successful S..

Beginner’s Guide: Learn How to Sail a Sunfish Sailboat Effortlessly
Alex Morgan
The Sunfish sailboat is a popular choice for recreational sailing enthusiasts. Its simplicity and maneuverability make it an ideal vessel for beginners and experienced sailors alike. Before setting sail, it is important to familiarize yourself with the various parts of the Sunfish sailboat. These include the hull, mast, boom, daggerboard, rudder, and sail. Understanding how these components interact and function will greatly enhance your sailing experience.
Once you are comfortable with the basics, it is time to prepare for your sailing adventure. This involves checking the weather conditions, ensuring you have the necessary safety equipment, and properly rigging the sailboat. Launching the sailboat into the water is the next step, and once afloat, you are ready to start navigating the waters.
To effectively sail a Sunfish, it is essential to learn and practice basic sailing techniques. This includes steering the boat, tacking (changing direction by turning the bow through the wind), jibing (changing direction with the wind behind), and adjusting the sail trim to optimize speed and control.
For those looking to enhance their sailing skills, advanced techniques such as hiking (leaning out to counterbalance the wind force), capsize and recovery procedures, and more can be explored.
Ensuring a safe and enjoyable sailing experience requires being mindful of safety precautions, such as wearing a life jacket, staying aware of your surroundings, and maintaining proper boat maintenance. Following these tips will help you make the most out of your Sunfish sailboat adventures.
Key takeaway:
- Sailing a Sunfish sailboat maximizes enjoyment: Sunfish sailboats are designed for a thrilling sailing experience, allowing sailors to have fun on the water.
- Being prepared is crucial for safe sailing: Checking the weather, having proper safety equipment, and correctly rigging and launching the sailboat are essential steps to ensure a safe sailing experience.
- Mastering basic and advanced sailing techniques improves performance: Learning how to steer, tack, jibe, and adjust sail trim will enhance control and maneuverability. Advanced techniques like hiking and capsize recovery will further enhance sailing skills.
Parts of a Sunfish Sailboat
When it comes to sailing a Sunfish sailboat , knowing the different parts is crucial. In this section, we’ll dive into the various components that make up a Sunfish sailboat. From the hull to the mast , boom , daggerboard , rudder , and sail , we’ll explore each sub-section and uncover the importance of these elements in maneuvering and harnessing the wind’s power. So, gear up and get ready to gain a comprehensive understanding of the essential parts that allow you to navigate the waters with grace and skill.
The hull of a Sunfish sailboat is essential for stability and buoyancy. It is made of lightweight fiberglass, allowing the boat to glide smoothly through the water. The sleek shape of the hull reduces drag and increases speed.
The hull includes the deck , cockpit , and hull bottom . The deck is the upper part of the hull for sitting or standing. The cockpit is sunken where the sailor controls the boat. The hull bottom is the curved section that contacts the water.
The hull is carefully designed for optimal performance. It is responsive and maneuverable, allowing sailors to navigate different sailing conditions easily. The hull of a Sunfish sailboat is self-bailing, efficiently draining any water that enters the cockpit .
Fun fact: The Sunfish sailboat is a popular recreational sailboat worldwide since its design in 1952. Its simple design and ease of use make it a favorite among sailors of all ages and skill levels.
The mast is an essential component of a Sunfish sailboat. It acts as the support for the sail, and it is crucial to understand some facts about the mast.
It is constructed using either aluminum or fiberglass , providing it with the necessary strength and durability. To ensure stability and proper positioning, the mast is securely attached to the sailboat’s hull using a mast step. Standing tall at around 17 feet, the mast extends vertically from the deck. One notable feature of the mast is the boom , which is affixed to hold the sail’s lower edge, allowing for better control. During sailing, the mast plays a vital role in capturing the wind and propelling the boat forward. Therefore, it is important to regularly inspect and maintain the mast to keep it in excellent condition. A key aspect of this maintenance is proper rigging, which ensures a secure attachment and alignment.
In a sailing race, a Sunfish sailboat encountered strong winds that resulted in the mast breaking in half. The sailor swiftly responded by releasing the sail and retrieving the broken pieces from the water. With the assistance of fellow sailors, a replacement mast was quickly obtained, enabling the sailor to regain strength and finish the race. This incident underlines the significance of a sturdy mast and showcases the resilience of sailors when faced with unforeseen circumstances.
The boom is an integral part of a Sunfish sailboat. It is a horizontal pole that extends from the mast and holds the lower edge of the sail. The boom effectively controls the shape of the sail and the speed of the boat.
One crucial function of the boom is to attach the mainsheet , which is utilized to command the sail. By adjusting the tension of the mainsheet, the sailor has the ability to regulate the angle and position of the boom , thereby governing the power and direction of the sail.
The boom is conveniently adjustable, enabling the sailor to modify the shape of the sail based on the wind conditions. By raising or lowering the boom , the sail can be tightened or loosened, optimizing its performance.
It is important to handle the boom with caution in order to prevent accidents. Always remain aware of the position of the boom while sailing and avoid getting hit. Properly securing the boom when the sailboat is not in use is crucial to prevent swinging and potential damage.
Daggerboard
The daggerboard, a fin-like structure located in the center of the hull, plays a crucial role in controlling the direction and stability of a Sunfish sailboat. Its primary function is to provide lateral resistance that counteracts the force of the wind on the sail, preventing drifting and maintaining the boat’s course.
Typically made of durable and lightweight materials such as fiberglass or wood , the daggerboard ensures strength while remaining easy to handle. It can also be adjusted in height, depending on the sailing conditions. Lowering it maximizes resistance in lighter winds, while partially raising it reduces resistance in heavier winds and increases speed.
To position the daggerboard, it is inserted into a slot in the center of the hull and extends beneath the boat into the water. A rope or line attached to a handle at the top allows for easy adjustment of its position. Regularly inspecting the daggerboard for damage or wear is essential, as it directly affects the boat’s performance. Always secure the daggerboard before sailing to prevent accidents or loss of control.
Proper understanding and effective use of the daggerboard will greatly enhance your sailing experience, allowing for smooth navigation in various weather conditions.
The rudder is a vital component of a Sunfish sailboat , situated at the stern. It is a vertical flat plate connected to the hull with a pivot point. The sailor manages the rudder with a tiller , a lengthy handle used to alter the boat’s direction.
The rudder provides stability and balance, counteracting the force of the wind on the sails. It assists in maintaining the boat’s course and prevents veering off track. When sailing straight, the rudder should be aligned with the boat’s keel .
Throughout maneuvers, the sailor adjusts the rudder to steer in the desired direction. Regular inspections are necessary to ensure proper functioning. Adequate control and coordination of the rudder are essential for safe and effective navigation.
Understanding rudder operation and practicing proper rudder control are critical for Sunfish sailboat sailors.
The sail is crucial for a Sunfish sailboat. It harnesses the wind’s power to propel the boat. The sail is made of durable and lightweight fabric, designed to withstand the forces of the wind. It attaches to the mast and boom, which provide structure and stability.
To control the sail, sailors use ropes known as the halyard, mainsheet, and boomvang. By adjusting these ropes, sailors can control the sail’s angle and tension, maximizing speed and maneuverability.
Proper sail trim is essential for efficient sailing. A smoothly shaped sail, without wrinkles or creases, captures the maximum amount of wind for power and speed.
Sailors should regularly inspect their sail for wear or damage. Tears or holes can significantly impact performance and should be promptly repaired. Storing the sail in a dry and protected area when not in use will prolong its lifespan.
Sail history: Sails have been used for propulsion for thousands of years, dating back to ancient civilizations like the Egyptians and Phoenicians. Sail designs have evolved with advancements in materials and technology. Today, sailboats come in various sizes and types, each with a unique sail configuration. From the Sunfish sailboat to larger racing yachts, the sail remains integral, allowing humans to harness the wind’s power and embark on incredible voyages across the seas.
Preparing for Sailing
Before embarking on a thrilling adventure of sailing a Sunfish Sailboat, it is crucial to properly prepare. In this section, we will dive into the essential steps of preparing for a successful sail. From checking the weather conditions to ensuring the presence of necessary safety equipment, we will cover all the pre-sailing essentials. We’ll explore the process of rigging the sailboat and launching it into the open waters. Get ready to set sail with confidence and enjoy a seamless experience on your Sunfish Sailboat !
Checking the Weather
Before sailing on a Sunfish sailboat, it is crucial to check the weather. This ensures a safe and enjoyable experience. Instead of using modal verbs, make factual assertions when checking the weather.
Start by reviewing the local weather forecast, including wind speed and direction, and potential storms or adverse conditions. Look for numerical details like the percentage chance of rain or wind speed in knots.
Also, observe the current weather conditions on the sailing day. Pay attention to the sky, clouds, and wind patterns. Clear sky and steady breeze are generally ideal, while dark clouds or strong gusts may indicate unfavorable conditions.
Understanding the weather will help you make an informed decision on whether it is safe to go sailing. If there are signs of thunderstorms, high winds, or dangerous weather conditions, it is best to postpone the sail.
True story: I once neglected to check the weather before sailing on my Sunfish sailboat. The sky unexpectedly turned dark, and the wind rapidly picked up. Within minutes, a thunderstorm approached, and I found myself in a precarious situation. The wind became too strong, and I struggled to control the boat. Thankfully, I managed to reach the shore safely, but it was a valuable lesson on the importance of checking the weather before sailing. Now, I always check the forecast and evaluate current conditions to ensure a safe and enjoyable experience.
Safety Equipment
Safety equipment is essential for sailing a Sunfish sailboat to protect the crew. To ensure a safe sailing experience, it is crucial to have the following safety equipment on board:
Life jackets: Each person on board needs a properly fitted and Coast Guard-approved life jacket. These life jackets keep individuals afloat and buoyant in the water.
Personal flotation devices (PFDs): In addition to life jackets, it is recommended to have readily available PFDs. These PFDs provide additional flotation and can serve as a backup in emergencies.
Whistle or air horn: A whistle or air horn is a valuable signaling device for emergencies or when assistance is required.
Throwable flotation device: It is important to have a throwable flotation device, such as a cushion or ring buoy, for assistance if someone falls overboard.
First aid kit: Accidents can occur on the water, so it is essential to keep a well-stocked and easily accessible first aid kit. This kit should include bandages, disinfectant, antiseptic cream, and necessary medication.
Bailer or bilge pump: Utilize a bailer or bilge pump to remove excess water from the boat and maintain buoyancy.
Anchor and line: In emergencies or to prevent drifting, have an anchor and line to secure the sailboat.
Navigation lights: If sailing at night or in low-light conditions, it is necessary to use navigation lights for visibility and to comply with marine regulations.
Emergency distress signals: Carry a distress signal kit with flares or other approved signaling devices to attract attention in a distress situation.
Always remember, having the proper safety equipment and knowing how to use it can significantly impact the safety of your sailing experience.
Rigging the Sailboat
Rigging the Sunfish sailboat involves the following steps:
– Attach the mast to the mast step on the boat’s deck.
– Connect the boom to the mast and secure it with a boom vang.
– Slide the daggerboard into the daggerboard trunk and secure it.
– Attach the rudder to the rudder gudgeons at the back of the boat.
– Raise the sail by attaching the halyard to the head of the sail and hoisting it up the mast.
– Attach the tack of the sail to the tack hook on the bow of the boat.
– Secure the clew of the sail to the boom using the mainsheet.
– Adjust the sail trim by tightening or loosening the mainsheet and the boom vang.
Before setting sail, make sure to check all fittings and ropes for proper tension and make any necessary adjustments. It is important to pay attention to the details and ensure everything is properly secured for a safe and enjoyable sailing experience. Regularly inspect and maintain your rigging equipment to prevent any issues while on the water.
Launching the Sailboat
Launching the sailboat is an important step. Here is a guide to help you successfully launch your Sunfish sailboat.
1. Prepare your sailboat by checking for all required equipment.
2. Attach the rudder to the stern of the boat securely.
3. Attach the daggerboard to the centerboard trunk fully.
4. Rig the sail by attaching the halyard to the head of the sail and hoisting it up the mast.
5. Attach the boom to the gooseneck on the mast and secure it with the boom vang.
6. Ensure all lines and fittings are properly secured and adjusted.
7. Push the sailboat into the water, ensuring the rudder and daggerboard are down.
8. Launch the sailboat by pushing off from the shore or using a launching ramp.
9. Once in the water, hop into the boat and position yourself in the cockpit.
10. Raise the daggerboard and rudder to desired positions for sailing.
11. Safely board the sailboat and prepare for sailing by positioning yourself comfortably.
Launching the sailboat can be an exciting experience. I remember the first time I launched my Sunfish sailboat on a calm summer day. As soon as the boat hit the water, I could feel the gentle rocking motion beneath me. With the wind in my sails and the sun on my face, I experienced a sense of freedom and adventure. Launching the sailboat was the start of an amazing day on the water, filled with the thrill of sailing and the beauty of nature surrounding me. It was a memorable experience that ignited my passion for sailing. So, get out there, launch your sailboat, and embark on your unforgettable sailing journey!
Basic Sailing Techniques
When it comes to sailing a Sunfish sailboat, mastering the basic sailing techniques is key . In this section, we will dive into the essential skills you need to navigate the waters with confidence . From steering to tacking , jibing , and adjusting sail trim , we’ll explore each sub-section to equip you with the knowledge and expertise to handle your Sunfish sailboat like a pro . So grab your life jacket and let’s set sail into the world of basic sailing techniques!
Steering a Sunfish sailboat involves understanding the techniques and principles.
Control the steering by using the tiller connected to the rudder at the stern of the boat.
To turn left, push the tiller to the right. To turn right, push the tiller to the left.
Small adjustments to the tiller create subtle changes in direction, while larger movements lead to sharper turns.
Consider the wind direction and force , as they will affect the boat’s steering. Adjustments may be necessary in different wind conditions.
Suggestions to improve steering skills:
Practice regularly in different wind conditions to become more familiar with how the boat responds to your steering.
Experiment with different tiller angles to find the most effective control for your sailing style .
Learn from experienced sailors and apply their techniques in your own sailing.
Develop balance and body positioning to maintain stability while steering the boat.
Continuously assess and adjust your steering to maintain a straight course or navigate turns smoothly.
Tacking is a sailing technique used to change direction when sailing against the wind. It involves turning the sailboat’s bow through the wind, allowing the sail to fill on the opposite side. To execute a successful tack , follow these steps:
1. Steer the sailboat upwind with the wind coming from either side.
2. Release the main sheet to slacken the sail as you initiate the turn.
3. As the bow starts to turn, quickly move to the opposite side of the sailboat.
4. Once on the opposite side, pull in the main sheet to trim the sail to its new position.
5. Steer the sailboat through the wind, maintaining control and avoiding excessive tilting or capsizing.
6. Once the sail starts to fill on the opposite side, the tack is complete, and you can resume your desired course.
Tacking allows for efficient upwind sailing by effectively utilizing the power of the wind. It is crucial for navigating tight or narrow sailing areas. Practice and develop your tacking skills to become a proficient sailor.
is a crucial sailing technique to change direction when sailing downwind. It involves turning the boat’s stern through the wind, switching the sail to the opposite side. To jibe successfully, follow these steps:
1. Prepare for the jibe by releasing the mainsheet slightly to ease sail tension.
2. Gradually steer the boat downwind as it approaches the downwind course.
3. Once on a downwind course, quickly steer the boat further downwind while pulling in the mainsheet to bring the sail across the boat.
4. Be ready for the boom to swing across rapidly as the sail crosses over. Keep your head down and weight centered for balance.
5. Adjust the mainsheet tension to trim the sail properly for the new downwind course.
Jibing can be thrilling but demands careful execution. Maintain control of the boat and be aware of surroundings to prevent collisions or capsizing.
Fact : Jibing can be challenging in strong winds, requiring precise timing and coordination to control sail and boat smoothly. Practice and experience are key to mastering this maneuver.
Adjusting Sail Trim
- Identify the wind direction by observing flag movement or ripples on the water.
- Adjust sail trim by tightening or loosening the mainsheet. Tighten it for upwind sailing and loosen it for downwind sailing.
- Check the sail’s shape for wrinkles or flapping, and make necessary adjustments.
- Pay attention to the sail’s angle in relation to the wind ( angle of attack ) as it affects the boat’s speed and direction. Adjust trim to achieve the desired angle.
- Maintain proper balance between the boat’s hull and sail by adjusting sail trim if needed.
- Continuously reassess and fine-tune sail trim as conditions change to optimize performance.
Advanced Sailing Techniques
Mastering the art of sailing a Sunfish sailboat requires more than just basic skills. In the exciting realm of advanced sailing techniques , we will uncover the secrets behind two crucial sub-sections: hiking and capsize recovery . Get ready to discover how leveraging the power of hiking , along with the essential knowledge of capsize recovery , can catapult your Sunfish sailing prowess to new heights. So, grab your life jacket and prepare to dive into the thrilling world of advanced sailing techniques !
Hiking on a Sunfish sailboat
is a technique that allows the sailor to balance the boat and increase speed. It involves leaning out over the side of the boat to counterbalance the force of the wind in the sail. Hiking is important in strong winds and prevents the boat from tipping over.
To hike effectively, the sailor should position themselves on the windward side of the boat with their feet facing towards the centerline. By extending their body weight out over the side and holding onto the hiking strap or hiking stick, the sailor can maintain stability and control.
Hiking increases boat speed and improves the sailor’s ability to steer and maintain control. By shifting weight and adjusting body position, the sailor can react to changes in wind and wave conditions.
Note that hiking requires strength and endurance. Sailors should build up their hiking muscles through practice and conditioning. Wearing appropriate hiking gear, such as hiking boots and a hiking harness, provides added support and comfort during long sailing sessions.
Capsize and Recovery
Stay calm if your Sunfish sailboat capsizes. Hold onto the boat and wear a life jacket for safety.
During the capsize and recovery process, prioritize safety for yourself and others. Assess the situation and act accordingly.
Attempt to right the boat by pushing down on the centerboard with your weight while pulling on the daggerboard handle or the hiking strap attached to the top of the mast.
If the boat does not immediately right itself, move to the side pointing towards the sky to help it turn back upright.
If you can’t right the boat on your own, wave your arms or shout for help to attract the attention of other sailors or authorities nearby.
Once the boat is upright, ensure all equipment is secure and functioning properly before proceeding.
Practice capsize and recovery drills in controlled environments to improve skills and confidence in managing such situations. Happy sailing!
Tips for Safe and Enjoyable Sailing
When sailing, it is important to prioritize safety and enjoy the experience. Here are some key tips to keep in mind:
– Prepare by checking the weather, tides, and wind speed. It is crucial to be well-informed about these factors to ensure a safe and enjoyable sailing trip.
– Wear a well-fitting life jacket for safety. In case of any unforeseen circumstances, a life jacket can be a lifesaver.
– Familiarize yourself with the sailboat’s controls and rigging. Knowing how to operate the sailboat properly is essential for a smooth and safe sailing experience.
– Stay alert and aware of your surroundings, including other boats and changing weather conditions. Being observant is necessary to avoid any potential dangers or collisions.
– Communicate effectively with your crew using clear commands and signals. Good communication is vital for coordinating actions and ensuring everyone’s safety.
– Follow navigational rules and be respectful of other boaters and wildlife. Respecting the rules and the environment is crucial for the safety and enjoyment of everyone on the water.
– Watch out for potential hazards in the water, like rocks or shallow areas. Being vigilant and avoiding such hazards can prevent accidents or damage to the sailboat.
– Adjust your speed according to the conditions and avoid unnecessary risks. Adapting to the situation and avoiding reckless behavior is important for a safe sailing experience.
– Maintain stability and balance by distributing weight properly on the boat. Proper weight distribution is essential for the stability and maneuverability of the sailboat.
– Take breaks and stay hydrated during longer trips. It is important to rest and stay hydrated to ensure your well-being and concentration while sailing.
– Lastly, enjoy the experience while always prioritizing safety. Sailing can be a thrilling and enjoyable experience, but safety should always be the top priority.
Some Facts About How To Sail A Sunfish Sailboat:
- ✅ The Sunfish is a small, one-person single sail boat that is popular for sailing at summer camps.
- ✅ It was developed by Alcort, Inc. and first appeared around 1952.
- ✅ The Sunfish has a wide beam for stability, increased freeboard, and a foot-well for a comfortable sailing position.
- ✅ It started as a wood hull design and later progressed to fiberglass construction.
- ✅ The Sunfish is easy to learn to sail due to its simple two line rigging and crab claw sail.
Frequently Asked Questions
How do i set up a sunfish sailboat.
To set up a Sunfish sailboat, first, make sure to attach the sail to the mast using the halyard. Then, insert the mast into the mast step on the deck of the boat. Next, attach the boom to the mast and secure it with the gooseneck. Insert the center board into the trunk and attach the rudder. Your Sunfish sailboat is now ready to sail!
What is the purpose of a stopper knot on a Sunfish sailboat?
A stopper knot is used on the halyard of a Sunfish sailboat to prevent it from pulling out while on the water. This knot is tied in the tail of the halyard at the clove hitch on the gaff or top boom. The stopper knot ensures that the sail remains secure, allowing for a smoother and safer sailing experience.
Where can I learn to sail a Sunfish sailboat?
You can learn to sail a Sunfish sailboat through various methods. You can watch YouTube videos that provide step-by-step instructions on sailing techniques and rigging. Another option is to take a sailing class offered by local recreation departments, especially during the summer. US Sailing’s website is also a helpful resource to find sailing classes in your area.
What are some tips for balancing the forces on a Sunfish sailboat?
Balancing the forces on a Sunfish sailboat is crucial for maximum speed and control. To achieve this, you can adjust the sail’s center of effort by moving it in relation to the hull. Lowering the sail on the mast helps reduce heeling and allows for better control by hiking out. Adjusting the gooseneck on the boom moves the sail forward and reduces weather helm, improving control. Other controls such as the vang, outhaul, and cunningham can further tweak the sail’s center of effort and de-power the sail.
What makes a Sunfish sailboat suitable for both kids and adults?
A Sunfish sailboat is suitable for both kids and adults due to its relatively light weight and easy maneuverability. It has a wide beam, increased freeboard, and a foot-well, providing a comfortable sailing position. These features, along with the simple two-line rigging and crab claw sail, make the Sunfish easy to learn to sail. Its versatility allows children and adults of various skill levels to enjoy sailing and have fun on the water.
Where can I find vacation homes for an Ocean Isle Beach summer beach vacation?
Ocean Isle Beach offers a great selection of vacation homes, from larger homes to condos, at affordable prices and with impressive customer service. You can make bookings for 2021 Ocean Isle Beach vacations by calling 800-727-9222. The website of the provided source, https://www.williamsonrealty.com, is a resource to explore various vacation home options and accommodations.
About the author

Leave a Reply Cancel reply
Your email address will not be published. Required fields are marked *
Save my name, email, and website in this browser for the next time I comment.
Latest posts

The history of sailing – from ancient times to modern adventures
History of Sailing Sailing is a time-honored tradition that has evolved over millennia, from its humble beginnings as a means of transportation to a beloved modern-day recreational activity. The history of sailing is a fascinating journey that spans cultures and centuries, rich in innovation and adventure. In this article, we’ll explore the remarkable evolution of…

Sailing Solo: Adventures and Challenges of Single-Handed Sailing
Solo Sailing Sailing has always been a pursuit of freedom, adventure, and self-discovery. While sailing with a crew is a fantastic experience, there’s a unique allure to sailing solo – just you, the wind, and the open sea. Single-handed sailing, as it’s often called, is a journey of self-reliance, resilience, and the ultimate test of…

Sustainable Sailing: Eco-Friendly Practices on the boat
Eco Friendly Sailing Sailing is an exhilarating and timeless way to explore the beauty of the open water, but it’s important to remember that our oceans and environment need our protection. Sustainable sailing, which involves eco-friendly practices and mindful decision-making, allows sailors to enjoy their adventures while minimizing their impact on the environment. In this…
Free Shipping Over $99* - 366 Day Returns - Dedicated Customer Support
- Call Us +1-503-285-5536
- Sign in & Register
- Recently Viewed
- One Design Parts
Sunfish Parts
Shop our limited selection of remaining Sunfish sailboat parts. Stock is limited.
- Qty in Cart

Sunfish Sail Afterglow

Sunfish Sail Freedom

Sunfish Mainsheet w/ Shackle

Sunfish Sail Rings

Sunfish Racing Main Halyard
")
Sunfish Bridle 3 Loop (Wire)
")
Sunfish Bridle 2 Loop (Dyneema)

Sunfish Mast Top Cap

Sunfish Boom Cap
")
Sunfish Bridle 2 Loop (Wire)

Omniflex Tiller Joint Universal w/ Rope Core

Sunfish Upper Boom

Tiller Saddle
")
Drain Plug (Allen)

Sunfish Line Kit *Standard*

Sunfish Boom Block
- Total: items /
- Add all to cart
Adding your products to cart
Since the 1950s, there has been no better way to play on the water than in a Sunfish. Find out why we're the go to source for dinghy sailing parts and enjoy FREE SHIPPING on qualifying orders . Our staff of Sunfish and dinghy sailing experts is on hand to answer questions about rigging a Sunfish and provide tips. Let us help you get ready to own the water in your Sunfish!
Click here for Sunfish Reference Photos
Click here for Sunfish Rigging Guide
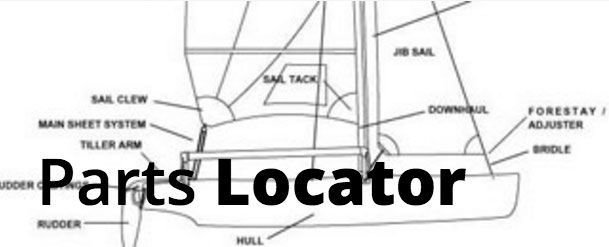
Click here for Sunfish Parts Locator
**Product Availability - Please Read**
Due to changes in the supply chain for new Sunfish and related parts, many one design Sunfish components are currently unavailable. Products we have in stock or are able to source will be listed on this page. Other products that are unavailable may be listed elsewhere on our website for reference. Our team is working hard to find new sources for Sunfish parts and will add those to our catalog as they become available. While our selection may be limited compared to previous seasons, we remain committed to serving Sunfish sailors and will continue to offer as many of the parts, rigging, sails, and accessories you need to keep your Sunfish at its best.
Sunfish Sails & Sail Rings Sunfish sails are recognized all over the world for their bright, fun colors. We stock an extensive selection of popular recreational sails in a variety of colorways plus the classic white racing sail for the hardcore Sunfish racing sailor. Don't forget to replace your sail rings when upgrading to a new sail, and add a set of tell tails for maximizing performance.
Sunfish Hull & Deck Parts West Coast Sailing is your source for hull and deck fittings for your Sunfish sailboat. Check out our selection of bailers, drain plugs, hiking straps, inspection ports, bridles, gudgeons, bow handles, and more.
Sunfish Covers Protect your Sunfish with a proper Sunfish cover, blade bag, or spar bag. Our covers are waterproof and resist both mildew and UV. They fit snuggly on your boat to provide max protection. Use a blade bag to protect your rudder, tiller, and centerboard, or pick up a spar bag to safely store and transport your mast and booms.
Sunfish Sailboat Lines & Line Kits Sunfish sail boat ropes and lines including mainsheets, sunfish halyards, outhaul lines, sunfish bridles and more.
Sunfish Rudder & Tiller Parts Keep your Sunfish heading the right direction with our selection of Sunfish rudder, tiller, and centerboard replacements and spare parts. We stock sunfish rudder parts, sunfish tillers and tiller extensions, centerboards, sunfish rudder pins and spring posts, pivot bolts, and more.
Sunfish Dollies & Trailers Keep things easy on shore with a Sunfish beach dolly or trailer. We stock dollies and trailers from Dynamic Dollies and Racks, Right-On, and Trailex, all designed specifically for your Sunfish! Sunfish dollies ship via our standard free ground shipping and are easy to assemble. Trailers can be shipping anywhere in the US or picked up fully assembled from our warehouse here in Portland, Oregon.
Subscribe To Our Newsletter
Sign up for our newsletter to receive exclusive discounts, new product announcements, and upcoming sales.
Image Unavailable

- To view this video download Flash Player
Sunfish Bailer Assembly (Post-1973) - 91026
Purchase options and add-ons, about this item.
- This bailer fits newer style boats (1973-present) with a 13/16'' thread length.
Frequently bought together

Featured items you may like

Product Description
Sunfish Bailer for boats built post 1973
Product information
Technical details, additional information, looking for specific info, customer reviews.
Customer Reviews, including Product Star Ratings help customers to learn more about the product and decide whether it is the right product for them.
To calculate the overall star rating and percentage breakdown by star, we don’t use a simple average. Instead, our system considers things like how recent a review is and if the reviewer bought the item on Amazon. It also analyzed reviews to verify trustworthiness.
- Sort reviews by Top reviews Most recent Top reviews
Top reviews from the United States
There was a problem filtering reviews right now. please try again later..

- Amazon Newsletter
- About Amazon
- Accessibility
- Sustainability
- Press Center
- Investor Relations
- Amazon Devices
- Amazon Science
- Start Selling with Amazon
- Sell apps on Amazon
- Supply to Amazon
- Protect & Build Your Brand
- Become an Affiliate
- Become a Delivery Driver
- Start a Package Delivery Business
- Advertise Your Products
- Self-Publish with Us
- Host an Amazon Hub
- › See More Ways to Make Money
- Amazon Visa
- Amazon Store Card
- Amazon Secured Card
- Amazon Business Card
- Shop with Points
- Credit Card Marketplace
- Reload Your Balance
- Amazon Currency Converter
- Your Account
- Your Orders
- Shipping Rates & Policies
- Amazon Prime
- Returns & Replacements
- Manage Your Content and Devices
- Recalls and Product Safety Alerts
- Conditions of Use
- Privacy Notice
- Your Ads Privacy Choices

- Sailboat Hardware
- Deck Hardware

Andersen Super Mini Special Bailer

Allen Brothers Delta Self Bailer

Andersen Super Max Bailer

Andersen Super Medium Bailer

Andersen New Large Bailer

Andersen Super Mini Bailer

Laser Performance Sunfish Bailer, 1 5/16 In, Comp

Laser Performance Sunfish Bailer, 13/16 In, Comp

Andersen Mini Bailer

Allen Brothers Self Bailer

Allen Brothers Delta Self Bailer Spares Kit

Andersen Service Kit for Super Max Bailer

Andersen Service Kit for Super Medium Bailer

Andersen Service Kit for Super Mini Bailer
")
Laser Performance Sunfish Bailer Ball w/Seal (X5)

ILCA Laser Autobailer

Andersen Service Kit for New Large Bailer

WinDesign Bailer for Laser hull

Allen Brothers Al-4155 Self Bailer Spares Kit

Andersen Service Kit for Mini Bailer
JavaScript seems to be disabled in your browser. For the best experience on our site, be sure to turn on Javascript in your browser.
- Compare Products ( )
- Create an Account
Autobailer O-Ring (Pack of 2)
Sunfish Bailer Assembly
Sunfish Bailer Complete

The Sunfish Bailer Assembly fits newer style boats (1973-present) with a 13/16'' thread length. Includes plug and cap, O-ring, bailer housing and bailer ball.
Part # 91026
FREE SHIPPING POLICY
Free shipping on all orders over $99. Does not apply to over-sized items or Hobie items. We consider over-sized items to be any sailboats, kayaks, paddle-boards, and anything over 40" in length. Learn more about our shipping policy by clicking here .
IMAGES
VIDEO
COMMENTS
The bailer ball on the Sunfish fits in the bailer housing on the bottom of the boat. It limits water.. $26.00 Add to Cart. Sunfish, Bailer Cap (1-5/16 Inches), 91061. This bailer cap is made for Sunfish. ... Sunfish bailer housing only.Plastic Includes o-ring & float ball Old # 65087.. $65.00 Add to Cart. Showing 1 to 8 of 8 (1 Pages) ...
That Self-Bailer is the older "DePersia" Brand unit, also used on that vintage DS II. Newer boats have a plastic version that is basically the same as the one used on the SUNFISH. The drainplug in the transom is used to drain any bilgewater after boat is hauled out and MUST be plugged while boat is in the water.
Sunfish Sailor, Lee Montes, shows you how to remove an old Depersia Metal Bailer from your Sunfish Sailboat and replace it with a New Sunfish Bailer. This i...
A few days ago I was discussing with a good sailor friend of mine, about the possible solutions for constructing an auto-bailer for small home-made dinghies with traditional cockpits (no sandwitch floor or open transom). As we see it, there are two ways of getting that water out (be it from spray, capsize, rain, etc.) 1. Floor-mounted auto-bailer;
The ball (one) is dropped inside the bailer from inside the cockpit. The black ring is a seal for the ball, which follows, and is a tight pinching fit on the plastic housing. There should be two small pins underneath tlo keep the ball from falling out. (Although the pins themselves can fall out). Oct 10, 2019.
The Sunfish Bailer Complete has everything you need to replace your old leaky bailer. Includes: Threaded Top cap Bailer Assembly O - Ring Bailer Ball Bailer Plug Note: Some Sunfish racers prefer to leave out the O - Ring and instead use silicone between the hull and bailer assembly. This gives you a tighter fit to the hull for a more streamline install.
The Sunfish sailboat has a self-bailing cockpit, meaning water automatically drains out for enhanced safety. It has a kick-up rudder, which can be lifted out of the water to avoid obstacles or shallow areas. Known for stability and ease of handling, the Sunfish sailboat is suitable for beginners and experienced sailors.
Install: Slip the brass bar into the hole that leads to the cockpit. Push the bailer into the hull and do a final fit check. Then tighten the screw - being mindful not to overtighten. The bailer shouldn't move around at all. Install the cockpit bung from inside the cockpit. You can do this again by twisting it firmly.
3439 posts · Joined 2010. #6 · Aug 26, 2013. the OP asked about the auto bailer. mine had a auto bailer in the cockpit and a drain plug for the hull. if it is the hull drain then put some grease on the gasket to help it seal. "FULL TILT II" 2011 BENETEAU FIRST 30. "GOLD RUSH" PRINDLE 16.
Sunfish, Auto Bailer (13/16 Inch), 91026. Description. Reviews (0) The bailer is mounted in the bottom of the cockpit and automatically drains excess water out of the cockpit. It is easily opened and closed with the rubber cap. This bailer fits newer style boats (1973-present) with a 13/16'' thread length. The 13/16'' is the length of the cap.
The hull of a Sunfish sailboat is self-bailing, efficiently draining any water that enters the cockpit. Fun fact: The Sunfish sailboat is a popular recreational sailboat worldwide since its design in 1952. ... Bailer or bilge pump: Utilize a bailer or bilge pump to remove excess water from the boat and maintain buoyancy. Anchor and line: In ...
West Coast Sailing is your source for hull and deck fittings for your Sunfish sailboat. Check out our selection of bailers, drain plugs, hiking straps, inspection ports, bridles, gudgeons, bow handles, and more. Protect your Sunfish with a proper Sunfish cover, blade bag, or spar bag. Our covers are waterproof and resist both mildew and UV.
I sailed sunfish all summer, without using the self bailer feature once. I am looking for plug that I can use in the place of the bailer plug. I measured the plug hole, it seems to be about 1 inch or 7/8 of inch. I tried using a 1 inch snap lock drain plug, it is slightly to big. The only other size of this I found was 1/2 inch.
Buy Sunfish Bailer Assembly (Post-1973) ... Complete cockpit bailer assembly for Sunfish sailboat 1973 to present. Product information . Technical Details. Brand Name LaserPerformance : Color White : Manufacturer LaserPerformance : ... Self-Publish with Us; Host an Amazon Hub
Order online Sailboat Bailers from a wide range available. WE SHIP WORLDWIDE: More Info. ... Sunfish Sailboat Parts; Lev-O-Gage Inclinometer; Lewmar Sailboat Hardware . Lewmar Anchoring; ... Sailboat Tracks; Self Tacking Jib System; Sliding Fairlead Systems; Sliding Systems; T-Tracks; Track End Stops; Track Slides;
torrid. It definitely should be installed with the screw and anchor to secure it. As far as the correct size, those items should have come with the bailer kit. I'm not sure of the replacement size. Obviously the screw and anchor need to be siliconed. However, the pictures show silicon all around the edge of the bailer.
The Sunfish Bailer Assembly fits newer style boats (1973-present) with a 13/16'' thread length. Includes plug and cap, O-ring, bailer housing and bailer ball. ... We consider over-sized items to be any sailboats, kayaks, paddle-boards, and anything over 40" in length. Learn more about our shipping policy by clicking here.
Sunfish Bailers and Plugs TOAD Marine Supply - offering a complete line of sailboat engine parts, hardware, boat parts and supplies for the boating enthusiasts. One source for all of your marine engine parts, sales and service. ... 91031 - Sunfish Bailer ball and seal kit (5pk) $26.00 5 pk: 91086 - Sunfish Drain plug, rwo, used 1989-1997: