

How to Draw a Boat – An Easy and Realistic Boat Drawing Tutorial
Ahoy there! You are invited on an exciting voyage of artistic discovery today as we learn how to draw a ship, much like those used for the first around-the-world trips. We break this quite complex boat down into very easy-to-follow steps, making this tutorial suitable for artists of any level. If you are ready to set sail, gather your supplies and let us jump right in!
Table of Contents
- 1.1 Step 1: Shape the Main Body of the Boat Sketch
- 1.2 Step 2: Outline Some Details
- 1.3 Step 3: Draw the Sails
- 1.4 Step 4: Add In the Railing and Ropes
- 1.5 Step 5: Draw the Ocean and the Oars
- 1.6 Step 6: Create Texture Within Your Realistic Boat Drawing
- 1.7 Step 7: Add Some Light Texture to the Waves
- 1.8 Step 8: Begin Coloring the Wood of Your Boat Sketch
- 1.9 Step 9: Color the Sails
- 1.10 Step 10: Add Some Color to the Ocean
- 1.11 Step 11: Start Contouring Your Boat Drawing
- 1.12 Step 12: Continue Shading Your Boat Sketch
- 1.13 Step 13: Start Shading the Sails
- 1.14 Step 14: Darken the Shading on the Sails
- 1.15 Step 15: Apply Highlights To Your Drawing of a Boat
- 1.16 Step 16: Create Three-Dimensions in the Water
- 1.17 Step 17: Highlight the Ocean Waves
- 1.18 Step 18: Finishing Your Boat Drawing
- 2.1 How to Make Boat Drawing Easy?
- 2.2 What Colors Do You Need for a Drawing of a Boat?
Step-by-Step Realistic Boat Drawing Tutorial
You can see from the main image that the boat sketch we are going to do today is quite complex. There are many small details and tricky elements, but we have tried to make boat drawing easy for all artists. We begin the tutorial with several simple steps that help us to build up the final shape of the boat drawing. We then begin to add the smaller details, before using color to bring our boat drawing to life.
You can see an outline of the different steps in the collage below.

Most of the realism in our drawing of a boat comes from the coloring steps. Whenever you begin learning how to draw a new subject, we find it best to use a coloring medium that you feel most comfortable with. Whether you are a digital artist or prefer physical mediums, you can simply adjust the instructions to suit your needs. If you are using a physical medium, like paint, we suggest using a light pencil for the initial construction and outlining steps. For digital mediums, use a separate layer for these steps.
If you are ready to dive right in, find somewhere comfortable to sit, and let us begin!
Step 1: Shape the Main Body of the Boat Sketch
We are going to begin our boat drawing by creating the basic shape of the hull. Start by finding the central point of your drawing area, and begin drawing the long curved shape. The shape is like a canoe, with a curve up and in on either end.

Step 2: Outline Some Details
We are now going to begin adding some smaller details. Begin on the far left end of the boat sketch, drawing a curving canopy shape. Add a small narrow band around the base of the boat drawing below this canopy, and then add a small tear-drop shape in the front point of the boat.
You can also add a small rope-like protrusion from the front (right side).

Step 3: Draw the Sails
In this step, we are going to draw the main sail and the front sail of our boat sketch. Begin with the main sail, a large curving rectangle above the middle part of the boat. You can then draw a long mast behind this sail, extending from the base of the boat and up above the top of the sail. You can then draw a smaller and more angled sail above the front bow of the boat.
Again, you can draw the mast which should be angled towards the right side of your canvas and extend slightly above the sail.

Step 4: Add In the Railing and Ropes
There are two main objectives for this step. Firstly, we are going to draw the railing of the deck, and then we are going to add the sail ropes. Let us begin with the barrier, starting with a curving shape that extends along most of the length of the boat. Then, using equally spaced lines, create several support beams. To complete this step, you are going to add the ropes for the sail. Begin by adding a bar along the top of each sail, and then draw several ropes that extend from the top of the masts to each corner of the sails.
You can also draw some ropes that join the sails to the deck of the boat.

Step 5: Draw the Ocean and the Oars
We are now going to add some context to your boat drawing. Begin by creating some gentle ocean waves around the base of the boat drawing. You can then draw some oars that extend from the side of the ship down into these waves. Generally, the oars should be facing backward, but you can create some variation in their angles for additional realism.

Step 6: Create Texture Within Your Realistic Boat Drawing
Things are starting to get exciting now. At this stage, we have the basic elements of our boat drawing complete, and we also have some of the finer details. We are now going to add some textural details to the sails and bow. Let us begin with the sails, using some fine horizontal and vertical lines to create a series of blocks.
Within these blocks, add some fine texture lines to emphasize the three-dimensionality.
Next, using fine and long strokes that follow the shape of the bow, create some wooden plank details. Create texture within these planks, and use fine lines to add more texture where you think it is necessary. As a final detailed touch, draw a wooden eye on the front of the boat sketch.

Step 7: Add Some Light Texture to the Waves
We are now going to add some final texture to our sketch before we begin using color. Within the shape of the waves, create some fine arched lines that represent a realistic ocean wave texture.

Step 8: Begin Coloring the Wood of Your Boat Sketch
In order to create our realistic boat drawing, we are going to build the color up gradually. In this step, we are going to add a base coat of color to the wooden parts of our boat sketch. Use a regular paintbrush and a light brown shade of paint for this.
Fill the base of the boat with an even coat of color, and then move on to the masts.

Step 9: Color the Sails
We are now going to complete our base color coat by coloring the sails. Use a regular paintbrush and a light shade of cream paint to carefully color the main sail and the front sail.

Step 10: Add Some Color to the Ocean
Let us now move on to the ocean, using some light blue paint to fill in the waves surrounding the base of your boat drawing.

Step 11: Start Contouring Your Boat Drawing
Now that we have the base colors down, we are going to begin adding more structure. For this step, you are going to need a small blending brush and a touch of black paint. Begin to add some definitions between the panels of wood on the side of your boat drawing. You can also add some shading to the masts, the oars, and the back curve of your ship.
Tip: When using black for contouring or shading, always begin very lightly and darken as you need to. Black is almost impossible to remove once you have applied it.

Step 12: Continue Shading Your Boat Sketch
We are now going to continue shading our drawing of a boat with a slightly finer tough. Use a sharp detailing brush and some black paint to add some fine shading along the details on the side of your boat. This will include things like shading around the eye, between each of the planks of wood, and within the canopy.

Step 13: Start Shading the Sails
Let us now move on to the sails. With a blending brush and the same brown that you used as the base coat for the boat, create a gentle blend of color up the sails. The bottom and sides of the sails should be slightly darker, and blend smoothly into the lighter cream color at the top.
Tip: For an extra smooth transition, you can use a clean blending brush to carefully all of these colors together.

Step 14: Darken the Shading on the Sails
As we did with the body of our boat drawing, we are now going to add more detailed shadows to the sails. With a small blending brush and some dark grey paint, add shadows on top of the textured areas. The grey shading should mostly be focused around the pleats in the sails, around the edges, and above the texture lines.

Step 15: Apply Highlights To Your Drawing of a Boat
The last few steps have focused on creating darkness within our boat drawing. We are now going to begin to contrast these shadows with a touch of highlighting. With a blending brush and some white paint, begin by creating a faded highlight on the lightest areas of the sails. Then, with a more detailed brush and white paint, apply highlights to the areas of the boat that are most likely to catch the light. These areas include the top of the canopy, the top of the masts, the railing, and on top of the ores.
Tip: When creating highlights, it is easiest to pick a light source. You can then imagine where the light would hit from that angle.

Step 16: Create Three-Dimensions in the Water
We are now going to shift our focus to creating structure within the waves. With a small blending brush and a touch of black paint, apply some light shading along the edges of the water. You can shade beneath the wave lines that you drew previously, giving the impression of moving water.

Step 17: Highlight the Ocean Waves
Just before we finish our realistic boat drawing, we are going to add a few spots of highlight to the water surface. Use a small blending brush and some white paint to apply short strokes of light onto the water surface.

Step 18: Finishing Your Boat Drawing
In this last step, we are going to add some final spots of water spray and then remove the outline. Begin by using a small blending brush and some white paint to create some realistic water splashes against the side of the boat. You can then remove the dark outline form your boat drawing, leaving you with a seamlessly realistic sketch. Use a fine detailing brush and the corresponding color at each point of the outline to carefully trace over it. You can do the same for any inner texture lines.

We really hope you have enjoyed your voyage of discovery today! As with all of our drawing tutorials , we hope that we have made boat drawing easy for artists of any levels. You now know how to draw a ship of any kind, following the same basic process.
Frequently Asked Questions
How to make boat drawing easy.
Learning how to draw a ship can seem like a daunting task. Fortunately, we make it really easy by breaking the process down into easy-to-follow steps. We begin with simple shapes, creating the basic outline of our boat sketch. We then build up a realistic boat drawing by using color to create detail and dimension.
What Colors Do You Need for a Drawing of a Boat?
You only need a few basic colors for this easy and realistic boat drawing. Firstly, you will need several different shades of brown , including one very light cream and a slightly darker shade. You will then also need white, black, and grey for the contouring, Finally, you will need a sea blue shade for the ocean waves around the base of your boat.

Matthew Matthysen is an educated multidisciplinary artist and illustrator. He successfully completed his art degree at the University of Witwatersrand in South Africa, majoring in art history and contemporary drawing. The focus of his thesis was to explore the philosophical implications of the macro and micro-universe on the human experience. Matthew uses diverse media, such as written and hands-on components, to explore various approaches that are on the border between philosophy and science.
Matthew organized various exhibitions before and during his years as a student and is still passionate about doing so today. He currently works as a freelance artist and writer in various fields. He also has a permanent position at a renowned online gallery (ArtGazette) where he produces various works on commission. As a freelance artist, he creates several series and successfully sells them to galleries and collectors. He loves to use his work and skills in various fields of interest.
Matthew has been creating drawing and painting tutorials since the relaunch in 2020. Through his involvement with artincontext.org, he has been able to deepen his knowledge of various painting mediums. For example, watercolor techniques, calligraphy and lately digital drawing, which is becoming more and more popular.
Learn more about Matthew Matthysen and the Art in Context Team .
Similar Posts

How to Draw a Table – A Fun and Easy Table Illustration Guide

How to Draw a Shark – Create Your Own Realistic Shark Drawing

Hard Things to Draw – Challenging Yourself to Difficult Drawings

How to Draw a Unicorn – Create a Cute Unicorn Drawing

Lilo and Stitch Coloring Pages – 43 Brand New Coloring Sheets

How to Draw a Mandala – Create the Indian Patterns Correctly
Leave a reply cancel reply.
Your email address will not be published. Required fields are marked *
Save my name, email, and website in this browser for the next time I comment.

How to Draw a Sailboat
Learn how to draw a sailboat by following along with this fun & easy drawing guide!
Everyone will like this simple step by step lesson for learning how to draw a boat sailing at sea. This easy sailboat instruction guide is perfect for young students looking to get started with drawing.
All drawing steps are included here which make it fun and easy to follow! Expect this drawing to last about 30 minutes, but the drawing process may actually take more time if other nautical crafts are included in the artwork.
Art making is much more fun when you have a clear lesson to follow. Let’s get drawing!
- Drawing Paper
- Crayons or Colored Pencils
- Black Marker (optional)
- How to Draw a Sailboat Printable PDF (see bottom of lesson)

In this post, we are going to learn how to draw a sailboat with basic drawing tools. Be sure to observe the different sizes and shapes of each part of the sailboat. The pencil lines in each step is drawn out in blue so you can see the current parts that you will be illustrating.
Time Needed: 30 minutes
Draw The Hull

First, draw the top of the hull by creating a horizontal oval shape with two pointed edges similar to the illustration. Next, create the side of the hull by drawing a line attached to the pointed edges of the oval.
Add The Cabin

Add the cabin by forming a sloped rectangular box.
Draw Windows

Draw the windows by forming rectangular shapes as shown.
Attach The Mast

Attach the mast by drawing a long vertical pole.
Attach The Boom

Attach the boom to the right side of the mast by creating a shorter horizontal pole.
Draw The Sails

Let’s draw the sails of the sailboat! First, draw the mainsail by making a diagonal line connected to the mast and boom. Next, draw a triangular shape on the left side of the mast to form the jib.
Add The Burgee

Add the burgee by making a V-shaped line attached to the top of the mast.
Draw The Water

Draw the body of water surrounding the sailboat by making wavy horizontal lines.
Complete The Sailboat Drawing
Complete the sailboat drawing by first coloring the mainsail with an orange crayon and the jib with a red crayon. Next, shade the burgee with a yellow crayon. Now, fill in the mast and boom of the sailboat with a brown crayon. Then, color the cabin with a white crayon and the windows with a blue crayon. Don’t forget to shade the hull of the sailboat with indigo. Finally, fill in the sky with a light blue crayon and the body of water with a dark blue crayon.
How to Draw a Sailboat PDF Download
Click the link below to view or download this drawing lesson. The PDF is a printable drawing lesson for How to Draw a Sailboat . The last page of the downloadable PDF includes a coloring book page with just the outlines and an extension exercise for prompting kids to get creative!
One Comment
Very nice, helped me very nice. Very nice
Leave a Reply Cancel reply
Your email address will not be published. Required fields are marked *
How To Draw A Yacht Step By Step? (A Guide For Beginners)

Do you want to learn how to draw a beautiful yacht? Drawing a yacht can be a fun and rewarding project, even for beginners! In this guide, we’ll walk you through the basics of yacht design, from creating a basic outline of the hull to adding small details like rigging.
With a few simple steps, you’ll be able to draw a stunning yacht of your own.
Let’s get started!.
Table of Contents
Short Answer
Start by sketching out a basic outline of the yacht, focusing on the shape and overall size.
Add details such as the deck, windows, and masts.
Shade in the parts of the yacht to give it depth.
Add the details of the rigging, flag, and other decorations to finish the drawing.
Understanding the Basics of Yacht Design
When it comes to yacht design, it is important to understand the basics before attempting to draw a realistic version of a yacht.
To successfully draw a yacht, you must first understand the different components of a yacht.
A yacht is made up of a hull, deck, cabin, and superstructure.
The hull is the main body of the yacht, and is typically made out of fiberglass or steel.
The deck is the top surface of the yacht, and is usually made from teak or synthetic materials.
The cabin is the interior of the yacht, and contains the living and dining areas.
Finally, the superstructure is the upper part of the yacht, and is typically made of metal or wood.
In addition to understanding the components of a yacht, it is also important to understand the different styles of yacht design.
The most common styles of yacht design are the sailboat, powerboat, and motor yacht styles.
Sailboats are designed to be powered by sails, while powerboats are designed to be powered by an engine.
Motor yachts are designed to combine the power of an engine with the luxury and comfort of a sailboat.
By understanding the different styles of yacht design, you can better visualize what a realistic yacht should look like.
Create a Basic Outline of the Yacht’s Hull

Drawing a yacht can be a great way to express creativity and have fun.
To get started, create a basic outline of the yacht’s hull.
Start by sketching a few basic shapes, such as a square or rectangle, to represent the main body of the yacht.
Then, draw a line down the middle to create the centerline of the yacht.
After that, use a ruler to draw the keel line, which is the line that runs along the bottom of the hull.
Lastly, draw the gunwales, which are the sides of the yacht.
Once you have the basic shapes and lines in place, you can begin adding details to your drawing.
Add Details to the Hull
Once you have sketched a basic outline of the yacht’s hull, it’s time to add in the finer details! Start by drawing any windows and doors, as well as any other features you want to include.
For example, if you’re drawing a sailboat, you might want to add in a mast, sails, and other rigging.
If you’re drawing a powerboat, you could add in an engine, propellers, and other mechanical components.
When you’re adding details, it’s important to pay attention to the proportions and shape of the yacht.
Keep the windows and doors proportional to the size of the yacht, and use curved lines and smooth angles to create a realistic shape.
If you’re feeling adventurous, you can even draw the interior of the yacht, complete with furniture, beds, and other amenities.
Once you’re happy with the details, use a pen or marker to trace over your lines and make them stand out.
Erase any unwanted pencil marks, and you’re ready to move on to the next step.
Draw the Deck of the Yacht

Drawing the deck of a yacht is an important step in creating a realistic and detailed picture.
To draw the deck, start by sketching out a basic outline of the main deck, including the sides, bow, and stern.
From there, add details such as windows, doors, hatches, and any other features you wish to include.
Depending on the type of yacht, you may want to add a flybridge, which is an upper deck located above the main deck.
To complete the deck, be sure to add details such as portholes, lifeboats, and masts.
With patience and practice, you can create a realistic deck of a yacht that will impress your friends.
Draw the Cabin and Mast
Once you have the basic outline of the yacht drawn, the next step is to draw the cabin and mast.
Start by drawing the cabin, which is usually a box-like structure at the back of the yacht.
Make sure to draw the cabin accurately in proportion to the rest of the yacht and add small details such as windows, doors, and handles.
Next, draw the mast.
This is a tall vertical structure that is usually placed in the center of the yacht.
Start by drawing a long vertical line, then add details such as the crossbar and any rigging.
If youre feeling adventurous, you can even add a flag to the top of the mast! Remember, the key to drawing a realistic yacht is to take your time and be patient.
Take the time to draw each individual detail accurately and dont be afraid to make mistakes they can be easily corrected.
With practice and patience, you can create a beautiful and realistic drawing of a yacht that will be sure to impress your friends!.
Add Rigging and Other Small Details

When youve completed the main outline and features of the yacht, its time to add the rigging and other small details.
Rigging refers to the ropes, cables, and sails that are used to navigate and maneuver a yacht.
To draw the rigging, start by sketching out the main ropes that connect the sails to the hull.
You can also add smaller ropes that hold the sails in place.
Next, draw the sails in place, making sure each sail is connected to the main ropes you drew earlier.
The details of the sails will vary depending on the type of yacht you are drawing, but the basics are the same.
Once youve finished the sails, you can add the mast, which is the vertical post that the sails are attached to.
Finally, you can add any additional details that you like.
This could include flags, seagulls, or other small details that will make your drawing look more realistic.
You can also add shading and highlights to give your drawing more depth and realism.
With patience and practice, you can create a realistic drawing of a yacht that will impress your friends.
Practice Makes Perfect
Drawing a yacht can seem intimidating, but with the right techniques and a bit of practice, you can create a realistic drawing of a yacht that will impress your friends.
The key to success when it comes to drawing or painting is to practice and refine your skills.
Start by sketching a basic outline of the yachts hull, and then add details such as windows, doors, and other features.
Work at your own pace and dont be afraid to make mistakes and experiment with different techniques.
It’s also important to pay attention to the details when drawing a yacht.
Take your time to add small details like the rigging and flag.
These small details can make a big difference in the overall look of your drawing.
Be sure to use light, even strokes when shading and blending colors and lines.
This will help you achieve a more realistic look.
Finally, take a step back and look at your drawing from different angles.
This will help you identify any areas that need improvement and make any necessary adjustments.
With patience and practice, you will be able to create a realistic drawing of a yacht that will truly impress your friends.
Final Thoughts
Drawing a yacht doesn’t have to be intimidating.
With a few simple steps and some practice, you can create a realistic and impressive drawing of a yacht.
Start by understanding the basics of yacht design, sketching out the hull, and adding details.
Then, draw the deck, cabin, and mast before finishing off with rigging and small details.
With practice, you can create a beautiful drawing of a yacht!.
James Frami
At the age of 15, he and four other friends from his neighborhood constructed their first boat. He has been sailing for almost 30 years and has a wealth of knowledge that he wants to share with others.
Recent Posts
When Was Banana Boat Song Released? (HISTORICAL INSIGHTS)
The "Banana Boat Song" was released in 1956 by Harry Belafonte. This calypso-style song, also known as "Day-O," became a huge hit and remains popular to this day for its catchy tune and upbeat...
How to Make Banana Boat Smoothie King? (DELICIOUS RECIPE REVEALED)
To make a Banana Boat Smoothie King smoothie at home, start by gathering the ingredients: a ripe banana, peanut butter, chocolate protein powder, almond milk, and ice. Blend the banana, a scoop of...

Sketch a Boat on the Water
JOIN THE VIRTUAL INSTRUCTOR Get ALL of our courses, ebooks, live lessons, critiques, lesson plans and more today.
For extended Live Lessons, video courses, ebooks and more, check out the membership program. Click on the button below to learn more.
How to Sketch a Boat on the Water
In this timed sketching exercise, we’ll tackle a challenging subject in color. The goal is to draw the entire image from start to finish in just 30 minutes. And although we don’t complete the image within the time constraints, we still benefit from setting a timed goal. By setting a time constraint, we at least get started and once we start, we have a good chance of finishing.
Regular sketching practice should be a part of your artistic development. If you just spend a few minutes everyday in your sketchbook, you’ll notice improvement. For many of us, just getting started is the tough part.
Gettin’ Sketchy is designed to provide you with a little drawing instruction through a fun drawing challenge. If you missed the previous episodes of Gettin’ Sketchy, you can check out the last three episodes here…
- Gettin’ Sketchy – Sketching a Crab
- Gettin’ Sketchy – Sketching a Bird
- Gettin’ Sketchy – Sketching a Frog
Here’s the step by step process for drawing the boat on the water…
- We’ll first draw the basic contours of the boat with a white colored pencil. We’ll leave out any details since we’ll develop the background before addressing the boat.
- Using PanPastels, we’ll develop a gradation of tone and color for the water. The top portion is a light orange that slowly transitions to a rich blue at the bottom.
- Once the water is addressed with a soft transition, we’ll use colored pencils over the top to draw the details of the boat. We can easily apply colored pencil applications over the PanPastels.
- Once the boat is in place, we’ll add in the reflection and slight shadow underneath, echoing some of the colors that we used on the boat.
You’ll need a few materials to complete the drawing. If you don’t have PanPastels, you can always use traditional soft pastels and blend them to create the transition of color and value.
- Canson Mi-Teintes Pastel Paper
- Polychromos Colored Pencils

The photo reference used for this drawing exercise is from Pixabay.com . I edited the image a little in Photoshop by intensifying the colors and cropping the composition. If you want to draw along, check out the reference photo below…

Here’s a look at the finished sketch of the boat on water with PanPastels and colored pencils…

If you enjoy this kind of thing, be sure to join us live. We’ve made “Gettin’ Sketchy” a semi-regular event. We broadcast live on YouTube (whenever possible) on Wednesday evenings somewhere between 8:00 PM EST to 8:30 PM EST.
Make sure that you’re a subscriber to the YouTube channel so that you won’t miss an episode. You can subscribe here .

Advertisement
How to Draw Boats
- Share Content on Facebook
- Share Content on LinkedIn
- Share Content on Flipboard
- Share Content on Reddit
- Share Content via Email
How to Draw Sailboats
Sailboats travel far and wide, exploring the ocean and seeking out tropical locales. Use our step-by-step instructions to create your own sailboat scenes.
In this section, we'll show you how to draw the above sailboat. Either draw it freehand while looking at your computer monitor or print out this page to get a closer look at each step.
Follow the red lines in each illustration to learn exactly what to draw in that step. The lines drawn in previous steps are shown in gray. Here, we'll show you an illustration of each step and then give you a description of how to draw it.
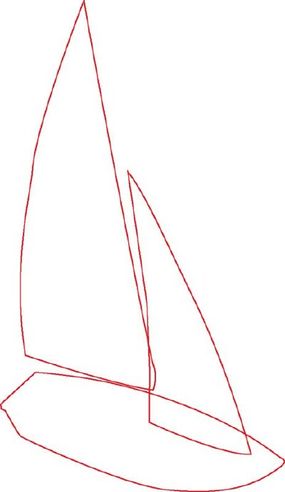
Step 1: Start the sailboat with two big curved triangles for the sails. Add a pointed shape for the hull.
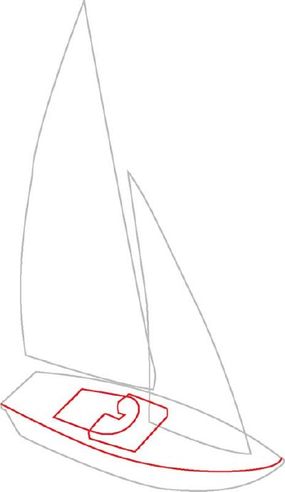
Step 2: Draw a curved line to form the side of the hull. Sketch a rectangle with a rounded end for the seating area. Add a fat bracket shape on top of it.
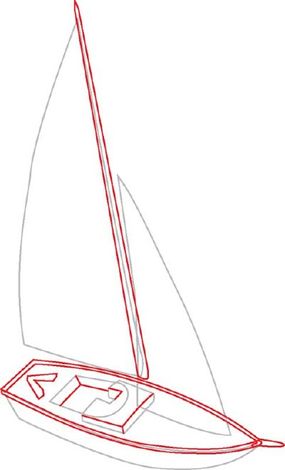
Step 3: Draw the mast between the sails. Add edge lines following the hull. Sketch a V-shape bar to create deck detail, and add lines for depth in the seating area. Draw a small post on the front of the boat.
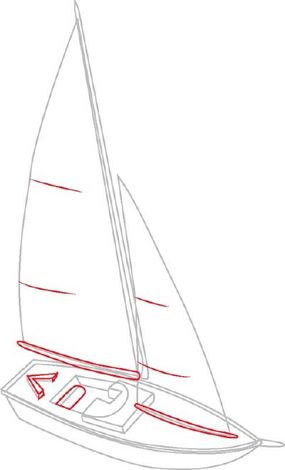
Step 4: Add rectangular crossbars at the bottom of both sails. Draw detail lines on the V shape and in the seating space. Add detail lines to each sail.
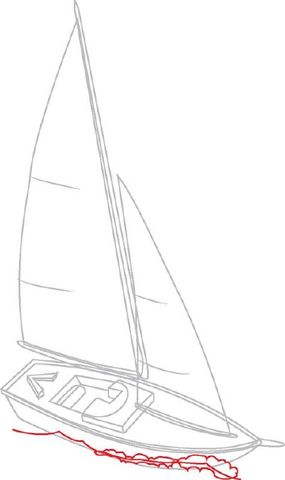
Step 5: Draw wavy lines under the boat for the water.
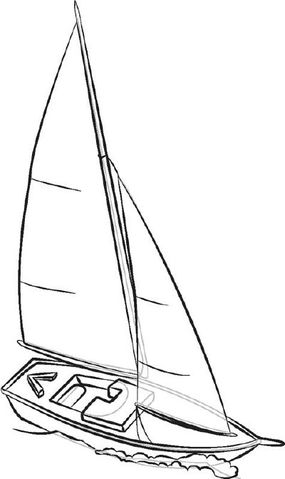
Step 6: Use a felt-tip pen to trace the lines you want to keep. Erase any extra pencil lines.
Explore the ocean's depths with our next drawing project. On the following page, learn to draw a submarine.
Want more help learning to draw? See:
- How to Draw
- How to Draw People
- How to Draw Dinosaurs
- How to Draw Flowers and Plants
- How to Draw Faces
- How to Draw Cartoons
- How to Draw Animals
- How to Draw Planes
- How to Draw Trains
- How to Draw Cars
Please copy/paste the following text to properly cite this HowStuffWorks.com article:

How To Draw A Yacht | A Fun Tutorial
It’s time to cruise the sea on a yacht. Yachts are used for nautical adventures and are a fun way to visit the open sea. Do you know that some yachts are so big that they contain a swimming pool ? Isn’t that interesting?
Today, we will go on an adventure and draw a fancy yacht. Grab your pencil and paper and begin. We can assure you that it will be an exciting 30 minutes.
What you will need
- A sheet of paper
- Coloring kit
How to Draw a Yacht
All you need to do is to follow each step without skipping. Rest assured, you’ll be having an amazing drawing by the end of this guide.

Step 1: Draw the Hull
The hull is the base of the yacht. Its structure is like a parallelogram. We’ll draw a straight horizontal line in the middle of the paper to draw the hull. Starting from where the first line ends, we’ll draw a straight vertical line slanted towards the right. This will be the side of our hull.
We’ll draw another horizontal line the same length as the first. To draw this, we’ll put our pencil nib on the point where the vertical line ends and stretch a horizontal line.

We have to make sure that both the horizontal lines are parallel to each other. We’ll draw a slightly curved vertical line on the left side to meet both horizontal lines. The hull is ready.
Step 2: Draw the Deck and Cabin
The decks are the floor of the yacht and are present over the hull. These decks are also present on a pirate ship . To draw the decks, we’ll stretch a line that is curved from the beginning and gets straight from the end. Then, we’ll draw a vertical straight line that connects the deck to the hull from behind.
We’ll make a similar shape over the first deck but smaller. These lines represent the deck.
The cabin is where the people stay. To draw it, we’ll start by drawing a straight vertical line slanting towards the right over the deck. Then, we’ll draw a straight vertical line where the slanted line ends . Finally, we’ll connect the cabin to the deck by making another straight vertical line.

Step 3: Draw Windows
Adding windows will make our yacht look great. We’ll draw two horizontal rectangles on the cabin and the upper deck that we drew in the previous step. These rectangles run across the length of the deck and cabin.
The rectangles represent the windows from where people can peek out and enjoy the sea view. We’ll make sure that no line of the rectangle overlaps the deck or cabin.

Step 4: Draw the railing
Every yacht has a railing as a safety feature for the tourists. We’ll draw a straight line over the hull to draw the railings. These railings are not a part of a row boat or a canoe . This line must be parallel to the hull.
Have you ever seen sticks standing in the upright position? You sure have. Imagining the same scenario , we’ll draw small vertical lines inside the line we drew. These features have added more beauty to our yacht.

Step 5: Draw light and wind tower
We’ll draw a square over the right side of the cabin to draw the light, which will serve as the base. Over this square, we’ll draw an upright semi-circle, like a cherry on top of a cake . This structure represents the light of our yacht.
Now, we will make the wind tower. To draw this, we’ll draw a straight vertical line over the left side of the cabin. We’ll draw a straight horizontal line over this line as if it is resting on the vertical line. It’ll give us a “T” shape for the wind tower.

Step 6: Draw windows on the hull
Now, we will give our yacht a cozy look. Just like our houses have windows for the light to come in , similarly, the yacht has windows for the people to see the magnificent views of the sea.
To draw the windows, we’ll draw several small-sized rectangles across the length of the hull. To give our yacht an organized look , we’ll make rectangles in an orderly manner rather than making them randomly anywhere on the hull. If our windows are not of the same size, we’ll erase them and draw again. We’ll use a ruler to take the measurements so we can make the same-sized windows .

Step 7: The yacht is completed
Congratulations, our yacht is ready to sail. It’s an easy and efficient process, isn’t it? In just a few minutes , we’ve drawn an amazing drawing.
We are confident that you have followed each step and your drawing is as good as ours or even greater. If you think your results haven’t satisfied you, give it another try. Ultimately, you will have an amazing drawing.

Taking your yacht drawing to the next level
The outline of our drawing is all set. But doesn’t it seem unlively? It sure does. We need to add more details to it. These details could include a background, colors, and other things. In this section, we will upgrade the drawing and make it professional. This section requires your artistic skills. Upgrading your drawing is a fun process.
Adding background to your drawing
A background will give our drawing a 3D look . The yachts are for adventures in the sea. So it will be great if we add sea as our background. We’ll draw several wavy lines under the base of the yacht to draw the sea. The wavy lines represent the ocean currents.
What happens when the yacht cruises at a high speed? The water around it splashes with enormous force. To capture that image on our paper, we will draw splashing waves near the front side of the hull. It will look like our yacht is cruising at a high speed in the sea.

Adding colors to your drawing
Colors will give our drawing new life. It will add energy to the whole scene, making the drawing look scenic.
Add real colors to your drawing. Like color the sun yellow or slightly orange. Color the ocean blue . You can use any color of choice for the yacht that soothes your eyes. You can use any coloring tool to color your drawing. Just make sure no color crosses the boundary of your drawing else it’ll look messy. Use your coloring skills and give your drawing the final touch.

P.S Bonus Tips
Creativity and imagination have no limits. We can customize our yacht the way we want. We can add multiple things to our yacht. It’ll make our yacht unique and appealing. We can write our name on the yacht so others can know who knows the yacht. We can add a banner to the yacht like we added to a battleship.
How can we not add the fish ? We can draw fish in the sea. We want this drawing to be scenic and catchy. Adding a sunset would serve this purpose.
We’ll begin drawing a sun at the top right corner of the paper. We can use any round lid to draw a perfect circle. If we don’t have the lid, we’ll use the freehand technique to draw the circle. As the sun is setting , we’ll draw rays as well coming out of the sun. We can make these rays by drawing small vertical lines outside the sun.
To make it picture-perfect, we can add a reflection of the sun in the sea.
Conclusion
Congratulations, young artists, on this remarkable journey. You have made your yacht amazingly using your creative minds. We are sure you had so much fun.
Now, we will recap the entire process for you. We drew the hull at the beginning. After making the hull, we made decks and a cabin over the hull . We added windows to our yacht for the people to have a scenic view. After drawing the windows, we drew the railings over the base of our yacht, the hull. Then we made the light and wind tower, followed by making windows on the hull.
After making our basic drawing, we upgraded our drawing by adding several details.

Thanks for reading & feel free to check out more of our articles !
Author Rating
Overall rating.
This guide explains how to draw a yacht. You will also interesting facts about it.
Check out how the rating system works
Useful Links

Hey there, I'm Maria and I am an author at Edits 101. Art, fantasy and sports are my life.
Feel free to check the About Us section for more info :) @storybutter.com
Similar Posts

How to Draw a Golf Course | Step-By-Step Guide
In this lesson, we’re going to be covering all you need to know in order…

How To Draw A Forklift | In 11 Easy Steps
Today, we’re diving into the world of heavy-duty vehicles with an informative tutorial on drawing…

How To Draw A Horse Carriage | 9 Easy Steps
Get ready for an amazing experience in the old days. We’ll travel back in time…

How To Draw A Bowling Lane | A Step-By-Step Tutorial
A bowling lane is the playing surface for bowling, typically made of wood or synthetic…

How To Draw An F1 Car | 6 Easy Steps
Are you ready to go racing on the track? Today, we brought you another exciting…

How to Draw an Electric Car | 9 Easy Steps
Are you guys for another ride? Today, we will draw an electric car. Thomas Edison…
EasyLineDrawing
Easy & Fun Drawing Tutorials for Beginners
How to Draw A Boat Step by Step
This tutorial shows how to draw a sail boat in nine steps with detailed illustrated examples and easy to follow instructions.

The sail boat used in this example is fairly modern and also fairly simple with just two sails. You can see a preview of what the final drawing as well as the different steps look like in the image above.
Start the tutorial using a pencil and make light lines that you can easily erase in case you happen to make a mistake. You can darken them later with a black pen/marker. You may also want to have some colored pencils/paints if you wish to color the drawing afterwards.
Step 1 – Draw the Boat Hull

Start by drawing the hull of the boat as shown in the example. Before you begin be sure to leave enough room at the top of your page/drawing area for the mast/sails.
All you need to outline the hall are just three slightly curved lines, one for the front, one for the top and one for the back.
Leave the bottom out as it will be submerged in water. Also be sure to draw the front slightly raised.
Step 2 – Draw the Surrounding Water

Add a wavy line along the bottom of the hull of the boat to show the water ripples around it and add the horizon line on each end of the boat slightly above that for the horizon. Unlike the water ripples around the hull this line can be straight.
Step 3 – Draw the Cabin

Sticking out from about the middle of the hull add the cabin. Draw it with a flat top, give it a slope on the front and a steeper slope at the back.
Step 4 – Draw the Mast

Going up from the top of the cabin draw the mast. Make it a straight pole with another part attached near it’s bottom and pointing backwards (the boom).
Step 5 – Draw the Sails

Draw the sails with the front one curved slightly forward but leave a little bit of room between it and the mast and front tip of the boat (there will be ropes tying it to those places added in the next step). Afterwards draw the back sail attacked directly to the mast and the boom. You can simply draw one very lightly curved line between these two to show it.
Finally you can also add a flag at the top of the mast pointing forward with a slightly fold to show that it’s blowing in the wind.
Step 6 – Draw the Ropes

Draw the ropes tying the front sail to the mast and the bow (front tip of the ship). Next draw another rope going down form the boom to the hull.
Step 7 – Draw the Windows

Draw some windows on the cabin as shown in the example. You can make the two in the middle rectangular in shape (also give them slightly rounded corners). The one in the front should look like it’s cut-off by the front of the cabin. The back end of the back window should be angled to match that end of the cabin. Also try and space the windows to have the same distance between each of them.
Step 8 – Finish the Line Drawing

Add more water ripples below the big wavy line at the bottom of the hull. Make the waves larger near the bottom of the drawing and smaller near the boat. This will add a bit of perspective making it look like the picture has some depth.
After you finish drawing the water go over your lines with either a black pen or marker. Alternatively you can simply darken the them with a pencil.
Step 9 – Color the Boat

Finally you can color the boat as well as the water/sky. It may be a good idea to use either water based paints or colored pencils to do this. Markers can be a little too bright.
Add the colors as follows:
- Yellow cabin
- Blue windows
- Light yellow sails
- Green/blue water
- Light blue sky
You can of course use a different colors for the boat if you prefer.
This tutorial shows how you can draw a sail boat without needing to go into too many small details or complex shading. By adding the most important parts and using a good combination of colors you can have a drawing that is simple but also looks nice.
For more similar tutorials also see:
- How to Draw an Anchor Step by Step
- How to Draw a Cartoon Car in 12 Steps
- How to Draw an Airplane Step by Step
- How to Draw a House Step by Step
- How to Draw a Light Bulb Step by Step
- How to Draw a Mobile Phone Step by Step
- How to Draw a Sports Car (12 Steps)
Related Posts:

Recent Posts
- How to Draw a Lock Step by Step
- How to Draw a Nail Step by Step
- How to Draw a Tulip Step by Step
- How to Draw Scissors Step by Step
- How to Draw a Bike Step by Step


Learn How To Draw A Sailboat – Step-By-Step Tutorial and Tips
Alex Morgan
Drawing a sailboat can be a fun and creative endeavor that allows you to express your artistic skills. Whether you are a beginner or an experienced artist, following a step-by-step guide can help you create a beautiful sailboat illustration. Here is a comprehensive guide on how to draw a sailboat:
Before you get started, gather the following tools and materials:
– Pencil: Use a sharp pencil for sketching and outlining. – Paper: Choose a sturdy paper or a sketchbook to draw on. – Eraser: Have a soft eraser on hand to correct any mistakes. – Ruler: A straight ruler can help you achieve clean and accurate lines. – Colored pencils or markers (optional): If you want to add color to your sailboat illustration, have colored pencils or markers ready.
Follow these steps to create your sailboat drawing:
Start by drawing a long, curved line that represents the hull of the sailboat. Make sure the line is smooth and slightly narrower towards the front of the boat.
Draw a horizontal line across the top of the hull to create the deck. Then, add a rectangular shape on top of the deck to represent the cabin of the sailboat.
Extend two diagonal lines from the top of the cabin to create the mast of the sailboat. Next, add triangular shapes on either side of the mast to represent the sails. You can draw multiple sails depending on the design you prefer.
Add details to your sailboat by drawing lines for the rigging and ropes. You can also include windows and a door on the cabin, as well as a flag on top of the mast. Use your creativity to add any additional elements you would like.
- Study reference images of sailboats to understand their structure and proportions.
- Use light, smooth strokes when sketching and outlining to create a clean and professional-looking drawing.
- Experiment with shading and blending techniques to add depth and dimension to your sailboat illustration.
- Practice drawing different types of sailboats to expand your skills and knowledge.
Common Mistakes to Avoid:
- Drawing the hull too wide or too narrow, affecting the overall balance of the sailboat.
- Neglecting to include important details, such as rigging and ropes, which add realism to the drawing.
- Not using proper proportions, resulting in an unrealistic or distorted sailboat.
- Rushing through the process without taking time to observe and refine each step.
By following this step-by-step guide and incorporating these tips, you can learn how to draw a sailboat and create a visually appealing illustration. Remember to enjoy the process and embrace your creativity as you bring your sailboat drawing to life.
Key takeaways:
Key takeaway:
- Tools and materials are essential for drawing a sailboat: Having the right tools and materials is important to create an accurate and detailed sailboat drawing.
- Following a step-by-step guide helps in drawing a sailboat: By following a systematic approach, starting from drawing the hull to adding the deck, cabin, sails, mast, and incorporating details, one can successfully draw a sailboat.
- Tips for drawing a realistic sailboat: To make the sailboat drawing more realistic, it is important to pay attention to proportion, shading, and perspective. Adding details like ropes, flags, and reflections can enhance the overall realism.
Tools and Materials Required
When creating a sailboat drawing, it is essential to have the necessary tools and materials. Here is a comprehensive list of the tools and materials that are required:
– A good quality pencil is necessary for creating precise lines and details.
– An eraser is handy for fixing mistakes or making adjustments.
– Choose a smooth and durable paper that is suitable for drawing. It is recommended to use a heavier weight paper to prevent tearing or smudging.
– A ruler will aid in creating straight lines and ensuring accurate proportions.
– If you want to draw a perfect circle for the sail, a compass will be useful.
– Adding color to your sailboat drawing can bring it to life. Consider using colored pencils or markers to add vibrant hues.
By having these tools and materials at your disposal, you will be well-equipped to create a beautiful sailboat drawing. Remember to practice patience and take your time to achieve the desired result.
Step-by-Step Guide: How to Draw a Sailboat
Get ready to set sail on a creative journey as we dive into a step-by-step guide to drawing a sailboat . In this guide, we’ll walk you through each stage of the process, from drawing the hull of the sailboat to incorporating intricate details that bring your artwork to life. So grab your pencil and let’s embark on an artistic adventure as we learn how to capture the beauty and grace of a sailboat on paper.
Step 1: Draw the Hull of the Sailboat
To draw the sailboat’s hull, follow these steps:
- Start with a smooth and symmetrical curved outline for the hull.
- Add a horizontal line at the bottom of the hull, curving slightly upwards at the front and back to define the waterline.
- Draw a vertical line near the front of the hull to represent the bow, extending slightly above the waterline.
- Connect the bow to the rest of the hull with another curved line, creating the front of the sailboat’s body.
- From the back of the hull, draw a slightly curved line upwards to represent the stern. This line should also extend above the waterline.
- Connect the stern to the rest of the hull with another curved line, completing the sailboat’s shape.
A well-designed and properly drawn hull is essential for the functionality and safety of a sailboat. I vividly remember a personal experience on a sailing trip with my family when we encountered a storm. The strength and sturdiness of our sailboat’s hull enabled us to navigate the rough waters with ease, keeping us safe. This experience underscored the significance of a well-designed hull in enabling a sailboat to withstand powerful waves.
Step 2: Add the Deck and Cabin
To add the deck and cabin to your sailboat drawing, follow these steps:
1. Draw the deck shape with a horizontal line on top of the hull.
2. Draw the cabin on top of the deck. Position it towards the front or middle of the boat based on your preference.
3. Create windows on the cabin by drawing smaller rectangles on the front and sides. Add a vertical rectangle for the door.
4. Add details to the deck and cabin, such as handrails, vents, or hatches. The specific details will depend on the style of sailboat.
Fact: Sailboats have been used for centuries and are wind-powered. The deck and cabin provide space for navigation and shelter while on the water.
Step 3: Draw the Sails and Mast
To draw the sails and mast for a sailboat, follow these steps:
1. Draw a vertical line in the center for the mast.
2. At the top, draw a horizontal line for the yardarm.
3. Draw a triangular shape on one side of the mast for the mainsail.
4. Extend the bottom of the mainsail towards the hull.
5. On the other side of the mast, draw another triangular shape for the jib.
6. Connect the bottom of the jib to the front of the sailboat.
7. Draw horizontal lines across the sails for fabric folds.
8. Add smaller sails, like a spinnaker, by drawing triangular shapes in different positions on the mast and hull.
Suggestions for improving the sails and mast:
– Use curved lines to show movement and tension.
– Add shading for depth and dimension.
– Consider wind direction when drawing the angle and shape.
– Add ropes or rigging for authenticity.
– Pay attention to proportions to ensure balance with the rest of the sailboat.
By following these steps and suggestions, you can draw realistic and detailed sails and mast for your sailboat drawing.
Step 4: Incorporate Details
Incorporating details in your sailboat drawing is crucial to make it realistic. Follow these steps to ensure your sailboat looks lifelike:
1. Draw proportional windows and doors on the cabin.
2. Add evenly spaced and sized portholes to the sides of the cabin.
3. Create a sense of depth by including a railing around the deck using short, straight lines.
4. Represent fabric and stitching on the sails by drawing lines and patterns, using curved lines to give them a billowy appearance. Make sure to incorporate details in Step 4.
5. Enhance authenticity by incorporating ropes and rigging on the mast and throughout the boat. Add details like knots and loops.
6. Improve the overall look of the sailboat by including additional features such as lifeboats, flags, or navigation lights.
7. Use shading and highlights to add depth and dimension to different elements of the sailboat.
Remember to consider proportion and scale when incorporating details and take your time to ensure accuracy. Regular practice will improve your skills and help you create even more realistic sailboat drawings.
Tips for Drawing a Realistic Sailboat
When it comes to drawing a realistic sailboat, it’s important to pay attention to details and capture the essence of the vessel. If you want to improve your sailboat drawing skills, here are some helpful tips for you:
1. Start by sketching a basic outline of the sailboat. Use simple lines and shapes to shape the overall structure.
2. Once you have the outline, add the main structure of the sailboat. Draw curved lines to create the hull, and if applicable, include the deck and cabin.
3. Don’t forget to depict the sails. Use triangular shapes that are proportionate to the size of the boat. This will help give your sailboat a realistic look.
4. To make your drawing more authentic, detail the rigging. Add the necessary ropes, lines, and rigging for the sails. Make sure to pay attention to proper placement and tension.
5. It’s the small details that make a big difference. Capture elements like windows, portholes, and other features that make the sailboat unique.
6. Creating texture and shading is essential for adding depth and dimension to your drawing. Experiment with shading techniques to achieve the desired effect.
7. Refine your lines. Clean up your drawing by erasing any unnecessary lines and adding final touches to make it polished.
Remember, practice is key to improving your drawing skills. By following these tips and dedicating time to honing your craft, you’ll be able to create realistic sailboat illustrations that truly reflect the beauty and intricacies of these majestic vessels.
Common Mistakes to Avoid
When learning how to draw a sailboat, it’s important to avoid common mistakes that hinder progress. Here are some common mistakes to avoid when drawing a sailboat:
1. Starting with complex details: Beginners often make the mistake of focusing on intricate details right from the start. Instead, it is recommended to begin by sketching the basic shapes and proportions of the sailboat.
2. Neglecting perspective: Perspective plays a crucial role in drawing any object, including a sailboat. It is important to correctly depict the angles and proportions in order to create a realistic sense of depth.
3. Forgetting about balance: Sailboats rely on balance to stay afloat. It is important to accurately depict the balance between the sail, hull, and other elements of the boat in order to capture its essence.
4. Ignoring reference images: Referencing images or real sailboats greatly enhances the accuracy and overall appeal of your drawing. Avoid relying solely on memory or imagination.
5. Overcomplicating the rigging: The rigging of a sailboat can be intricate, but it’s important not to get overwhelmed. Break it down into simpler shapes and lines, and gradually add detail.
To improve your sailboat drawing skills, it is important to practice regularly and study different techniques. Pay attention to details and strive for accuracy. With time and dedication, you will be able to create impressive sailboat drawings.
Some Facts About How To Draw A Sailboat:
- ✅ This tutorial provides step-by-step instructions on how to draw a sailboat. (Source: Art Projects for Kids)
- ✅ Drawing a sailboat can be a simple and enjoyable process, even for beginners. (Source: wikiHow)
- ✅ To draw a sailboat, you will need basic art materials such as paper, pencils, and crayons or colored pencils. (Source: Hello Artsy)
- ✅ The sailboat drawing process usually takes about 30 minutes to complete. (Source: Hello Artsy)
- ✅ Adding color to your sailboat drawing can make it more vibrant and realistic. (Source: I Heart Crafty Things)
Frequently Asked Questions
How do i draw a sailboat using pencil lines.
To draw a sailboat using pencil lines, follow these steps:
- Start by drawing the frame of the sail using two close parallel lines.
- Extend a curved line down from the top of the frame to form the sheet of the sail.
- Add two more parallel lines at the base for the bottom frame.
- Draw another sail, similar in shape to the first one but reversed and smaller.
- Position it lower down and add a straight frame at the bottom.
- Draw the outline of the boat from a top-down perspective using curved lines for the sides and straight lines for the back.
- Add details to the sails by drawing slightly curved lines horizontally across them.
- Finish off your drawing by adding any additional details, patterns, or colors you desire.
What materials do I need to draw a sailboat?
To draw a sailboat, you will need the following materials:
- Drawing paper
- Colored pencils, crayons, or markers (optional, for coloring)
How can I draw a sailboat with pointed edges?
To draw a sailboat with pointed edges, follow these steps:
- Start by drawing the hull of the sailboat, which involves creating a horizontal oval shape with two pointed edges.
- Draw a line to form the side of the hull.
- Add a sloped rectangular box for the cabin section of the boat.
- Draw rectangular shapes to represent the windows on the cabin.
- Attach the mast by drawing a long vertical pole.
- Attach the boom to the right side of the mast with a shorter horizontal pole.
- Draw the sails, including a diagonal line connected to the mast and boom for the mainsail and a triangular shape on the left side of the mast for the jib.
- Add a burgee by making a V-shaped line attached to the top of the mast.
- Finish your drawing by adding any additional details or coloring as desired.
How long does it take to draw a sailboat?
The time needed to draw a sailboat may vary depending on your skill level and the level of detail you want to incorporate. On average, it can take about 30 minutes to complete a basic sailboat drawing.
How can I add color to my sailboat drawing?
To add color to your sailboat drawing, you can use colored pencils, crayons, markers, or paint. Choose your favorite colors and apply them to different parts of the sailboat, such as the sails, hull, water, and sky. Get creative and have fun bringing your drawing to life with bright and pretty colors.
Where can I find a step-by-step lesson on drawing a sailboat?
You can find a step-by-step lesson on drawing a sailboat in various online resources. Some websites offer clear step-by-step instructions, along with accompanying visuals, to guide you through the drawing process. You can also search for tutorial videos on platforms like YouTube to see the drawing process in action.
About the author

Leave a Reply Cancel reply
Your email address will not be published. Required fields are marked *
Save my name, email, and website in this browser for the next time I comment.
Latest posts

The history of sailing – from ancient times to modern adventures
History of Sailing Sailing is a time-honored tradition that has evolved over millennia, from its humble beginnings as a means of transportation to a beloved modern-day recreational activity. The history of sailing is a fascinating journey that spans cultures and centuries, rich in innovation and adventure. In this article, we’ll explore the remarkable evolution of…

Sailing Solo: Adventures and Challenges of Single-Handed Sailing
Solo Sailing Sailing has always been a pursuit of freedom, adventure, and self-discovery. While sailing with a crew is a fantastic experience, there’s a unique allure to sailing solo – just you, the wind, and the open sea. Single-handed sailing, as it’s often called, is a journey of self-reliance, resilience, and the ultimate test of…

Sustainable Sailing: Eco-Friendly Practices on the boat
Eco Friendly Sailing Sailing is an exhilarating and timeless way to explore the beauty of the open water, but it’s important to remember that our oceans and environment need our protection. Sustainable sailing, which involves eco-friendly practices and mindful decision-making, allows sailors to enjoy their adventures while minimizing their impact on the environment. In this…
- PRO Courses Guides New Tech Help Pro Expert Videos About wikiHow Pro Upgrade Sign In
- EDIT Edit this Article
- EXPLORE Tech Help Pro About Us Random Article Quizzes Request a New Article Community Dashboard This Or That Game Popular Categories Arts and Entertainment Artwork Books Movies Computers and Electronics Computers Phone Skills Technology Hacks Health Men's Health Mental Health Women's Health Relationships Dating Love Relationship Issues Hobbies and Crafts Crafts Drawing Games Education & Communication Communication Skills Personal Development Studying Personal Care and Style Fashion Hair Care Personal Hygiene Youth Personal Care School Stuff Dating All Categories Arts and Entertainment Finance and Business Home and Garden Relationship Quizzes Cars & Other Vehicles Food and Entertaining Personal Care and Style Sports and Fitness Computers and Electronics Health Pets and Animals Travel Education & Communication Hobbies and Crafts Philosophy and Religion Work World Family Life Holidays and Traditions Relationships Youth
- Browse Articles
- Learn Something New
- Quizzes Hot
- This Or That Game
- Train Your Brain
- Explore More
- Support wikiHow
- About wikiHow
- Log in / Sign up
- Hobbies and Crafts
How to Draw a Sailboat
Last Updated: November 29, 2022
wikiHow is a “wiki,” similar to Wikipedia, which means that many of our articles are co-written by multiple authors. To create this article, 15 people, some anonymous, worked to edit and improve it over time. This article has been viewed 205,854 times. Learn more...
Drawing a sailboat can be a great way to envision sailing the open seas if you're not able to do so at that moment. It's also a relatively easy process! This wikiHow article will explain how you can draw a sailboat.

Community Q&A
Things You'll Need
- Piece of paper
- Coloring tool(s) of your choice (if you'll be adding color to your picture)
You Might Also Like

About This Article
To draw a simple sailboat, first, sketch a long, upside-down trapezoid for the hull of the boat. Then, draw a small trapezoid on top of the larger trapezoid for the cabin. You can also draw some long rectangles to serve as windows. Once you’ve drawn this, sketch a long, skinny L-shape on top of the cabin. This will be the mast. Finally, draw 2 right triangles on each side of the mast for the sails. If you’d like, draw some waves below the boat to make your drawing more life-like! To learn how to finalize your sailboat sketch, read on! Did this summary help you? Yes No
- Send fan mail to authors
Did this article help you?

Featured Articles

Trending Articles

Watch Articles

- Terms of Use
- Privacy Policy
- Do Not Sell or Share My Info
- Not Selling Info
Get all the best how-tos!
Sign up for wikiHow's weekly email newsletter

How to Draw a Sailboat

Skill Level : 1 Beginner , 2 Intermediate
Medium : Pencil Drawing
Subject : Seascapes , Transport
Tutor : Nolan Clark
Class Length : 2 hours 10 minutes
Avg Rating : No Ratings Yet
Silver Level or Higher Class
Class Description
- Read Class Reviews
In this lesson we will draw a sailing boat.
During the class you will learn:
1) How to draw clouds 2) How to draw the sails so they look like they have various amounts of wind 3) How to draw reflections in the water 4) How to show the land in the distance 5) and much more...
Latest Reviews
Unlock the follow along class here, short class video.
Class Tutorial

In this tutorial we will draw a sailboat. This is the reference photo I will be working from.
Drawing the Sky

Our sailboat reference photo doesn't have nice clouds in it so I have found this photo which does have nice clouds.
We will use our artistic license to add clouds similar to these into our drawing. That should add extra drama and interest to the scene.

Start off by covering a spare piece of paper with graphite.
We will use this and a cloth to draw with.

We don't want to lose the horizon so we mask it off.

Now rub the cloth over the graphite paper, then onto your drawing to draw the clouds.
In a circular motion rub the shadows of the clouds onto the paper.

What I am trying to do is create the gradual shadings formed by the clouds.
To ensure I don't loose the shape of the boat I use an eraser to keep the edges of the sails defined.
The clouds give us the contrast we need for the white sails to be visible so don't be shy with the contrast you add to the clouds.
Drawing the Sails

Now we can move over to the sails.
Each sail has a different shading because of its shape so you need to carefully look at how the light reflects off of each sail.
This one here is round so it has a gradual shading.

The one behind it is also round so will also get that gradual shading.
This time however the first sail is casting a shadow on it so the tonal values of these shadings are different.
To draw these tonal values and shadings correctly vary the pressure you apply to the pencil as well as use harder and softer pencils.

This sail is full of creases, just suggest these creases by creating a series of contrasting lines.
Look very carefully at the direction of these lines through as they follow the shape of the sail.
Do the same with the other sails as well.

Now we can start to add the detail to the sails.
For this use a very sharp pencil or a mechanical pencil to add in all the rigging and to suggest the stitching work on each sail.

To ensure you draw the masts accurately use a ruler to draw the outside edges. Then color in the insides.
To show the mast is round darken the right hand edge on each mast.
Now we can gently remove the masking tape in order to draw the water.
Drawing the Water

There is a dark edge to the horizon so I use the ruler to establish the edge of the boat so I don't lose it's shape.

Now use your cloth and the graphite paper to lay down a basic tonal value on the water.

Erase the ripples on the water using a kneaded eraser.
To show perspective, make the ripples in the distance short and close to each other and the nearby ripples large and further apart.

The reflections are broken vertical lines so put in the dark vertical lines using the cloth first.
Then squiggle out the lighter reflections.
I have also used the pencil to squiggle a few extra contrasts here and there which completes the water.
Drawing the Boat

Now shade in the shape of the boat.

And use a dark pencil to suggest the people and detail on the boat.
Don't draw fine detail here. Suggestions and basic shapes are good enough. Your brain will imagine the rest of the detail when looking at the completed artwork.

This is what the final sailboat drawing looks like:

Enjoying This Tutorial?

About Nolan Clark
Read more about Nolan Clark

Follow Us on :
Copyright © · Paint Basket TV · All Rights Reserved
As an Amazon Associate, I earn from qualifying purchases.
Pin It on Pinterest
How to Draw a Boat
Learn how to draw a great looking Boat with easy, step-by-step drawing instructions, and video tutorial.
By following the simple steps, you too can easily draw a perfect Boat.
FREE DOWNLOAD

Where Can We Send Your Free Coloring Page?
Join our newsletter and get the coloring PDF as a free welcome gift.
- Name This field is for validation purposes and should be left unchanged.
We take your privacy seriously and will never spam you. You can unsubscribe from emails any time in 1-click. Check out our Privacy Policy for full details.
Step-by-Step Instructions for Drawing a Boat

How to Draw a Great Looking Boat for Kids and Beginners - Step 1

1. Begin the cartoon boat outline by drawing the hull. Outline the top of the hull with a short straight line and two long curved lines that meet at a sharp point, forming a flattened teardrop shape.
Then, enclose a nearly parallel shape around the first.
Easy Boat Drawing - Step 2

2. Extend two curved lines below the top of the boat, one diagonal and one nearly vertical. Then texture the wood with horizontal curved lines.
Unlock AD FREE and PRINTABLE drawing and coloring tutorials
- 1,900+ drawing & coloring PDFs
- Ad-free website
Easy Boat Drawing - Step 3

3. Enclose the shape of the hull with waves beneath it. Use a series of curved lines that meet at points. Draw more waves at the front and back of the boat.
Easy Boat Drawing - Step 4

4. Draw a straight, horizontal horizon line above the boat's hull. Then, draw more waves on the water's surface, using curved lines that meet at points.
Easy Boat Drawing - Step 5

5. Extend two vertical straight lines from the middle of the boat. Connect them at the top with a short line, and erase lines from between them.
This is the mast that supports the sails. Then, draw rectangle-shaped seats inside the hull. Draw a straight line from the back corner of the hull to give the boat a three-dimensional shape.
Easy Boat Drawing - Step 6

6. Extend two vertical straight lines from the middle of the boat. Connect them at the top with a short line, and erase lines from between them. This is the mast that supports the sails.
Then, draw rectangle-shaped seats inside the hull. Draw a straight line from the back corner of the hull to give the boat a three-dimensional shape.
Easy Boat Drawing - Step 7

7. Use long curved lines to enclose the first of the triangular sails between the mast and the boom.
Add More Details to Your Boat Picture - Step 8

8. Draw the second triangle-shaped sail using long curved lines between the mast and the boom. Then, stripe the sail with horizontal curved lines.
Complete the Outline of Your Boat Drawing - Step 9

9. Use curved lines to enclose fluffy cumulus clouds in the sky.
Color Your Boat Drawing

Your cartoon boat outline is now complete. Color your sailboat. We've shaded the hull with brown like wood. Often the sails are white or brightly colored.

Click HERE to save the tutorial to Pinterest!
Learn More About The Boat Drawing
Would you like to sail away on your own boat? This easy, step-by-step boat drawing guide is your dream come true.
The boat in this drawing is called a sailboat because it is powered by the wind and two large, triangle-shaped sails.
Scroll down for a downloadable PDF of this tutorial.
There are lots of other types of boats, like this fishing boat drawing which is powered by a motor, or this canoe drawing , which is driven by human power - moving the rectangle-shaped paddles.
Did you know? Boats are usually less than 45 feet or 14 meters in length. Larger boats are known as ships. You can learn how to draw a ship here.
Boat Drawing Tutorial - Easy & Fun Printable Pages
Join now and get immediate access to thousands of printable drawing instruction and practice pages!

Learn how to get access to thousands of printable pages!

MEMBER TROUBLESHOOTING
Still seeing ads or not being able to download the PDF?
First, check that you're logged in. You can log in on the member login page .
If you're still not able to download the PDF, the likely solution is to reload the page.
You can do this by clicking the browser reload button.
It is a circular arrow-shaped icon at the top of the browser window, typically found in the upper-left side (you can also use keyboard shortcuts: Ctrl+R on PC and Command+R on Mac).
See a Google Web Story of this Boat Drawing Tutorial.
Yacht Sketches royalty-free images
19,492 yacht sketches stock photos, vectors, and illustrations are available royalty-free for download..

Our company
Press/Media
Investor relations
Shutterstock Blog
Popular searches
Stock Photos and Videos
Stock photos
Stock videos
Stock vectors
Editorial images
Featured photo collections
Sell your content
Affiliate/Reseller
International reseller
Live assignments
Rights and clearance
Website Terms of Use
Terms of Service
Privacy policy
Modern Slavery Statement
Cookie Preferences
Shutterstock.AI
AI style types
Shutterstock mobile app
Android app
© 2003-2024 Shutterstock, Inc.
Definitions
Length overall (LOA)
Length of water line (lwl)
Length between perpendiculars (LFF)
Rated length
he hull of a yacht is a complex three-dimensional shape, which cannot be defined by any simple mathematical expression. Gross features of the hull can be described by dimensional quantities such as length, beam and draft, or non-dimensional ones like prismatic coefficient or slenderness (length/displacement) ratio. For an accurate definition of the hull the traditional lines drawing; is still a common tool, although most professional yacht designers now take advantage of the rapid developments in CAD introduced in Chapter 1.
In this chapter we start by defining a number of quantities, frequently referred to in yachting literature, describing the general features of the yacht. Thereafter, we will explain the principles of the traditional drawing and the tools required to produce it. We recommend a certain work plan for the accurate production of the drawings and, finally, we show briefly how the hull lines are generated in a modern CAD program.
The list of definitions below includes the basic geometrical quantities used in defining a yacht hull. Many more quantities are used in general ship hydrodynamics, but they arc not usually referred to in the yachting field. A complete list may be found in the International Towing Tank Conference (ITTC) Dictionary of Ship Hydrodynamics.
The maximum length of the hull from the forwardmost point on the stem to the extreme after end (see Fig 3.1). According to common practice, spars or fittings, like bowsprits, pulpits etc are not included and neither is the rudder.
The length of the designed waterline (often referred to as the DWL).
This length is not much used in yachting but is quite important for ships. The forward perpendicular (FP) is the forward end of the designed waterline, while the aft perpendicular (AP) is the centre of the rudder stock.
The single most important parameter in any rating rule. Usually L is obtained by considering the fullness of the bow and stern sections in a more or less complex way.
The maximum beam of the hull excluding fittings, like rubbing strakes.

Fig 3.1 Definitions of the main dimensions
Beam of waterline (bwl)
Displacement
The maximum beam at the designed waterline.
The maximum draft of the yacht when floating on the designed waterline. Tc is the draft of the hull without the keel (the 'canoe' body).
The vertical distance from the deepest point of the keel to the sheer line (see below). Dc is without the keel.
Could be either mass displacement (m) ie the mass of the yacht, or volume displacement (V or V), the volume of the immersed part of the yacht. mc, Vc and Vc are the corresponding notations without the keel.
Midship section For ships, this section is located midway between the fore and aft perpendiculars. For yachts it is more common to put it midway between the fore and aft ends of the waterline. The area of the midship section (submerged part) is denoted AM, with an index 'c' indicating that the keel is not included.
Maximum area section For yachts the maximum area section is usually located behind the midship section. Its area is denoted Ax (AXc).
Prismatic coefficient This is the ratio of the volume displacement and the maximum section (CP) area multiplied by the waterline length, ie CP = V/(AX • Lwl). This value is very much influenced by the keel and in most yacht applications only the canoe body is considered: CPc = Vc(AXc • Lwl). See Fig 3.2. The prismatic coefficient is representative of the fullness of the yacht. The

Circumscribed cylinder volume = v = L^ Ay
Fig 3.2 The prismatic coefficient

BOX WL WL c
Circumscribed box volume =
Fig 3.3 The block coefficient
Block coefficient ( CB)
Centre of buoyancy (B)
Centre of gravity (G)
Freeboard fuller the ends, the larger the Cp. Its optimum value depends on the speed, as explained in Chapter 5.
Although quite important in general ship hydrodynamics this coefficient is not so commonly used in yacht design . The volume displacement is now divided by the volume of a circumscribed block (only the canoe body value is of any relevance) CBc = V J(Lwl • BWL • Tc). See Fig 3.3.
The centre of gravity of the displaced volume of water, its longitudinal and vertical positions are denoted by LCB and VCB respectively.
The centre of gravity of the yacht must be on the same vertical line as the centre of buoyancy. In drawings G is often marked with a special symbol created by a circle and a cross. This is used also for marking geometric centres of gravity. See. for instance, Figs 5.27 or 8.2.
The intersection between the deck and the topside. Traditionally, the projection of this line on the symmetry plane is concave, the 'sheer* is positive. Zero and negative sheer may be found on some extreme racing yachts and powerboats.
The vertical distance between the sheer line and the waterline.
Tumble home
When the maximum beam is below the sheer line the upper part of the topsides will bend inwards (see Fig 3.4). To some extent this reduces the weight at deck level, but it also reduces the righting moment of the
Fig 3.4 Definition of tumble home and flare

Tumble home crew on the windward rail. Further, the hull becomes more vulnerable to outer skin damage in harbours.
Flare The opposite of tumble home. On the forebody in particular, the sections may bend outwards to reduce excessive pitching of the yacht and to keep it more dry when beating to windward.
Scale factor (a) This is not a geometrical parameter of the hull, but it is very important when designing a yacht. The scale factor is simply the ratio of a length (for instance the Lw,) at full scale to the corresponding length at model scale. Note that the ratio of corresponding areas (like the wetted area) is a2 and of corresponding volumes (like displacement) a3.
Lines drawing A complete lines drawing of the YD 40 is presented in Fig 3.5. The hull is shown in three views: the profile plan (top left), the body plan (top right) and half breadth plan (bottom). Note that the bow is to the right.
In principle, the hull can be defined by its intersection with two different families of planes, and these are usually taken as horizontal ones (waterlines) and vertical ones at right angles to the longitudinal axis of the hull (sections). While the number of waterlines is chosen rather arbitrarily, there are standard rules for the positioning of the sections. In yacht architecture the designed waterline is usually divided into ten equal parts and the corresponding sections are numbered from the forward perpendicular (section 0) backwards. At the ends, other equidistant sections, like # 11 and # 1 may be added, and to define rapid changes in the geometry, half or quarter sections may be introduced as well. In Fig 3.5 half sections are used throughout.
The profile is very important for the appearance of the yacht, showing the shapes of the bow and stern and the sheer line. When drawing the waterlines, displayed in the half breadth plan, it is most helpful if the lines end in a geometrically well defined way. Therefore a 'ghost" stem and a 'ghost' transom may be added. The ghost stem is the imagined sharp leading edge of the hull, which in practice often has a rounded stem, and the ghost transom is introduced because the real transom is often curved and inclined. If an imagined vertical transom is put near the real one at some convenient station, it will facilitate the fairing of the lines. The drawing of Fig 3.5 has been produced on a CAD system and no ghost stem is shown. However, a ghost transom is included.
In the body plan, the cross sections of the hull are displayed. Since the hull is usually symmetrical port and starboard, only one half needs to be shown, and this makes it possible to present the forebody to the right and the afterbody to the left. In this way mixing of the lines is avoided and the picture is clearer. Note that in the figure the half stations are drawn using thinner lines.
The above cuts through the hull are sufficient for defining the shape, but another two families of cuts are usually added, to aid in the visual perception of the body. Buttocks are introduced in the profile plan,

* * ^ "i * 2 § 2 II II II II II II II ll II
showing vertical, longitudinal cuts through the hull at positions indicated in the half breadth plan. The diagonals in the lower part of the half breadth plan are also quite important. They are obtained by cutting the hull longitudinally in different inclined planes, as indicated in the body plan. The planes should be as much as possible at right angles to the surface of the hull, thus representing its longitudinal smoothness. In practice, the flow tends to follow the diagonals, at least approximately, so that they are representative of the hull shape as "seen' by the water. Special attention should be paid to the after end of the diagonals, where knuckles, not noticcd in the other cuts, may be found, particularly on lOR yachts from the 1970s and the 1980s. Almost certainly, such unevenncss increases the resistance and reduces the speed of the yacht.
The other line in the lower part of the half breadth plan is the curve of sectional areas, representing the longitudinal distribution of the submerged volume of the yacht. The value at each section is proportional to the submerged area of that section, while the total area under the curve represents the displacement (volume). A more detailed description of the construction of the curve of sectional areas will be given in Chapter 4.
In order to define exactly the shape of the hull a table of offsets is usually provided by the designer. This is to enable the builder to lay out the lines at full size and produce his templates. Offsets are always provided for the waterlines, but the same information may be given for diagonals and/or buttocks also. Note that all measurements are to the outside of the shell.
The drawing should be made on a special plastic film, available in different thicknesses. The film is robust and will not be damaged by
Photo 3.6 Tools (triangle, plastic film, straight edge, brush, pens, pencil, erasing shield and eraser)

Photo 3.7 Tr¿\nster of measures from body plan (top) to half breadth plan (bottom) using a paper ribbon

erasing. Furthermore, it is unaffected by the humidity of the air. which may shrink ordinary paper.
Since the film is transparent the grid for the lines drawing is drawn on the back so that it will remain, even after erasing the hull lines on the front many times. Great care must be exercised when drawing the grid, making sure that the alignment and spacing are correct and that all angles arc cxactly 90°. In Fig 3.5 the grid is shown as thin horizontal and vertical lines, representing waterlines, buttocks and stations.
Black ink should be used when drawing the grid and preferably when finishing the hull lines also. However, when working on the lines a pencil and an eraser are needed. There are, in fact, special pencils and erasers for this type of work on plastic film. An erasing shield and a brush are also most useful (see Photo 3.6).
For creating the grid a long straight edge is required, together with a
Photo 3.8 Ducks and a spline used for drawing a water Iine

Photo 3.9 Templates used for drawing lines with large curvature

large 90° set square. It is very convenient to have a bunch of paper ribbons, which can be used for transferring different measures from one plan to the other. For example, when drawing a waterline the offsets of this line may be marked on the ribbon directly from the body plan and moved to the half breadth plan (Photo 3.7).
To draw the hull lines it is necessary to have a set of splines and weights or ducks. Long, smooth arcs can be created when bending the splines and supporting them by the ducks at certain intervals. Photo 3.8 shows how these tools are used when drawing a waterline. The splines should be made of plastic, somewhat longer than the hull on the drawing, and with a cross-section of about 2.5 mm2. Many different types of ducks can be found, some of them home made. Preferably,

Photo 3.10 PI an i meter they should be made of lead, and the weight should be between 1.5 and 2.5 kg. To be able to support the spline, they should have a pointed nose, as shown in Photo 3.8.
The splines are needed when drawing the lines in the profile and half breadth plans. However, the lines of the body plan are usually too curved for the splines, so it is necessary to make use of a set of templates especially developed for this purpose. The most well known ones are the so called Copenhagen ship curves, the most frequently used of which are shown in Photo 3.9.
A very convenient instrument, well known in naval architecture, is the planimeter, used for measuring areas (see Photo 3.10). The pointer of the planimeter is moved around the area to be measured, and the change in the reading of the scale when returning to the point of departure gives the area enclosed by the path followed. Considering the difficulty in following exactly any given line the accuracy is surprisingly high, more than adequate for the present purposes. The need for measuring areas will be explained in the next chapter.
Since many calculations have to be carried out when preparing the drawings, and indeed in the whole design process, an electronic calculator is essential. A simple one would be sufficient in most cases, but a programmable calculator would simplify some of the calculations, particularly if a planimeter is not available. Most scientific calculators have programs for calculating areas with acceptable accuracy, and programs are available for most of the calculations described in the next chapter.
Designing the hull is a complex process, and many requirements have to be considered. One difficulty is that important parameters, such as the displacement cannot be determined until the lines have been fixed. This calls for an iterative method. Such a method is also required in the fairing of the lines. The problem is to make the lines in one projection correspond to smooth lines in the other two projections. For an inexperienced draftsman this problem is a serious one, and many trials may be needed to produce a smooth hull.
While the preferred sequence of operations may differ slightly between yacht designers the main steps should be taken in a certain order. In the following, we propose a work plan, which has been found effective in many cases. It should be pointed out that the plan does not take into account any restrictions from measurement rules.
Step 1: Fix the main dimensions These should be based on the general considerations discussed in Chapter 2, using information on other yachts of a similar size, designed for similar purposes. This way of working is classical in naval architecture, where the development proceeds relatively slowly by evolution of previous designs. It is therefore very important, after deciding on the size of the yacht, to find as much information as possible on other similar designs. Drawings of new yachts may be found in many of the leading yachting magazines from all over the world.
The dimensions to fix at this stage are: length overall, length of the waterline, maximum beam, draft, displacement, sail area, ballast ratio, prismatic, coefficient and longitudinal centre of buoyancy. One of the aims of this book is to help in the choice of these parameters and to enable the reader to evaluate older designs when trying to find the optimum for his own special demands.
Step 2: Draw the profile As pointed out above, this step takes much consideration, since the aesthetics of the yacht are, to a large extent, determined by tBfe pi^ffle-
Step 3: Draw the midship section The midship section can be drawn at this stage, or, alternatively, the maximum section if it is supposed to be much different. This may occur if the centre of buoyancy is far aft. The shape of the first section drawn is important, since it determines the character of the other sections.
Step 4: Check the displacement To find the hull displacement calculate (or measure) the submerged area of the section just drawn and multiply by the waterline length and the prismatic coefficient chosen for the hull. From the ballast ratio, the keel mass can be computed and the volume can be found, dividing by the density of the material (about 7200 kg/m3 for iron and 11300 kg/m- for lead). Assume that the rudder displacement is 10% of that of the keel and add all three volumes. If the displacement thus obtained is different from the prescribed one, return to step 3 and change accordingly.
The procedure described is for a fin-keel yacht. For a hull with an integrated keel, as on more traditional yachts, the prismatic coefficient usually includes both the keel and the rudder.
Step 5: Draw the designed waterline One point at or near the midship station is now known, together with the two end points from the profile, so now a first attempt can be made to draw the designed waterline.
Step 6: Draw stations 3, 7 and the transom The waterline breadth is now known, as well as the hull draft, and the sections should have a family
resemblance to the midship section. Often it is helpful to draw a ghost transom behind the hull.
Step 7: Draw new waterlines Two or three waterlines can now be drawn above and below the DWL. If the appearance is not satisfactory, go back to step 6 and change.
Steps 8 and 9: Add new sections and waterlines
Once this is done, sections I-9 should be completed as well as 7-10 waterlines. Constant adjustments, have to be made in order to create smooth lines in the body plan, as well as in the half breadth plan.
Step 10: Recheck the displacement and the longitudinal centre of buoyancy The curve of sec tional areas can now be constructed. Its area gives the displacement (excluding that of keel and rudder) and its centre of gravity corresponds to the longitudinal position of the centre of buoyancy. If not correct, adjustments have to be made from steps 5 or 6,
Step 11: Draw diagonals Inspect the smoothness, particularly near the stern. Adjust if necessary.
Step 12: Draw buttocks This is the final check on the smoothness. Usually only very minor corrections have to be made at this stage.
Computer aided design of hulls
As mentioned in Chapter 1, most CAD programs use master curves for generating the hull surface. Each curve is defined by a number of points, called vertices. Photo 3.11 shows, in a plan view, the grid of master curves used for generating the YD-40 hull. One of the transverse curves has been selected in Photo 3.12 and it can be seen how the smooth hull surface is generated inside the curve, which is shown as piece-wise linear between the vertices.
Photo 3.11 Grid of master curves used for the YD-40 (the vertical line to the right marks the origin of the coordinate system)
Photo 3.12 A section with vertices (crosses), master curve (between the crosses), hull surface and cuwature (outermost line)

The task of the designer is to specify the vertices in such a way that the desired hull shape is created.There are different ways of achieving this. Some programs start from a long cylindrical body or a box, while others start from a flat rectangular patch, defined by an orthogonal grid. These original shapes are then distorted by moving the vertices around, and it is relatively easy to produce a yacht-like body. However, it takes experience and experimentation to obtain a shape that satisfies criteria set up beforehand. In practice, designers very seldom start from scratch, but work from earlier designs, which already have a desirable shape and a known grid of master curves surrounding it. Since most new designs are evolutions of previous ones this approach is very natural.
A problem encountered when the first CAD programs for yachts appeared was that the scale on the screen was too small, and the resolution too low to enable the designer to create fair lines. Small bumps on the surface could not be detected 011 the screen, and it sometimes happened that the bumps were noticed only after the start of the hull construction . Therefore the CAD program developers introduced plots of the curvature of lines on the hull. Such a plot is shown.in Photo 3.12. The curvature of the line, which essentially corresponds to a section, is almost constant, except at the ends where it goes to zero.
Photo 3.13 illustrates the sensitivity of the curvature to small changes of the surface. The sheer line is shown in a plan view. In the top photo (the real design) the curvature is smooth and relatively constant along the hull. In the bottom photo one vertex point has been moved 10 mm at full scale perpendicular to the surface. The resulting change in the sheer line is so small that it cannot be detected by eye, but the curvature exhibits a considerable bump and some smaller fluctuations, showing that the line is not smooth. By looking at the curvature, lines may thus be generated that look fair even at full scale.
Photo 3.13 Sheer line with vertices and curvature. (top) Real design. (bottom) One vertex point moved 10 mm

Photo 3,14 Perspective view A great advantage of most CAD programs is that the hull may be of the YD-40 shown in perspective. As pointed out in Chapter 1 it is important to study the sheer line in particular from different angles, since the impression of the hull contour in reality is also influenced by the beam distribution, which is not visible if only the profile view is studied. Fig 3.14 shows the YD-40 in perspective, and a good impression can be obtained of the shape. "
By using a CAD program a fair hull can be produced rapidly and different requirements may be satisfied without too much work, such as a given prismatic coefficient or longitudinal centre of buoyancy. Meeting such requirements accurately in a manual process is extremely time consuming, so it is understandable that CAD techniques are always used nowadays by professional designers. However, due to the considerable cost of a CAD system, most amateur designers will still have to use the manual approach described above.
Continue reading here: Hydrostatics And Stability
Was this article helpful?
Recommended Programs

Myboatplans 518 Boat Plans
Related Posts
- Methodology - Ship Design
- Plan Drawing Fregatt - Rigging
- Hull Construction - Ship Design
- Catamaran Design Guide - Catamarans Guide
- Hull Hydrodynamics and Design
- LOD and LOA - Cruising Sailboats Reference
Readers' Questions
How to figure the width to height to length of a yacht?
To figure out the width, height, and length of a yacht, you typically need to refer to the yacht's specifications provided by the manufacturer, yacht designer, or owner. These specifications should include the appropriate measurements. Consult the yacht's specifications: Look for the official documentation or technical information provided for the yacht. This documentation usually includes the length, width, and height of the yacht, referred to as LOA (Length Overall), Beam, and Draft, respectively. The specifications are usually available in brochures, user manuals, or on the official website of the yacht manufacturer. Seek professional advice: If you cannot find the specifications yourself or need more specific information, consider reaching out to yacht brokers, yacht builders, naval architects, or other professionals in the yachting industry. They have extensive knowledge and can guide you with accurate measurements or provide information by using the yacht's model or brand. Measure the yacht yourself: If you have physical access to the yacht and cannot find the specifications through other means, you can measure it directly. However, this method is less accurate and should only be used as a last resort. Use a measuring tape or other appropriate tools to measure the overall length, width or beam, and height. Ensure to measure from fixed reference points for consistency and accuracy. Remember that yachts come in various sizes, designs, and layouts. The width or beam, for example, may be different at different points along the vessel's length due to design variations. It is essential to refer to the official specifications or seek professional advice for the most precise and reliable measurements.
Can you use geometry on boats?
Yes, geometry can be applied to various aspects of boats, particularly in the design and construction phase. Here are a few examples: Hull Design: Geometry is crucial in designing the shape and dimensions of a boat's hull. The angles, curves, and mathematical calculations are used to ensure stability, hydrodynamics, and buoyancy. Stability Analysis: Geometry is used to determine the center of buoyancy, center of gravity, and metacenter of a vessel. These calculations are essential for assessing a boat's stability, both at rest and in motion. Navigation and Bearings: Geometric concepts such as angles, triangles, and trigonometry are used to calculate headings, course corrections, and bearings while navigating a boat. Sail Measurement and Adjustments: Sailboats utilize various geometric principles to determine sail sizes, aspect ratios, and shapes. The geometry of sail adjustments, such as tightening or loosening the sail, can affect the boat's speed and performance. Nautical Charts: Geometry plays a vital role in nautical charting, which involves representing the Earth's curved surface on a flat chart. Projections, grid systems, and coordinate systems are employed to accurately depict and navigate waterways. These are just a few examples of how geometry can be applied to boats. Overall, geometry is critical in ensuring boat design, navigation, and performance, making it an important aspect of the boating industry.
How to find ship displacement from submerged area?
To find the ship displacement from submerged area, you can follow these steps: Determine the underwater or submerged area of the ship. This can be done by calculating the area of the ship's hull that is below the waterline when it is fully submerged. Convert the area into a volume by multiplying it by the ship's beam (width) or mean draft (depth). Multiply the volume by the density of the water. The density of water varies slightly depending on temperature and salinity, but a typical value is around 1,000 kilograms per cubic meter. The result of this calculation will be the ship's displacement. It represents the weight of the water displaced by the ship when it is fully submerged. Note: This method assumes that the ship's hull has a constant shape below the waterline. In reality, the shape may vary, especially towards the ends of the ship.
How to draw a simple ship?
To draw a simple ship, follow these step-by-step instructions: Start by drawing a horizontal line slightly curved at the ends to create the ship's hull. Add a smaller curved line above the hull to outline the ship's deck. At the front of the ship, draw a triangular shape for the bow. On top of the deck, draw a small rectangular structure or cabin. Add a flagpole at the back of the deck by drawing a long, thin rectangle. Draw a small rectangle or square at the top of the flagpole for the flag. Next, add a slightly curved line near the waterline for the keel of the ship. On both sides of the hull, draw a series of diagonal lines to create the ship's planking. To indicate windows or portholes, draw small oval or circular shapes along the cabin. Add a couple of mast poles on the deck. To do this, draw two vertical lines with a horizontal line connecting them at the top. On top of the mast poles, add triangular or rectangular shapes for the sails. Finally, erase any unnecessary guidelines, and you can add more details like waves or seagulls to complete your simple ship drawing. Remember, this is just one way to draw a simple ship. Feel free to modify the design or add additional elements to make it your own!
How to draw a pin keeldrawing tutorialtop keel?
To draw a pin keel, follow these steps: Begin by drawing a slightly curved horizontal line. This line will serve as the water surface. Next, draw a long vertical line that will represent the keel. The keel should start at the bottom of the water surface line and extend downward. At the bottom of the vertical line, draw a slightly curved horizontal line. This line will represent the lower part of the keel. On the left side of the keel, draw a diagonal line extending outward. This line will represent the forward part of the keel. Repeat the previous step on the right side of the keel, drawing a diagonal line to represent the aft part. Connect the ends of the diagonal lines with a curved line, forming the bottom part of the keel. Add additional detail to the keel by drawing a small horizontal line near the top. This line represents the top part of the keel. Finally, erase any unnecessary lines and add shading to give the keel more depth and dimension. Remember to take your time and practice as much as needed to improve your drawing skills.
How do you draw a ship?
Drawing a ship can be a fun and creative process. Here's a step-by-step guide on how to draw a ship: Start by drawing a long, slightly curved horizontal line in the center of your paper. This line will serve as the ship's waterline. From one end of the waterline, draw a slanted rectangle shape, slightly wider at the bottom than the top. This will be the ship's hull. At the other end of the waterline, draw a smaller rectangle shape, slightly tilted upward. This will be the ship's bow. Connect the bow and the hull with two diagonal lines, creating the ship's front structure. Add a large, slightly curved rectangle shape at the top of the hull. This will be the main deck of the ship. Draw a smaller rectangle shape above the main deck to represent the ship's superstructure. Sketch two parallel, slanted lines on the front of the ship's superstructure to create the pilot house. On the main deck, draw a few rectangular shapes to indicate windows or portholes. Add details like railing, stairs, and lifeboats on the sides and top of the ship as desired. Extend the hull below the waterline using a curved line to give the ship depth. For the finishing touches, you can draw some waves around the ship, seagulls in the sky, or a flag on top. Remember to be creative and modify the design as you like. Don't worry if your drawing doesn't turn out perfect at first; practice makes perfect!
What hull curves do yachts fallow is it x squared?
The hull curves of yachts can vary depending on the design and purpose of the yacht. While some yacht hulls may follow a curve that resembles the function of x squared, others may follow different curves such as parabolic curves, ellipses, catenary curves, or other mathematical shapes. The specific curvature of a yacht's hull is determined by factors such as the desired speed, stability, maneuverability, and hydrodynamic efficiency of the vessel. It is typically designed by naval architects and engineers who consider various factors including the size and weight distribution of the yacht, the intended use (e.g., racing, cruising, etc.), and materials used in construction. In summary, while some yachts may have hull curves similar to x squared, there is no universal standard hull curve for all yachts. The hull design depends on various factors and can incorporate different mathematical curves to achieve specific performance characteristics.
How to calculate the curvature of a boat?
To calculate the curvature of a boat, you would need to determine the radius of its curvature. The curvature refers to the degree of how much the boat's hull curves or bends. Gather the measurements: You will need the length and width measurements of the boat. These measurements can be obtained from the boat's specifications or by physically measuring it. Determine the midpoint: Locate the midpoint of the boat's length. This can be done by dividing the boat's length measurement by 2. Measure the rise: Starting from the midpoint, measure the distance between the bottom of the boat's hull and a straight line connecting the bow and stern (i.e., the rise). Measure the run: Measure the distance between the midpoint and the bottom of the boat's hull at the bow and stern. Calculate the radius of curvature: The radius of curvature can be calculated using the following formula: Radius = (run^2 + rise^2) / (8 x rise). The curvature: The curvature is calculated as the reciprocal of the radius of curvature. It's important to note that this calculation assumes a boat's hull shape can be represented by a simple section of a circle. More complex hull shapes, such as those with multiple curves or irregular shapes, may require different mathematical models or numerical methods to accurately determine curvature.
How to measure the curveture of a boat hull?
There are several methods to measure the curvature of a boat hull. Here are three common techniques: Profiling: This method involves taking measurements at specific points along the hull's surface to understand the curvature. You can use a flexible measuring tape or string to measure the distance from the hull to a straight reference line at different points along the boat's length. These measurements can then be plotted on a graph to depict the curvature of the hull. Reflection Method: For this technique, you need a laser level and a measuring tape. Firstly, position the laser level at a fixed distance from the boat hull and horizontally direct the laser beam towards the hull. The laser beam will be reflected back from the hull surface. Measure the distance from the laser level to the hull at different points along the boat's surface. These measurements can be used to calculate the curvature of the hull. 3D Scanning: Utilizing modern technology, you can use a 3D scanner to create a digital model of the boat hull. The scanner emits laser beams or projects structured light patterns onto the hull, capturing its shape in detail. The resulting 3D model can then be used to measure the curvature of the hull accurately. It is important to note that measuring the curvature of a boat hull may require specific tools and expertise. Hence, it is advised to consult with industry professionals or specialists for accurate measurements.
How to draw a yacht keel?
To draw a yacht keel, you can follow these steps: Start by drawing a horizontal line on your paper. This line will serve as the waterline. From the center point of the waterline, draw two vertical lines going downward to create the main part of the keel. These lines should taper towards the bottom. At the bottom of the keel, draw a horizontal line connecting the two vertical lines. This will form the bottom edge of the keel. Now, draw a diagonal line on each side of the keel, starting from the top and curving slightly outward. These lines will form the shape of the keel as it narrows towards the top. Connect the ends of the diagonal lines at the top with a smooth curve to create the rounded shape of the keel. Next, draw horizontal lines across the keel to represent the different sections or layers. These lines can be evenly spaced or closer together at the top and gradually getting wider towards the bottom. Add details such as ribbing or reinforcements by drawing diagonal lines across the keel, intersecting the horizontal lines. To give the keel a more realistic look, you can shade the bottom part and add some shadow where it meets the waterline. Finally, you can add additional details such as a bulbous bow or a fin at the bottom of the keel based on the specific design of the yacht you are drawing. Remember to sketch lightly at first and gradually darken your lines as you refine the shape. And don't forget to have fun and experiment with different styles and variations to make your drawing unique!
How to draw a boat into transverse stations?
Drawing a boat into transverse stations can be done by following these steps: Start by selecting a suitable scale for the drawing. This will depend on the size of the boat you want to draw and the size of the paper or canvas you are using. Begin by drawing a horizontal line across the paper, representing the waterline. Next, draw vertical lines representing the transverse stations at regular intervals along the waterline. These lines should be evenly spaced and represent the cross-sections of the boat at different points along its length. Use reference drawings or images of the boat to guide your drawing. Start by drawing the outline of the boat's hull within each station. Pay attention to the curvature and tapering of the hull as it moves towards the bow and stern. After drawing the outline, add any additional details such as deck lines, windows, hatches, and other features of the boat. Use shading techniques to add depth and dimension to the drawing. Pay attention to the light source and add shadows accordingly to create a realistic representation of the boat. Finally, go over your drawing and make any necessary adjustments or corrections to ensure accuracy.
What is nonprismatic hull?
A nonprismatic hull is a type of hull shape in naval architecture that does not conform to the standard prismatic shape of traditional sailing vessels. Nonprismatic hulls are designed to increase performance in certain areas such as speed and efficiency, as well as to reduce drag and enhance maneuverability. Nonprismatic hulls are also often used as part of a wave piercing design to cut through wave crests, thus reducing the size of the wake behind the ship.
How to design a schooner hull?
Research the history of schooner hulls and their design features. This will help you understand the shipbuilding principles and methods used in their construction. Consider the type of schooner you want to design. Is it a racing vessel or a cruising boat? This will help you determine the size, weight and other characteristics of the hull. Consider the type of material you will use for the schooner. Traditionally, schooner hulls have been made of wood or fiberglass, but there are other materials that can be used as well. You need to choose a material that meets your needs and budget. Work with an experienced maritime designer or drafter to create a 3D model of the schooner hull. This will help you visualize the hull and make sure it meets your specifications. Have a qualified shipwright or boat builder construct your schooner. Ensure that the schooner is tested and certified by a naval architect before you take it out on the water.
How to draw hull lines plan from boat existing images in reverse engineering?
Take a picture of the boat's existing lines plan. Import the image into a vector graphic program such as Inkscape, Adobe Illustrator, or Corel Draw. Trace the contours of the boat's hull using the Pen Tool or other trace tool in the program. Adjust the lines to make sure they accurately represent the boat's shape and contours. Once the lines plan is complete, use a ruler to draw perpendicular lines from the boat's existing lines plan as a reference for the hull. Use the curved line tool to refine the shape of the hull and make sure everything is in proportion and accurate. Double-check to make sure the hull lines plan is correct, and save the file for future reference.
What does half a sideways figure eight mean on a ship drawing?
Half a sideways figure eight on a ship drawing typically denotes the ship's waterline—the line where the ship sits in the water.
How to work out the shape and profile of a yatch datum line?
Establish the design criteria and parameters of the yacht. This should include the length, width, height and any other characteristics relevant to the design of the yacht. Define the design goals and objectives of the yacht, including the purpose and function of the yacht, how it will be used, and what type of sailing or other activities will take place on it. Choose an appropriate hull shape and size for the yacht based on the design criteria, goals and objectives. Create a 3D computer model of the yacht design, incorporating the appropriate hull shape and size. Use the model to define a datum line for the yacht, which will help to accurately measure the craft's performance and characteristics. The datum line should run from the center of the waterline around the hull to the transom. Using the 3D model, define the profile of the yacht by “lofting” the curves of the hull and the deck. Refine the design by adjusting the curves of the hull and deck to ensure that the yacht's performance characteristics are maximized. Use the computer model to run “virtual wind tunnel” tests on the design, to ensure that its performance characteristics are optimized.
How to draw a boat on water?
Start by sketching the basic shape of the boat. Start with a long, rectangular shape to form the hull of the boat. Add a slight curve to the top of the boat to give it an authentic boat shape. Draw a smaller rectangular shape for the cabin of the boat. Sketch two triangular shapes on the left and right side of the cabin for the sails. Draw a series of small circles along the bottom of the boat to create the waterline. Now add the details to your boat: windows, doors, life preservers, etc. Finally, draw some small waves around the boat to create the illusion of the boat sailing on water.
What are fair lines and sheer lines of a yacht?
Fair lines are the contours of the yacht's hull. Sheer lines are the long, gradual arch of the deck, starting at the bow and extending to the stern.
How to draw a hardshine boat hull quickly?
To draw a hardshine boat hull quickly, you can follow these steps: Start by drawing a horizontal line to represent the waterline. This line will serve as the base for the boat hull. Sketch a rough outline of the boat hull shape above the waterline. Keep in mind that hardshine boat hulls are typically streamlined and have a sharp, angular shape. Add a slightly curved line below the waterline to depict the bottom part of the hull. The curve should be gentle and gradually merge into the horizontal waterline. Extend two diagonal lines downward from the front end of the boat hull to create the bow. The bow should be pointed and sharp to cut through the water efficiently. Add a small transom at the rear end of the boat hull. The transom is usually flat or slightly curved upward. Sketch two straight lines from the bow to the stern to represent the deck of the boat. Draw a horizontal line across the middle section of the hull to indicate a separation or border between the upper and lower parts. Add details to the hull, such as chines (angled lines along the sides of the hull) and spray rails (small fins or ridges). These elements contribute to the boat's stability and improve its performance in the water. Shade the lower portion of the hull with a darker tone to emphasize the hardshine effect. Use quick and light strokes to achieve a glossy appearance. Finally, erase any unnecessary guidelines and refine the drawing as needed. Remember, practicing and experimenting with different techniques will help you improve your drawing skills and speed over time.
How to measure a ships hull shape from inside?
One way to measure a ship's hull shape from inside is by using 3D laser scanning. This technique uses lasers to take precise measurements of a ship's inner hull shape. The lasers scan around the interior of the ship and create a 3D image of the ship's shape. This data can then be used to create a precise and accurate measure of the ship's hull shape.
How to lay out a lines drawing for displacement hulls?
Start by drawing the waterline at the mid-point of the vessel. Draw the bow from the top of the waterline to the nose of the vessel. Draw the stern from the bottom of the waterline to the end of the vessel. Draw in all of the chines of the vessel, the curved lines along the bottom of the sides of the boat, at the waterline. Draw in any other details such as the upturned bow, the tail, or any other details that the vessel may have. Draw the sheer line and the sheer forward, running along the top of the vessel and curving inwards and downwards in the center. Add in any additional lines needed to complete the displacement hull. Use a protractor to make sure all of the angles are correct. Use a ruler to draw the exact lines and make sure the lines are the correct length.
Israel-Gaza latest: Israeli fighter jet hits West Bank in deadly strike; aid pier off Gaza coast 'not enough'
An Israeli fighter jet has struck the West Bank. Palestinian authorities say at least one person has been killed. Meanwhile, the bodies of three hostages have been recovered.
Friday 17 May 2024 22:57, UK
- Israel-Hamas war
Please use Chrome browser for a more accessible video player
- Israel says its fighter jet has hit West Bank
- IDF has 'seized bodies of three hostages from Gaza'
- They were murdered while celebrating life', IDF says | Netanyahu 'heartbroken' over deaths
- Alistair Bunkall: Discovery of bodies will reinforce Israeli belief that more hostages are in Rafah
- Israeli protesters attack truck in attempt to block aid reaching Gaza
- Spain bans ships carrying weapons for Israel from docking at its ports
- Scroll down for the latest on the Israel-Gaza war
- Listen to the Daily above and tap here to follow wherever you get your podcasts
That's all for this evening, but if you're just catching up, here is a recap of the key developments.
- An Israeli fighter jet struck a refugee camp in the West Bank, killing at least one person and injuring eight;
- The bodies of three Israeli hostages were recovered from Gaza;
- An investigation was launched after a 450kg bomb fell from an Israeli fighter jet into an Israeli town;
- Spain banned ships carrying weapons for Israel from docking at its ports;
- Dozens of Israeli protesters in the West Bank attacked a truck in an apparent attempt to prevent aid from reaching Gaza, beating its driver and setting it on fire.
A group of US medical workers trapped at a hospital in Gaza have now left the territory, the White House says.
American doctors providing care in Gaza were unable to leave after Israel closed the Rafah border crossing.
Among them were 10 from the US-based Palestinian American Medical Association, who had intended to leave after a two-week mission at the European Hospital in Khan Younis.
Today, 17 American doctors and healthcare workers, out of a total of 20, left Gaza, White House national security spokesperson John Kirby said.
"I can assure you that any of them that wanted to leave are out," Mr Kirby said.
Three of the doctors chose not to depart Gaza, a source familiar with the situation said.
The Palestinian American Medical Association reported on Wednesday that its team of 19 healthcare professionals, including 10 Americans, had been denied exit from Gaza
Israel seized and closed the Rafah border crossing between Gaza and Egypt on 7 May.
The number of people injured by an Israeli airstrike in the West Bank has risen to eight, according to the Palestinian health ministry.
They are in a stable condition and receiving treatment at hospitals, it said.
As we reported in our last post, at least one person has been killed by the attack on Jenin refugee camp.
Residents of the camp said a house was targeted.
Unlike Gaza, such a strike is a rarity in the West Bank, which is run by the Palestinian Authority, not Hamas.
The Israeli military says a fighter jet has carried out a strike in Jenin in the West Bank.
One person was killed and two injured, the Palestinian health ministry said.
While Palestinians live in both Gaza and the West Bank, the territories are controlled by distinct groups.
Hamas has ruled over Gaza since seizing control in 2007 following a brief civil war with the Palestinian Authority.
The West Bank, meanwhile, is still run by the Palestinian Authority, headed by president Mahmoud Abbas.
By Mark Stone , US correspondent
A three-year-old Palestinian girl with an ultra-rare genetic condition has been forced backwards in her quest to leave Gaza for life-saving treatment.
Julia Abu Zeiter, whose story is being followed by Sky News, was moved with her family from a tent in the southern city of Rafah and relocated to a supposedly safer zone to the north and further away from the border they had hoped to cross.
Speaking to Sky News, her mother Maha said: "We were going through the travel procedures to leave Gaza. When the time for us to travel through Rafah crossing got close, the Israelis occupied the crossing, and they told us they want to invade Rafah."
She added: "I was between two fires, not knowing where to go. Do I go try to travel to treat my daughter or do I flee to another place?"
Read on here...
Israel has assured the US they are willing to continue discussions before making any major decisions on plans to assault Rafah, a US official has said.
White House national security spokesperson John Kirby said national security adviser Jake Sullivan will raise the issue on a visit to Israel to meet Benjamin Netanyahu.
Mr Sullivan will stress the need to go after Hamas in a targeted way, not with a full-scale assault on the southern city, Mr Kirby said.
He said it was important that the Rafah crossing was opened immediately.
The Israeli military seized control of the crossing between Gaza and Egypt earlier this month.
Hamas says the US-built aid pier off Gaza's coast is no alternative to opening all land crossings under Palestinian supervision.
It added that they reject any military presence on Palestinian land.
Trucks carrying aid rolled across the pier today for the first time in an operation the US says will scale up to 150 truckloads a day.
But Gaza is already on the brink of famine, according to international aid organisations.
Aid groups also say land crossings are much more effective, and at least 500 trucks a day are required to meet the basic needs of the population.
Israeli restrictions on border crossings and heavy fighting have hindered the delivery of food and other supplies.
An investigation has been launched after a 450kg bomb fell from an Israeli fighter jet into an Israeli town this morning, according to reports.
Images showed the munition landed close to homes in Yated.
The Israeli military said it was intended for Rafah and described the incident as "unusual", reported the Times of Israel.
"Air Force technical teams arrived at the scene and began an in-depth investigation of the incident."
The Rafah strike was carried out moments later, the military said.
Israeli strikes on Lebanon have killed at least five people including Lebanese militants, Hamas fighters and Syrian civilians, security sources told Reuters.
A series of strikes on a coastal town further north than the usual conflict area killed a Hezbollah member as well as two Syrian civilians, the security sources said.
They said a separate Israeli strike on Majdal Anjar, on Lebanon's eastern border with Syria, killed two Hamas fighters.
Israel and Hezbollah have been exchanging fire across Lebanon's southern border for seven months in parallel with the Gaza war, but it has ramped up in recent days.
There was no immediate comment from the Israeli military.
The recovery of the bodies of three hostages from Gaza is a "painful reminder" of those who are still in captivity, says a member of the Hostages and Missing Families Forum.
Professor Hagai Levine said over the last day, rumours circulating about which bodies had been returned to Israel were "very painful for the families" of all the captives.
It was important to bring home the bodies of hostages to give their families closure, he said.
"We do not lose hope. We are preparing for the return of the hostages that are alive," he said.
"As long as we promote a solution to release the hostages, it will also help to prevent further bloodshed in Gaza."
Turning to the approach the Israeli government has taken, Mr Levine said the government "is not representing well the desires of the public".
"There is a majority in Israel that believe that we should now promote regional agreements and together with the moderate countries, not the extremists, we should kick out Hamas... and replace them with another kind of government.
"This could really bring peace and prosperity to the Palestinians and to Israelis and to the entire region and we feel that the government is not doing enough."
Be the first to get Breaking News
Install the Sky News app for free

COMMENTS
How to Draw a Boat in Water Scenery - Step by Step With Color PencilStep by Step Tutorial on https://www.drawingtutorials101.com/how-to-draw-a-boat-in-water-...
To draw the water in your sailboat illustration, follow these steps: Step 1: Sketch the water outline lightly with curved lines for waves and ripples. Step 2: Add smaller, irregular lines to represent the texture of the water's surface. Step 3: Use shading techniques to create depth.
Sketch the main body of the sailboat. Start by drawing a trapezoid shape. 2. Sketch a line perpendicular to the body of the boat. Next, draw a small trapezoid where this line is connected to the boat. 3. Sketch another line. This time, place the line perpendicular to the first. Add more details to the stand of the mast.
Let's finish the yacht drawing by adding some color! First, color the windows on the superstructures with a dark purple crayon. Next, shade the portholes with orange and blue crayons. Now, fill in the rest of the yacht with a white crayon. Then, color the sky with a light blue crayon and the body of water with a dark blue crayon.
Step 2: Outline Some Details. We are now going to begin adding some smaller details. Begin on the far left end of the boat sketch, drawing a curving canopy shape. Add a small narrow band around the base of the boat drawing below this canopy, and then add a small tear-drop shape in the front point of the boat.
How to draw a sailboat real easy with award winning illustrator, Shoo Rayner, who has illustrated well over 200 - books for famous authors and for his own st...
Learn how to draw a Boat in this simple pencil drawing tutorial of a sailboat. SUBSCRIBE for more: http://www.youtube.com/user/circlelinemediaI hope you like...
Complete The Sailboat Drawing. Complete the sailboat drawing by first coloring the mainsail with an orange crayon and the jib with a red crayon. Next, shade the burgee with a yellow crayon. Now, fill in the mast and boom of the sailboat with a brown crayon. Then, color the cabin with a white crayon and the windows with a blue crayon.
Start by drawing the cabin, which is usually a box-like structure at the back of the yacht. Make sure to draw the cabin accurately in proportion to the rest of the yacht and add small details such as windows, doors, and handles. Next, draw the mast. This is a tall vertical structure that is usually placed in the center of the yacht.
Here's the step by step process for drawing the boat on the water…. We'll first draw the basic contours of the boat with a white colored pencil. We'll leave out any details since we'll develop the background before addressing the boat. Using PanPastels, we'll develop a gradation of tone and color for the water.
Draw a small post on the front of the boat. Step 4: Add rectangular crossbars at the bottom of both sails. Draw detail lines on the V shape and in the seating space. Add detail lines to each sail. Step 5: Draw wavy lines under the boat for the water. Step 6: Use a felt-tip pen to trace the lines you want to keep. Erase any extra pencil lines.
Step 1: Draw the Hull. The hull is the base of the yacht. Its structure is like a parallelogram. We'll draw a straight horizontal line in the middle of the paper to draw the hull. Starting from where the first line ends, we'll draw a straight vertical line slanted towards the right. This will be the side of our hull.
To draw a sailboat in easy steps, follow these instructions: 1. Start by drawing a wave of water and the boat. 2. Add the left sail and then draw the right sail. 3. Add a flag on top of the boat. 4. Draw a horizon water line. 5. Add a simple zig-zag tree line. 6. Draw a second layer of trees. 7. Finish with waves and clouds. 8.
Step 1 - Draw the Boat Hull. Boat hull drawing. Start by drawing the hull of the boat as shown in the example. Before you begin be sure to leave enough room at the top of your page/drawing area for the mast/sails. All you need to outline the hall are just three slightly curved lines, one for the front, one for the top and one for the back.
The deck and cabin provide space for navigation and shelter while on the water. Step 3: Draw the Sails and Mast. To draw the sails and mast for a sailboat, follow these steps: 1. Draw a vertical line in the center for the mast. 2. At the top, draw a horizontal line for the yardarm. 3. Draw a triangular shape on one side of the mast for the ...
1. Sketch the sailboat's hull. To do this, draw an upside-down trapezoid. 2. Sketch the cabin section of the boat. To sketch this section of the boat, draw a very skinny rhombus-like shape that is touching the boat—you won't need to draw the long bottom line though, since the sailboat itself already creates that.
Class Description. In this lesson we will draw a sailing boat. During the class you will learn: 1) How to draw clouds. 2) How to draw the sails so they look like they have various amounts of wind. 3) How to draw reflections in the water. 4) How to show the land in the distance.
Learn to draw a Sailing BoatSUBSCRIBE: https://goo.gl/QnNBj6INSTAGRAM: https://www.instagram.com/guuhdesenhosSTORE: https://teespring.com/stores/guuhstoreFAC...
6. Extend two vertical straight lines from the middle of the boat. Connect them at the top with a short line, and erase lines from between them. This is the mast that supports the sails. Then, draw rectangle-shaped seats inside the hull. Draw a straight line from the back corner of the hull to give the boat a three-dimensional shape.
Browse 9,300+ yacht drawings stock illustrations and vector graphics available royalty-free, or start a new search to explore more great stock images and ... isolated and stylized waves. A sea single-masted yacht floats on the surface of the water. yacht drawings stock illustrations. Single-masted sailboat vector sketch isolated. Sailboat ...
Sailing boat. Airport sketch. Tropical tree leaves. Tree sketch. Yacht flyer. of 195. Find Yacht Sketches stock images in HD and millions of other royalty-free stock photos, illustrations and vectors in the Shutterstock collection. Thousands of new, high-quality pictures added every day.
Drawing a boat into transverse stations can be done by following these steps: Start by selecting a suitable scale for the drawing. This will depend on the size of the boat you want to draw and the size of the paper or canvas you are using. ... How to draw a boat on water? 1 year ago. Reply; Start by sketching the basic shape of the boat. Start ...
Learn how to draw a Boat with the help of our drawing lessons! In this video I will walk you step by step through the drawing techniques you will need to cre...
The UN's top court will hear from Israel today as it responds to charges of genocide over its actions in Gaza brought by South Africa. Meanwhile, the head of a Gaza hospital issues a desperate ...
Welcome to our channel! In this video, we will be sharing some easy drawing techniques for kids. Follow along as we demonstrate step-by-step instructions to ...