- BOAT OF THE YEAR
- Newsletters
- Sailboat Reviews
- Boating Safety
- Sailing Totem
- Charter Resources
- Destinations
- Galley Recipes
- Living Aboard
- Sails and Rigging
- Maintenance
- Best Marine Electronics & Technology

How To Install Lazy Jacks
- By Green Brett
- Updated: October 28, 2015
Installing Lazy Jacks
In the glory days of sail, the British sailors were known as jack-tars, and with a flurry of shouted commands from the quarterdeck, they could have a huge sail furled or reefed in seconds. Today, forcibly pressing large numbers of civilians into low-paying servitude aboard your boat is generally frowned upon, so new methods have been developed to tame sails. One of the most important innovations for shorthanded sailing is, arguably, lazy jacks, so named because the sailor using them can simply let go of the halyard. The sail then drops into a nice basket on top of the boom ready for furling or reefing—no sail wrestling involved. As an added bonus, the person on the helm never has his or her vision blocked by the sail.
For our 44-foot Reliance ketch, Lyra , my wife, Jen, and I wanted a non-intrusive lazy jack system that could be quickly deployed, adjusted with one hand, and put safely away when not in use. We didn’t want to alter our existing sail cover, and we didn’t want the lazy jacks to chafe the sail.
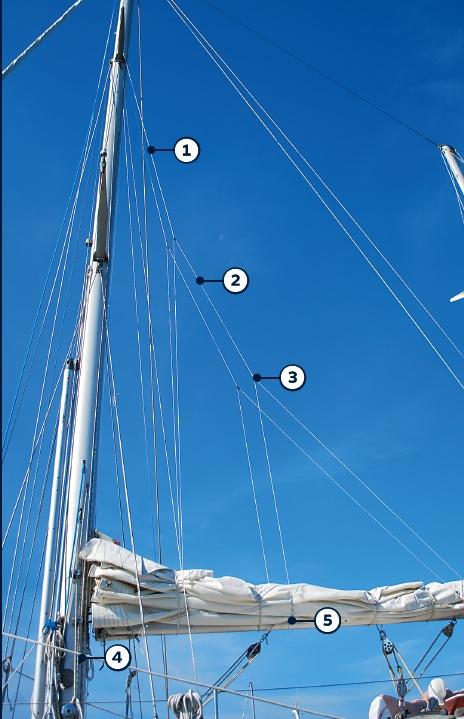
After a couple of hours of raising and lowering the main while mocking up the lazy jacks using parachute cord and halyards, we decided that three support lines did the job. Each of the support lines is fastened to the boom just forward of the leech end of a batten; the sail should naturally land in the basket and shouldn’t hang on the support lines when it’s being raised. Each of the cheek blocks for the halyards aloft should be independently able to take the weight of the boom.
Materials and Costs
For the halyard on our lazy jack installation aboard Lyra, we used 55 feet each side (110 feet in total) of 1/4-inch braided Sta-Set X [1] , from New England Ropes, at a cost of $78. We used 42 feet each side (84 feet in total) of 3/16-inch braided Sta-Set X [2] for the support lines; this cost $45. The six 1/4-inch Orbit blocks [3] from Ronstan—we used three on each side—cost $72. The total cost of the two 1/4-inch Spinlock jammers [4] we used, one per side, was $84. The 12 Ronstan sister clips [5], used six to a side, cost $24. The total cost of our new lazy jack system? $303, along with six hours of labor, most of which we spent developing the right configuration. Miscellaneous items we used include whipping twine, a sewing needle, a hot knife, machine screws with appropriate taps, a drill, bits, and cutting oil for drilling and tapping.
Green Brett has been sailing and living aboard since childhood, and he currently shares his love of cruising through his company, On Watch Sailing charters and instruction, out of Newport, Rhode Island.
- More: How To , Photo Galleries , photos how to , refit , sail handling
- More How To

3 Clutch Sails For Peak Performance

It’s Time to Rethink Your Ditch Kit

8 Ways to Prevent Seasickness

How To De-Winterize Your Diesel Engine

Kirsten Neuschäfer Receives CCA Blue Water Medal

2024 Regata del Sol al Sol Registration Closing Soon

US Sailing Honors Bob Johnstone

Bitter End Expands Watersports Program
- Digital Edition
- Customer Service
- Privacy Policy
- Email Newsletters
- Cruising World
- Sailing World
- Salt Water Sportsman
- Sport Fishing
- Wakeboarding
- Skip to main content
- Skip to primary sidebar
- Skip to footer
The Boat Galley
making boat life better

How To Make Lazy Jacks Easy To Use
Published on April 22, 2016 ; last updated on March 20, 2023 by Carolyn Shearlock

Lazy jacks are a great way to control your mainsail as it comes down, but they can also be a real frustration when raising it. The sail battens catch on the lazy jacks and you have to raise the sail a few inches at a time and time the ups perfectly as the lazy jack flips out of the way so the batten doesn’t catch.
There’s usually a bit of “discussion” between the person raising the sail and the one at the helm along the lines of “would you PLEASE hold the boat directly into the wind so I can get this sail up?” We won’t repeat what the person at the helm may be saying. For that reason, lots of people hate lazy jacks.
And I know a number of people who don’t want a stack pack system because it combines a sail cover and lazy jacks into one package.
A quick bit of rigging, however, will make lazy jacks simple to use when raising the main. The secret is being able to move the lazy jacks out of the way when raising the sail (and eliminate the chafe on the sail when sailing) but still have them easily available when you drop the main.
It’s easier to show in pictures, so here goes.
Using Improved Lazy Jacks
Our system – I’ve drawn the lines and blocks in as they didn’t show up well.

To raise the main, you release each lazy jack where it’s cleated on the mast, pull the two lines that are attached to the boom forward, and hook them on the reef hooks or the cleats that the lazy jacks are on. Then tighten up the lazy jack lines. The lazy jacks now form a reverse “L” going along the boom and up the mast.

Now, with the lazy jacks out of the way, you can easily raise the main.

While sailing, we leave the lazy jacks hooked on the mast cleats so they don’t chafe on the main.
Then, when it’s time to take the main down, we unhook the lazy jacks and tighten them up to catch the main.

In light air, we can even take the main down without turning into the wind as the lazy jacks nicely corral the sail as it comes down.

It almost flakes itself – a little bit of adjustment and it’s ready for the sail cover.

This system works equally well with a stack pack and/or lazy jacks that have three or four attachment points on the boom. We had a stack pack and lazy jacks with four boom (or stack pack, really) attachments on our previous boat (a Tayana 37 with a much larger main sail) and it worked perfectly.
Barefoot Gal had lazy jacks when we bought her, but they were terminated at the mast above the first spreaders. No line back down to deck level. Yes, it drove us nuts. But thanks to whoever had rigged Que Tal those many years ago, we knew exactly how to fix it.
How to Make Your Lazy Jacks Easy to Use
You’ll add a small block on the mast where the lazy jack control line will turn and come down to deck level. Then add a cleat on the mast where you’ll cleat off the lazy jack control line. Finally, you’ll add a longer control line to the lazy jacks.
There is no change to the part of the lazy jack system that is attached to the boom and which goes up to the block where the single control line attaches. The changes are all above that point.
You will need to go up the mast to the point where the lazy jacks attach with a bosun’s chair or another climbing device.
Total cost is $100 to $150 on most boats; time required is two to three hours once you have all the parts.
Preparation
Whip or melt the ends of the new control lines.
Rig up your bosun’s chair or other mast-climbing apparatus and container for carrying tools and parts up the mast with you. Be sure to take the new control lines up with you!
Step One: Add Cleats on Mast
Install the cleats on the mast at a convenient height. You want them to be out of the way of any winches and easy to access.

When attaching fittings to the mast, always use machine screws (or rivets) and not sheet metal screws. Halyards and wiring run inside the mast and the pointed tips of sheet metal screws can damage either one. Drill a hole in the mast and tap it for machine screws. Dab Tef-Gel on the screw threads before putting the screw in to prevent the dissimilar metals seizing. As a side note, you should also use machine screws or rivets for fittings on the boom, so as not to snag the outhaul or reefing lines running inside.
Step Two: Pad Eyes and Blocks on the Mast
For this step, you’ll have to go up the mast, using a bosun’s chair or whatever mast-climbing device you prefer ( see ours ). Always use a backup, totally independent system to lessen the chances of injury or death. And be sure to read my tips for keeping people on deck safe while someone is working in the air.
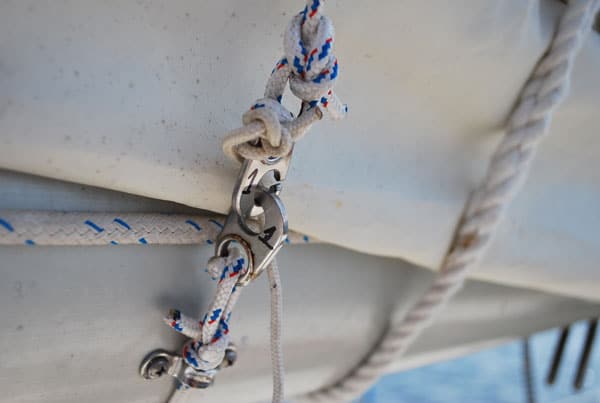
There were already pad eyes on the mast where our lazy jacks were terminated, so all we had to do was shackle a small block (sized for the lazy jack line) on the pad eye.
If you don’t have pad eyes, you’ll have to attach them to the mast, either with machine screws or rivets, then shackle the blocks to the pad eyes.
Use seizing wire or a cable tie to secure the shackle pins so that the pins cannot back out with the motion of the boat.
Step Three: New Lazy Jack Control Line
Before coming back to deck level, pass one of the new control lines through each of the blocks you’ve just installed. You may want to tie the ends together on each side so that you don’t have one go up the mast and come out of the block while you’re coming down (ask me how I know about this possibility!). When tying them together, do it fairly near the ends of each line so you can untie them from the deck.
Once you’re back down on deck, tie one end of each line to the block at the top of the catch lines on each side of the boat, at the point labelled “block” in the drawing below. Cleat the other end on the cleat you just installed.
There is very little load on the various parts. We had some items in our spares locker and bought others from Amazon. Due to the relatively light loads, you don’t need heavy-duty or top-of-the-line parts.
- Two small blocks (these are what we used; make sure yours will fit your control line)
- Two shackles to hold the blocks to the pad eyes (size to fit your other hardware)
- Two pad eyes (this 10-pack is a great deal, but don’t use the pointy screws that come with them; buy 4mm stainless machine screws at a hardware or home improvement store)
- Machine screws or rivets for pad eyes
- Seizing wire or cable ties to secure shackle pin
- Two small cleats and machine screws for attaching
- New control line for lazy jacks — the easiest way to measure the length is to go from the aft attachment point of the lazy jacks on the boom to the gooseneck, plus twice the distance from the gooseneck to the pad eye on the mast. This will give you enough line to cleat. You need two pieces this long. Be sure to choose line that is UV-resistant; we like using Sta-Set.
- 9 Great Books for the Soon-to-Be Cruiser
- The Mental Aspect of Cruising
- 🎧 Jury-Rig Your Rigging

And check out our other courses and products

Find this helpful? Share and save:
- Facebook 686
- Pinterest 3.9K
Reader Interactions
April 22, 2016 at 8:55 am
How do you know exactly what we say to each other when raising the main?! Great tips, we will have to do this!
Patty Thompson says
April 22, 2016 at 2:27 pm
Carolyn I really do love your advice!! Our boat has lazy jacks and we were never quite sure how to take full advantage of it and yes it has been a pain!! Now I can’t wait to do this and try it out! Thank you
Ted Broom says
April 22, 2016 at 10:15 am
We made our own maany years ago and that’s how I made them. Figured Relinda didn’t need the hassle of fighting the sail up. She pulls the legs forward to catch them at the gooseneck and hoists. No problems
BEVERLY VENABLE says
April 23, 2016 at 2:40 pm
We’ve always done this in our home-made set up because I had already made a regular sailcover and didn’t want to put slots in it for the lazy jack, so we pull the lazy jack forward before covering and that way it is out of the way for raising the sail on next trip.
Rodney L Foushee says
April 26, 2016 at 8:41 am
Having difficulty with lazy jacks is not a function of the jacks. It is a self-induced problem caused by raising/lowering sails in the wrong order. First up and last down is the head sail. Last up / first down is the main. After making way with the head sail, release the main sheet which allows the main on the boom to wind vane into the apparent wind. Leave the main sheet released. Helmsman pilots with the head sail; crew raises main with no batten snagging because the main system (boom, sail, jacks) is aligned with the wind. After the main halyard is cleated, helmsman trims the main. Same procedure in reverse order for lowering sails. Works in any breeze. Try it.
Keith & Nicki, s/v Sionna says
December 1, 2017 at 6:33 am
Rodney, this is great theory, but in many boats – ours included – it simply doesn’t work. Largely this is because with any breeze at all the mainsail is a living thing, luffing and moving randomly as soon as you begin to hoist. Carolyn’s advice is Stirling, and exactly what our sail maker recommended, with the added benefit of reducing chafe on our main from having the lazy jacks rub against the sail while under way.
December 1, 2017 at 11:39 am
There is no “theory” with my recommendation – the main sail on your boat, my boat, every boat is subject to the same laws of physics, and, thus, is nothing more than a flag aligned with the wind until the main sheet is tightened. You are correct, the main will move about just like a flag, but what you are missing is that it carries the boom and everything attached to the boom, including the lazy jacks, in alignment along with it.. Head sail first, then the main, it is just too easy.
I’m not questioning the wisdom of the jack system offered here. I’m just offering a practical efficient way of raising and lowering sails without fighting the wind. Simply a tip for the toolbox; don’t like, don’t use it.
Carolyn Shearlock says
December 1, 2017 at 11:44 am
I get what you are saying, but as the sail is raised the battens do not stay in alignment with the boom nor do the lazyjacks. They move independently and the battens WILL snag on the lazyjacks.as the sail is raised.
Michael says
January 1, 2022 at 8:22 pm
Depend on the boat and the sail. The size of the boom and the mast width usually determine the space between the lazy jacks some larger boats have wider boom and mast making the space between the lazy jacks much wider. Some sails are full length battens some have partial Battens. This makes a different in stiffness of the sail and the ends getting hung up or not. Sail shape also makes a difference. I like having the same setup as shown because it allows me to adjust The position of the block that supports the lower lines on the boom. But what works on one boat may or may not be best for all.
Marc Kornutik says
December 1, 2017 at 12:51 pm
Please allow that your system will not work if lazy jacks are in position. But I’m still confused because even if none are used or they are pulled out of the way…, once you are sailing after the headsail is unfurled the main is going to fill and billow out to leeward putting a lot of strain on the boltrope, mast track etc. Would be hard to raise and I think it would look quite the mess on deck. Glad it works for you is all I can say, but would love to see a video of you doing it.
Adam Norman says
April 26, 2016 at 9:26 am
Hi Carolyn Another advantage of your excellent system is that you can move the lazy jacks out of the way to the mast cleats when the boat is moored in the marina, thus cutting out chafe and wear on the sail cover if it gets windy while you are away from the boat. All the best from the UK! Adam
Margaret says
April 26, 2016 at 11:29 am
Going to do this!
April 28, 2016 at 7:43 am
We’ve had a similar system on our boat for 20 years. It’s great. No chafing, no interference with sail shape.
April 28, 2016 at 12:20 pm
A much cheaper and easier way I came up with is to just unfasten the aftmost attachment of the lazy jacks on both sides of the boom and tie shackles on the ends. Then since it is usually the aft lazy jacks that catch the battens, you can just unshackle them and walk them forward (I snap them together around the mast mounted jib halyard winch.) As long as you remember to walk them aft and reattach them before you lower the main (best to do them one at a time on the windward side of the main to avoid the pressure of the wind on the sail, and do the other on the next tack) it works fine. Granted this does not solve the problem of interference with the sail cover.
Patrick says
April 29, 2016 at 2:04 am
I have been doing this for a long time but with a little modification. If you have a long tail on the line that raises your lazy jack you can run it through a small cleat and back up to the first eye on the lazy jack. In this way to lower you just untie the tail and pull down the lazy jack. to raise you do the opposite. You do not end up with a lot of line to deal with as the line that comes down goes up at the same time. I hope this is understandable.
Jason Ellmers says
May 5, 2016 at 7:35 am
another thing that will help with snagging issues is to terminate the top most point in the middle of your spreaders and not on the mast at all.. It holds the top away from the centreline.
I have a stack pack with jacks which works like a dream.. Must admit also I don’t have to worry about the blocks the sail might rub on as I have soft spliced eyes at the ends of the rope for the other lines to pass through… Another tip.
Marc J. Kornutik says
April 13, 2017 at 9:23 am
Carolyn, excellent system for using just a sail cover. Must disagree though when using it with a stackpack. My lazy jacks also control the tension on the stackpack so it would flop to the sides rather than staying in place. Wouldn’t be realistic to sail that way if lazyjacks were brought fwd out of the way. It also allows the sail to drop out of it prior to hoisting (no sail ties) so really defeating it’s purpose. That said mine is rigged exactly as you described from the previous owner but I can’t get around the issue of the pack dropping down when those lines are loosened unfortunately.
April 13, 2017 at 9:32 am
We had a stackpack with lazy jacks on our previous boat. The sail falling out the pack as we raised the sail was far less of a problem than having the battens catch on the lines in our opinion. One trick is to release one side fully and the other only slightly — keep the boat not perfectly head to wind so that the sail all stays in the slightly released side (it will form a big belly as you partially release the lazy jacks) then bring the boat fully into the wind just as the person at the mast starts raising the sail and the sail starts spilling out. Takes a bit of coordination, but isn’t as hard as it sounds and keeps the sail contained pretty well as it’s being hoisted but also prevents the sail from hanging on the lazyjacks.
You may feel the opposite and prefer to keep the lines in their normal position. And yes, with a stackpack, we did re-tighten the lazyjack lines once the sail was up so that the stack pack laid next to the sail.
Jorge Bermudez says
April 25, 2017 at 8:56 pm
I only put up the lazy jacks to drop the main. Otherwise they are stored along the boom and mast
Bill Dixon says
April 26, 2017 at 8:55 am
We run the “downhaul ” leg aft to the sail cover. It becomes a 3rd lazy jack instead of just another line banging on the mast.
Andrent says
June 29, 2017 at 6:45 pm
We are new boat owners struggling with the stack pack and lazy jacks! Could not figure out what to do, will definitely try your method. Thanks.
Vangelis Christodoulou says
December 29, 2017 at 6:07 am
When under way don’t you get the lines fixed on the boom pulling ie not letting the boom swing out?
December 29, 2017 at 7:10 am
No, they go to hooks that are quite close to the gooseneck, so there is virtually no difference in length.
Evangelos Christodoulou says
December 30, 2017 at 7:16 pm
Ok makes sense. Thanks
Anonymous says
March 24, 2018 at 7:00 pm
Drives me nuts to lower the main without them!
March 25, 2018 at 3:29 am
Mike Drury read this!
March 25, 2018 at 6:53 am
That’s what I have been saying all along 😎 We need to get this rigged up once the new boom bag is made.
March 25, 2018 at 8:51 am
Mike Drury new boom bag is up already on the old lazy jacks! Just needs some finishing off on Monday x
March 28, 2018 at 12:22 am
Des Bradley
Bill Murdoch says
December 6, 2019 at 9:44 am
There is a 1994 US patent on the idea. The drawings and description would be helpful in setting up the system. https://patents.google.com/patent/US5327842A/en
Leave a Reply Cancel reply
Your email address will not be published. Required fields are marked *
Each week you’ll get:
• Tips from Carolyn • New articles & podcasts • Popular articles you may have missed • Totally FREE – one email a week
SUBSCRIBE NOW
- Questions? Click to Email Me
- Visit Our Store Cruising Guides Living on a Boat Courses Books & References


- Sails & Canvas
- Hull & Structure
- Maintenance
- Sailing Stories
- Sailing Tips
- Boat Reviews
- Book Reviews
- Boats for Sale
- Post a Boat for Sale
- The Dogwatch
- Subscriptions
- Back Issues
- Article Collections
- Free for Sailors
Select Page
DIY Lazy-jacks: Mainsail Tamers
Posted by Guy Stevens | Projects , Sails & Canvas

Take the pain out of the main, make your own lazy-jacks

The easiest way for the shorthanded sailor to control the mainsail when reefing or stowing is a set of well-fitted lazy-jacks. Lazy-jacks are made from a set of fixed or movable lines led from the upper section of the mast to the boom, with lines on each side. They guide the sail onto the top of the boom when reefing or dousing it and keep it there to be tied up at the crew’s leisure.
When properly installed, a lazy-jack system adds to safety and sail control. Lazy-jacks function well with sails with no battens, half battens, or full battens. When installed and used correctly, they prevent chafe and tearing. A well-thought-out installation makes the lazy-jacks convenient to use, puts them out of the way when stowed, and does not require expensive alterations of sails or sail covers.
There are several varieties of lazy-jacks. The fixed systems permanently attach to the mast and are not stowed. These require altering the sail cover, may chafe the sail while sailing, and sail battens may catch in the lazy-jacks, making hoisting difficult. The better systems allow the lazy-jacks to be stowed and are deployed only when the sail is being doused or reefed.
Off-the-shelf and custom-built lazy-jack systems are available. Sail-loft versions start at $200; mid-range systems cost about $400; and high-end systems can cost $1,500 or more if professionally installed. A scratch-built system can be fabricated for less than the cheapest off-the-shelf systems, and has some advantages in the way it fits and functions with your boat.
Off-the-shelf lazy jack systems are not always better
The off-the-shelf lazy jack systems are not necessarily better designs. Most off-the-shelf systems use blocks at their segment junction points. When stowed, these blocks may bang on the mast. Correcting this situation requires the installation of hooks on the mast or boom and sections of shock cord to pull the support segment away from the mast. The need for blocks at the segment junctions is questionable, and they are more costly than thimbles.
Systems that use a line through the sail can cause sail chafe and require modifications to the sail and cover. Since the average do-it-yourself sailor can’t perform these modifications, the work can be expensive. These lines can also interfere with the shape of the sail when set. Changing the sail requires re-threading the lines through the sail each time it is changed or removed, neither a quick nor an easy task.
Some systems use shock cords to support the leg segments of the lazy-jacks. However, the shock cord provides too much stretch, and the sail may fall out of the lazy-jacks. Most of these systems use a plastic clip-on fitting to secure the lazy-jacks to the boom and mast. This plastic deteriorates in sunlight and often fails within a season or two.
With about an hour more than you would invest in the installation of an off-the-shelf lazy-jack system, you can make your own custom set, tailored to your boat.
Line choices
The line you select should match your splicing abilities and rig construction. There are four types to choose from: three-strand nylon; three-strand Dacron, standard double yacht braid, and more exotic fibers, such as Sta-Set X or Spectra line. Lazy jacks made of three-strand nylon for the average boat can be assembled for about $91. The same lazy jacks in Sta-Set would cost about $160. Don’t let cost be the only deciding factor; each line has advantages and disadvantages.
Three-strand nylon is simple to splice, requiring no tools and little knowledge. It’s inexpensive and available from most chandlers for 13 cents a foot or less for 1/4-inch diameter. However it is stretchy, so it is not as well-suited for high-aspect-ratio rigs where the stretch could allow the sail to fall off of the top of the boom. It’s susceptible to chafing where it contacts other lines, and it may cause twisting when deploying the lazy-jacks, necessitating the untwisting of the support lines.
While this is the cheapest line, with the most disadvantages, it served well on my 39-foot racer/ cruiser for more than five years, until recent replacement with double yacht braid. I’ve constructed a number of lazy-jack systems using three-strand nylon for people who wanted to spend as little as possible on the initial trial of the lazy-jack system. Each system I created with three-strand nylon has occasionally required some intervention to untwist the support lines. Using this line, you could first build a three-legged system, expand to a four-legged system, or experiment with other aspects. As it is the least expensive material, making radical changes in lazy-jack rigging rarely involves more than a $30 expense.
Less stretch
Three-strand Dacron is as easy to work with as three-strand nylon. It is less expensive than yacht braid or exotic fibers and has significantly less stretch than nylon: 4.2 percent compared to 16 percent when loaded to 15 percent of breaking strength. This makes lazy-jack deployment and tensioning easier. It has less tendency to twist than nylon, lasts longer, and is significantly less prone to chafe. It is also 10 to 20 percent stronger than the same-sized nylon. It looks great on traditionally rigged vessels on which the rest of the rigging is three-strand and costs about 18 cents a foot. A system constructed with three-strand Dacron for an average boat costs about $106.
Double yacht braid line has still less stretch than three-strand Dacron – only 2.4 percent. It is less prone to chafe than either of the three-strand lines and looks a lot more at home on a boat with braided running rigging. It is more difficult to splice than three-strand line, and splicing requires the use of a fid and pusher like those produced by Samson or the Splicing Wand from Brion Toss. Both come with excellent directions. Double yacht braid eliminates twist. It costs about 36 cents a foot. A system would cost about $160 for an average boat.
The exotic lines are more expensive, and there is no need to make your lazy-jack system out of these because lazy-jacks are not normally subject to the kinds of loads these lines are meant to handle. They do rate a single mention. Should your boat have an extremely high-aspect-ratio mainsail, you might wish to make the support segments out of Sta-Set X. This line is harder to splice but has the advantage of the least stretch for the money, at 1.6 percent stretch and about 59 cents per foot. This would reduce any tendency of the high-aspect-ratio sail to stretch out the lazy-jacks and fall off the top of the boom. An alternative to splicing might be a good seizing job; it’s almost as strong and a whole lot easier.
Excessive chafe

Chafe on the mast is an issue because of noise and wear.
With the exception of a turning block for the support segment, blocks are not well suited to use in lazy-jacks; they cause excessive chafe on the sail and bang on any surface they contact. They also add unnecessary expense to the installation. They’re prone to jamming when deploying the lazy-jacks and to sunlight damage to their sheaves. Blocks are meant to make adjusting a line under load easier, but in deploying your lazy-jacks there shouldn’t be any load. The weight of the sail is placed on the lazy jacks after they have been deployed and adjusted.
There are three types of thimbles available. These are used for the inserts that go into the eye splices to reduce the chafe and friction where the segments of the lazy jacks meet.
Galvanized steel thimbles are really cheap, but they rust quickly and make a mess of the sails, mast, and anything else they contact. Nylon thimbles are cheaper than stainless steel, are a nice white color, and won’t remove the surface coating of the mast should they come into contact with it. However, they do chafe more easily and are subject to degradation in sunlight, often being the first part of a lazy-jack system to fail. Stainless-steel thimbles last longer than nylon thimbles and have the least friction. If allowed to bang on the mast, they make a racket and remove the surface coating. I use them only when I’m certain they’re not going to contact the mast. They will outlast the rest of the lazy-jack system and probably even the boat itself.
Stainless wire
Most off-the-shelf systems use vinyl-coated stainless wire for support segments. The wires are mounted to pad-eyes on the mast. Since both ends of the support segment are next to the mast when the unit is stowed, the segment bangs against the mast in rolly or windy conditions. A fixed-support segment requires lazy-jacks to be adjusted, stowed, and deployed from a spot on the boom. The disadvantage is that you have to adjust them from the center of the boom. If you position the lazy-jack controls on the mast, it’s much easier to deploy them when the boom is moving or not centered on the boat.
Mounting control lines on the mast also makes it possible to mount the support segment blocks 6 to 8 inches out on the spreaders. This prevents banging on the mast. Mounting the support segment blocks on the spreaders works best on the upper spreader of double-spreader rigs. If your boat has a single-spreader rig, or if you are mounting to the lower spreader, three-strand nylon may stretch too much and let the sail fall off of the boom. In these cases, the easiest solution is to use a stiffer line.
For free-standing rigs , a general rule for the placement of the support segment blocks is: the higher the better. About 70 to 75 percent of the height of the mast off the deck provides a good angle. If the support segment blocks are too low, the tension is more forward than upward. In this situation, the sail pushes the lazy-jacks out of the way and falls off of the boom when it is lowered.
Spreader blocks
The parts list on the previous page is for a 40-foot boat I recently equipped with lazy-jacks. On this boat I was able to use spreader-mounted blocks for the support segment. The rig is modern, so we used 1/4-inch double yacht braid for the installation. Since the support segments were spreader-mounted, I used stainless-steel thimbles. If we had not been able to use the spreaders for the support segment blocks, I would have used two Harken 092 cheek blocks at a cost of about $8.79 each.
The first step in the installation is cutting the lines for the support segments. If you’re installing lazy jacks on a double-spreader rig and are able to use the spreaders as a mount for the support segment, measure the height of the second set of spreaders to the deck. Double this measurement and add 3 feet for splicing room. You will need to cut two lines this length for the support segments, one for each side of the mast.
If you are unable to use the spreaders as a mount for the support segments, you will want to mount the support segment blocks about 70 percent of the way up the mast . Measure this spot on the mast by using a long tape and a halyard. Make sure the area is clear of other fittings and there is sufficient room to mount the cheek blocks.
If you’re mounting the support segment blocks to the bottom of the spreaders, position them about 8 inches from the base of the spreaders at the mast. Double-check the location. If there are spreader lights, they must be far enough away that the line for the support segments will not chafe on them. Make sure the drill does not hit the spreader-light wiring.
Small dimple
Once you are certain there are no obstacles, use a center punch to make a small dimple as the mark for the first hole. Drill the hole, using a little light oil on the bit. Then lightly oil the tap and tap the hole, being careful to start and keep the tap perpendicular to the bottom of the spreader. With each turn you should turn the tap back a quarter of a turn. This helps to avoid breaking the tap off in the hole because it clears the chips from the tap. When the hole is tapped, spread some Ultra Tef-Gel or anti-seize on the screw, and screw one end of the eye strap into place just barely tight. Use the other end hole as a guide. Center punch on this mark, drill, and tap it as before. But before inserting the screw, slide the block onto the eye strap. String one of the two support-segment lines thorough the block, one end on each side of the lower spreader.
If you are mounting the support-segment cheek blocks to the mast, the procedure is much the same, except you are going to measure up to the position you determined earlier and mark in the middle of the side of the mast. Using the cheek block for a pattern, drill and tap each hole. Exercise caution while drilling in the mast; go slowly so as not to over-drill and damage wire or lines in the mast. Thread the support-segment lines through the blocks, keeping one end on each side of the spreaders below you (if any).
Next, mount the cleats on the mast. They should be about level with the end of the boom, on the side of the mast. Make sure they are not going to interfere with other control lines on the mast. If they do interfere, moving the cleats up or down several inches might solve the problem. If the area on the mast is too cluttered, you can mount them about a foot or so aft on the boom, making sure you lead the support-segment control lines aft of any spreaders to avoid chafe and noise. I’ve found that moving the bottom of the cleat slightly toward the bow of the boat makes cleating the support segments a lot easier than an absolutely vertical cleat.
Various effects
Boom length, batten length, and the hand of the sail cloth all have an effect on the perfect number and placement of the leg segments for the lazy-jacks. I have had excellent performance with three-legged systems with booms up to 16 feet. Many rigs have mainsails that are shorter on the foot than the length of the boom. In these cases the sail’s foot length is the critical measurement. The best way to determine the number and placement of the legs is trial and error; every rig is slightly different.
Here are some good starting points for placement, but they are only starting points; 20 minutes of testing will make sure that the lazy-jacks are dialed in perfectly for your boat. Measure 25 percent of the length of the foot of the sail, back from the gooseneck on the boom. Mark this position on the bottom of the boom. Repeat at 60 and 85 percent of the length of the foot of the sail, and mark the bottom of the boom for these points. These will be the starting position for the legs on a three-legged system.
Both the forward leg segment and the single line that makes up the middle and aft segments should initially be 2.5 times the length of the boom. The forward leg segment passes under the boom at the mark closest to the mast and is hoisted by the eyes spliced in the support segments. It, in turn, supports the after and center leg sections in a three-legged system.
The luff of the sail is held to the mast by the sail slides, so when adjusting the forward leg segment keep in mind that it should attach to the boom at about the most forward point where the sail first starts to fall off of the boom. About 25 percent of the sail’s foot length aft of the mast is a good starting point. Too far forward, and the leg provides no support for the center section of the sail; too far aft, and the top of the sail tends to fall off the boom.
Through thimbles
The aft and center leg sections in a three-legged system make a loop. They are supported by the forward leg segments where they pass through the thimbles spliced to the ends of the forward segment. The center leg segment supports the large belly of the sail so that the sail does not spill off the boom. Slight adjustments of the center segment fore and aft can have large results.
The aft leg attachment point is generally the first place to start adjusting the system. If the sail falls out the end of the lazy-jacks, you will need to move it aft; if the center section needs more support, try moving it forward to add some support to the center section.
When you are roughing in the system and testing it, attach the middle of one of these lines to the aftmost mark on the bottom of the boom, using a constrictor knot or some good tape wrapped a couple of times around the boom. Lead the ends forward to the center mark on the boom. Tie them together making a loop out of this line. Secure it to the boom with a constrictor knot or tape. You can use a loose bowline in place of all of the thimbles while testing.
On sails that have slides on the foot, it is often possible to use these slides as mounts for the leg segments of the lazy-jacks. This does, however, limit the options for placement, and does not function well in all cases. It also means that you will have to remove the leg segments from the boom to remove the sail.
Attached to boom
Now you have a roughed in lazy-jack system. The legs should be attached to the boom well enough that you can hoist and drop the sail into them. Hoist the sail on a calm day, drop it into the lazy-jacks, and adjust until the sail stays stacked on top of the boom.
Should you have a boom over 16 feet long and the sail falls out of the middle no matter what adjustments you make, you may need a four-legged system. A simple addition to the system you already are working on makes the transformation an easy one. Instead of the forward leg supporting the center and aft leg loop, as it does in a three-legged system, it is going to become a loop just like the one between the two aft segments. Connecting the two loops are two pieces of line, each about half the length of the boom, one on each side, that are supported by the support segment. Good starting positions for the boom attachment points on a four-legged system are at about 24 percent, 45 percent, 55 percent, and 84 percent of the boom length, measured aft from the gooseneck.
Once you have tested to make sure you have the legs roughly where you want them, test to see if the system stows cleanly away. To put the system in the stowed position, ease the support segments and place the aft side of the segments under the cleats on the mast, then tension the support segment halyard. At this point you may have to shorten the forward or aft leg segments to remove any excess line that drapes below the boom. Do this by simply retying your bowline on one side of the aft or forward section. The leg sections should lie parallel to the boom when stowed. Naturally, this may change the way the segments support the sail, so hoist the sail again and drop it into the lazy-jacks, making sure that everything still looks correct before splicing the thimbles in the ends and attaching the eye straps. This is the trial-and-error part.
Anti-seize compound
Mount the eye straps that hold the leg segments, with the holes fore and aft, using machine screws drilled and tapped into the bottom of the boom. Remember to put the lines through them before attaching the second screw. Some riggers use pop rivets for these attachments, however, I have not found them to hold up as well as properly tapped screws coated with anti-seize compound.
Tie a small knot on each side of the center of the leg segments under the boom to prevent having to readjust the system periodically. Alternately, a couple of stitches through the line and around each of the eye straps looks neater and serves the same function.
Splice thimbles into all of the segments where there are bowlines. Make sure that you place the line going through the thimble in the thimble to be spliced before making each of the splices.
Using the system is straightforward: simply ease the support segment halyards on the mast, remove the leg segments from the cleat bottoms, and tension the support segment halyards. The lazy-jacks are ready for use.
Deploying the lazy-jacks allows you to drop the mainsail any time the wind is on or forward of the beam. I have used them when picking up a mooring and when sliding into a slip under sail. Simply let the mainsheet out and drop the sail. Pull the mainsheet back in when the sail falls into the lazy-jacks and you have quickly de-powered without having to head into the wind.
If your sail should hang on the track and refuse to allow the sail to drop easily, check for bent sail slides, and lubricate the track and slides with a dry Teflon lubricant.
Readers’ comments: What about sail containment systems: lazy-jacks and furlers?
We asked our readers what their thoughts and experiences were with sail hoisting, dousing, and reefing systems.
- Don Launer, of Forked River, N. J., has lazy-jacks on the jib, foresail, and mainsail of his Ted Brewer-designed Lazy Jack Schooner (what else, right?). All three lazy-jack systems are simple two-legged arrangements that do not stow. Don reports that all work well, but he needs to go head-to-wind to hoist the Marconi mainsail.
- Ron Bohannon, of Big Bear City, Calif., says his previous boat, a Phil Rhodes Chesapeake 32, had a roller-furling main. (This is the older rolling-boom type of reefing where the sail stows around the boom, rather than inside of it.) He says this system works fine as long as a main is cut properly and the topping lift is adjusted correctly. He adds, “It sure is simpler than any other system.”
- Fred Bauer, of Marblehead, Mass., says, “I have a classic boat with old-fashioned lazy-jacks, but don’t miss the Hood Stow-away system.” He points out that Dodge Morgan had the Hood system on American Promise when he sailed around the world in her. Fred says, “It’s by far the easiest and most precise way to trim sails to the power of the wind I’ve ever used.”
- Patrick Matthiesen, of London, England, sent a detailed opinion of the Hood Stoboom. He thinks it may work well with short booms but did not work well on the 22-foot-long boom of his Sparkman & Stevens CCA 47 yawl. He would not have another one.
- Gary Heinrich, of Chippewa Falls, Wis., said that he has slab reefing on his S2 9.2 with “no furling system for the main, other than the arms of those available and, in a pinch, the deck and lifelines, followed by sail ties.” He has no plans to change his S2, but has chartered larger boats with lazy-jacks and sailcovers built into the sail. On these boats it was necessary to go head-to-wind to hoist the sail, and it took more than one person to do it.
- Larry Helber, of Rochester, N.Y., said he had installed a Schaefer lazy-jack system on his Grampian 28. He liked the leather-covered blocks and the one-cleat design for storing the lines. He felt the hardware supplied was of good quality. He did say, however, that the system turned out to be a very poor design and cited problems with raising the sail and jamming of the jacks where they pass under the boom. A friend of his bought the cheapest set of lazy-jacks he could find in a catalog, and they worked better. “I would do it again (install lazy-jacks), but I would choose the cheaper version,” he says.
- Bruce Goldman, of Southfield, Mich., reminds us that almost every aspect of sailing is some kind of compromise. “We have an in-mast ProFurl system on our Beneteau Oceanis 300. The convenience, ease of sail handling, and ease of setting and striking the main and genoa more than compensate for the sad sail shape (and resulting poor performance). We had some initial trouble with the furling line, but a good wash and ample Sailcote solved that problem.”
- Jerry Powlas and Karen Larson, of Maple Grove, Minn., wondered “how complicated does all this have to be?” Our 20-foot Flying Scot had a longer boom than our C&C 30. With such a short boom, our high-aspect-ratio mainsail couldn’t get in much trouble when we dropped it. It was not control that we needed, it was order. We wanted the main to flake neatly over the boom. Obviously a neat flake has alternating panels to port and starboard. We made a very neat flake in calm conditions and then marked the luff of the main with red and green permanent markers to show which side of the boom the sail should fall on at that point on the luff. We did the same for the roach.Now when we lower, the person at the halyard at the base of the mast guides the panels to port and starboard as they fall. The roach can be made neat at the same time by another person or later by the same person. Once the luff is laid down correctly, the roach can be made to follow with minimal effort. The main was soon so well-trained that it almost always falls correctly and unaided. We think the sail is too small to require extra gear to control it. We use the same red-green markings on our heavy 110-percent jib to help us get it flaked prior to bagging it. It works so well, we will probably mark all our jibs that way.
Article taken from Good Old Boat magazine: Volume 4, Number 4, July/August 2001.
About The Author

Guy Stevens
Guy and his wife, Melissa, are working on a circumnavigation aboard Pneuma, their good old 1973 Ericson 39. Currently, they're in the Marquesas.
Related Posts

Tanks a Lot: Part 2 – Rescue that rusting tank
July 24, 2019

The Fore and Aft Rig
July 17, 2019

Polished Up
September 1, 2020

How to Build a Dog Bowl Solar Vent
August 15, 2020
Now on Newsstands
Join Our Mailing List
Get the best sailing news, boat project how-tos and more delivered to your inbox.
You have Successfully Subscribed!
Home > Resources > How to Install a Precision Sails Lazy Jack Bag System
How to Install a Precision Sails Lazy Jack Bag System
12 June 2017
Ask Precision Sails , Hardware , Products and Accessories Tags: How to install lazy jacks , lazy bag , Lazy Cradle , Lazy Jack System , mainsail bag , Stack pack
The Lazy Cradle is possibly the easiest way to cover your mainsail and is perfect for short-handed crews. One simply lowers the halyard, settling the sail in the cover, and zips the top for complete coverage.
The Precision Sails Lazy Cradle Boom Cover is manufactured from solution dyed Acrylic Sunbrela brand fabric with polyester or nylon webbing so that, while it keeps your sail clean and protected, it is itself appealing and compliments your boat. This fabric is used specifically because it can offer protection against physical abrasion as well as the elements, especially UV damage. As well, its ability to breath prevents any threat of mildew.
Along with the Boom Cover, the Cradle comes complete with mast collar, lines and rings. The cover is stiffened at the top with battens(optional) that hold the cover open when raising or lowering the sail and provide a straight clean look when not in use. A YKK zippered flap closes the top as well as the forward end. The zipper sliders are fitted with lanyards and close bottom up for easy use.
Much like a sail, the sail cover of each boat is unique and should be tailored to the specific dimensions required by the vessel’s set up. At Precision Sail we provide an easy to use and comprehensive measurement form that will ensure your cover operates effectively so that you can get the most out of your sails.
How to Install Video Precision Sails Lazy
3 Grommet Bag Video Below
Suggestion :
Rough out the layout of your Precision Sails Lazy Jack Bag on the lawn or floor to ensure good angles are achieved to support the bag well. Use a 2X4 or a long line to simulate your mast and use the bag to simulate your boom. The goal is to have the bag supported and the lines to guide the sail down into the bag.
Lazy Jack Bag and System Install Instructions:
There are many ways to arrange the lines, however my preference for a 4 grommet system is to make 4 sections of rope and use 3 rings per side. (See Diagram Below) For a 3 grommet bag use the same general layout with 3 lines and only 2 rings.
Install Battens
If you chose to order round fiberglass battens with your bag, attach the battens together with the sleeves and cut to length if needed (use hacksaw)
If you didn’t order battens, 1″ PVC piping works well. Cut to length and insert in the batten pockets on both sides of the bag
Lines 1 & 2 – Rings 1 & 2
Line 1 & 2 should be approximately the same length.
Line 1 runs from grommet 1 to grommet 2 through ring one. (do not attach the ring to the line)
Line 2 runs from grommet 3 to 4 through ring two (do not attach the ring to the line)
To attach Line 1 and Line 2 to your bag. Run the line through the grommets and tie directly to the batten inside the bag. A bowline knot is a good choice .
Line 3 – Ring 3
Line 3 is tied to the ring on Line 1 runs through ring 3 and is tied to the ring on line 2.
Control Line (Line 4)
Line 4 (control line) is tied to ring 3 and runs vertically through the block on your mast and down to a cleat toward the base of the mast.
Control Line Blocks – The control line will run from the highest ring (ring 3) up to a set of blocks on the mast and down to a cleat toward the base of the mast.
The blocks should be installed approximately 1/2-3/4 from goose neck to the top of the mast (the longer the boom the higher you should install). The exact location will depend on other lines, gear, spreaders on your mast. Find a location that is at least 1/2 the way up the mast to ensure there is a good angle to keep the lines high enough to catch the sail.
See Diagram Below: (Four Grommet Bag)
Pictures courtesy of Carl Kotheimer
Operating your Precision Sails Lazy Bag:
Once you bag is installed you are ready to go out and give it try. You have two choices while sailing:
- Leave the lazy jack lines and the bag up.
- Release the lazy jack lines by releasing the support line from the cleat at the base of the mast. Bring the lines close the mast and tie them to the mast out of the way of the mainsail (use a line or a bungee). The bag will now also be lowered and can be attached to the boom (sail ties work well) and kept out of the way of any rigging or the sail.
- When you are ready to lower your mainsail, prepare the lines and the bag back their original position and lower the bag directly into the bag allowing it to flake naturally. Once inside the bag close the zipper.
If you have any questions please reach out for help.
888-958-5638
precisionsails
Related Posts

Full Battens vs Partial Battens vs 2 Full plus 2 Partial Battens
Full Battens VS Partial Battens At
Precision Sails we are asked every day during our customer quote consultation “Should I choose Full Battens or Partial Battens for my new mainsail?” Whether you are cruising or racing you will need to examine the pros and cons of adding full battens to your main sail.Positive Aspects of Full […]

My Need for Cruising Speed Demands a Great Suit of Sails
My Need for Cruising Speed Demands a Great Suit of SailsI like to sail fast mostly in the heavy winds that Lake Ontario throws.

How to Fold a Sail (Mainsail or Headsail) For safe Storage
Knowing how to fold a sail correctly will make your sails last longer and make them easier to set. Replacement sails are an investment and folding them properly is important to their longevity.
" * " indicates required fields

Lazy Jacks: A Simple Solution for Sail Handling
If you are a sailor, you know how challenging it can be to raise and lower the mainsail, especially on larger boats or in windy conditions. You have to deal with heavy and unruly sailcloth, battens that get caught on shrouds or spreaders, and the risk of losing control of the sail and damaging it or injuring yourself or others. That’s why many sailors use a system called lazy jacks to make sail handling easier and safer.
Lazy jacks can be used with or without a stack pack, which is a type of sail cover that stays attached to the boom and zips closed over the sail when not in use. A stack pack protects the sail from sun damage and eliminates the need for a separate sail cover and snaps or clasps.
In this article, we will explain what lazy jacks are, how they work, what are their advantages and disadvantages, and how to use them properly. We will also review some of the best lazy jack systems available on the market and give you some tips on how to install them on your boat.
What are Lazy Jacks?
Lazy jacks are a simple but effective solution for sail handling that has been used for centuries by sailors around the world. The name comes from the fact that they make sailing easier and less labor-intensive, allowing sailors to be “lazy” when dealing with the mainsail.
Lazy jacks consist of a series of lines that run from a point on the mast (usually just above the spreaders) to several points on the boom (usually two or three on each side). The lines form an inverted V shape on each side of the sail, creating a pocket that catches the sail when it is lowered.
The lines can be attached to the mast and the boom with pad eyes, blocks, rings, or knots, depending on the type and design of the system. Some systems have adjustable lines that can be tightened or loosened to change the size and shape of the pocket. Some systems also have retractable lines that can be pulled up to the mast or down to the boom when not in use, to avoid interference with the sail.
Lazy jacks can be used with any type of fore-and-aft rigged sail, such as a mainsail, a mizzen sail, or a gaff sail. They can also be used with any type of reefing or furling system, such as slab reefing, roller reefing, or in-mast furling.
How do Lazy Jacks Work?
Lazy jacks work by guiding and supporting the sail as it is raised and lowered, making it easier to control and secure. When you raise the sail, you have to make sure that it stays within the pocket formed by the lazy jacks and avoid snagging the battens on the lines. This may require some careful steering and coordination between the helmsman and the crew.
When you lower the sail, you simply ease the halyard and let the sail drop into the pocket. The lazy jacks will hold the sail on top of the boom, preventing it from falling overboard or onto the deck. You can then reef or furl the sail as needed, without having to leave the cockpit or struggle with the sailcloth.
If you have a stack pack, you can also zip it closed over the sail, protecting it from UV rays and weather damage. This way, you don’t have to remove and store a separate sail cover every time you use or stow the sail.
What are the Advantages of Lazy Jacks?
Lazy jacks have many advantages for sailors who want to make sail handling easier and safer. Some of the benefits of using lazy jacks are:
- They save time and effort when raising and lowering the sail, especially on larger boats or in windy conditions.
- They reduce the risk of damaging or losing the sail due to wind gusts, waves, or human error.
- They allow you to reef or furl the sail quickly and easily, without having to leave the cockpit or climb on the boom.
- They make sailing more enjoyable and less stressful, as you don’t have to worry about dealing with a heavy and unruly sail.
- They can be used with any type of sail or reefing system, and can be adapted to different boat sizes and configurations.
- They are relatively inexpensive and easy to install, and require little maintenance.
What are the Disadvantages of Lazy Jacks?
Lazy jacks are not without some drawbacks, however. Some of the disadvantages of using lazy jacks are:
- They can interfere with the sail shape and performance, as they create friction and windage on the sail.
- They can snag the battens or the sailcloth when raising the sail, causing tears or jams.
- They can be noisy and annoying when sailing in light winds, as they flap against the mast or the boom.
- They can be difficult to adjust or retract, depending on the type and design of the system.
- They can add clutter and complexity to the rigging, and may not suit the aesthetic of some boats.
How to Use Lazy Jacks Properly?
Lazy jacks are not complicated to use, but they do require some attention and care to avoid problems and maximize their benefits. Here are some tips on how to use lazy jacks properly:
- Before raising the sail, make sure that the lazy jacks are properly tensioned and aligned, and that there are no twists or tangles in the lines. If you have retractable lazy jacks, make sure that they are fully extended and secured.
- When raising the sail, watch the sail carefully and steer the boat into the wind to keep the sail within the pocket. Avoid letting the battens catch on the lazy jacks, as this can damage the sail or stop it from going up. If a batten gets snagged, ease the halyard slightly and try to free it gently. Do not force it or pull it hard, as this can rip the sail or break the batten.
- When lowering the sail, ease the halyard slowly and let the sail fall into the pocket. Do not drop the sail too fast or too far, as this can cause it to spill overboard or onto the deck. If you have a stack pack, zip it closed over the sail as soon as possible to protect it from sun damage. If you don’t have a stack pack, flake or fold the sail neatly on top of the boom and secure it with ties or straps.
- If you have adjustable lazy jacks, you can loosen them slightly when sailing in light winds to reduce friction and noise on the sail. You can also tighten them slightly when sailing in strong winds to increase the support and stability of the sail. Do not over-tighten or over-loosen them, as this can affect the sail shape or cause the sail to fall out of the pocket.
- If you have retractable lazy jacks, you can pull them up to the mast or down to the boom when not in use, to avoid interference with the sail. Make sure that they are properly secured and out of the way. Do not leave them loose or dangling, as this can cause them to get caught on something or damage the sail.
What are the Best Lazy Jack Systems?
There are many types and brands of lazy jack systems available on the market, ranging from simple DIY kits to sophisticated commercial products. The best lazy jack system for you will depend on your boat size, sail type, reefing system, budget, and personal preference. Here are some of the best lazy jack systems that we recommend:
- Harken Lazy Jack Kit : This is a high-quality and easy-to-install lazy jack kit from one of the leading sailing equipment manufacturers. It comes with pre-swaged wire legs, low-friction bullet blocks, eyestraps, line, and fasteners. It can be used with or without a stack pack, and can be adjusted or retracted as needed. It is suitable for boats up to 45 feet long.
- Sailrite Lazy Jack Kit : This is a versatile and affordable lazy jack kit from a popular sailing supply company. It comes with Dacron line, Harken bullet blocks, eyestraps, screws, and instructions. It can be used with or without a stack pack, and can be customized to fit different boat sizes and configurations. It is suitable for boats up to 40 feet long.
- Schaefer Lazy Jack System : This is a durable and reliable lazy jack system from a reputable sailing hardware manufacturer. It comes with stainless steel legs, aluminum cleats, nylon blocks, eyestraps, line, and fasteners. It can be used with or without a stack pack, and can be adjusted or retracted as needed. It is suitable for boats up to 50 feet long.
How to Install Lazy Jacks on Your Boat?
Installing lazy jacks on your boat is not very difficult, but it does require some tools and materials, as well as some basic rigging skills. Here are the general steps on how to install lazy jacks on your boat:
- Measure the length and width of your sail, and determine how many support lines and attachment points you will need. A typical lazy jack system has two or three support lines on each side of the sail, attached to the boom just forward of the leech end of a batten. The distance between the attachment points on the boom should be about 10% of the sail’s foot length. The distance between the attachment points on the mast should be about 60% of the mast’s height above the boom.
- Mark the attachment points on the mast and the boom, and drill holes for the pad eyes or blocks. Use a center punch, a drill bit, a tap, and cutting oil to make clean and precise holes. Secure the pad eyes or blocks with screws or rivets, and apply sealant to prevent leaks.
- Cut the line for the halyard and the support lines, and whip or melt the ends to prevent fraying. Use a hot knife or a lighter to melt synthetic line, and use whipping twine and a needle to whip natural line. You can use different colors of line for the halyard and the support lines to make them easier to identify.
- Attach one end of the halyard line to a pad eye or block on the mast, and run it through a cheek block at the base of the mast. Secure it with a cleat or a jammer near the cockpit. Leave some extra line for adjustment.
- Attach one end of each support line to a pad eye or block on the boom, and run them through the corresponding pad eyes or blocks on the mast. Join them with the halyard line using a knot, a ring, or a block. Leave some extra line for adjustment.
- Raise and lower the sail several times to test and adjust the lazy jack system. Make sure that the sail stays within the pocket and does not snag on the lines. Adjust the tension and length of the lines as needed, and trim the excess line. You can also add some chafe protection to the sail where it contacts the lines, such as leather patches or tape.
- If you have a stack pack, attach it to the boom with zippers, snaps, or velcro. Attach the lazy jack lines to the stack pack with ties or clips. Zip the stack pack closed over the sail when not in use.
Key Takeaways
- Lazy jacks are a network of lines that run from the mast to the boom, creating a pocket on each side of the sail.
- Lazy jacks make sail handling easier and safer, as they guide and support the sail as it is raised and lowered and prevent it from falling overboard or onto the deck.
- Lazy jacks can be used with or without a stack pack, which is a type of sail cover that stays attached to the boom and zips closed over the sail when not in use.
- Lazy jacks have some advantages and disadvantages, such as saving time and effort, reducing the risk of damage or loss, interfering with the sail shape and performance, and snagging the battens or the sailcloth.
- Lazy jacks are not complicated to use, but they do require some attention and care to avoid problems and maximize their benefits. They also need to be properly installed and adjusted to fit your boat and sail.
The cost of lazy jacks depends on the type and brand of the system, as well as the size of your boat and sail. You can buy a ready-made lazy jack kit from a sailing equipment manufacturer or retailer, or you can make your own lazy jack system with some basic materials and tools. A typical lazy jack kit costs between $100 and $300, while a DIY lazy jack system costs between $50 and $100.
Some lazy jack systems have retractable lines that can be pulled up to the mast or down to the boom when not in use, to avoid interference with the sail. To retract them, you simply release them from their cleats or jammers, and secure them with ties or clips. Other lazy jack systems have fixed lines that cannot be retracted but can be loosened or tightened as needed. To stow them, you simply loosen them slightly and tie them to the mast or the shrouds.
Lazy jacks are not the only solution for sail handling. Some alternatives to lazy jacks are:
- Boom furling: This is a system that allows you to roll up the sail around the boom, using a handle or a motor. It is very convenient and easy to use, but it is also very expensive and complex, and it can affect the sail shape and performance.
- In-mast furling: This is a system that allows you to roll up the sail inside the mast, using a handle or a motor. It is also very convenient and easy to use, but it is also very expensive and complex, and it can affect the sail shape and performance.
- Dutchman system: This is a system that uses vertical lines that run through the sail, and guide it into neat folds on top of the boom when lowered. It is less expensive and complex than boom or in-mast furling, but it still requires some modifications to the sail and the rigging, and it can interfere with the sail shape and performance.
Saiful Emon is the founder and editor of Sun Sea Skis , a sailing blog for adventure seekers. He loves sailing, traveling, and sharing his experiences with others. He also writes about fitness, wellness, business, and marketing in his spare time!
How a Boom Vang Can Improve Your Sailing Performance?
How much does it cost to paint a boat hull a complete guide, leave a comment cancel reply.
Save my name, email, and website in this browser for the next time I comment.
Lazy Jacks for Your Sailboat: Tips & Tricks
THIS POST MAY CONTAIN AFFILIATE LINKS. PLEASE READ OUR DISCLOSURE FOR MORE INFO.
Our boat is complex. There are lots of moving parts, standing parts, parts work pretty well or parts that could use improvement. While circumnavigating, we’ve learned so much about our boat, but one of our very early lessons was on lazy jacks.
Table of Contents - Click to Jump
What are Lazy Jacks?
Our boat, Starry Horizons, a Fountaine Pajot Helia 44, has a stack pack for the mainsail. This stack pack attaches to the boom through a track. It closes around the sail with a zipper to keep the sail in a bundle. The lazy jacks keep the stack pack upright. The stack pack has a batten down the length of either side and integrated into the stack pack (and around the battens) are four loops on either side.
The lazy jacks tie to those loops. The part of the lazy jacks connected to the stack pack are the legs. Each leg is tied to the stack pack loop on either end, so you have four lines that make up your legs, all eight ends of the legs tied to the stack pack.
The next part of the lazy jacks is the risers. The risers run from the legs up to a pulley on the mast and then down to the base of the mast. There, they usually have their own cleats on either side where you secure the lines.
A pulley connects the risers and to the middle of the legs – or at least it should be! We were discussing lazy jacks with one FP owner. While we investigated his problem, we discovered that he didn’t have pulleys, the installers had simply tied the risers to the legs via a bowling knot. This is going to cause chafing issues with the lines so he replaced the bowlines with pulleys.
It is important that the lazy jacks never take the full weight of the sail and the boom. They are just to keep the sail and stack pack centered. The topping lift raises the boom up and takes a majority of the weight of the sail.
Why Do Boats Have Them?
Lazy jacks serve a couple of purposes. Aside from keeping the stack pack on top of the boom, they also help guide the mainsail down when you drop it. Ideally, your mainsail will naturally flake as you lower it down inside the stack pack.
When Should You Adjust Your Lazy Jacks?
We do not adjust ours at all. When you raise the mainsail, the boom lifts higher than it does when the weight is on the topping lift. This creates slack in the lines when raising the mainsail. When we drop the mainsail, we first ease our main halyard down until the topping lift is tight. This brings the lazy jacks back to their usual tightness, and then we finish dropping the sail.
If we adjust the topping lift for any reason, we adjust the topping lift. We have a line marked on our topping lift that aligns with the topping lift clutch in the cockpit. This ensures we get the boom to the same height every time.
Our Biggest Problem
Very early in cruising, we discovered that when raising your mainsail, the lazy jacks get in the way. Our mainsail has full battens, and the leech (the aft part of the sail which flogs) end of the battens often get caught on the upsidedown Y shape in the legs.
We complained about this problem to our friend Spike, who was the skipper of the Gunboat Tribe. He pointed out an easy solution: add a second pulley (or low-friction ring ) out from the mast. David and Spike got to work and lashed a low-friction ring on our diamond stays using thin Dyneema. This angles the lazy jacks away from the mast and makes it less likely that they will catch the battens while raising the mainsail.
The Boat Galley offers a way to loosen your lazy jacks and move them forward just before raising the mainsail, but that’s two trips to the mast that you may not have to take.
Replacing Lazy Jacks
Once set up properly, they are very easy to replace. I’ve replaced ours once. All you need is the replacement line and your knowledge of the most important knots for sailors – the bowline! The legs of the lazy jack attach to the stack pack loops with a simple bowline knot. Use a hot knife with the rope cutter attachment to trim your rope and use our tricks to replace running rigging to remove the old lazy jack and replace it with the newer one.
Great idea…but how do you attach the extra pulley? With lashings you say…but doesn t it slide down? Thanks
Nope, doesn’t slide. Lashings done properly won’t slip.
How does the boom movement work when the lazy jack lines are no longer centred on the boom?
No, it doesn’t interfere with the boom swing. The lazy jacks are still even and they have no problem going to one side or the other. We often move the boom at anchor when we are using the lounge deck. Under sail, of course, your lazy jacks are loose as the main is holding the boom up.
Thanks, we are still searching for a solution… we’ve been using Cat Impi’s solution which is just free the main sheet an let the boom out to follow the wind, and this works well in stable seas and constant wind, but not so much if the seas are rough… talked to one guy who ran the lazy Jack’s to blocks on the end of the spreader and then to the mast and down; never got a clear answer as to how he controlled the extra tension in the lines when down wind and the boom was well out…
Pulling the lazy jack’s forward and down is appealing, but wonder if the sail would fall out a bit over the boom… might try it and see… I don’t think I need to do anything but connect a line to the top block on each side and pull it down once I loosen the lazy jack’s…
Your way maybe simpler, but a couple of questions: 1) any concern about extra tension on your rigging. 2) was there issue with extra tension on the jack lines when the boom swings out downwind.
Getting used to life on the hard?
Hey Rick! We haven’t had any issues with additional tension anywhere. Let us know which route you decide to go with!
Leave a Reply Cancel reply
Your email address will not be published. Required fields are marked *
Notify me of followup comments via e-mail. You can also subscribe without commenting.
This site uses Akismet to reduce spam. Learn how your comment data is processed .
Search form
Sailing with lazy jacks and stack packs.

What are lazy jacks and stack packs?
Lazy jacks are networks of lines that are rigged along each side of the mainsail from multiple points on the boom or a stack pack to a point on the mast just above the spreaders, at about 60% the mast's height. Their purpose is to hold the mainsail on top of the boom when it is lowered.
Typically, lines called "legs" are joined with single lines called "risers" to form two upside-down Y shapes. However, lazy jack legs and risers can be rigged in a variety of configurations. Also, the legs can be joined to the risers with blocks, rings, or even tied together. The space between the two sets of lazy jacks on either side of the sail is known as the "pocket."
The stack pack (sometimes called a lazy pack or lazy bag) is a modern type of a sail cover. It is secured to the boom and zips closed at the top to protect the sail from sun damage when it's not in use.
Lazy jacks can be set up with or without a stack pack. When a stack pack is present, the lazy jacks are tied to the stack pack to support it. With no stack pack, the lazy jacks are rigged directly to the boom.
lazy jacks and stack pack system image.jpg

Nine yachts in the Modern Sailing School & Club fleet are equipped with lazy jack systems. Only one of these has lazy jacks with no stack pack.
- Fiore Italia (Beneteau Oceanis 31)
- Kokomo (Catalina 320) - lazy jacks only, no stack pack
- Traharta (Beneteau Oceanis 35)
- Auriah (Beneteau Oceanis 37)
- Sijambo (Beneteau Oceanis 423)
- Ry Whitt (Jeanneau 409)
- Coho II (Spencer 1330)
- Vela Mare (Seawind 1160 Catamaran)
- Kanaloa (Fontaine Pajot Lavezzi 40 Catamaran)
Advantages
- On larger boats, a mainsail can be very heavy and unweildy to handle, especially in high winds. When dousing, lazy jacks guide the mainsail into the stack pack and keep it neatly flaked on top of the boom - instead of flopping all over the deck. In San Francisco Bay, lazy jacks and stack packs are particularly useful, even on smaller boats.
- Since a stack pack remains on the boom even while sailing, there's no separate sail cover to wrestle with and no need to fiddle with snaps or clasps at the bottom. After dousing the mainsail, simply zip up the stack pack and you're done!
- When hoisting the mainsail, batten ends can get snagged on the lazy jacks. It takes a bit of caution and precision steering to raise the main without snagging it.
- A stack pack adds windage that can detrimentally affect sailing performance to some degree. For many leisure sailors and cruisers, this is not a major concern.
- Lazy jacks are not intended to replace the topping lift as support for the boom. Never loosen the topping lift to the point that the lazy jacks bear the boom's weight.
How To Hoist a Mainsail with Lazy Jacks
Your goal is raise the mainsail without snagging the battens on the lazy jacks. The trick is for the helmsman to watch the sail as it goes up, steer carefully, and use the breeze to help keep the mainsail in the pocket between the lazy jacks.
- Steer the boat to head the bow into the wind. Keep the boat pointed as straight into the wind as possible.
- Loosen the mainsheet and begin hoisting the mainsail.
- As the mainsail approaches the point where the legs join the risers, keep a close eye on the sail. If the wind is pushing the sail into one of the legs, steer towards the wind until the sail is luffing evenly between the lazy jacks (in the pocket) on both sides again.
- If a batten gets snagged on the lazy jack, immediately instruct your crew to stop hoisting, then lower the sail until the batten is clear of the line. Steer the boat towards the wind just until the wind pushes the sail back into the pocket.
Additional Tips
- In "Hurricane Alley" (the entrance to Richardson Bay, the Sausalito arm of San Francisco Bay), winds often blow in a circular or erratic pattern, which can complicate hoisting a mainsail with battens and lazy jacks. Before hoisting the mainsail, check the masthead windex frequently to determine if wind direction is steady. If not, consider motoring to a location such as Racoon Straights or The Slot where the wind direction may be more steady. Note that heavy winds will luff the mainsail more vigorously, increasing the odds that you'll experience a snag. (Wind conditions and directions on the Bay may vary by season and weather.)
- Never force a stuck sail by grinding hard on a winch. Excessive force could damage the sail, lazy jacks, or other components.
How To Douse the Mainsail
Hoisting the mainsail may require attention and skill, but dousing is a breeze - and the best part of sailing with lazy jacks!
- If conditions and crew size permit, send a crew member forward to stand in front of the mast and evenly flake the luff of the sail as it comes down.
- Steer to point the boat's bow into the wind and loosen the mainsheet.
- If a crew member is at the mast to flake the sail, ease the main halyard in a controlled manner to facilitate flaking. Otherwise, simply douse the sail and let it fall into the stack pack.
- Zip the stack pack closed. That's it!
Additional Tip
If the mainsail didn't flake evenly into the stack pack as it was doused, the stack pack may be difficult (or impossible) to zip closed. If conditions at the dock permit, hoist and douse the sail again and stand at the mast to flake it evenly as it comes down. Also, it helps to tug the leech to straighten out the sail, if necessary.
Coho II mainsail lazy jacks and stack pack.jpg

Article by Mary Elkins on February 6, 2020
Share This Page
Testimonials.
I love sailing in the San Francisco Bay and greatly appreciate everything that MSC has to offer, the classes, clinics, club sails, racing and charters. I enjoy our supportive sailing community and use every opportunity to spend time on the water. After obtaining the certifications from MSC I did my first charter in Croatia in 2022 with my family. It was amazing and we’re looking forward to returning soon!

I try to get out on the water every week: out the Gate, around Angel, up Raccoon - I love it all. After 18 years as a member of OCSC in Berkeley, I learned to sail the bigger boats at Modern by taking ASA 103 and 104. My ASA 104 instructor Dave Russell was terrific. Also, Captain Bill Moreland has been very generous in giving informal advice whenever I’ve asked him. Thanks to Bill, I no longer have any anxiety about docking!
Since many, many years, I had the dream to sail underneath the Golden Gate bridge. On October 14th last year, my dream became true. Thanks to our dear friend Aaron Fritz who made it possible and organized this cruise for us. With this adventure I was able to achieve one more milestone on my sailing career.
Finally on the water, it was great! Full moon made the flows even stronger and it was like sailing in a washing machine.
I did my sailing education in the English Channel, where the situation with the wind and flows is comparable to the San Francisco Bay. So I felt pretty much "at home" being on the helm in the Bay.
I hope our skipper Stan Lander enjoyed this day cruise too. We, definitely did! It was an unforgettable experience for all of us.
A very big thank you to all of you who made it possible, that my dream became reality! Also thank you for the MSC flag I got at the end of the day. It found it's place in my study, where I can see it daily.

View All Testimonials
Follow us on Social Media

Modern Sailing School & Club
Sausalito Location 2310 Marinship Way, Sausalito, CA 94965 (415) 331-8250 (800) 995-1668
Berkeley Location 1 Spinnaker Way, Berkeley, CA 94710 (415) 331-8250 (800) 995-1668
Map / Directions
You are here.
What Are Sailing Lazy Jacks?

Last Updated by
Daniel Wade
June 15, 2022
If you ever find yourself struggling with hauling down the mainsail, do not reinvent the wheel since people already have sailing lazy jacks!
Lazy jacks are simply rigs that are put into your boom and mast to make raising and lowering the mainsail easier in any condition or with limited manpower. They work through a simple series of lines and come in multiple varieties depending on ship construction and budget.
No matter what kind of construction you choose, getting a sailing lazy jack will surely make your outings that much more enjoyable. In fact, even if you have a full crew, using them can help you save time and navigate better without having to worry about reefing or fighting with your mainsail. However, there is a lot of confusion over the different types of lazy jack systems out there, and this article hopes to conglomerate into one place all the questions you might have ever had that you cannot find in one place.
After combing through and reviewing dozens of first-hand accounts from people who have used lazy jack systems across a wide range of rigs and brands, we have compiled a list of common questions, problems, solutions, and background to make this the best beginner’s guide for lazy jacks possible. While not all-encompassing, this should serve well as a springboard for further questions on lazy jacks once you start looking into them.
Table of contents
Why Get a Lazy Jack?
Lazy jacks are great for a wide range of sailors and sailboats. While lazy jacks save the most time and hassle with larger sailboats or single sailors, that is not to say every sailboat would not get an advantage out of them. After all, every sailboat has the same problem of having to lower and raise a mainsail, and every boat does not have the luxury of favorable weather conditions. By getting a lazy jack system, you can save time and frustration that this task normally brings and be able to focus on more important things like the safety of navigation.
This is probably the single most important reason to get one of these systems, especially for solo sailors, because trying to fight the wind, the sail, and keep a steady course in a dense traffic environment, like entering or leaving port, is an inherently dangerous evolution. By being able to cut out some of the required manpower and focus more time on safely navigating, you can save yourself a lot of headaches in the future.
What Does a Lazy Jack System Consist Of?
One of the best parts about lazy jacks is that they can be as simple or as advanced as you want them to be depending on your individual circumstances. In its most basic form, lazy jacks will need at a minimum line, several pad eyes, blocks or rope thimbles, and possibly a bag. That is it!
Of course, you will also need tools and material to help install a lazy jack such as a hammer, drill, tape measure, center punch, screwdriver, and rivets. However, this kind of logistics is only for the more advanced commercial systems which brings us to our next question: commercial or do-it-yourself?
Commercial or DIY Lazy Jacks?
The first major decision you will have to make before getting a lazy jack is going to the commercial or DIY options. One of the main disadvantages of commercial lazy jacks is the cost. For larger sailboats, these kits can run up into the hundreds or thousands of dollars depending on the size of the sailboat you have. Additionally, these kits only come with instructions and you would still have to pay someone else for installation if you did not want to do it.
For do-it-yourself kits, there is a plethora of information and guides online that explain in detail what materials you will need, where to put them, and how to install them. In fact, most of the major marine companies even publish their manuals like this one for free online on how to install the lazy jack system and these are chock full of useful information.
When done correctly, a DIY lazy jack system is the better option for sailboats less than 50 feet and for usually less than 50 dollars. In fact, you can usually repurpose most of the materials you probably already have like lines, rope thimbles, and cleats. Even larger sailboats would see the limited utility in getting a commercial kit since they would be geared more towards a specific brand of the boat that you might not have.
What Kinds of Lines to Use?
Choosing the kind of line you will use is probably the last big decision you will make since this will directly affect the performance of your lazy jack system. When choosing lines, you need to focus on strength and durability. The key here is to strike a balance between having enough strength to handle your mainsail while also not being too tough or gritty to damage your sail when underway.
For most people, using 1/8” or 3/16” is plenty enough strength. Additionally, synthetic lines like nylon or polyester work best since they are durable, lightweight, and can be easily spliced, which are all qualities that you will need when setting up your rig. The main reason why you want to use the right size line is not only to ensure that you have enough strength to hold in the mainsail and that the system functions properly but if the lines are too large this may also cause unnecessary chaffing to your mainsail. While this is surely not an exhaustive list by any means, since you could probably write an entire article on lines alone, these are a few things to consider when starting to look at lines if you have absolutely no idea where to start.
What Options Are Available?
For lazy jack systems, both DIY and commercial, there are three main systems to choose from:
- Two-line system
- Three or four line system
- Dutchman system
Determining which system to get largely depends on the size of your mainsail. For those with smaller or medium-sized boats, a two-line system should be just fine. For those with larger sails, a three or four-line system would provide better support to fight against a larger sail. For the Dutchman system, this is better suited for those with battens
Two-Line System vs. Three and four-line systems
There is really no right or wrong answer for what kind of system you need to get for your sailboat. After all, the whole purpose of the lazy jacks is to help guide your mainsail back onto the boom to help stow it. However, before you go out and get a whole bunch of line and start connect lines to your boom and mast, consider a few pros for a two-line system:
- Easier to set up
- Less material to use
- Less opportunity to catch on your sail
However, despite a two-line system’s simplicity, there are a few drawbacks:
- Provides less support
- Not suitable for larger sails
- Loss of redundancy if a line parts
Three and four-line systems are obviously needed for those with larger sails and help those who want to have greater support and redundancy. However, they too have a few cons:
- More difficult to rig
- Usually has blocks that need to be secured
- Less novice-friendly
Dutchmen System
One of the main problems with sailboats with lazy jacks is that if you have battens installed they frequently get caught when hoisting the mainsail. For those sailboats, it is recommended to use the Dutchmen system. The Dutchmen system prevents battens from getting caught in the lazy jack lines by having lines interwoven into the mainsail every few feet through fairleads. These leads help raise and lower the sail like a window shade.
While this system is great for those with battens, unless you have sail-making experience, you would not be able to make this system on your own. Additionally, this system requires the use of a topping lift line. Since not all sailboats come equipped with this line you would have to add it on.
How Does a Lazy Jack Work?
Operating a lazy jack is rather simple. After all, if it was not it would not be as popular as it is today. In its most basic form, the pilot can operate the lazy jack by pulling the lazy jack off its cleat and then attaching the hooks to the boom where it is anchored. You then raise the mainsail and get underway.
No matter whether you have a two, three, or four-line system, the lines act as a guide when you are ready to retrieve the mainsail. To keep the rig anchored, you will usually have two pad eyes drilled into the mast and then the lines will be fastened to the boom. The lines should ideally cover three-quarters of the surface area of the sail and wherever there is a junction a rope thimble or block should be used.
When retrieving a mainsail, you simply hook the lazy jack back together and then let the sail flake itself down onto the boom. While this might be easier for sails with battens on them, for those without this extra process it might be kind of a pain and take some of the utility out of having a lazy jack.
Related Articles
I've personally had thousands of questions about sailing and sailboats over the years. As I learn and experience sailing, and the community, I share the answers that work and make sense to me, here on Life of Sailing.
by this author
Sailboat Parts
Most Recent

What Does "Sailing By The Lee" Mean?
October 3, 2023

The Best Sailing Schools And Programs: Reviews & Ratings
September 26, 2023
Important Legal Info
Lifeofsailing.com is a participant in the Amazon Services LLC Associates Program, an affiliate advertising program designed to provide a means for sites to earn advertising fees by advertising and linking to Amazon. This site also participates in other affiliate programs and is compensated for referring traffic and business to these companies.
Similar Posts

How To Choose The Right Sailing Instructor
August 16, 2023

Cost To Sail Around The World
May 16, 2023

Small Sailboat Sizes: A Complete Guide
October 30, 2022
Popular Posts

Best Liveaboard Catamaran Sailboats
December 28, 2023

Can a Novice Sail Around the World?
Elizabeth O'Malley

4 Best Electric Outboard Motors

How Long Did It Take The Vikings To Sail To England?

10 Best Sailboat Brands (And Why)
December 20, 2023

7 Best Places To Liveaboard A Sailboat
Get the best sailing content.
Top Rated Posts
Lifeofsailing.com is a participant in the Amazon Services LLC Associates Program, an affiliate advertising program designed to provide a means for sites to earn advertising fees by advertising and linking to Amazon. This site also participates in other affiliate programs and is compensated for referring traffic and business to these companies. (866) 342-SAIL
© 2024 Life of Sailing Email: [email protected] Address: 11816 Inwood Rd #3024 Dallas, TX 75244 Disclaimer Privacy Policy
You are using an outdated browser. Please upgrade your browser .
Moscow International Business Center (Moscow City)
- Guide to Russia
What can you do at Moscow City?
- Dine in style: Moscow City is home to 100+ cafes and restaurants, including Europe’s highest restaurant and ice-cream shop
- See Moscow like never before: Ascend to one of Moscow City’s observation decks for an unparalleled panorama of Moscow
- Admire world-class architecture: Each of Moscow City’s skyscrapers has distinctive architecture and design
- Learn something new: Visit the Museum of High-Rise Architecture in Moscow or the Metro Museum
Moscow City is a multifunctional complex in the west of Moscow, which has come to represent the booming business of Russia’s capital. Its skyscrapers enrich Moscow’s skyline, contrasting the medieval cupolas and Stalinist high-rises. Visitors to Moscow City can enjoy entertainment high in the sky, as the complex is home not just to offices, but to restaurants, cinemas, viewing platforms, and museums.

Photo by Alex Zarubi on Unsplash
History of Moscow City
Moscow City was first conceived in 1991 by honoured Soviet architect Boris Tkhor, who proposed to construct a business center in Moscow. It would be complete with gleaming skyscrapers rivalling those of New York and London, to reflect the new life and growing ambitions of post-Soviet Russia.
The chosen site was a stone quarry and disused industrial zone in western Moscow, in between the Third Ring Road and Moskva River. Initially, the territory was divided into 20 sections arranged in a horseshoe shape around a central zone. The skyscrapers would increase in height as they spiralled around the central section, with shorter structures built on the waterfront to give the taller buildings behind a view of the river.
Architect Gennady Sirota, who contributed to iconic projects such as the Olympic Sports Complex on Prospekt Mira, was selected as the chief architect, and many other world-famous architects were attracted to Moscow to realise their visions in Moscow City.
What can you see and do at Moscow City?
Where Moscow’s cityscape was once dominated by Stalin’s Seven Sisters skyscrapers , this is no more. Moscow City is home to eight of Russia’s ten tallest buildings, six of which exceed 300 metres in height. More buildings are still under construction there today, including the One Tower (which will be Europe’s second-tallest building). Once completed, Moscow City will comprise more than 20 innovative structures.
Each of Moscow City’s skyscrapers was designed by its own architect, lending the cluster of skyscrapers a unique appearance. Aside from being a site of architectural wonder, Moscow City is a place for leisure and entertainment with over 100 cafes and restaurants, exhibition spaces, cinemas, viewing platforms, and more.
Photo by Nikita Karimov on Unsplash
Federation Tower
- East Tower: 374m, 97 floors; West Tower: 243m, 63 floors
- Completed in 2017
- Architects: Sergey Tchoban and Peter Schweger
The East Federation Tower is the tallest building in Moscow, and the second-tallest building in Europe after the Lakhta Centre in St Petersburg. Visitors can enjoy a luxurious meal of seafood, truffles or steak at restaurant ‘Sixty’ on the 62nd floor of the West Tower, or visit Europe’s highest observation deck, ‘Panorama 360’, on the 89th floor of the East Tower.
Did you know? The ice cream and chocolate shop on the 360 observation deck are the highest in the world!
- South Tower: 354m, 85 floors; North Tower: 254m, 49 floors
- Completed in 2015
- Architect: Skidmore, Owings & Merrill LLP
The South OKO Tower is the third-tallest building in Russia and Europe. Here, you can visit ‘Ruski’ to dine on hearty Russian cuisine cooked on a real Russian stove, and have a drink in the ice bar. Alternatively, visit restaurant, nightclub and performance space ‘Birds’; the restaurant is the highest in Europe, situated on the 86th floor roof terrace alongside an observation deck. The OKO Towers are also home to karaoke club ‘City Voice’.
Did you know? Underneath OKO Towers is the largest underground parking in Europe, with 16 levels and 3,400 parking spaces.
Mercury Tower
- 339m tall, 75 floors
- Architects : Mikhail Posokhin, Frank Williams, Gennady Sirota
Another multifunctional skyscraper, which was designed as the first truly ‘green’ building in Moscow. The Mercury Tower has a distinct geometric shape and copper-coloured glazing, and was the tallest building in Europe upon completion. Visit ‘More i myaso’ (Sea and meat) on the first floor of the tower to enjoy European and Mediterranean cuisine whilst surrounded by greenery. On the 2nd and 40th floors a modern art gallery, the ‘ILONA-K artspace’, has just opened.
City of Capitals
- Moscow Tower: 302m, 76 floors; St Petersburg Tower: 257m, 65 floors
- Completed in 2009
- Architect: Bureau NBBJ
The unique geometric design of the City of Capitals towers resembles stacks of rotating blocks, and is rooted in Constructivism of the early Soviet period (many Soviet Constructivist buildings can be found in Moscow). Visitors to the Moscow Tower can enjoy a range of cuisines – traditional Italian dishes on the summer terrace of ‘Tutto Bene’, Panasian cuisine in the tropical luxury of the ‘Bamboo Bar’ on the 1st floor’, and poke or smoothie bowls at ‘Soul in the Bowl’ cafe on the 80th floor.
Tower on the Embankment
- Tower A: 84m; Tower B:127m; Tower C: 268m, 61 floors
- Completed in 2007
- Architects: Vehbi Inan and Olcay Erturk
After completion, the Tower on the Embankment was the tallest building in Europe, and is now the 13th tallest. It houses the headquarters of several large Russian and international companies, including IBM and KPMG. There are two cafes located on the 1st floor of Tower C – self-service café ‘Obed Bufet’ (Lunch Buffet) and Bakery Chain ‘Khleb Nasushchny’ (Daily Bread).
Evolution Tower
- 255m tall, 54 floors
- Architects: Philip Nikandrov and RMJM Scotland Ltd
Evolution is Moscow City’s most recognisable tower, and the 11th tallest building in Russia. Its façade is a true architectural marvel, comprising continuous strips of curved glazing spiralling high into the sky. According to the architect, Philip Nikandrov, the spiral shape of the tower honours centuries of architectural design in Russia, from the onion domes of St Basil's Cathedral to Vladimir Shukhov’s Tatlin Tower, a masterpiece of Constructivist design. Outside the Evolution tower is a landscaped terrace and pedestrian zone descending to the Presnenskaya Embankment, which was also designed by Nikandrov.
Did you know? Moscow’s largest wedding palace was supposed to be built on the site of the Evolution tower, though the project was abandoned.
- 239m tall, 60 floors
- Completed in 2011
Imperia’s interesting design has a curved roof and an arched glass façade. Inside the tower are various cafes including ‘City Friends’ for all-day breakfasts and light lunches, ‘Mama in the City’ for simple meals of Russian cuisine, and ‘abc kitchen’ for European and Indian-inspired dishes. Alternatively, visit ‘High Bar’ on the 56th floor for cocktails with a view. In Imperia you’ll also find the Museum of High-Rise Construction in Moscow (suitably located on the 56th floor), and the Camera Immersive Theatre.
Did you know? Inside Vystavochnaya metro station is the Metro Museum , dedicated to the history of the beautiful Moscow Metro!
- 130m tall, 26 floors
- Completed in 2001
- Architect: Boris Tkhor
Tower 2000 was Moscow City’s first tower. It stands on the opposite bank of the Moskva River, and houses a viewing platform from which visitors can admire an unparalleled panorama of Moscow City. The Bagration Bridge reaches across the river from the tower to Moscow City, and underneath are piers from where you can take boat trips.
Photo by Alexander Popov on Unsplash
Afimall is Moscow’s largest entertainment and shopping complex, home to 450 shops, cafes and restaurants, a cinema, and a virtual-reality game park. The shopping centre is located in the central section of Moscow City, and a cinema and concert hall are currently under construction there.
What’s nearby?
Sechenov Botanical Gardens: The botanical gardens of the First Moscow State Medical University was created for students’ training and research in 1946. Today it is open for free visits, and is home to a large arboretum.
Park Krasnaya Presnya: This park belonged to the Studenets estate of the Gagarin princes. It is a monument of 18th and 19th century landscaping, with Dutch ponds, ornate bridges, and tree-lined alleys. There are also sports facilities, sports equipment rental, and cafes.

Photo by Akkit on Wikipedia
Essential information for visitors
Website: https://www.citymoscow.ru/
Email: [email protected]
Phone: +7 (495) 730-23-33
Nearest metro: Mezhdunarodnaya (closest to the skyscrapers), Delovoy Tsentr (underneath Afimall), Vystavochnaya (closest to Expocentre)
Related Tours

Moscow - St. Petersburg 3-star cruise by Vodohod
This is our most popular cruise covering Moscow and St. Petersburg and all of the significant towns between these 2 cities. Besides the Two Capitals, you will visit the ancient towns of Uglich, Yaroslavl and Goritsy, the island of Kizhi, and Mandrogui village.
Cruise Ship

Two Capitals and the Golden Ring
This tour covers the best sights of Moscow and St. Petersburg along with a trip to the Golden Ring - a group of medieval towns to the northeast of Moscow. Ancient Kremlins, onion-shaped domes and wooden architecture is just a small part of what awaits you on this amazing tour.
Accommodation
PRIVATE TOUR

Classic Moscow
This is our most popular Moscow tour that includes all the most prominent sights. You will become acquainted with ancient Russia in the Kremlin, admire Russian art in the Tretyakov Gallery, listen to street musicians as you stroll along the Old Arbat street, and learn about Soviet times on the Moscow Metro tour.
Our travel brands include

Express to Russia
Join us on Facebook
We invite you to become a fan of our company on Facebook and read Russian news and travel stories. To become a fan, click here .
Join our own Russian Travel, Culture and Literature Club on Facebook. The club was created to be a place for everyone with an interest in Russia to get to know each other and share experiences, stories, pictures and advice. To join our club, please follow this link .
We use cookies to improve your experience on our Website, and to facilitate providing you with services available through our Website. To opt out of non-essential cookies, please click here . By continuing to use our Website, you accept our use of cookies, the terms of our Privacy Policy and Terms of Service . I agree
Sosenskoye, Moscow
Around the globe, hurricane tracker.
Severe Weather
Radar & Maps
News & features, today's weather.
Tue, Mar 26
Cloudy Hi: 43°
Tonight: Cloudy with a little rain Lo: 27°
Current Weather
Minutecast™.
Snow starting in 59 min
Looking Ahead
Mild this weekend
WinterCast®
Lasting 2 hours
Sosenskoye Weather Radar & Maps
Hourly Weather
10-day weather forecast.
Night: Cloudy with a little rain
Cloudy and mild
Mild with periods of rain
A bit of snow late
Clouds giving way to some sun
Partly cloudy
High clouds and mild
Patchy clouds
Mainly cloudy and warm
Turning cloudy and warm
Considerable cloudiness
Sun through high clouds
An a.m. shower; partly sunny
Sun & Moon
Air quality.
The air quality is generally acceptable for most individuals. However, sensitive groups may experience minor to moderate symptoms from long-term exposure.
Allergy Outlook
Top Stories
Risk of tornadoes, severe weather to ramp up, continue into Monday
8 hours ago

Weather News
Fire erupts on cruise ship after witnesses report lightning strike
14 hours ago

Winter Weather
Record snowfall in Minneapolis as massive storm buries Northern Plains

Boeing CEO Dave Calhoun to step down in wake of ongoing safety problem...
15 hours ago

Hubble telescope spots spider galaxy 30M light-years from Earth

Featured Stories
First fatal mountain lion attack in California in 20 years kills man
10 hours ago

Why don’t humans have tails? Scientists find answers in unlikely place
9 hours ago

Ancient amphibian fossil named after Kermit the Frog

US study: Nearly half of US tap water is contaminated with chemicals

‘Britain’s Pompeii’ reveals Bronze Age village frozen in time

Weather Near Sosenskoye:
- Khimki , Moscow
- Moscow , Moscow
- Zelenograd , Moscow
We have updated our Privacy Policy and Cookie Policy .
Get AccuWeather alerts as they happen with our browser notifications.
Notifications Enabled
Thanks! We’ll keep you informed.
IMAGES
VIDEO
COMMENTS
http://www.sailrite.com/Harken-Lazy-Jack-System-For-boats-21-to-28 Lazy jacks are designed to contain and restrain a main sail when furling and reefing. The ...
Lazy Jacks Installation (Pfeiffer Marine) Part 1Are you looking to install lazy jacks for sailboats? In this video I show you the steps I made for my lazy ja...
For the halyard on our lazy jack installation aboard Lyra, we used 55 feet each side (110 feet in total) of 1/4-inch braided Sta-Set X [1] , from New England Ropes, at a cost of $78. We used 42 feet each side (84 feet in total) of 3/16-inch braided Sta-Set X [2] for the support lines; this cost $45. The six 1/4-inch Orbit blocks [3] from ...
The simplest possible system involves having the risers of the lazyjacks (1/4in pre-stretched line) secured to padeyes about 50-60 percent up the mast, or just above the spreaders. The legs are secured to the boom about two-thirds of the way abaft the gooseneck, taken up about 6ft and through small blocks or stainless steel rings on the falls ...
Step One: Add Cleats on Mast. Install the cleats on the mast at a convenient height. You want them to be out of the way of any winches and easy to access. When attaching fittings to the mast, always use machine screws (or rivets) and not sheet metal screws.
Lazy jacks made of three-strand nylon for the average boat can be assembled for about $91. The same lazy jacks in Sta-Set would cost about $160. Don't let cost be the only deciding factor; each line has advantages and disadvantages. Three-strand nylon is simple to splice, requiring no tools and little knowledge.
Release the lazy jack lines by releasing the support line from the cleat at the base of the mast. Bring the lines close the mast and tie them to the mast out of the way of the mainsail (use a line or a bungee). The bag will now also be lowered and can be attached to the boom (sail ties work well) and kept out of the way of any rigging or the sail.
Here are the general steps on how to install lazy jacks on your boat: Measure the length and width of your sail, and determine how many support lines and attachment points you will need. A typical lazy jack system has two or three support lines on each side of the sail, attached to the boom just forward of the leech end of a batten. ...
LAZY JACK KIT 253 Installation Manual - Intended for specialized personnel or expert users 4059 12/13 Boats 27 - 37 ft. (8.2 - 11.3 m) ... To avoid snagging the mainsail on the Lazy Jacks when raising sail, the boat must be equipped with a topping lift or vang that holds boom lifted.
On This Episode of New Salts Ignacio designs and installs our DIY Lazyjack System. Trailer Sailer Next week we will be setting up the spinnaker hardware, in...
The lazy jacks keep the stack pack upright. The stack pack has a batten down the length of either side and integrated into the stack pack (and around the battens) are four loops on either side. The lazy jacks tie to those loops. The part of the lazy jacks connected to the stack pack are the legs. Each leg is tied to the stack pack loop on ...
The stack pack (sometimes called a lazy pack or lazy bag) is a modern type of a sail cover. It is secured to the boom and zips closed at the top to protect the sail from sun damage when it's not in use. Lazy jacks can be set up with or without a stack pack. When a stack pack is present, the lazy jacks are tied to the stack pack to support it.
LAZY JACK KIT 254 Installation Manual - Intended for specialized personnel or expert users 4058 12/13 Boats 35 - 42 ft. (10.7 - 12.8 m) Booms ... To avoid snagging the mainsail on the Lazy Jacks when raising sail, the boat must be equipped with a topping lift or vang that holds boom lifted.
Commercial or DIY Lazy Jacks? The first major decision you will have to make before getting a lazy jack is going to the commercial or DIY options. One of the main disadvantages of commercial lazy jacks is the cost. For larger sailboats, these kits can run up into the hundreds or thousands of dollars depending on the size of the sailboat you have.
THE BOAT HEAD TO WIND DURING THE INSTALLATION PROCEDURE. Once the StackPack unit has been installed correctly, the unit should give efficient service ... To rig lazy jacks, it is necessary to send a person aloft in a bosun's chair. However, before you start hauling them up, carry out the following steps, so all will be ready when the ...
We are finally getting around to finishing some sailboat restoration projects and one that had been on my list for a while was finishing the installation of ...
255m tall, 54 floors. Completed in 2015. Architects: Philip Nikandrov and RMJM Scotland Ltd. Evolution is Moscow City's most recognisable tower, and the 11th tallest building in Russia. Its façade is a true architectural marvel, comprising continuous strips of curved glazing spiralling high into the sky.
Current Weather. 8:07 PM. 55° F. RealFeel® Sun 51°. RealFeel Shade™ 51°. Air Quality Fair. Wind S 8 mph. Wind Gusts 8 mph. Sunny More Details.
Lazy Jack Bags are simple to install. This video will get you started on the right foot for your install.For complete instructions on how to install a Precis...
The so-called growth points or centres for production, business and social activity, will make it possible to reduce shuttle migration volumes. For these purposes, housing will be built either simultaneously with the transport systems, utility mains and social facilities or just after installation.
Kommunarka is an urban-type settlement in Sosenskoye Settlement, Novomoskovsky Administrative Okrug, Moscow, Russia. Mapcarta, the open map.
Paul VanNess shows you how to make a simple set of lazy jacks for a small sailboat aboard "Rainbow Dash, a SanJuan 21 MKII.Music: All music on this channel ...
In the video I give a demonstration of the boom bag /lazy jack setup on my boat and point out some of the issues. I also give my honest opinion on whether t...