
By Product Categories
Small Boat Blocks
Big Boat Blocks
Complementary Hardware
Travelers & Genoa Leads
Mainsail Handling
Headsail Handling
Mooring Solutions
Spare Parts
Accessories
Harken Canvas
Fly Soft-Attach Blocks
Carbo Air Blocks
Small Boat Classic
Flip-Flop Small Boat
GP Catamaran Ceramic Mainsheet Systems
Protexit™ Exit Blocks
Through-Deck
Wire High-Strength
Dinghy Vang
Small Boat Deck Organizers
Midrange Classic
Midrange Deck Organizers
Zircon Blocks
Element Blocks
Black Magic Air Blocks
Cruising ESP Blocks
Megayacht Blocks
Stainless Steel Blocks
Black Magic Air Runners
FlatWinder Powered Blocks
Mastbase Blocks
Over-the-Top
Crossover Blocks
Big Boat Deck Organizers
Cam Cleats & Kits
Cam Cleat Accessories
Cam Cleat Bases
Stand-Up Bases
Deck Organizers
Spinnaker Pole Cars
Soft Attachments
Fixed Padeyes
Removable Padeyes
Bolt-Down Fairleads
Grand Prix Jib Leads
Halyard Tensioners
Tiller Extensions
Peter's Desk Drawer
Dinghy Jib Leads
Crossbow Pivoting Self-Tacking Jib Traveler
13 mm Micro
22 mm Small Boat
27 mm Midrange
32 mm Big Boat
Windward Sheeting
42 mm Mini-Maxi
T-Track Genoa Lead
Access Rail System
13 mm AA Battcar System
22 mm A Battcar System
27 mm B Battcar System
32 mm C Battcar System
18 mm Switch Battcar System
26 mm Switch Battcar System
26 mm Trysail Switch
32 mm Switch Battcar System
32 mm Trysail Switch
40 mm Switch Battcar System
40 mm Trysail Switch System
Furling Mainsail Outhaul Systems
Single Line Reefing
Harken Vang-Master
Carbo Racing Foil
Small Boat Furling
Small Boat Underdeck
Reflex Furling
MKIV Jib Reefing & Furling
MKIV Underdeck Jib Reefing & Furling
Furling Accessories
Powered Furling
MKIV Ocean Furling
SnubbAir (Not a Winch)
Grand Prix Winches
Air Winches
Circuit Breakers
Analog Switches
Digital System Switch
Aluminum, Chrome & Bronze Winch Handles
Carbo OneTouch Locking Winch Handle
Service Kits
CLR Mooring Winches
Electric Captive Reel Winches
Hydraulic Captive Reel Winches
UniPower Radial
Single-Acting Integral Backstay Adjuster
Single-Acting Cylinders
Locking Cylinders
Double-Pull Cylinders
Grand Prix Cylinders
Hydraulic Cylinder Rod End Blocks
Hydraulic Cylinder End Fittings
Control Valves
Control Manifolds
Control Panels
Compact Control Panel
Rotary Pumps
Hydraulic Pump Handles
Power Systems
Repair Kits
Ball Bearings
Block Spare Parts
Traveler Cars
Furling Spare Parts
Winch Spare Parts
Winch Service Kits
Promo & Gifts
Marine Grip
harkengear.com
Jeep/Truck tops
Garage storage
One-design Covers
Boat accessories
Canvas bags
By Type of Sailing
Dinghy / One-Design
Offshore Racing
Coastal / Day Cruising
Bluewater Cruising
Megayachts / Custom
Service Guide
Tech/Service
deck layouts
Data Sheets (SDS)
How to choose
System diagrams
Calculators
Reeving diagrams
Traveler Purchase Selection Guide
How to Choose
Testimonials
Hoister Videos
Request a Quote
Request Samples
Fabric details
Cover Styles
Canvas Videos
Contract Services
Materials and Components
Our Equipment
Contract Cut-and-Sew Project Spotlight
- Harken at the front
- Safety & Rescue
Support / Selection tools / System diagrams
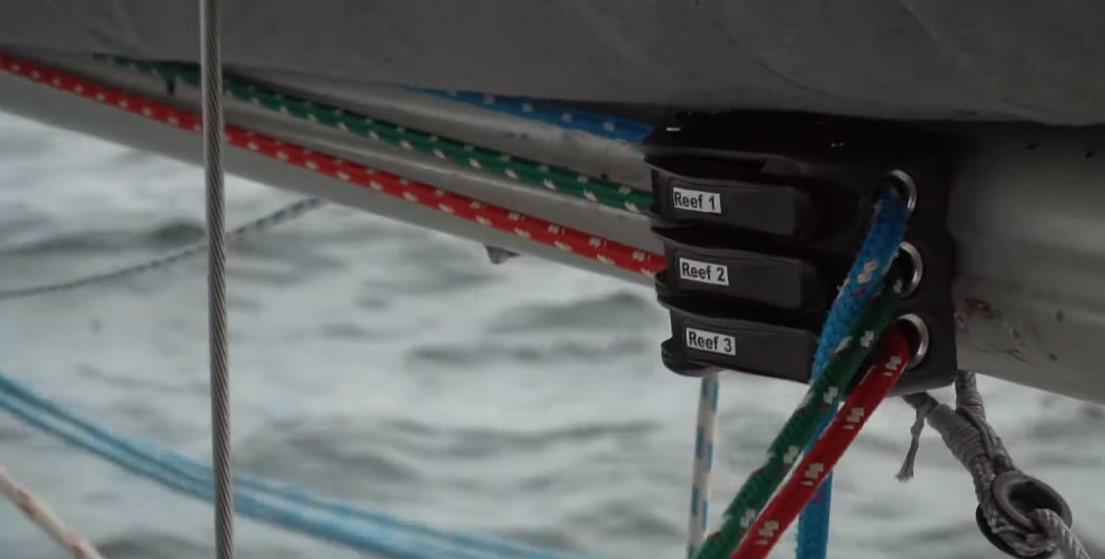
Mainsail Reefing Systems
Mainsail reefing systems must operate effciently to reduce sail under adverse conditions and provide proper sail shape when reefed. These systems are a must for both racers and cruisers.
Typical Boat Length: Small Boat: 22' - 28' (6.7 - 8.5 m) Midrange: 29' - 34' (8.8 - 10.4 m) Big Boat: 35' - 42' (10.7 - 12.8 m)
This dual-line system is common on boats 30 ft (9 m) and larger. Position blocks so line pulls down and out to keep the sail flat and prevent lateral loads on the luff rope or luff sliders.

Lazy Jacks contain mainsails during reefing and dousing. They work exceptionally well with full-battened mains, but are also used with conventional sails.

Product Categories
- United States
- New Zealand
- United Kingdom
Reefing: How, Why and When to Reef

Last Updated by
Capt Chris German
June 15, 2022
When I was starting out sailing, “reefing” was one of those subjects that scared the hell out of me. First off, if you were reefing you were likely going to be in nasty weather.
Second, if you had to reef, it meant touching all sorts of things on the boat that I might not be able to put back when I was done. It all seemed a bit too technical and it was intimidating.
That was until I moved to the coast of East Carolina and to sail meant not only to reef, but reef regularly, if not every day.
In Long Island Sound we were lucky to even have wind, let alone a need to reef, but in East Carolina, the winds regularly blew 15 to 20 directly off the North Atlantic and would top out in the 30s almost daily.
Sailing, and more to the point, teaching sailing, became a challenge to say the least and to reef was not just an option, but a necessity.
So let’s clarify our terms on what it is to “reef” a boat and then we’ll discuss why it is so intimidating.
Table of contents
What is Reefing?
To “Reef” a sail means to shorten it. And really nothing more. It is the simple act of reducing sail area, so as to reduce the surface area and thereby reducing power. A sailboat is powered by the wind and when there is too much wind it is overpowered.
An over powered boat becomes difficult to steer, has excessive heel and can be quite scary.
With newbee sailors in my little hunter 26, an over powered boat taught the student very little.
The student would fight the helm incessantly and the boat would constantly round up or turn to wind with gusts of heavier breeze.
Thankfully the Hunter 26 is built for overweight adults so it doesn’t heel excessively, but in a heavy breeze, that little boat was no picnic.
On bigger boats like the Endeavour, a reefed main means a lower center of gravity in addition to reduced sail area.
That boat with a full keel and relatively light build danced on top the waves like a hobby horse.
On one run I made up Pamlico Sound to Ocracoke, I had my wife blowing chunks for six of the seven hours we were out there.
By lowering the center of gravity and depowering the boat, we had less force aloft pitching the boat side to side and fore and aft.
So now we know what reefing is: shortening sail to depower the boat and lower the center of gravity of the boat to make it more comfortable for the crew.
When should we reef?
If you think you need a reef and don’t already have one in, it's too late. Reef early and Reef often. Reef your boat at the dock or on the hook well before you ever head out. You don't want to be dancing on the fore deck with lines flying and sails dropping in 25 knots of breeze with a six foot chop. As with all things regarding water safety, if you think it might be dangerous, it is.
Reefing at the dock is actually harder than reefing a boat on a mooring.
On the dock your boat could be 350 other degrees than upwind.
On a mooring, odds are your boat is head to wind at all times and that is how your boat should be when you start to reef, head to wind.
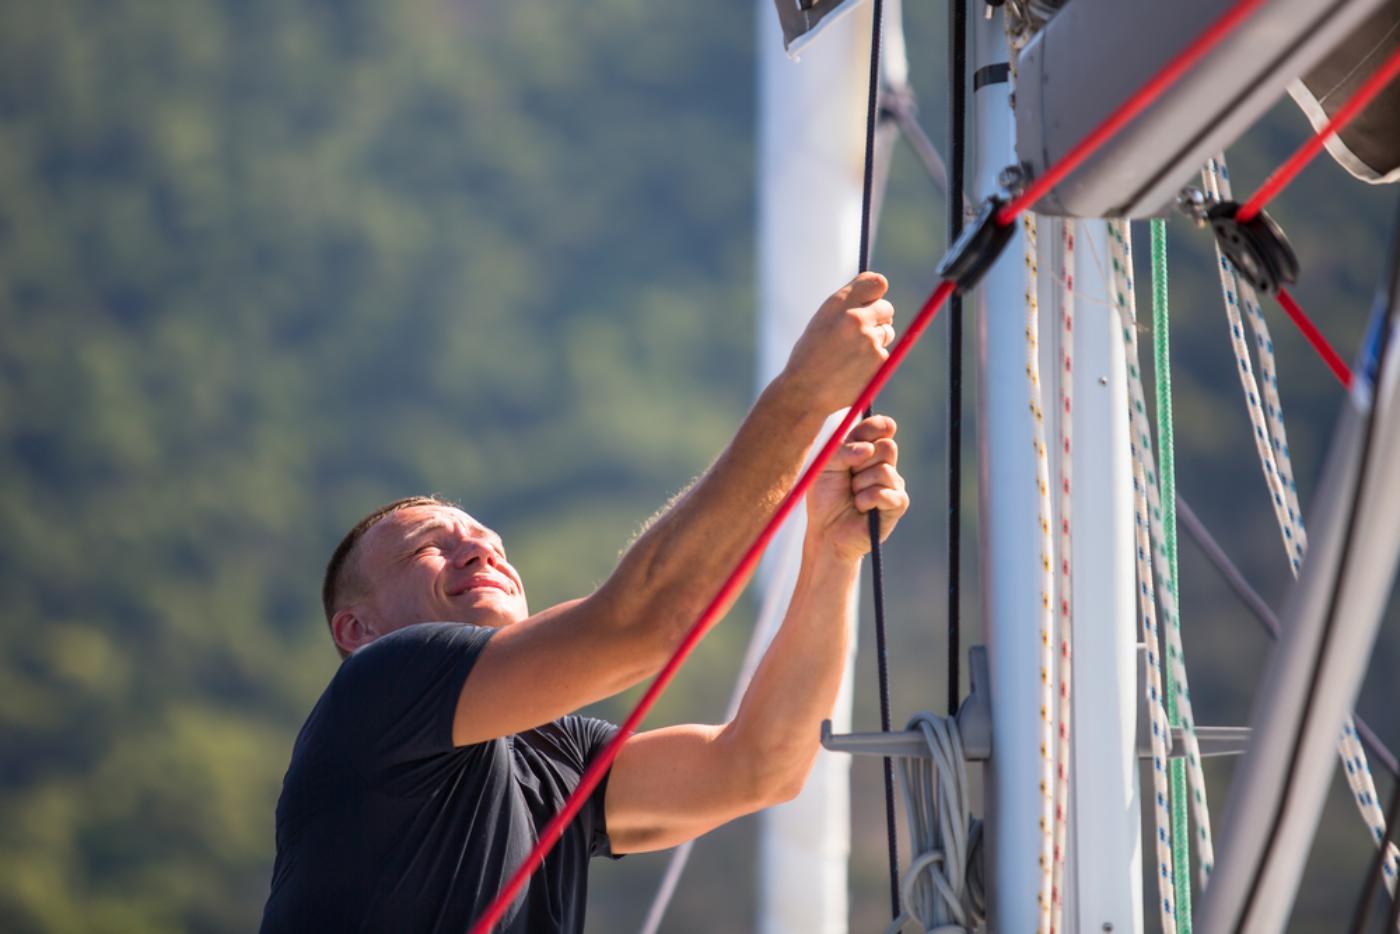
How To Reef
With your boat head to wind, slack your main sheet and raise your main, all the way up. This will allow you to see the reefing points on your sail.
Many bigger boats have at least two sets of reefing points which includes corresponding tacks and clews. For these purposes however, let's just talk about using the first reef points.
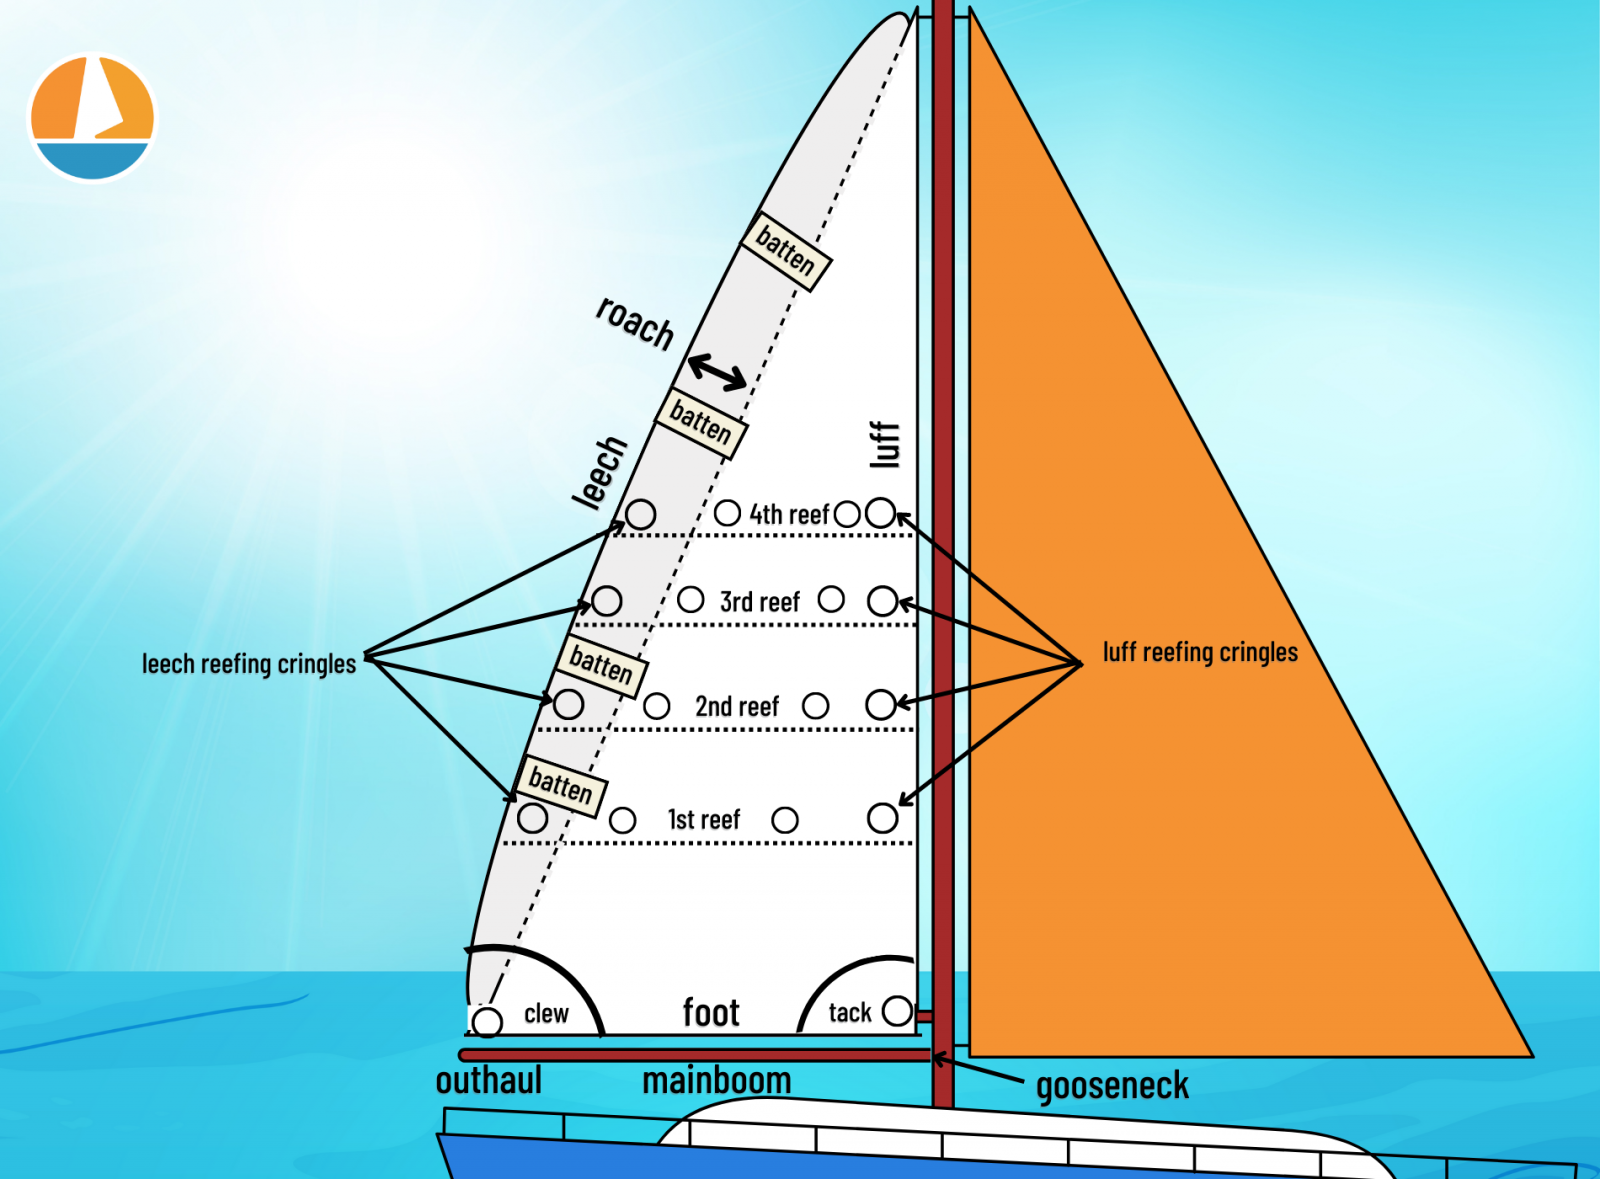
About 4 feet up from the foot or bottom edge of the sail, you will see two or three or more holes sewn into the belly of the sail. These are your reef points.
Follow them fore and aft and note that there is another hole sewn into the leading edge of the sail that corresponds with these reefing points and that is your new tack or front corn of the sail.
There will be another on the aft edge of the sail or the leach of the sail which is where you will attach your outhaul making that the new clew or back corner of the sail.
I'm always a little scared that these points will fail in a heavy breeze, but engineers with much greater intelligence than me put them there, so I tell myself I am being ridiculous. But this where the failure will take place if and when it ever happens. And we’ll talk about that more in a few paragraphs. But for now have faith that the sail manufacturer knew what they were doing by putting these reef points in your sail.
Now that you have found your reef points take a reefing line or sail tie and feed it through the holes.
Some boats have what they call a jiffy reefing system and lines are pre-fed through these holes.
Other boats have lines permanently sewn into the sail.
But for clarity take a small line and stick it through the hole. Now you can lower your main four feet so that the reef points with the lines fed through are sitting on your boom.
This is where it can get very messy and can be very difficult.
A sticky mast track or a stiff halyard or block at the mast top can make lowering your main four feet nearly impossible.
If you have a friend or crew member, this job will be much easier, but all too often a sailor finds him or herself on deck alone, so we will assume you’re by your onesies.
With your main lowered a small fraction, cleat it off and attend to those reef lines.
Gather up the sail and as neatly as possible tie those lines around the bottom of the boom using a “reef” or “ square” knot.
If you have a hook on the front of your boom you can hook your new tack to it, or otherwise fasten your tack to the front of your boom, or “gooseneck” with whatever system you have.
Take the outhaul and tie it or fasten it to the new clew at the back of the boom and make all those attachments as tight as you can.
Once you're satisfied that your attachments will hold in heavy breeze, go back to your halyard and haul away.
You will note that your sail looks a bit smaller and perhaps even a bit awkward with all that extra fabric bunched up at the bottom and a bare pole at the top.
If your sail looks like a smooth airplane wing, rest assured you have done it correctly. It's the shape we are going for and there are no style points deducted for an ugly reef.
Functionality is key.
You're ready to hit the waves now.
There are no hard and fast rules about reefing. Every boat is different and every skipper has a different comfort level.
My rule is anything over 15 I would prefer to have a reef rather than not. But your boat might love a stiff breeze and only wake up at 20 so don’t go by my rules.
But listen to that little voice inside you that says, “it’d be a good idea to reef.”
When they start talking to you, it’s time to reef.
When Things Go Bad
Now let's talk about when things go bad. Sails rip, masts fold in half and lines break, It’s what they do and when the wind picks up, the chances of bad things happening increases exponentially.
That is why some skippers don’t ever reef, because they don’t want to be out there when the seas turn gloomy.
But if you have to go and you have to reef, there is always a chance that things could break.
Think about your mast like a soda straw.
When you hold it at the top and bottom, it is quite strong. But when you apply just a little pressure to the middle, it can fold in half easily.
That's the same thing as your 65 foot aluminum mast.
When you lower your main and reef your sail, you are changing the application of force on the mast.
Smart people took this into consideration when they designed your boat, but then again Mother Nature is a fickle sort and can do things those smart people never considered.
So it is always a risk that things can break when you decide to reef.
Know Your Boat’s System
And another point: know your boat. Practice reefing on a calm clear day when you have lots of time.
Your first time reefing your boat should not be at midnight 25 miles out to sea with a freshening easterly.
Know what reef systems your boat may have. Jiffy reefing systems, when they work, can be a great asset, but if they are rigged wrong, as they almost alway are, they can be a nightmare.
I have also seen reefing systems where they feed heavy monofilament up through the sail in lieu of reefing lines. It’s not my favorite design because again, it is never rigged correctly after the first day it is installed.
By learning the system you have on the hook with lots of light and little stress, you will have the skills you need to have when the need arises.
Roller furlers are also great, if they are rigged correctly. A simple pull of the roller furling line can shorten a jib or a main and reduce sail quite nicely.
But again, you're changing the angle of force on the stay or mast and when the wind blows harder things are easier to break.
I also have seen skippers confuse their halyards with in-mast roller furlers with cataclysmic results.
Taking the tension off the halyard allows the main to drop just enough to jam the head of the sail at the top of the mast. Then the sail will not go in or out and you are stuck with an overpowered main and no way to douse it without climbing the mast.
Not an enviable position.
Whatever reefing system you have and whether you are a fair weather sailor or a crusty old salt, reefing is a great tool to make an unsafe voyage safe and an uncomfortable crew comfortable on a windy day.
But when the wind abates and you're ready to shake out your reef, there are a few things you ought to do.
Bring your boat head to wind once again.
Untie all your reef lines and reattach your tack and clew to their normal positions.
You will likely have to lower your main a little to get these fastenings loose, but once the sail attachments have been returned to their full normal positioning, you can haul away on the main and feel the boat wake up once again, with a full throated breath of breeze.
The first time you shake out your reef, you will notice the advantage of a full sail and it will feel like you stepped out of a car after a long road trip, ready to stretch your legs and run.
Nothing beats the feeling when your boat wakes up and all the forces at play work together to make your sails sing and your hull hum.
And quite frankly, the sense of accomplishment and confidence you will have when you have navigated your vessel through your first heavy weather, successfully reefed sail and made it to the safe side of the storm to see the sun shine again, can not be overstated.
Good weather never makes a great sailor, so reef early, reef often and take the longest leg with confidence, knowing that you have the tools you need to get your boat home safely.
Related Articles
Capt Chris German is a life long sailor and licensed captain who has taught thousands to sail over the last 20 years. In 2007, he founded a US Sailing-based community sailing school in Bridgeport, CT for inner city youth and families. When Hurricane Sandy forced him to abandon those efforts, he moved to North Carolina where he set out to share this love for broadcasting and sailing with a growing web-based television audience through The Charted Life Television Network.
by this author
How to Sail
Most Recent

What Does "Sailing By The Lee" Mean?
Daniel Wade
October 3, 2023

The Best Sailing Schools And Programs: Reviews & Ratings
September 26, 2023
Important Legal Info
Lifeofsailing.com is a participant in the Amazon Services LLC Associates Program, an affiliate advertising program designed to provide a means for sites to earn advertising fees by advertising and linking to Amazon. This site also participates in other affiliate programs and is compensated for referring traffic and business to these companies.
Similar Posts

How To Choose The Right Sailing Instructor
August 16, 2023

How To Sail From California To Tahiti
July 4, 2023

How To Tow A Skier Behind A Boat
May 24, 2023
Popular Posts

Best Liveaboard Catamaran Sailboats
December 28, 2023

Can a Novice Sail Around the World?
Elizabeth O'Malley

4 Best Electric Outboard Motors

How Long Did It Take The Vikings To Sail To England?

10 Best Sailboat Brands (And Why)
December 20, 2023

7 Best Places To Liveaboard A Sailboat
Get the best sailing content.
Top Rated Posts
Lifeofsailing.com is a participant in the Amazon Services LLC Associates Program, an affiliate advertising program designed to provide a means for sites to earn advertising fees by advertising and linking to Amazon. This site also participates in other affiliate programs and is compensated for referring traffic and business to these companies. (866) 342-SAIL
© 2024 Life of Sailing Email: [email protected] Address: 11816 Inwood Rd #3024 Dallas, TX 75244 Disclaimer Privacy Policy
- Boats & Gear
- Instructional
- Cruising Stories
- Cruising Destinations
- Race Results
- Race Reports
- Racing Technique
- Submit a Classified Ad
- Boats for Sale
- All Classifieds
- Terms & Conditions
- Your Dashboard
- Seattle Area Racing Calendar (SARC)
- 48° North Cruising Rally
- Croatia Flotilla
- How To: Smooth Reefing for Smooth Sailing
- Seamanship & Navigation
From the January 2021 issue of 48° North .
Winter winds are here! It’s something to celebrate, but also something that requires special readiness. Being able to reduce sail to maintain better control of the boat is, of course, always important. This is especially crucial at this time of year.
Let’s zoom out, first. Boats are designed to sail best at a particular angle of heel — depending on the boat, somewhere between 10° and 20°. If the force of the wind on the sails causes the boat to heel more than that, it not only makes it harder to control and puts unnecessary strain on the rigging and the crew, but it is almost always a slower way to sail.
Reefing — the act of reducing the effective sail area to reduce the force the wind can apply to the boat — is one way to address this. Conventional wisdom offers the general rule: “If you are wondering if you should reef, you should already have a reef in.”
However, when and how to reef leaves lots of room for interpretation. Below, we will review some of the different kinds of reefing and how to make them work for you, your crew, and your boat during a particularly windy winter sail.
Before you get to tucking a reef in, remember that the first way to depower a sail is with the sail controls; and weather helm can guide you in this process. A few principles apply to this line of thinking:
A flatter sail has less power than one with more shape. Tightening the halyard, cunningham, outhaul, or the sheet and/or moving the traveler to leeward or headsail fairleads aft can all flatten and depower the sails. If your boat has an adjustable backstay, trimming the backstay on also flattens both main and jib.
All these sail controls will affect weather helm, which is the tendency of the boat to want to round up into the wind when it is overpowered. You always want a little weather helm, as keeping the bow from coming up creates lift to windward. It is also much safer for the boat to want to go bow-to-wind if you let go of the helm. As the wind increases so does the weather helm, so if it gets to be too much you will not be able to keep the bow down and/or will have to have the rudder so far over that it acts as a brake and slows the boat down. If sail controls are tight and you’re still struggling with excessive heel, a lot of weather helm, or both, it’s past time to reef. Remember, reefing when you first think about it is the best practice.
Reefing Approaches
Most often, when sailors think of reefing, they’re thinking of shortening the main first sail using a reefing system like Hook and Cringle. This is not the only option, but here are some considerations:
Roller Reefing: With furlers for roller furling headsails, in-boom and in-mast furling mainsails, we can shorten the sail by simply rolling it up on the furler. Unfortunately, these can be the most expensive reefing systems and the least effective, depending on execution. They are the most complicated and, by extension, the least reliable. However, they certainly have their advantages and can be well executed in their design, installation, and use.
The biggest problem with roller reefing is related to sail design. The designed draft (depth) in the middle of the sail dictates that, as the sail is rolled up, the edges of the sail roll proportionately faster than the middle of the sail (where the draft leaves more material). The resulting sail shape when partially rolled thus involves very tight sail edges while leaving the maximum draft area in the middle of the sail loose and baggy (Figure 1). This is exactly what you don’t want, because a loose sail with a lot of shape has more power and/or drag than a flat sail — resulting in poor upwind performance, more heel, and less control.

There are some clever designs to help with this problem. Lengths of foam sewn into the luff can help roll the sail more tightly and evenly for a better shape; and in-boom furlers are normally thicker in the middle to compensate for sail shape as the sail rolls up (as opposed to a simple straight bar). Another option is to roll the sail up so small that it is flat because the end of the sail has very little shape to it (Figure 2). With a headsail, the best way to shorten sail may be to take down the larger sail designed for light air, and put up a smaller one designed for heavier wind.
Slab Reefing: Slab Reefing, also known as Jiffy reefing (Figure 3), is the most common form of reefing you’ll see on sailboats with traditional mainsails these days. This involves having reef points on the sail that can form the new tack and clew when it is lowered, so that a slab of the sail is no longer used below the reef points.
Hook and Cringle Reefing: Hook and cringle reefing is one of the simplest ways to secure this new tack. A hook is typically integral to the boom near the gooseneck and a sailor must go forward to attach the sail’s reef-point cringle to this fixed hook. The clew is then secured with a reefing line, usually rigged through the aft end of the boom, that thus becomes the new outhaul.
Two Line Reefing: The reef points on the sail used in slab reefing can also be secured each with their own lines (Figure 4). To reef, lower the sail to below the reef you wish to put in, tighten each reefing line to the proper tightness, then raise the halyard to tension the sail against the new tack and clew. Generally, each of these lines is run prior to sailing and is ready to employ from the cockpit. One way to save on reefing lines when using the two-line system is to have the cunningham attached to the sail by a hook (which could be used similarly to a fixed hook at the reefing cringle). While more efficient in terms of lines, it requires someone to go forward to attach the sail to the hook at its reef point, negating one of the benefits of a dedicated two-line system.
Single Line Reefing: This method works very much like two line reefing, except that one line is run through both reef points (Figure 5) and then only that line is tightened to secure the reef. This can be the simplest system to put a reef in, but can be one of the more problematic to get to work smoothly because it may have a lot of friction.
For the most part you can change your reefing system from one to the other as it suits your needs. If you don’t have in-mast or in-boom furling mainsail, roller reefing the main probably requires a new mast or boom … no small or cost-effective undertaking. But for the rest, they work similarly enough that they can be changed one for another. But why would you want to? Well, each sailor may want to identify their personal preferences in balancing ease, safety, and effectiveness. You want the reef to be easy to put in and shake out. It is almost always easier to shake a reef out than to put one in — hence the saying “reef early and often.” Many sailors would like to avoid going forward to put the reef in, if possible. Reefing setups altered to run all the lines back to the cockpit for easy employment may necessitate new lines, since existing lines may not have the length to work in this system.
Ultimately, each of these systems has advantages and disadvantages. Hook and cringle is the simplest option as far as moving parts and friction: cringle goes over hook, re-tension the halyard, then tension the reefing line (probably with a winch mounted on the mast or boom), and you’re done. With two-line reefing, you can lead both reefing lines and the halyard back to the cockpit and do everything from there. This will require several more blocks, which will add friction, plus the attachment and lead points for the tack reefing line need to be properly placed. With some careful rigging and friction management, a single-line system may work even more easily.
Friction is a big factor in whether any system works smoothly for you. Low-friction ball bearing blocks and low-friction rings properly placed and used can help reduce the total friction by quite a bit, but also remember to keep them well lubricated.
Reefing is one of those step-by-step procedures where, when it is really needed, it is likely to be done in less-than-ideal conditions. Going through each and every step and seeing if it can be improved is the only way to make it as smooth as possible. Practice at the dock, time yourself, get some friends to compete with to see who can do it the fastest; and then see why and if there is a way to improve it. All systems involve compromises, and experience is the only way to know what will work best for you, your boat, and crew.
And don’t forget, you are a part of that system. The best reefing system for your boat is the one where you can put a reef in quickly, safely, and effectively, no matter how cold and strong the winter winds may blow.

Alex Wilken
Alex Wilken and his father, Jack, are lifelong cruisers, professional shipwrights, USCG licensed captains, and the owners of Seattle Boat Works.
Boating Lifestyle , Featured
Editor’s Letter: 48° North is Asking for Your Support
March 5, 2024
Casting Off: Better Sailing Means Going With the Flow to Learn as You Go
Featured , Events Coverage
Fisheries Supply Spring Swap Meet Set for April 20
March 4, 2024

Race Reports , Featured
Type 2 Entertainment: Girts Rekevics Foulweather Race 2024
March 1, 2024

Cruising Stories , Featured
The Dreaded Lopez Channel
February 29, 2024
Instructional , Featured
Registration Open for Two-Day Boating Skills and Certification Course
February 26, 2024
Simple Reefing System for Sailors
- Snowboarding
- Scuba Diving & Snorkeling
Reefing the mainsail involves lowering the sail part way to reduce its size when the wind increases. A reefed sail reduces heeling of the boat and makes the boat easier to manage. It also reduces the risk of capsizing in a gust. Reefing the mainsail is like partly furling the jib when your boat has a furling jib.
Why and How to Reef the Mainsail
Tom Lochhaas
The classic sailor’s saying is that if you are asking whether it’s time to reef the main, it’s already past that time. This refers to sailors who are having difficulty controlling a wildly heeling boat because the wind has gotten up and is putting a lot of pressure on too much sail area.
A prudent sailor reefs the main when the wind starts to build before things get wild. When the wind is blowing more than twelve to fifteen knots, depending on the boat, conservative sailors will start out with a reefed sail. Over twenty knots on many boats and it can become difficult to control the boat for smooth reefing, especially when short-handed.
When you’re sailing downwind and the boat is not heeling, you may not notice at first that the wind is increasing. Since you have to turn up into the wind to do the reefing, things may get dicey if you wait too long to reef.
How to Reef
With the common slab reefing system, reefing is fairly simple, though it’s a skill that requires some practice. The basic steps are:
- Turn the boat toward the wind and ease the mainsheet to reduce pressure on the sail.
- While slowly easing the main halyard, take in the reefing control line. This pulls the bottom of the mainsail down toward the boom.
- When the sail reaches the desired reef point, secure the halyard and the reefing line, go back on course, and trim the sail .
Slab Reefing System
International Marine
This is a simple slab reefing system you can easily install on your boat if you do not have one. If you already have a reefing system, be sure you understand how it works before you need it in rough conditions.
The illustration shows a single-line system. Larger boats often have a double-line system, in which a second reefing line is added on the other side of the boom to the second higher set of reef points. There are also variations in the use of a hook, or reefing horn, at the forward reefing point on the sail’s luff.
How the Reefing Line Runs
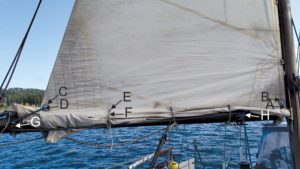
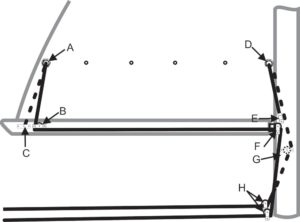
- From a fixed point on the port side of the boom, the line rises to the aft grommet in the sail, called a reefing cringle.
- The line continues down the sail on the starboard side to a turning block mounted on the boom, then forward along the boom to another turning block.
- The line rises up to the cringle on the sail’s luff edge. In the illustration, the line passes through a block on a reefing horn and then back down. Alternatively, the line may pass through the cringle and down on the port side in the same manner as it did through the luff cringle. The advantage of the horn with a block is reduced friction, and the horn can be raised to a higher reef point as well. The disadvantage is that a crew has to go forward to position the horn.
- Finally, the line comes down to a turning block at the base of the mast and back to the cockpit, where it can be taken in for reefing.
A Reefed Mainsail
Tom Lochhaas
A reefed sail using a slab reefing system is illustrated in the photo shown. On this boat, the reefing line runs through the cringle at the sail’s luff rather than using a horn. The position of the aft turning block on the boom is a little back from the cringle when the sail is reefed. This helps keep the sail taut for better trimming when reefed.
The Second Reef In
This mainsail has the second reef in. If you look carefully at the leach of the sail where it lies against the boom, you can see the cringle of the first lower reef point.
Depending on the conditions, a boat with two reef points and a double-line system allows you to reef the mainsail in stages from the first to the second reefs. You can also go all at once to the second reef if needed.
This boat has lazy jacks in place that help hold the lowered part of the sail on the boom. No additional securing may be needed. Without lazy jacks, the bottom of the sail can blow about and get in the way.
Tie Up the Reefed Sail
Most sails with reefing cringles also have smaller grommets across the width of the sail at the same level as the reef points. After reefing, you can secure the loose part of the sail to the boom by passing a sail tie through the grommets and tying it off around the boom, as shown here. It’s not a coincidence that the best knot used here to tie the reef in place is called a reefing knot .
Some sailors prefer not to tie off the reefed main at these smaller grommets because of the risk of forgetting them later when you shake out and remove the reef. If you loosened the reefing line and started raising the mainsail back up without first removing these ties, the mainsail may rip.
To Shake Out a Reef
To remove the reef and raise the mainsail back up, simply reverse the basic reefing steps:
- While slowly easing the reefing line, pull in the halyard to raise the mainsail back up.
- When the sail is fully up, secure the halyard and the reefing line, go back on course and trim the sail.
Other Reefing Systems
With larger cruising sailboats, manufacturers are increasingly offering in-boom and in-mast reefing and furling systems for mainsails. Such systems essentially involve a roller inside the boom or mast with an electric motor that rolls up the sail to reduce its size (reefing) or to stow the sail away after sailing. While such systems certainly add convenience when they’re adjusted and everything is working well, many experienced sailors still prefer slab reefing, which doesn’t depend on an electrical system, multiple moving parts, and a fine-tuned rig.
Slab reefing does require some practice and careful installation of the basic system. Once the line is rigged, it’s always ready for use and comes close to being foolproof.
Monitor changes in the wind so that you can reef early when it's easy, rather than late when it's difficult or dangerous. You can learn to read the wind or use an inexpensive handheld wind meter. Additionally, you can use the traveler and other sail adjustments for strong winds .
- How to Raise the Mainsail
- Learn How to Sail a Small Sailboat – 1. The Parts of the Boat
- How to Use a Topping Lift
- How to Rig a Preventer Line
- When to Adjust Sailboat Sails for Stronger Winds
- Using a Sailboat Boom Vang in Sailing
- How to Use Roller Furling
- How to Gybe a Sailboat
- How to Heave To a Sailboat
- How to Tack a Sailboat
- How to Use a Mainsheet Traveler
- How to Tow a Dinghy Behind a Sailboat
- The Sunfish: A Perfect Lake or Urban Sailboat
- How to Anchor a Sailboat
- Control Your Tiller Without a Tiller-Tamer
- Tricing Pendants and Lifeboat Rigging
Home > Resources > Reefing 101: How to reef a mainsail and when to do it
Reefing 101: How to reef a mainsail and when to do it
17 September 2019
Ask Precision Sails , Design , Featuring - Partners , Hardware , Headsail , Mainsail , Sails , Technical Tags: furling headsail , How to , reduce sail area , reefing headsail , reefing mainsail , sail area , sail reduction , sailcloth durability , sailcloth stretch resistance , sailcloth weight , sailing uma
Reefing is meant to increase your ease-of-use, flatten sail shape, reduce sail area, and re-position the boat’s center of effort. This reduces heeling and de-powers your sails to improve safety and stability in rough weather.
Reefing is an important part of sailing to learn and understand how to do efficiently and effectively. This guide is meant to give a general overview of the process and discuss the preparation a sailor should take. There are various methods of reefing and each sailor has their own process. Nonetheless, whether you are slab reefing, in-boom reefing, in-mast reefing your mainsail, or furling in your headsail the principles remain the same.
Preparation is essential
Being prepared for heavier winds and identifying when to reef is key to maximizing the performance and safety of the boat. Here are several things every sailor can do to be prepared:
Keep lines organized
Make sure to have your lines organized beforehand and a reefing plan in place. This will assure that each time a crew member reefs the same actions are taken to re-organize the lines so no time is lost figuring out what the preceding person has done.
Practice Makes Perfect
Taking time to exercise your reefing routine will ensure that your crew is ready when that gale approaches. Additionally, having a plan in place will keep your crew focused during turbulent weather by overcoming their hesitation with confidence to handle the situation swiftly and correctly.
Check the Forecast
With the multitude of devices and apps which show weather patterns, wind speeds, and forecast predictions available today no sailor should be fully unprepared for the weather they are going to face.
Reef Before You Need To
When it comes to knowing when to reef, not every sailor, boat, sail or breeze is equal.
“It depends on the boat, and the sailor,” says one of our designers, Jeremy Roszmann, “more cautious sailors will reef earlier, and some boats will heel more in different winds”. A boat’s design, sail inventory, and crew experience are all factors in determining when reefing should take place.
“It’s pretty difficult to give an ‘at 15 knots take your mainsail to reef 1’… headsails sort of follow the same line. You can theoretically run your 150 Genoa up to 20 knots, and I’ve had clients ask for extra reinforcements because they do, but you risk causing undue stress on the cloth, running into shape issues quicker and in-time sail failures”.
One common saying about reefing is that if you think you need to reef, you should have already reefed. “I avoid telling clients when to reef because if they feel they should reef, they should. Until either, they are more experienced sailors or they are more comfortable sailors”. Every boat is going to handle wind speeds differently due to their design and sail inventory. It is important to practice reefing so that you can be fully prepared and know when to reef before you need to.
How to Reef
While there are many methods to reefing the core concept is the same: to efficiently reduce sail area in order to stabilize the boat in varying winds. Sailing Uma has made a wonderful video on how they go about reefing their mainsail, watch the video below and visit Sailing Uma’s partner page , and website to show some support.
Reefing your mainsail
- Ease the main-sheet. This will cause the mainsail to luff, stabilizing the boat by reducing heel and easing the tension on the mainsail making it easier to drop.
- Lower the main halyard, and hook the reefing point onto a carabiner or ram’s horn to set the new tack position of the sail. Tie sail ties around the boom through the grommets if necessary to contain the loose material left over. If you use a stack-pack the loose material will be gathered inside the folds.
- Haul in the first reef line.
- Tension the main halyard. Don’t be afraid to crank it tight, your sail is reinforced at it’s Cunningham.
- Tighten up the boom vang in its new position.
- Trim the main-sheet.
- Bonus Uma Tip : Stow your main halyard and lines, in the same way, each time. Then no time is wasted figuring out what the previous person had done.
Shaking Out a Reef
Follow the above steps in reverse order, making sure to re-tension and trim for the new position of the sail.
Don’t Forget Your Headsail
Adjusting your Genoa or Jib can help balance out the boat and reduce heeling. Furling in your headsail is a great way to reduce sail area.
Simply furl in your headsail as you normally would but stop prematurely to determine the size reduction you want to make.
For areas with seasonal variance in wind strength or for those sailors traveling to areas with different conditions, if you find yourself constantly furling your 150% down to 115% that you might want to consider increase your sail inventory. When you constantly are partially furling your headsail you are doing two things:
- Furling away sail shape which causes a decrease in performance compared to a sail meant for the conditions.
- Increasing the pressure applied to the unfurled portion of the sail while the other portion remains untouched from the stretching causing your sail to become “baggy” over time.
How Many Reefs Should a Mainsail Have?
Again, this will be different based on the sail inventory, experience, boat, and sailing conditions for each person. Ron, our Lead Sail Consultant regularly recommends that “one reef keeps you sailing, two gets you home safely”.
Can Reefing Damage Your Sails?
The size of the sail, cloth weave, weight, and design will all play large factors in determining how fast a sail will stretch. As Jeremy said earlier, “you can theoretically run [a] 150 Genoa up to 20 knots… but you risk causing undue stress on the cloth, running into shape issues quicker, and in-time sail failure.”
Think of it this way, if you have a 150 Genoa and you are furling it to a smaller size constantly due to the wind conditions where you sail you are not only furling away sail shape (making it less efficient) but you are also using the sail outside of its intended conditions. Having a few sails in your inventory, like a 115, 150, and a Trysail is a great option as it allows you to reduce sail area more efficiently depending on the conditions.
“Reefing sails to induce the qualities of another sail, i.e. reefing to third reef instead of a Trysail on-board, can damage specific areas of the sail, damaging the smooth vertical representation that we design in the sail. In the example above you would slightly bag out the top of the sail which means that you have a deeper top which encounters higher velocities, and could cause weather helm in the boat.”
Likewise, if you are constantly reefing your mainsail to the first or the second reef the exposed area is being stretched at a greater rate than the hidden section. This can cause the sails to become baggy and impairs the efficiency of the design of the sail.
This isn’t to say you shouldn’t reef. Well built sails will be able to handle the strain that comes from sustaining a reef and there are many ways to reinforce your sails to prolong their lifespan.
Panel Layout and Sailcloth Weight Are Important
Higher quality Dacron sailcloth has increased resistance to stretch and UV damage to prolong their shape-holding life. Meaning you can sail more aggressively without being concerned about stretching too early. Tri-Radial Dacron sails have greater resistance to stretch due to their design and the load-bearing properties of the seam layout. Laminate sails are the complete solution to stretching, but unfortunately, lack the resistance to UV that is needed for longevity. You can learn more about sailcloth and crosscut vs tri-radial designs in our blog.
Cloth Weight
For a long time it was thought that the heavier the sailcloth, the better the sail. We still get asked this question everyday but heavier cloth does not mean that it will last longer. Here is what our designer Jeremy had to say about it: “Cloth weight is determined on the size of the boat, usually in LOA (ft/m). Larger boats induce more displacement and require a larger sail which will have to undertake more force to move the boat. Too light of cloth, while providing superior performance, risks tearing or warping very quickly. ”
Design is Crucial for New Sails
The design of your sail is a crucial step in preparing your it to perform well in heavier winds. Precision Sails prides ourselves on our leading design consultations to build the best sail possible for your boat. Our designers get to know you, your boat, the conditions your sailing in, long term plans, and experience level to select the best cloth, weight, and features for your sail. Here are some of the features your new sail can have:
“A foam luff allows you to furl in the sail partially and maintain lift in the front camber of the sail, this allows someone with a 150 Genoa to furl it into a 140 and sail in higher winds.” Think of a sail like an airplane wing, it has a specific curved surface. When you furl you are changing the draft of the sail, the curve, which causes it to be less efficient.
Offshore package
Designed for those looking to do offshore sailing in areas with more aggressive winds and increased UV. This package includes:
- Double tapes along the Leech, Luff, and Foot of the sail.
- Wider seams with three rows of stitching.
- Reinforcement belts on reefs, Leech and Luff.
- Leech seam wedgies.
You can learn more about our Offshore Package here .
Elite Package
Our elite package includes many of the sail enhancements listed here and many that are not, as well as up to a 1-hour design consult with your designer where you can see your requested changes to your sail in real-time.
Learn more about our elite package by submitting a quote request.
Block and Radial patching:
These corners have been designed to better distribute the load. Our unique radial corner design is stronger and more durable than the competition and prevents premature material failure.
And Many More
Precision Sails prides ourselves on building custom sails for your boat and sailing conditions. Our sails are fully customizable and we have many other sail enhancements and customization options for you to consider.
Thinking about getting new sails?
Start the conversation by scheduling an appointment with one of our sail consultants.
precisionsails
Related Posts

Full Battens vs Partial Battens vs 2 Full plus 2 Partial Battens
Full Battens VS Partial Battens At
Precision Sails we are asked every day during our customer quote consultation “Should I choose Full Battens or Partial Battens for my new mainsail?” Whether you are cruising or racing you will need to examine the pros and cons of adding full battens to your main sail.Positive Aspects of Full […]

Memories of Sail Repairs, Replacement Sails and FINALLY New Sails
I have had a Tanzer 26 for over 20 years now. The vessel, without much imagination I call The Boat, has served me well and without complaint through yearly cruises on Lake Ontario with my three kids and day sailing with the wife. Did I mention that my wife is a good sport but a definitive lover of a good.

My Need for Cruising Speed Demands a Great Suit of Sails
My Need for Cruising Speed Demands a Great Suit of SailsI like to sail fast mostly in the heavy winds that Lake Ontario throws.
" * " indicates required fields

Reefing A Sail: The Ultimate Guide
Sailing is an exhilarating experience that offers a sense of freedom and connection with nature. Whether you are an experienced sailor or a novice, reefing a sail is an essential skill to learn.
Reefing allows you to reduce the sail area in high winds, making the boat more manageable and safer to navigate. It also helps to prevent damage to the sail and rigging.
It’s one of the first skills Adam and I learnt onboard and I wouldn’t head out without knowing how to. It’s one of the main things you must know in sailing!
Putting in a reef quickly and under pressure is so important that we sometimes do drills around a bay just making sure we can reef quickly and efficiently. When you know how it really is easy to do, and will make sailing more comfortable and most importantly, more safe.
In this ultimate guide to reefing a sail, we will cover everything you need to know about reefing, from when to reef to the different reefing techniques and equipment needed.
So, grab your sailing gear, and let’s dive into the world of reefing a sail!

As an Amazon Associate, we earn from qualifying purchases. We also earn from other affiliate programs. This means we may receive a small commission on products purchased through our links at no extra cost to you.
Table of Contents
What is reefing, when should you reef a sail, how to reef a mainsail, how to reef a headsail, which sail do you reef first.

Reefing is a sailing term that refers to reducing the sail area in order to manage the sailboat in high winds.
Reefing involves folding or rolling part of the sail and securing it to the boom or mast to decrease the surface area of the sail exposed to the wind.
This reduces the amount of force on the boat, making it more stable and easier to control.
It is an important technique for any sailor to master, as it can make the difference between a comfortable and safe sail and a dangerous one. It’s one of the first things we learnt to do when sailing, and I wouldn’t go out on any sailboat without knowing how to reef the sails first!
In this guide, we will explore the basics of reefing and provide tips and techniques for successful reefing.

Reefing a sail is an important skill for sailors to have, as it helps to control the sail’s surface area in strong winds. But when exactly should you reef a sail?
The answer to this question depends on various factors, such as the strength of the wind, the type of boat and sail, and the experience and comfort level of the sailors on board.
As a general rule, most sailors will start reefing their sails at around 18knts of wind. If you’re sailing a smaller, lighter vessel then you might need to reef earlier. If your boat is a heavy, slow boat then it might be able to handle stronger winds.
Our heavily built sailboat can handle slightly higher winds, more like 20 knots. But we will usually play on the side of caution and reef earlier anyway. It’s always better to be safe when conditions are picking up.
You should always take into consideration the comfort of your crew, too. Your boat might be sailing along nicely in 15 knots without a reef, but if it’s heeling significantly and your crew are nervous and uncomfortable then you should put their ease ahead of speed.
Obviously when things get really spicy out there you’re going to want to know what to do. Sometimes putting reefs in the sails isn’t enough, and you’ll need to learn proper storm tactics like how to heave to or use a storm sail .
How Do You Reef While Sailing?

Each boat has a slightly different reefing system so before you head out sailing on an unfamiliar vessel you should make sure you know how to reef the sails.
That being said, most sails are reefed in a very similar way, so here is a basic guide to reefing your headsail and mainsail.

Reefing a mainsail while sailing can be a bit challenging, but it’s an essential skill for any sailor to learn. The process of reefing involves reducing the sail area to help control the boat in strong winds. This is done by partially lowering the mainsail and securing it to the boom and mast using reefing lines.
To reef a mainsail while sailing, the first step is to ease the mainsheet to depower the sail. You’ll want to head up into the wind to take pressure off the sail, so make sure everyone knows you are about to reef so they can help or get out the way!
Once the boat and boom are in a safe position, the reef can be put in. To do this, take tension off the main halyard and lower the sail to the first, second, or third reef. Then attach it to the hook or ramshorn at the foot of the boom.
You have now effectively shortened your sail. But it’s probably flapping around all over the place! Time to get some tension on.
First, raise the halyard. You’ll see your sail is much shorter now, with a reduced sail area. Then take tension on your reefing line (hopefully these are labelled so you know which to tension). This will tighten the foot of your sail.
Lastly, trim the sail by adjusting the mainsheet and traveler to ensure the boat is sailing efficiently with the reduced sail area.
You might also need to adjust the topping lift now that your sail is smaller and lighter.
It’s important to practice reefing a mainsail in moderate conditions before encountering stronger winds, as it can be a challenging task in rough weather. Adam and I tend to reef our mainsail early if we’re beating upwind, as the design of our boat means we need to go up to the mast to reef.
When the sea picks up this can feel pretty dangerous, so if we foresee this happening we stick a reef in just in case and put up with sailing slower.
With a lot of boats these days you can reef from the cockpit, making everything much safer and easier, especially for the single-handed sailor.
Proper preparation and practice will help ensure you’re able to reef the sail safely and efficiently when the need arises.

Reefing a headsail, or furling it, can be a bit easier than reefing a mainsail. Here are the general steps to follow:
- First, decide how much you need to reef the sail. If you have a roller furling headsail, this may be as simple as rolling it up a bit. If you have a hank-on headsail, you will need to remove the hanks from the appropriate reefing points.
- Turn the boat into the wind to take pressure off the sail. Make sure the headsail is completely luffing (flapping back and forth) before you start reefing.
- Begin furling the sail or removing the hanks as needed. If you have a roller furling headsail, use the furling line to roll up the sail to the desired reefing point. If you have a hank-on sail, remove the appropriate hanks and retie the sheets to the reefing points.
- Once the sail is reefed, trim the sheets to the appropriate angle and adjust the jib lead if necessary.
- Resume your course and adjust the sail trim as needed.
It’s important to note that reefing a headsail may not be necessary for all sailing conditions, and the specific steps may vary depending on your boat and equipment. The great thing about a furling headsail is that you can keep reefing and reefing until you’re just flying a tiny triangle.
The downside is that reefing a headsail does usually mess with its shape a little bit, especially if it’s older. We’ve never had a problem with this.
If we need to reef then the wind is usually strong enough that we aren’t worried about getting maximum performance and more worried about safety!

Generally, it is recommended to reef the mainsail first and then the jib sail . This is because the mainsail is usually larger and more difficult to handle than the headsail, and it can have a greater impact on the boat’s stability and handling if left unreefed in strong winds.
It’s also usually the hardest sail to reef, as you often have to go up to the boom which isn’t always desirable in rough seas.
However, the exact order of reefing can depend on various factors, such as the boat’s design, the sail configuration, and the sailing conditions.
For example, our genoa sail is absolutely massive. We will sometimes reef this first, especially if the wind isn’t forecast to pick up and the conditions are changeable. It’s far easier to put reefs in and shake them out on a furling headsail.
This is where knowing the boat you’re sailing can be a real benefit.
What If The Sails Are Already Fully Reefed?
If you’ve fully reefed your sails and the boat is still overpowered then don’t just sit and do nothing!
If you continue to sail with an overpowered rig then all sorts of things can go wrong, including your sails ripping (you don’t want to know how much new sails cost ) and even getting dismasted.
If the wind is so strong that you can’t continue sailing on your current reefed sails then you need to take them down and put up your storm sail . This is a small and rugged headsail that you can hank on for really rough conditions.
Again, this isn’t something you should be using for the first time in anger. You need to know how your storm sail works, have it easily accessible and be well versed at fitting it.
If you are still overpowered or you don’t have a headsail then you will be best off doing one of a few things, depending on the type of boat you’re sailing, where you are and your experience level.
- Sail on bare poles alone. Some boats will keep sailing relatively well without any sails up if the wind is strong enough. The type of boat, wind conditions, and sea state will all dictate whether this is a good idea.
- Heave to. If you’re sailing in storm conditions then heaving to is almost always a good idea. The boat will ride nicely over any waves and you will make hardly any headway, meaning you can go and make a cup of tea below while you wait out the bad weather.
- Motor. If you’re in an enclosed bay or close to land then you might be best off motoring to a safe anchorage or marina. Using a sailboat without sails is sometimes the best option. Adam and I have done this more than once!
Conclusion: Reefing A Sail

Reefing a sail can be a crucial skill to have as a sailor. Knowing when and how to reef can make the difference between a safe and enjoyable sailing experience and a dangerous one.
It is important to remember that every boat and sailing condition is different, and there is no one-size-fits-all approach to reefing. You should have a rough idea of the kind of wind speed the boat your sailing will need to reef in, but you should also pay attention to how much your boat is heeling and how comfortable your crew are.
Whether you are a beginner or an experienced sailor, taking the time to practice and learn the different reefing techniques can help you become a more confident and skilled sailor.
Similar Posts

Visiting Kyparissia In The Peloponnese: The Ultimate Guide

Sailing Close To The Wind: How And Why You Should

What To Pack For A Sailing Trip
Catching (and killing) a fish for the first time.

The 9 Best Sailing Hats 2024: Top Yachting Headware

Can You Sleep While Sailing?
- Search Search Hi! We’re Emily, Adam and Tiny Cat, liveaboard sailors travelling the world on our 38ft sailboat and writing about it as we go. We hope we can inspire you to live the life you’ve always dreamed, whether that’s exploring the world or living a more simple way of life in a tiny home. Find out more. Patreon
- Privacy Policy
The Worldwide Leader in Sailmaking
- Sail Care & Repair
- Sailing Gear
- Sail Finder
- Custom Sails
- One Design Sails
- Flying Sails
- New Sail Quote
- 3Di Technology
- Helix Technology
- Sail Design
- NPL RENEW Sustainable Sailcloth
- Sailcloth & Material Guide
- Polo Shirts
- Sweaters & Cardigans
- Sweatshirts & Hoodies
- Accessories
- Mid & Baselayers
- Luggage & Accessories
- Spring Summer '24
- Sailor Jackets
- NS x Slowear
- Sailor Jacket
- Sustainability
- North Sails Blog
- Icon Sailor Jacket
- Our Locations
- North SUP Boards
- North Foils
- North Kiteboarding
- North Windsurfing
SAIL FINDER
SAILING GEAR
COLLECTIONS & COLLAB
COLLECTIONS
WE ARE NORTH SAILS
ACTION SPORTS
Popular Search Terms
Collections
Sorry, no results for ""
Slab Reefing Systems & Tips for Reefing
Slab reefing systems & tips for reefing, it’s all about efficiency and effectiveness.

Sailing in big breeze can be fun, exciting, maybe stressful, and sometimes expensive when things go wrong. Shortening sail quickly and easily when the breeze comes on is key to looking after your sails and your crew. In the lead up to your next offshore race, here’s a look at a typical mainsail reefing system and some tips for looking after the mainsail when reefing.
There are many different reefing systems for the mainsail; most are pre-determined by the mast manufacturer, while some are customized by the crew to make reefing faster and safer. Here’s what to look out for when reefing to ensure you are looking after the sail, mast, boom, and fittings.
Practice first
Reefing needs to be both safe for the crew and fast, because the more time the sail spends flogging the more likely it will be damaged. The best way to achieve reefing efficiency is to practice, practice, practice, both at the dock (to get all the lines, knots, and clips positioned correctly) and on the water. Take the time with the whole crew to go through the process in moderate conditions. Check everything under load, and mark the main halyard so you know how much you’ll need to drop the sail to get the luff on the reef horn or clip. Measure out the reef ties for tying up the reefed section of the mainsail, and check the mainsail has the spreader chafe dots fitted in the correct place. It’s great for the whole crew to do this together, as the next time will be under pressure and no doubt dark and windy! You might even take photos as a reminder of what setup worked best.
Slab reefing
There are many different systems for reefing the mainsail these days, but the most common system is slab reefing. This is the way that 90% of the fleet will reef their mainsail, and when done correctly it is the simplest and most reliable system. First the luff’s reef point is secured, and then the clew’s reef point is pulled toward the outboard end of the boom until the foot of the sail is nice and flat. Below is a description of each step that will work on most boats; if you are not 100% sure of your setup, ask your sailmaker or rigger for help.
Secure the luff
The forward end of a slab reefing system consists of either reefing horns, a cunningham hook, or a luff-line on the boom. The sail will have fittings that must match the boat so they will hold the luff end secure: web loops, floppy rings, or press rings. Whatever system you have, it must be easy and fast to secure the reef point on the luff. The luff must be held both down and forward, to keep the load off the boltrope or slide; if the tack drifts too far aft, the sail can pull out of the track or tear.
This photo shows the luff end of a reefed offshore mainsail. A cunningham is fed through the mast eyelet and is pulled through the gooseneck to secure the reefed tack. Note on some boats, the boltrope will be all in line with the rig and not angling backwards, loading up the feeder. If the cunningham hook/eyelet is not held forward, the slide above the reef point will take all the load. Eventually the slide will break or the sail will tear.
Tension the outboard end
The outboard end of the first reef is generally controlled by a reef line run through either a pressed ring or a webbing loop on the leech. The reef line itself is either secured by a ‘running bowline’ or ‘buntline hitch’ tied around the boom. It’s ok to use a knot on an alloy boom. On a carbon boom, a ‘reef nappy’ is recommended to prevent point loading.
The position of both the knot and the reef nappy relative to where the clew will end up is very important. Try to end up with the line around the boom about 50mm behind the ring in the sail when it is fully tensioned, which will help keep the sail close to the boom but still allow it to be flattened out properly. Note also the second reef line, which is ready for the next reef but ttailed up so it won’t get caught on anything.
Reefing step by step
The process itself should be performed in a specific order and overseen by the mainsheet trimmer. Once the call is made to reef, here are the basic steps:
- Flake out main halyard to ensure no twists or knots will slow the drop and increase flogging time. Load halyard on winch.
- Load up the outboard reef line, and check all is clear on the leech.
- Ease vang off completely and ease outhaul off a few inches.
- Mainsheet trimmer eases the mainsheet and calls, “Drop Halyard”.
- Mast pulls down the luff and secures the sail onto the horn or cunningham clip.
- Mast ensures the cunningham is max on, calls “Made”, and signals to the pit to hoist the main halyard. Watches bolt rope feed into the rig in case of snags.
- Pit hoists the halyard until the luff is firm, then signals for the pit to grind in the outboard reef line.
- Mainsheet trimmer watches the reef line, calls how much is left to grind in, and makes sure the reef line is not crushing the sail. The sail can be pushed out to leeward or pulled over to windward of the boom, depending on how the reef line is run and what tack you are on. Remember we are bringing the boom up to the sail, not sheeting on the sail with the reef line, so make sure mainsheet and vang are eased.
- Mainsheet trimmer calls “ Made ” on the reef line and sheets on the sail.
- Mast and bow secure the reefed section of the sail, tying only around the sail and not around the boom. (If the reef line breaks, the sail will tear at the next reef tie if it’s secured around the boom.)
- Mainsheet checks leech line tension. Spilts in the leech are where the tears usually start during reefing.
While reefing, good clear communication is very important, so consider removing jacket hoods. If it’s dark, make sure the mainsheet trimmer has a torch to watch the part of the sail being winched, to ensure there is no tangle or over-tensioning.
As with anything in sailing, practice and good equipment are key to success, so get out there, pull in a reef, and check everything is in order.
Remember : to finish first, first you have to finish. So look after your sails!

FEATURED STORIES
Npl renew faq, flying sails 101.
21 December
CAPE 31 TUNING GUIDE
- Refresh page
How To Reef Your Sails (Mainsail, Jib, Furling, Loose)
Learning to reef your sails is a critical skill for on the water safety and enjoyable sailing. When the wind picks up, you want to know the best way to keep your boat under control, and reefing is your first response to building breeze.
What is reefing your sails? Reefing is reducing sail area in the sail without removing or dousing the sails. Depending on your boat, you can reef sails by partially furling them, or the halyard and tying them off. With reefed sails, your boat will be easier to handle in heavier weather.

On this page:
When should you reef a sail, what happens when you reef, how do you reef the main sail, how do you reef the headsail, preparing boats for reefing, preparing for various reefing scenarios.
Reefing is not hard to learn. An important part of how to reef is knowing when to reef. Also know that reefing is a normal strategy for sailing . It's not just a survival skill for extreme conditions, it's a skill that lets you sail better in heavy wind.
Our rule for when to reef was when someone asks "do you think we should reef?" Meaning the first time the weather and wind build enough to give us some discomfort about the developing conditions, it was time to reef.
Because we had furling main and headsails, reefing was quick and easy for us so we reefed early. After all, you can always shake out the reef if conditions don't continue to deteriorate. You can't really reef too early. If you are uncomfortable with what you see happening on the water, reef the sails.
Reefing early when you're learning is smart because it takes time, especially if you have to leave the cockpit to do it. While you work, the wind may continue to build as conditions deteriorate, so the longer you wait the harder it may be to reef. You'll get faster as you do it more often, but when you're learning it's better to get an early start.
Specific signs that it may be time to reef:
- Sustained increase in wind speed, especially with large, powerful gusts.
- Out of control feeling to the boat that you can't ease by de-powering the sails.
- Storm/dark clouds on the horizon, especially in the direction you're sailing.
- Building wind-lashed waves and chop
Situational awareness when you are sailing into big breeze is critical. You don't want heavy wind to sneak up on you.
A reefed boat will sail well with a balanced helm, so get in the habit of reefing when you feel you're fighting the boat and the wind. Once you've mastered the skill you'll know when it's time, and you'll know when it's faster and more in control to reduce sail.
The aim of reefing is to reduce the sail area that you expose to the wind. This lowers the forces on the boat, reduces heeling, and restores control to the helm and sail controls in overpowering conditions. You are reefing so you can keep sailing, but with more control and less power in the rig.
One downside to this is that you often lose some sail shape. Sails are cut to be flown full, but shortening sail can impact the efficiency. When you need to reef there's usually enough wind to keep the boat moving, even with a suboptimal shape that's harder to trim. The major performance impact is on upwind sailing. Without that nice headsail shape, you may not point as high.
You'll often find that sailing reefed is as fast as sailing with all your sails out, because the boat is in control and spends less time with the rail buried, rounding up, and sailing all over as you fight the rudder to keep the boat straight. And you'll be more comfortable.
To reduce your main, you either furl it in if you can, or you drop the halyard to a set point and tie the main off on the boom with sail ties and reefing lines. The specifics vary with your rig, your equipment, and your boat and how you've set things up beforehand.
Reefing the main sail with jiffy or slab system
For boats without furling or sail handling systems, jiffy or slab reefing is the most common and easiest main reefing. You will need to leave the cockpit and work on deck to use most of these setups.
Your sails will have one or more reef points on them. Each reef point is a row of holes with grommets (called cringles ) through the sails and parallel to the foot, with a larger hole on the luff and leach of the sail. Many boats will have a reef hook , a metal hook with the end facing the deck, on the boom or near the gooseneck. Reef lines are rigged through the large cringles on the leech and tie to the boom, with one line per leech cringle. Some sails may have tie-down lines at the cringles, but this is less common on newer sails since they add weight and drag. For most sails, you will also need sail ties - short lengths of line or web meshing - for each cringle between the leech and luff.
The basic process for most mainsails follows these steps. Follow this for any reef point on the sail.
- Sail upwind to center the main and take the load off. You can work with the main to the side, but it's more difficult.
- Snug up the topping lift (if needed) to keep the end of the boom from dropping.
- Ease the mainsheet and vang a little.
- Ease the main halyard until it's far enough to attach the luff cringle to the reefing hook (if there is one) or until it's at the boom if you need to tie it.
- Hook the luff cringle to the reefing hook, or tie it firmly to the boom with a sail tie.
- Pull the matching reef line down until the leech cringle is tight to the boom and tie it off.
- Gather the body of the sail into folds.
- Put a sail tie through each sail body cringle and around the boom and tie them off so the sail is tight against the boom.
- Snug the main halyard to add appropriate luff tension, ease the topping lift, and trim the vang.
The sail is now reefed, and you can sail normally and trim it again.
To "shake out the reefs" or unreef the sail, reverse the process. Ease the halyard, undo the ties, ease the reef line, undo the reef hook, and hoist the main halyard back up.
Reefing an in-mast furling main sail
In mast furling has a lot fewer steps, since you're just putting the main partially away. It’s like fully dousing the sail, but you only go partway and stop.
Most in mast furling systems have a way they like to be put away to avoid jams going in and out, and it's important that you keep this in mind when you reef. Our furler liked the boom centered and parallel to the deck, and a little tension on it as we furled. If we reefed with the boom way out over the side on a broad reach, we were taking our chances if we didn't shake the reefing out before we furled fully. We also eased the backstay before furling in or out normally, which isn't practical when the wind is hooting up.
As a good rule of thumb, always take the reef out of your main and stow it normally after you reef . Don't just keep furling the sail in if you've reefed with a different boom and sheet tension than usual, as you may end up jamming your sail.
So keep in mind how your furler works and what you need to do for smooth furling, and don't violate those guidelines as you do these steps.
- Head upwind to take tension off the main.
- Center the boom as much as is practical.
- Ease the outhaul as you furl the sail to reduce sail area. You may have to get a little ahead with the outhaul as you ease.
- Trim the outhaul properly after you finish furling.
That's all there is to it. To unreef, just ease the sail back out all the way while unfurling. If possible, do this without changing sheet or vang tension from when you reefed in, just to be sure the sail doesn't bind.
Reefing a boom-furling main sail
When boom furling, you'll need to ease the halyard as you furl the sail to the reefed position. Because the sail furls on the boom, the foot stays taught just like a slab reefed sail, but you don't need any lines to hold it.
Like main furling, if there are any specific steps you need to take like setting the boom height or position on the boat, take care to do as much of this as possible when you reef.
Different boom furling systems have different tolerances for furling and reefing at different wind angles. Some furlers do not work will furling off the wind, while others are fine on almost any point of sail. Consult your manual for your model boom furler for directions about furling and unfurling on different points of sail, and follow them when reefing.
- Head upwind to take tension off the main halyard.
- Ease the halyard to the desired height while furling the sail.
- Check halyard tension in case you got ahead furling.
Just raise the sail again to shake out the reef when the wind drops.
Headsail reefing is easier with roller furling, but hank on sails have a few challenges if they aren't set up for reefing.
Reefing a furling headsail
Like furling mainsails, reefing a furling headsail is just putting the sail partially away. Sine the sail isn't attached to the boom, it’s even easier. All you have to change are the jib cars.
To reef a furling headsail:
- Head upwind to take load off the sail.
- Furl the sail partway to the reefing point.
- Adjust jib cars forward for new sail length.
Removing the reef is just unfurling the sail and moving the jib cars back.
Reefing the headsail with hank-on sails
Most sailors with hank-on sails "reef" by swapping the headsail out for a smaller sail. But if a hank-on headsail has reef points, it may be less work to reef it then douse and bend on a new sail.
A jib rigged for reefing will have a cringle on the luff to attach near the deck, and a cringle at the leech for a second attachment point for the sheets. Note that most hanks are not strong enough to handle the load as the tack attachment point on the sail. You want a dedicated cringle with a sturdy grommet to attach the new tack point while reefed.
To reef a jib with a hank-on headstay:
- Ease the jib halyard so the cringle in the reef point is near the deck.
- Attach the luff cringle to the reef hook or tie it to the base of the forestay.
- Move the sheets from the normal clew and tie them to the leech cringle, or use a second set of sheets if you have them.
- Bunch up the sail under the reefed areas as you can and tie with sail ties or bungees so it doesn't flap.
- Re-tension the halyard to the new position and trim the sail.
As you can see, there's going to be extra sail on the deck, which isn't as easy to contain without a boom to tie it to, and moving the sheet takes more work than main reefing.
With no preparation, boats without furling systems cannot reef those sails at all. And if you have everything you need, if you don't prepare it in advance, reefing will be much more work.
Adding foam strips to furling sails
Furling headsails lose shape and get baggy when reefed, but a sail with foam strips to stiffen the luff keeps its shape better. It won't be perfect, but it will reef in a better shape with the support.
Getting hank on and track sails
For non-furling sails you will need:
- Reef points on the sails.
- Reef lines.
- A reefing hook is best, but you can tie the sail.
In addition, you'll need to run the reefing lines through the sail before you can reef. Where the reefing line runs to on your boat varies, but the far end of each line must go through the leech cringle for that reef point then down to the boom, where it ties with a bowline around the boom or to an installed block or ring.
Most sailors don't leave reefing lines rigged because they flop around and add drag to the sails. They aren't used often in fair weather sailing and many just don't go out when a big breeze is expected. But if there is wind in the forecast, take the time to rig one or more reef points so you don't have to do it in building seas and heavy wind.
Mark your main halyard for each reef point to save time and make it easier when you're dropping the halyard. Iit will get you close enough to get the job done before you do the final trim. Use a sharpie or put a few stitches of high visibility thread in the cover at each point.
Reefing sails is the same on monohulls and catamarans, as it's the sail and rig you're worried about and the hulls have little to do with it. But other rigs and configurations beyond a sloop rig may require different or extra steps.
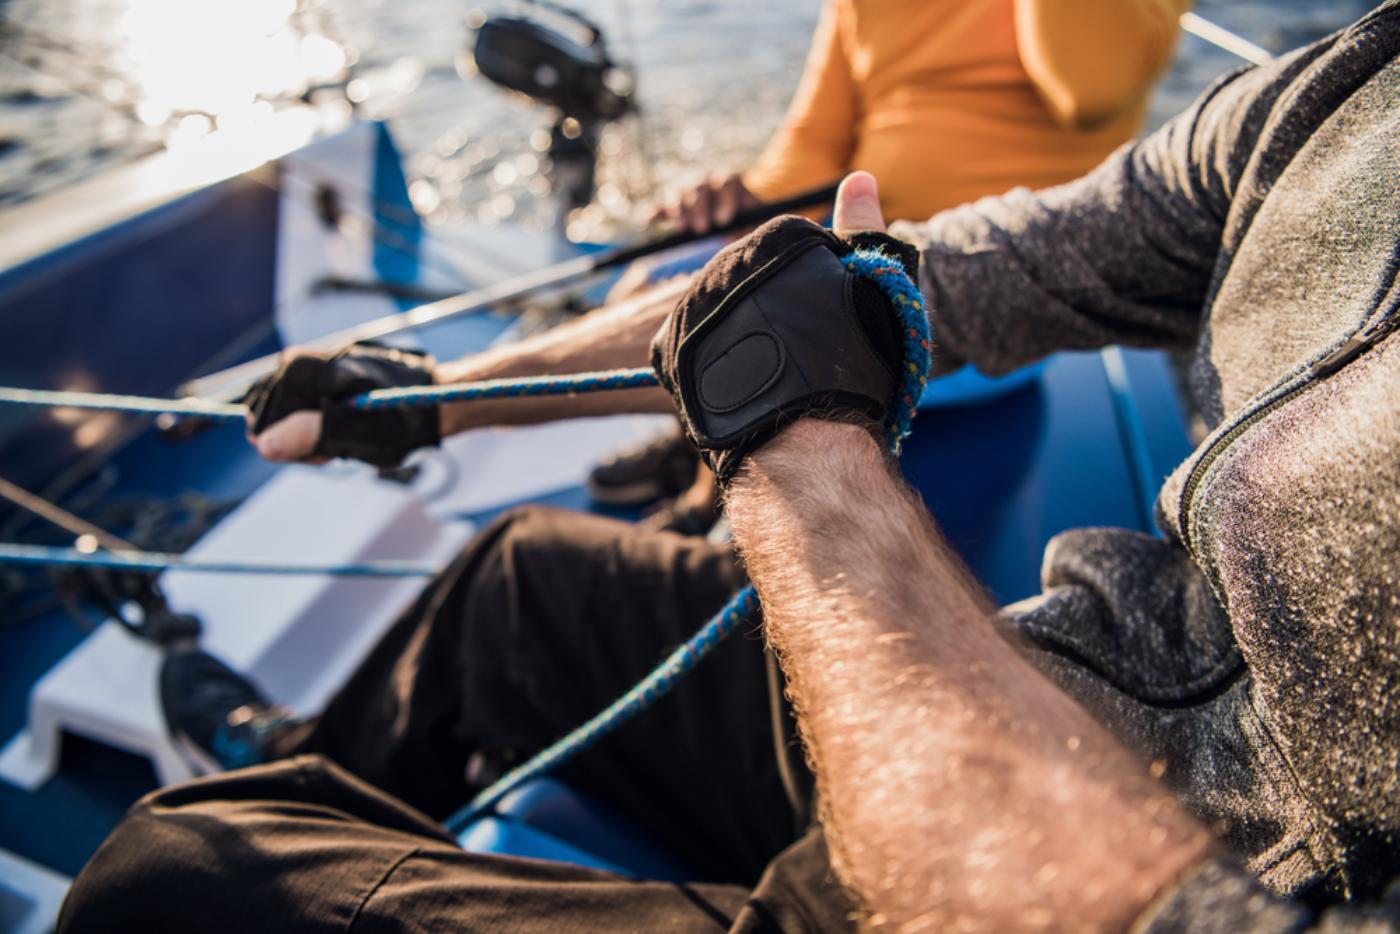
How you can reef when solo sailing
Reefing takes a lot of steps, and it's not always easy to do with one hand. Sailing by yourself, there won't be anyone to hold the wheel or ease lines as you haul others and tie things off.
For furling systems, the easiest way to reef with one hand (or person) is to do it step wise. As you head upwind, wase the outhaul (main) or sheet (headsail) a little, pull in the furler. Ease again, pull in again, until your sail is reefed where you want it. You can use the autopilot or your other hand to keep you on course.
For non-furling sails, single-line reefing systems can simplify the operation, as does running your reef lines, halyards, and topping lift to where you can reach them from all one place or with minimal movement.
Bring a single-line reefing kit
A single-line reefing system is a kit you install with several blocks and lines on the boom and mast to pull the tack and clew of a sail down together. It gets you out of hooking the luff cringle onto the reefing hook, since it pulls the luff down with the leech. If you need to tie down the middle of the sail, you still will need to move forward, but with the right setup, you can reef from the cockpit. It is more complex to install, but can be faster to use.
Leave a comment
Own your first boat within a year on any budget.
A sailboat doesn't have to be expensive if you know what you're doing. If you want to learn how to make your sailing dream reality within a year, leave your email and I'll send you free updates . I don't like spam - I will only send helpful content.
Ready to Own Your First Boat?
Just tell us the best email address to send your tips to:
This page is currently offline due to an unexpected error. We are very sorry for the inconvenience and will fix it as soon as possible.
Advice for developers and administrators: Enable debug mode to get further information about the error.
- Hiking Shoes
- Hiking Boots
- Hiking Sandals
- Trail Runners
- Base layers
- Hiking Shirts
- Fleece Jackets
- Softshell Jackets
- Rain jackets
- Down Jackets
- Hiking Pants
- Hiking Shorts
- Base Layers
- Rain Jackets
- Hiking Bras
- Baby Carriers
- Cookware Sets
- Water Filters
- Water Purifiers
- Sleeping Bags
- Sleeping Pads
- Hiking Poles
- GPS Devices
- Solar Chargers
- Dive Regulators
- Dive Computers
- Dive Watches
- Dive Wetsuits
- Dive Gloves
- Dive Lights
- Dive Knives
- Spearfishing Wetsuits
- Spearfishing Masks
- Spearfishing Fins
- Spearfishing Watches
- Freediving Wetsuits
- Freediving Masks
- Freediving Fins
- Freediving Watches
- Sit On Top Kayaks
- Inflatable Kayaks
- Fishing Kayaks
- Tandem Kayaks
- Touring Kayaks
- Kayak Paddles
- Kayak Seats
- Kayak Roof Racks
- Kayak Carts
- Stand Up Paddle Boards
- Touring SUPs
- Inflatable SUPs
- Fishing SUPs
- SUPs For Yoga
- SUPs For Surfing
- SUP Paddles
- Climbing Boots
- Belay Devices
- Climbing Shoes
- Women's Climbing Shoes
- Bouldering Shoes
- Approach Shoes
- Climbing Pants
- Bouldering Pants
- Mountain Bikes for Men
- Mountain Bikes for Women
- MTB Handlebars
- Bike Saddles
- Bike Computers
- Bike Lights
- MTB Jackets
- Bike Helmets
- Bike Packing Gear
- Fat Biking Gear
- Ski Bindings
- Ski Helmets
- Ski Goggles
- Ski Jackets
- Snowboarding Bindings
- Snowboarding Boots
- Snowboard Helmets
- Snowboard Goggles
- Snowboard Pants
- Snowboard Jackets
- Snowshoe Poles
- Avalanche Beacons
- Avalanche Probes
- Avalanche Shovels
- Ski Backpacks
- Surfboards For Beginners
- Surfboards For Kids
- Surfboard For Small Waves
- Soft Top Surfboards
- Foam Surfboards
- Body Boards
- Boogie Boards
- Kiteboarding Kites
- Kitesurfing Boards
- Kiteboarding Harnesses
- Surfing Wetsuits
- Men's Rash Guards
- Women's Rash Guards
- Board Leashes
- DLSR Travel Cameras
- Mirrorles Travel Cameras
- Point and Shoot Travel Cameras
- Fuji Travel Lenses
- Nikon Travel Lenses
- Tripods for Travel
- DLSR Landscape Cameras
- Mirrorles Landscape Cameras
- Point and Shoot Landscape Cameras
- Fuji Landscape Lenses
- Nikon Landcape Lenses
- Canon Landcape Lenses
- Tripods for Landscape Photo
- Wildlife Cameras
- Wildlife Lenses
- Wildlife Tripods
- Wildlife Monopods
- Birdlife Cameras
- Birdlife Lenses
- Surfboards For Small Waves
How To Reef A Sail – A Beginners Guide
Does the idea of strong winds when out sailing freak you out? Plenty of sailors miss great sailing days for fear of squalls or increasing winds. But even if you do get caught out with strong winds approaching, you don’t need to worry. Once you learn how to reef a sail, you’ll be able to confidently sail in any condition.
Sailboats are made for the ocean and its weather. That’s why all it takes is learning how to sail to be safe. When yachts get into trouble, it’s often the crew at fault rather than a flaw in the boat! Understanding how wind strength and sail plan affects your sailboat will give you the tools to fearlessly go on an adventure.
WHAT IS REEFING?
Reefing is simply making a sail smaller. This is usually done in response to the increasing wind. Reefing down a sail allows you to continue sailing without being overpowered. This keeps the boat under control and often makes the journey more comfortable.
A sail that is too large for the wind conditions could be dangerous as it provides too much resistance for the boat. Putting off reefing, especially for a squall or very strong winds, is a bad idea. It can result in the sail ripping, the boat heeling over dangerously or even the mast breaking.
Reefing can seem overwhelming but in reality, it’s a fairly simple action. Once you’ve reefed, even strong winds will seem considerably more manageable and the conditions will be far less daunting.
DO YOU NEED TO REEF?
When you need to reef will depend on the boat you’re sailing. Some boats will need to be reefed considerably earlier than others. Lightweight yachts often need reefing much earlier than heavy, more traditional yachts.
If your sailboat has a heavy, full keel, chances are you’ll be able to hold full sail for longer than a fin-keeled lightweight cruiser. In increasing winds and relatively safe waters or conditions – small waves, daylight – you can wait until the boat feels like she’s starting to strain before reefing.
In more difficult conditions – large waves, twilight or dark – you will want to reef in anticipation.
Unless you are continuing a particular course, you may not need to reef at all. If you need to turn downwind, for instance, you can turn sooner and keep a full sail.
Often, you can reef just the foresail to reduce pressure while keeping the center of effort further aft for better performance (unless you’re a catamaran).
TYPES OF REEFING
Reefing the main.
Mainsails have reefing points sewn into them when they are made. Yachts expecting strong winds may well have a three-reefed mainsail. This gives them more opportunity to reef in different winds. Day sailing yachts might only have one or two reefing points as they wouldn’t be out in exceptionally strong winds.
To reef the mainsail, the boat must be turned up into the wind to take the pressure off. You don’t want to turn it so much that the boat tacks itself or that the foresail starts flogging madly. Easing the mainsheet will also help take off the force.
After the pressure has been taken off the sail, you’ll need to release the kicking strap/vang (the rope or arm holding the boom down) and tighten the topping lift. The weight of the boom will now be taken on the topping lift and not the sail.
After you’ve reefed and tightened up the main halyard again, you can loosen the topping lift and tighten the kicking strap/vang.
SLAB REEFING
Slab reefing is the preferred method for serious offshore sailors including the famous Skip Novak . This is the act of folding the bottom of the sail down until you reach your desired reefing point. In slab reefing, the mainsail is lowered down onto the boom and then secured at it’s new smaller size.
Many modern yachts use a lazyjack system which creates a pocket for the mainsail to reef down into. If your lines lead back to the cockpit and you have a single-line reefing system, the process is straightforward.
Simply lower the main halyard down until the reefing point reaches the boom. Then, cleat it off. Pull the reefing line until it tightens the luff and leech of the sail.
With lazyjacks, the excess material will be safely contained. Without lazyjacks, you’ll have folds of material flopping around the boom. You’ll need to tie these using the metal eyes sewn into the sail along the reefing point.
If you don’t have lines leading back to the cockpit, you’ll need to reef the sail while standing at the mast. After lowering the halyard to the reefing point, you can hook the reefing point and pull the reefing line to tighten the new foot.
IN MAST REEFING
In mast reefing is popular with modern yachts and charter yachts. This type of reefing rolls the mainsail into the mast as opposed to dropping it down onto the boom. In mast reefing is usually very straightforward and extremely quick. This is performed by pulling on the furling line.
Long-distance sailors or sailors likely to encounter unpleasant conditions may steer away from in mast reefing. This is due to the risk of the furling system causing a mast jamming. In a jam, it may become impossible to reef the main or take it down at all. This situation can quickly become extremely dangerous.
BOOM REEFING
Boom reefing is where the mainsail is rolled around or furled inside the boom. Possibly the least popular type of furling, boom reefing can be difficult and has a few downsides to it such as the boom becoming larger than it would be otherwise and the shape of the sail getting lost.
Boom reefing is performed simply by releasing the main halyard down and pulling the furling line until the sail reaches the desired size. Boom reefing technicalities depend on the make of the furler but are usually very easy to operate.
FORESAIL REEFING
Foresail reefing is quick and easy. It is a great way to reduce overall sail area fast. Many yachts perform best with the power in the center of the boat, i.e. the mainsail. So, reefing the foresail before the main can be ideal to maintain the forward drive.
Most sailboats have a roller furling system for the foresail and reduce the size of the sail to however small they like. Reefing a foresail requires easing out the sheet so that the sail loses the wind and the pressure is taken off.
Then, you can pull in on the foresail reefing line until the sail is the desired size before cleating off. Winch in the sheet until the sail is set and you’re reefed down!
REEFING OTHER BOATS
While we’ve only talked about reefing a sloop, you can reef almost all sailboats. The only boats that you often cannot reef are those with hanked-on sails. When the wind gets too strong in this case, the sails must be swapped out for small ones.
Reefing catamarans is a good example of needing to reef the main and not the foresail. The foresail of a catamaran creates an upward lift, which is important to prevent the cat from burying its bows.
WHAT HAPPENS AFTER REEFING
Reefing either sail will slightly change the way the boat is handled. Depending on which sail is reefed or reefed the most may cause the boat to come up into the wind or bear away from it. The helmsman will feel the change and should adjust the steering accordingly.
If the reefing caused the boat to drop a large amount of momentum and is suddenly slopping about in the water, you have reefed too much. In gusty or squally conditions, it can be difficult to know how much to reef or exactly when to reef.
If you see a squall approaching, you may have to put up with wallowing a little under a deep reef before the squall hits you. When it does though, you’ll be glad you reefed!
GO SAILING!
Reefing is an essential skill for sailing. However, the fundamentals are so simple that you’ll soon easily get to know the reefing systems on your boat or the boats you sail. Having the knowledge to reef will give you the confidence to go out sailing in some great conditions.
A great tip for setting out into strong winds is to reef before you even leave the harbor! It’s often easier to put out more sail than to reef it in. So, start smaller if you think the wind strength might call for it.
- Types of Sailboats
- Parts of a Sailboat
- Cruising Boats
- Small Sailboats
- Design Basics
- Sailboats under 30'
- Sailboats 30'-35
- Sailboats 35'-40'
- Sailboats 40'-45'
- Sailboats 45'-50'
- Sailboats 50'-55'
- Sailboats over 55'
- Masts & Spars
- Knots, Bends & Hitches
- The 12v Energy Equation
- Electronics & Instrumentation
- Build Your Own Boat
- Buying a Used Boat
- Choosing Accessories
- Living on a Boat
- Cruising Offshore
- Sailing in the Caribbean
- Anchoring Skills
- Sailing Authors & Their Writings
- Mary's Journal
- Nautical Terms
- Cruising Sailboats for Sale
- List your Boat for Sale Here!
- Used Sailing Equipment for Sale
- Sell Your Unwanted Gear
- Sailing eBooks: Download them here!
- Your Sailboats
- Your Sailing Stories
- Your Fishing Stories
- Advertising
- What's New?
- Chartering a Sailboat
- Single Line Reefing
Is Single Line Reefing Right for Your Sailboat?
The single line reefing system is probably the easiest way to pull a reef in a mainsail and, providing the mainsail halyard and topping lift are led back to the cockpit, there's no need to clamber up to the mast to shorten sail.
But if the halyard and the topping lift are operated from the mast, then this is where the reefing pennant should terminate too.
On some boats the halyard is operated from the mast and the topping lift from the cockpit - which is just plain daft - but if this is the case it's best to keep the halyard and the reefing line in the same location, as you can deal with the topping lift before you leave the cockpit and when you return to it.
Clearly it makes a lot more sense to have everything all in the same place - either at the mast or in the cockpit - so you can deal with it on your own if you have to.
Pulling In a Slab with a Single Line Reefing System
It doesn't get much simpler than the external system shown here:~

- Ease the kicking strap, or vang as it's also known, then;
- Ease the mainsheet;
- Head up towards the wind;
- Take up on the topping lift to support the end of the boom;
- Release the halyard and drop the main by enough to pull in the reef;
- Pull in the reef and secure the reefing line;
- Tension halyard and secure;
- Ease the topping lift;
- Adjust course, trim sails - and it's job done!
Internal Systems
Some spar manufacturers incorporate single line systems inside the boom, which, although looking neater is:
- more expensive, and
- is difficult to repair when something breaks, and
- uses a two-part tackle which makes pulling a reef in easier, but
- the mechanical advantage works against you when letting a reef out.

There's only enough room inside the boom for the first two reef tackles, so the third reef - if there is one - has to be done with a standard slab reefing arrangement .
This means that in the very worst conditions you'll have to go to the mast anyway!
I know some offshore sailors that use this system have just two deep slabs in the mainsail, and rely on the trysail when things get really unpleasant.
The trysail should have its own separate track and be kept bagged but ready for hoisting at the foot of the mast, as shown here.
Any Questions?
What is the difference between single-line reefing and slab reefing?
The difference between single line reefing and slab reefing is that single-line reefing uses one line to pull down both the outboard and inboard reef cringles of the mainsail, while slab reefing uses two separate lines for each cringle.
Single-line reefing simplifies the reefing process and reduces the number of lines and hardware needed, but it also introduces more friction and tension in the system, which can make it harder to pull in or release the reefing line.
Slab reefing is more traditional and classic, and it allows for more precise adjustment of the luff and leech tension, but it also requires more steps and more lines to handle.
How do I convert the slab reefing system on my sailboat to a single-line mainsail reefing system?
To convert your yacht from slab to single line reefing, you will need to modify your existing reefing system by adding some blocks, sheaves and lines that will allow you to pull down both the outboard and inboard reef cringles with one line. The exact configuration may vary depending on your boom and mast layout, but the general steps are:
- Attach a block or sheave at the end of the boom that can redirect the reefing line from the outboard cringle to the inboard end of the boom;
- Attach another block or sheave at the inboard end of the boom that can redirect the reefing line from the boom to the inboard cringle;
- Attach a block or sheave at the base of the mast that can redirect the reefing line from the inboard cringle to the cockpit;
- Run a low-stretch rope from the cockpit cleat or winch, through the mast base block, through the inboard cringle, through the boom end block, through the outboard cringle, and back to the cockpit cleat or winch. This will be your single-line reefing line;
- Remove or disable any existing lines or hardware that were used for slab reefing, such as reefing pennants or hooks.
Some tips and considerations for converting to single-line reefing are:
- Make sure all blocks, sheaves and lines are sized appropriately for your sail area and load;
- Make sure all blocks, sheaves and lines are aligned properly and run smoothly without any twists or jams;
- Make sure all blocks, sheaves and lines are secured firmly to the boom, mast and deck using rivets, screws, washers or other suitable fasteners;
- Make sure you have enough slack in your halyard and topping lift to lower your sail to the desired reef point;
- Make sure you mark your halyard and reefing line with tape or markers to indicate where to stop for each reef point.
What are the Pros and Cons of single-line reefing?
Some of the advantages are:
- It reduces the number of lines and hardware needed for reefing;
- It eliminates the need to go to the mast or boom to secure the reef cringles;
- It simplifies the reefing process and reduces the risk of errors or jams;
- It allows for quick and easy adjustment of sail shape and balance.
Some of the disadvantages are:
- It produces more friction and tension than conventional reefing systems, which can make it harder to pull in or release the reefing line;
- It may not provide enough tension on the luff or leech of the sail, which can cause sagging or flapping;
- It may not work well with full-battened mainsails, which can interfere with the passage of the reefing line through the cringles.
How do I shake out a reef using a single-line reefing system?
To shake out a reef using a single-line reefing system, you need to:
- Ease off or release any vang, outhaul or mainsheet tension that may prevent you from lowering or raising your mainsail;
- Ease off or release the reefing line until both the outboard and inboard cringles are free from the boom. Cleat off or lock the reefing line;
- Raise the mainsail halyard until you reach a pre-marked point that corresponds to the original sail area or the next lower reef point;
- Re-tension the reefing line to remove any slack or wrinkles from the leech of the sail. Cleat off or lock the reefing line;
- Adjust the vang, outhaul and mainsheet as needed to trim and shape your full or partially reefed sail.
The above answers were drafted by sailboat-cruising.com using GPT-4 (OpenAI’s large-scale language-generation model) as a research assistant to develop source material; to the best of our knowledge, we believe them to be accurate.
Read more about Reefing and Sail Handling...

Headsail Roller Reefing Systems Can Jam If Not Set Up Correctly
When headsail roller reefing systems jam there's usually just one reason for it. This is what it is, and here's how to prevent it from happening...

Is Jiffy Reefing the simplest way to reef your boat's mainsail?
Nothing beats the jiffy reefing system for simplicity and reliability. It may have lost some of its popularity due to expensive in mast and in boom reefing systems, but it still works!

Sailboat Running Rigging - Sheets, Halyards & Control Lines
There’s a huge amount of running rigging on a cruising sailboat. Do you really want all of it to lead back to the cockpit?
Recent Articles
Used Sailing Equipment For Sale
Feb 28, 24 05:58 AM
My Vagabond 47 Sailboat 'Untethered Soul' is for Sale
Feb 27, 24 12:40 PM
The Newport 41 Sailboat
Feb 24, 24 04:33 AM
Here's where to:
- Find Used Sailboats for Sale...
- Find Used Sailing Gear for Sale...
- List your Sailboat for Sale...
- List your Used Sailing Gear...
- Sign-up for our newsletter, 'The Sailboat Cruiser' ...
- Identify this month's Mystery Boat...
Our eBooks...

A few of our Most Popular Pages...

Copyright © 2024 Dick McClary Sailboat-Cruising.com

Mainsail Furling Systems – Which one is right for you?
With the variety of options of mainsail furling systems available, including slab, in-boom, and in-mast systems, it can be challenging to determine which one best suits your needs. In this comprehensive guide, we will explore the pros and cons of each system, enabling you to make an informed decision that aligns with your sailing requirements.
The majority of yachts, specifically over 75%, utilize the slab-reefing technique as their preferred method for reefing the mainsail. However, as the size of the boat increases, there is a noticeable trend towards adopting systems that allow the sail to be furled within the spar itself. In-mast furling systems, in particular, are more prevalent in larger yachts with a length overall (LOA) of 50 feet and above. For craft measuring 65 feet and beyond, in-boom furling becomes the more commonly employed method.
In essence, as yacht size grows, there is a shift towards the use of in-mast or in-boom furling systems instead of the traditional slab-reefing method. This transition is influenced by factors such as ease of use, convenience, and the desire for improved sail control. Larger yachts often opt for in-mast furling due to its ability to reef the sail at any point of sail, while in-boom furling offers advantages in terms of sail shape and incremental reefing positions.
Slab (AKA ‘Jiffy’ Reefing) System
The slab-reefing method has stood the test of time and remains the most prevalent choice, with over 75% of yachts utilizing this system. Over the years, jiffy reefing lines have replaced the traditional reefing points stitched into the sail, offering a more convenient and efficient solution. There are variations of the jiffy system, including single lines and continuous lines, each with its advantages.
When it’s time to reef the mainsail, the crew releases the halyard tension to allow the sail to be lowered. Reefing lines, which are pre-attached to the sail, are then pulled through reefing cringles (sturdy metal rings) along the luff of the sail. These lines are used to gather and secure the excess sail material in a folded position. By pulling the reefing lines, the sail is gradually reduced in size, creating a smaller and more manageable sail area.
Once the desired amount of sail area is reefed, the reefing lines are secured, typically by tying them off to designated reefing points or reefing hooks on the boom. This ensures that the reefed portion of the sail remains securely in place. After the reefing lines are secured, the halyard tension is adjusted to raise the sail back up, taking into account the reduced size of the reefed area.

Advantages of Slab System
- Best Sail Shape: When sailing upwind, the bellied shape of a slab-reefed mainsail optimizes its wing-like performance both at the luff and on the foot. This design ensures enhanced aerodynamics and improved overall sail efficiency.
- Bigger Sail Area When Fully Set: The slab-reefing system allows for considerable roach in the mainsail, adding valuable sail area. However, it’s important to note that this advantage diminishes when the sail is reefed.
- Adjustable Back Stays: Unlike in-mast systems, the slab configuration enables better sail shape through the ability to tension the back stays and bend the top of the mast head back. This adjustability contributes to improved performance and control.
- Simplicity: The slab system boasts minimal complexities, reducing the likelihood of mechanical failures and simplifying maintenance requirements.
- Lowest Cost: In comparison to in-spar furling systems like in-boom and in-mast, the slab system proves to be the most cost-effective solution. The absence of additional mechanisms such as mandrels, motors, and gearing significantly reduces overall expenses.
- Better Stability: When the sail is furled using the slab system, the weight is concentrated on the boom, resulting in improved yacht stability. In contrast, in-mast systems carry the weight aloft, affecting stability in certain conditions.
- Less Windage: The slab system incorporates a smaller mast section, reducing both cost and windage when compared to in-mast systems. Additionally, the boom’s smaller and lighter profile ensures easier control and eliminates the need for a preventer on all points of sail, as required with in-boom systems.
Disadvantages of Slab System:
- Must Come Head to Wind: To set and reef the sail using the slab system, the yacht needs to be rounded up into the wind. This maneuver can be challenging, particularly in open ocean conditions with 40 knots or more of wind and waves reaching heights of 5 meters or more. Rounding up the yacht in these extreme conditions requires skill and experience.
- Crew Required on Deck: When the mainsail needs to be fully dropped, it will require crew members to go on deck to lash down the main halyard, preventing the sail from snaking up again. This additional crew involvement adds complexity and potential risks, especially in adverse weather conditions.
- More Sail Maintenance: Slab-reefed sails require more maintenance compared to in-boom or in-mast systems. The reefing point cringles, which take all the load when the sail is reefed, need to be regularly inspected and maintained to ensure they do not break down. This additional maintenance requirement adds to the overall workload of sail care.
- More Crew Needed: Setting a reef using the slab system typically requires a minimum of two crew members. This means that, depending on the size of the yacht and the sailing conditions, additional crew members may be required to put a reef in the mainsail. This can limit the sailing options for those who prefer to sail single-handed or with a smaller crew.
- High Sail Stack: On larger yachts (45ft and above), the mainsail stack on the mast can become quite high when using the slab system. To fully secure the mainsail to the gooseneck, crew members will need to go on deck and climb two or three steps up the mast. However, it’s worth noting that the Harken T-Track Switch system can significantly reduce the height of the stack, offering a potential solution to this challenge.
- Less Reef Points: Slab-reefed sails are generally limited to two or three reef points. In comparison, in-boom or in-mast systems offer a greater range of incremental reefing options. Having more reef points allows for more flexibility in adjusting the sail area to match various wind conditions, enhancing sailing performance and safety.
- More Lines in the Cockpit: When the sail is reefed using the slab system, there are more ropes present in the cockpit, requiring proper stowage to prevent tangling and ensure a clear working area. Managing the additional lines can be challenging, especially in fast-paced or demanding sailing situations.
- Needs Lazy Jack Bag: A stack-pack bag, also known as a lazy jack bag, is required on the boom to contain the mainsail when it is furled using the slab system. While this bag facilitates sail stowage, it adds windage and potentially affects the aesthetics of the yacht. The impact on aesthetics may vary depending on personal preferences and the design of the lazy jack bag.
In-Boom Furling System
In-boom furling is a method used to reef the mainsail on a yacht by rolling the sail inside the boom. When it’s time to reef the mainsail with an in-boom furling system, the process begins by activating the mainsail furling mechanism. This mechanism is typically located inside the boom and is connected to a mandrel, which acts as a spindle for rolling the sail. By operating the mainsail furling control, the mandrel rotates, causing the mainsail to be gradually rolled up inside the boom.
As the sail is rolled up, the excess material is neatly stowed within the boom. In-boom furling systems often feature full-length battens that help maintain the shape and stability of the reefed sail. The mainsail furling process continues until the desired amount of sail area is reefed, adjusting to the prevailing wind conditions.
Once the sail is fully rolled up inside the boom, it is securely held in place. In-boom furling systems usually incorporate a locking mechanism to prevent any unintended unfurling of the sail. This ensures that the reefed sail remains tightly furled and ready for use when needed.

Advantages of In-Boom:
- Good Sail Shape: The in-boom system allows for a better wing-style sail shape compared to the in-mast system, though not as versatile as the slab system. It enables the sail to maintain a more efficient aerodynamic profile, enhancing overall performance. It’s important to note that while some claim the sail shape can be the same as that of a slab system, this is not entirely accurate. The sail and its full-length battens must be rolled around a straight mandrel (the in-boom spindle), and excessive belly built into the sail can cause it to stack forward onto the gooseneck, leading to undesirable consequences.
- More Reef Positions: With the in-boom furling system, there are typically more reef positions available. The furling process finishes at a point well between the battens, allowing for smaller increments of reef compared to the slab system. This finer control over reefing enables sailors to adjust the sail area more precisely to match varying wind conditions, optimizing performance and maintaining a comfortable sailing experience.
- Less Weight Aloft: When the sail is furled, it rests on the boom rather than being positioned aloft, resulting in a better righting moment compared to the in-mast system. The reduced weight aloft contributes to enhanced stability and maneuverability of the yacht, particularly in challenging weather conditions.
- No Reefing Lines in the Cockpit: Unlike the slab system, the in-boom system eliminates the need for reefing lines in the cockpit. This simplifies the setup and reduces clutter, providing a cleaner and more organized cockpit layout. It allows for better movement and minimizes the risk of tripping or entanglement during critical maneuvers.
- Less Windage on the Mast: The mast section required for the in-boom system is generally smaller compared to the in-mast system. This reduction in mast size, similar to the slab system, leads to lower windage. The reduced wind resistance contributes to improved performance and maneuverability, particularly when sailing upwind.
- Bigger Sail Area: With the in-boom system, the mainsail can have a substantial roach, similar to the slab system. The roach refers to the extended area of the sail beyond a straight line connecting the head and clew. A larger sail area allows for increased power and potential speed, benefiting both performance-oriented sailors and those seeking exhilarating sailing experiences.
Disadvantages of In-Boom:
While the in-boom system offers several advantages, it’s important to consider its limitations and potential drawbacks before making a decision. Here are some disadvantages associated with the in-boom mainsail furling system:
- Must Come Head to Wind: Similar to the slab system, the in-boom system requires the yacht to be rounded up into the wind to furl and set the sail. This maneuver can be challenging, particularly in open ocean conditions with strong winds and large waves. Rounding up the yacht in adverse weather or rough sea conditions may pose difficulties and require skilled seamanship.
- Longer Furling Process: When furling the sail using the in-boom system, the sail takes longer to drop compared to the slab system. The mandrel, which the sail is rolled around, requires more time to take up the lowering sail. As a result, the helmsman must hold the yacht into the wind for a longer duration, extending the mainsail furling process. This prolonged time spent maneuvering into the wind can impact overall sailing efficiency and require additional attention from the crew.
- Two-Man Operation: To ensure the sail is not stacking forward excessively during the mainsail furling process, crew members must be stationed on deck to monitor the furl. This means that the in-boom system typically requires a minimum of two crew members or more. The need for additional crew members may limit the flexibility and ease of handling for single-handed sailors or those operating with a smaller crew.
- High Cost: Among the three mainsail furling systems discussed, the in-boom system tends to be the most expensive option. In addition to the furling system itself, the installation often requires additional components, such as a powered vang to assist with lifting the boom. The higher cost of the in-boom system should be taken into account when considering budget constraints or cost-effectiveness.
- Propensity to Stack Forward: If the helmsman allows the boat to fall off the wind while the sail is being furled and wind fills the sail, even at the leech, there is a risk of the sail stacking forward. When this happens, the sail must be re-hoisted and the mainsail furling process restarted. This potential for the sail to stack forward adds complexity to the furling procedure and requires vigilance from the crew to prevent such situations.
- Needs a Preventer: The in-boom system, due to its larger boom size and the inclusion of furling mechanics, requires the use of a preventer on all points of sail. A preventer is a line used to secure the boom and prevent unintended jibes or sudden movements. The presence of a preventer adds complexity to sail handling and requires careful attention to prevent accidents or damage to the rigging.
In-Mast Furling System
When utilizing an in-mast furling system, reefing the mainsail is a straightforward process. The mainsail furling mechanism, typically located inside the mast, is engaged to initiate the mainsail furling operation. As the furling control is activated, the sail is rolled up around a mandrel positioned within the mast.
As the mainsail is furled, it is neatly stored inside the mast, reducing the exposed sail area. The mainsail furling process continues until the desired amount of reefed sail area is achieved, providing better control and stability in stronger winds. In-mast furling systems often allow for infinite reefing points, enabling precise adjustments to match the prevailing conditions.
In-mast furling provides sailors with a reliable and user-friendly solution for reefing the mainsail. Its versatility, ease of operation, and streamlined cockpit contribute to a more enjoyable and efficient sailing experience, particularly for cruisers and those seeking simplicity in sail handling.

Advantages of In-Mast:
The in-mast mainsail furling system is widely favored among larger offshore cruising boats for its convenience and ease of handling. It offers several advantages that make it a popular choice for many sailors. Here are some advantages associated with the in-mast mainsail furling system:
- Doesn’t Need to Come Head to Wind: One of the significant advantages of the in-mast system is that it allows the mainsail to be furled at almost any point of sail. Unlike other systems, which require the yacht to be rounded up into the wind, the in-mast system enables reefing or furling without altering the yacht’s course significantly. Even when running downwind , a simple change of course by around 20 degrees can lift the sail off the shrouds and spreaders, facilitating easy reefing.
- One-Man Operation: Depending on the chosen system, the in-mast furling can be operated by a single crew member. Electric or hydraulic systems, in particular, offer the convenience of effortless furling with minimal physical exertion. This feature is advantageous for short-handed sailing or when there’s a lack of crew members available to assist with sail handling.
- Less Rope in the Cockpit: Compared to the slab system, the in-mast system reduces the amount of rope and lines in the cockpit. If equipped with an electric or hydraulic motor, the sail furling can be controlled from the cockpit, minimizing the need for crew members to go on the deck during sail maneuvers. This contributes to a clutter-free and safer working environment onboard.
- More Reef Points: The in-mast system allows for infinite reef points, offering more flexibility in adjusting the sail area to suit various wind conditions. Sailors have the freedom to reef the sail incrementally, tailoring it to the prevailing winds and maintaining optimal control over the yacht’s performance. This versatility is particularly beneficial for long-distance cruising or when encountering unpredictable weather conditions.
- Medium Cost: Compared to the in-boom system, the in-mast system generally falls into a more moderate cost range. While specific prices may vary depending on the chosen manufacturer and additional features, the overall cost is often more affordable, making it an attractive option for sailors seeking a balance between performance and budget.
Disadvantages of In-Mast:
The in-mast mainsail furling system is widely popular, particularly among larger offshore cruising boats. It offers several advantages, but it’s also important to be aware of its limitations and potential drawbacks. Here are some disadvantages associated with the in-mast mainsail furling system:
- Flatter Sail Shape: One of the drawbacks of the in-mast system is that it doesn’t provide as good a sail shape as the slab or in-boom systems. The need to wrap the sail around the mandrel inside the mast restricts the ability to achieve an optimal wing-style sail shape. This limitation can impact overall performance, especially when sailing upwind.
- Bigger Mast Profile: The in-mast system requires a larger mast section to accommodate the mandrel and the furled sail. The increased size of the mast profile can lead to additional weight aloft, affecting the yacht’s stability and righting moment. It’s important to consider the impact of a larger mast profile on the overall sailing characteristics and performance of the yacht.
- Smaller Sail Area: With the in-mast system, the sail area is generally smaller compared to the slab or in-boom systems. To accommodate the furling mechanism, the sail cannot have battens and instead relies on a hollow shape (the reverse of roach) to minimize leech flapping. This reduction in sail area can limit the yacht’s performance, particularly in light winds or when maximizing sail power is crucial.
- Greater Weight Aloft: Due to the inclusion of the mandrel and the furled sail within the mast, there is increased weight aloft with the in-mast system. This additional weight affects the yacht’s center of gravity and can have a slight impact on the righting moment. It’s important to assess the implications of increased weight aloft on the yacht’s stability and overall sailing performance.
- Possible Sail Jam: One concern with the in-mast system is the potential for the sail to jam within the mast. Although this is a concern for many sailors, it can be mitigated by adopting proper furling procedures. Releasing the outhaul line gradually, followed by tensioning the sail through the in-mast motor, can help prevent jamming. Some manufacturers have also developed automatic outhaul systems to further reduce the chances of sail jam. However, it’s crucial to be aware of this potential issue and take the necessary precautions.
- No Mast Bend: Unlike other systems, the in-mast system requires the mast to remain straight. Bending the masthead back, which is possible with other systems, can cause the sail to jam. The inability to adjust mast bend restricts the ability to fine-tune sail shape and performance, especially when sailing in varying wind conditions.
When considering the various mainsail furling systems available for yachts, it’s important to evaluate the advantages and disadvantages of each option to determine which system best suits your sailing needs. Here’s a summary of the main points discussed for the three common mainsail furling systems: slab, in-boom, and in-mast.
Slab System: The slab system is widely used and offers several advantages. It provides excellent sail shape and a larger sail area when fully set. It is relatively simple, cost-effective, and lightweight compared to other systems. However, it requires the yacht to come head to wind for reefing or setting the sail, which can be challenging in adverse weather conditions. Additionally, it requires more crew members for sail maneuvers and has a higher sail stack on larger yachts.
In-Boom System: The in-boom system keeps the furled sail low down and allows for good sail shape. It offers more reef positions and reduces weight aloft, contributing to a better righting moment. However, it also requires the yacht to come head to wind for furling and setting the sail, which can be time-consuming. The system tends to be more expensive, often requiring a powered vang for boom lifting. There is a propensity for the sail to stack forward, necessitating the use of a preventer on all points of sail.
In-Mast System: The in-mast system is favored for larger offshore cruising boats due to its convenience. It eliminates the need to come head to wind for reefing or furling, allowing for easier sail handling at any point of sail. It can often be operated by a single crew member and has fewer ropes in the cockpit, enhancing safety and reducing clutter. The system offers more reef points, allowing for incremental adjustments to the sail area. However, it compromises on sail shape, has a larger mast profile, and results in a smaller sail area when fully set. Sail jamming is a potential concern, but can be mitigated with proper sail tensioning techniques.
Similar Posts

How Does a Marine Toilet Work?
Have you ever wondered how a marine toilet works? If you’re planning to embark on a boating adventure or just curious about the mechanism of a marine toilet, this article is for you. Marine toilets work similarly to the ones on land with a bowl, a seat, and a flushing mechanism that uses water. However,…

Monohulls vs. Catamarans: Which One is Best for You?
If you’re considering purchasing a sailboat, you might be wondering which type of vessel is best suited for your seafaring adventures. Fear not, for we’re here to help you weigh the differences between monohulls vs. catamarans to make an informed decision. Now, before we dive into the nitty-gritty details of hull design, sail handling, and…

Whats the Difference between Standing Rigging and Running Rigging?
Running rigging refers to the movable lines and ropes used to control the position and shape of the sails on a sailboat. Standing rigging, on the other hand, refers to the fixed wires and cables that support the mast and keep it upright. As the sun rises on another day, we find ourselves immersed in…

What is a Keel?: The Backbone of a Ship
As ships sail through tumultuous seas, their stability and maneuverability are tested to the fullest extent. The intricate design and engineering that go into a ship’s construction ensure that it can withstand the forces of nature and navigate through any challenging conditions. One of the most critical components of a ship’s design is the keel,…

Advantages of Catamaran Sailboat Charter
A catamaran sailboat charter is an exciting way to explore the beauty of the sea. Whether you are an experienced sailor or a first-timer, booking a catamaran sailboat charter has a lot of advantages that you can enjoy. In this article, we will discuss the advantages of booking a catamaran sailboat charter, so that you…

How Much Does Biofouling Slows Down your Boat?
Are you wondering how much biofouling can impact the performance of your sailboat? The amount of how much biofouling slows down a sailboat depends on various factors, such as the type of boat, its size, and the severity of the biofouling. On average, a sailboat with a heavily fouled hull can experience a reduction in…
A Quick Guide to Reefing
Taking your friends and family out for a day cruise is just about the best way we can think of to enjoy the fall colors that are about to start painting the northern parts of the U.S. But dragging the leeward rail in the water, saltwater (or any water) spray mixed in with your hot cider, and snacks splayed out over the deck isn’t fun for anyone.
Most people who sail in notoriously windy locals should have a reefable mainsail and headsail. The trick is to put to put the reef in before you need one. Your guests will have a much better time if they feel safe and stay dry, and your boat will be in a lot better shape at the end of the day if you plan ahead for the conditions.
To make sure everyone’s having fun, we put together a few best practices on when and how to reef.
Jib Reefing
An important feature of a roller furling headsails is having a foam or rope luff, that is, a tapered piece of material sewn into the luff that takes up the camber of sail when it rolls around the headstay, ensuring that the sail still has a clean flying shape when it’s rolled down. You can generally roll a headsail up to 30% before it loses its effective flying shape.
When furling, you don’t want to fight the sheet, so before you furl, follow good procedure and be prepared: Get ready to ease the sheet, luff up into the wind to take the load off the sail, take up on the furling line to wind the desired amount of sail onto the headstay, and then tack up slack on the sheet and resume sailing.
Good care and maintenance will protect your sail, make the job easier, and prevent loose sheets from flogging around and hitting someone in the face.

Mainsail Reefing
It is good tradecraft for a sailor to reef the mainsail before they have to – and a lot easier. When reefing, the most important thing is to protect the luff of the sail. Whether you have a bolt rope main or a slide main, something is likely to get broken if you don’t have the luff tension on first. Let the outhaul and the vang completely off, and then drop the main halyard down to the desired reef position. Get the tack of the reef fixed and then winch up the halyard to put good tension on the luff –this keeps the sail pulled forward. Once the luff is taught, you can take up the slack on the reef line on the clew, again making sure to put good tension on the foot of the sail.
If you have a loose-footed sail, as most cruisers do, roll the reefed portion into itself and secure with sail ties or a heavy-duty shock cord. Take care not to tie the sail around the boom – it wouldn’t be the first time someone goes to shake out a reef and forgets a sail tie through a grommet and around the boom, ripping the sail down the middle. If you have a fixed foot, using one long shock cord to secure the sail (standard procedure on many racing boats) will help to prevent unnecessary damage. Once the reef is set and the sail is properly secured you can resume sailing.
P.S. Furling mainsails can be reefed too. Just follow the procedure for your sail and system.
When & What to Reef
If the boat is heeling over and main is washing out, the first thing to do is roll the jib down, but smart seamanship requires looking at the conditions ahead and setting up the boat early before you get overpowered. You’ll see the water start to whitecap consistently between 11–16 knots. If you see whitecaps ahead, you should be thinking about a reef in the main. Look to where you want to go—if the boats already there are well heeled over, put in a reef. Depending on where you live, other telltale signs may include kite surfers ripping across the waves, a low fog blowing in, or racing boats crashing and burning—you don’t want that to be you.
Don’t wait until the conditions are too much. Being conservative is not only good for the enjoyment of your guests; it’s also good for your boat.
Motor-Sailing Home
If the conditions do get to be too much and you’re ready to head home, you may want to furl the jib and motor-sail home. Don’t go straight upwind; it’s not fast or good for the sail. Move the traveler to centerline, and sheet the main on fairly tight. Sail off the wind just enough to keep the sail just filled and have a slight heel. You’ll use half the amount of fuel and go the same speed making the engine more efficient. It’s okay to tack back and forth while motorsailing, and it will be a lot more pleasant than bashing straight upwind.
You don’t have to shy away from windy fall days, just follow these tips and your cruise will be that much more enjoyable for everyone onboard.
The Discussion

Us, too. We pour that passion into each of our newsletters to help you enjoy sailing even more.
Yachting Monthly
- Digital edition

Mainsail furling systems: an expert guide
- Graham Snook
- December 21, 2020
Some sailors swear by mainsail furling systems, others swear at them. Graham Snook looks at way to keep your furling mainsail in check

In-mast furling mainsails (left) have evolved significantly, and vertical battens allow more roach and better sail shape. Credit: Graham Snook
Mainsail furling systems have come on a long way.
Sails no longer need to be wrapped around a boom, nor does an in-mast mainsail need to be the hollow-leached, baggy triangle we first saw decades ago.
Furling mainsail systems can now offer more sail area than a traditional slab-reefed mainsail.
Be that as it may, every slab-reefed sailor knows a horror story about in-mast or in-boom furling that is enough to make them steer well clear, while those that have furling mains wouldn’t put to sea without one.
There is little doubt that furling mainsails are gaining in popularity, even for serious offshore cruising boats.

Get mainsail furling wrong and it can lead to costly and potentially dangerous problems. Credit: Graham Snook
In 2018, 38% of boats sailing round the world in the World ARC had furling mainsail.
Hallberg Rassy reports that almost all new owners buying boats over 40ft opt for furling mainsail systems, with Discovery reporting a similar trend.
So has the reputation of furling mainsails been unfairly tainted, and are they more prone to user error, or have the systems ironed out the glitches?
Whether you’ve got a furling main on your own boat, or if you’ll be using one when you charter, it’s worth knowing how to avoid the pitfalls of furling mainsails.
How do furling mainsail systems work?
In an age where we expect everything just to be simple and to work, letting off one line, and pulling another to make the mainsail appear or disappear sounds appealing, but what is the best way to furl the mainsail?
Is there a correct way to do it?
‘Carefully,’ replies Jeremy White,of Elvstrøm Sails UK. ‘They’re mechanical systems and they need to be operated correctly.’
Whether you have in-boom or in-mast, they both work on a similar principle which anyone with a furling genoa will be familiar with.
Inside the mast is an aluminium foil that takes the luff of the mainsail, and in a boom a mandrel takes the foot of the mainsail; both the foil and the mandrel revolve to roll up the sail.
A lot of issues with in-mast furling are caused by the sail not furling properly inside the mast and the furl being too bulky or the sail rubbing on the inside of the mast.
Many in-boom problems are caused by an uneven furl with the sail bunching at one end or the other.
There are a number of issues to look out for with each system to ensure stress-free furling.
Different options
If you’ve bought a new boat that was ‘good value’ and it came with sails, question how good those sails really are.
Many original Dacron sails are built to a price that will get you on the water and get you sailing, but they may not be built for longevity or performance unless you’ve specified them and know what you’re getting.
There has been much advancement in furling mainsail design, improved materials, vertical battens, and increased sail area.
Many new furling mainsail systems present a larger sail area than that of a conventional slab reefing sail.
But what should you be looking for when buying a new sail?
‘Whichever sailmaker you choose, get the highest quality material you can afford,’ advises Jeremy.
It’s a false economy to buy cheaper sailcloth as it will stretch and you’ll be left with a baggy sail after a few seasons.
For example, the luff of laminate sail (on a 45ft yacht) might only stretch 15mm over its lifetime, but on a polyester sail that might be as much as 15 cm.
That excess sail has to roll up in the same space as did when it was new.
For those wanting maximum sail area, and sail support, full-length vertical battens are the way forward.
These support the leech giving a good full roach, and importantly, they support the sail over its full height which gives it rigidity while it’s being furled, whereas shorter, vertical roach battens can leave the sail unsupported at their base causing furling problems.
For those without the budget or desire for a battened sail using modern materials, a sail with a hollow leech still offers many advantages over a slab reefing system, namely ease of reefing, the ability to set exactly the right amount of sail, and the simplicity of stowing, even if you do lose some power from a smaller sail area and a less perfect aerofoil sail shape.
If you’re having new sails made consider getting them silicone-coated.
This helps the sail slide over itself making the furl inside the mast tighter.
In-mast furling
It may be a simple system, but how you unfurl and furl the main will help avoid problems.
If you were to look down from the top of the mast, the foil usually rolls onto the foil in anti-clockwise direction, that is, the unfurled sail comes off the starboard side of the foil, though it’s worth checking on yours.
This is the key to getting in-mast furling to work correctly; trying to furl on a port tack drags the full height of the sail over the side of the mast slot, adding friction where there shouldn’t be any.
Furling on starboard tack obviates most of this friction while you furl.

Full-height battens support a larger roach, but make the furled sail more bulky. Credit: Graham Snook
Whether letting the sail in or out, the first thing is to release the backstay (to straighten the mast so the foil doesn’t rub) and put the boat on a starboard tack – with the wind slightly forward of the beam – this is so the sail feeds cleanly into the mast and around the furler inside.
Unfurling the sail is usually pain-free if the sail was furled correctly.

With the yacht on a starboard tack and the wind forward of the beam, release the mainsheet and vang.
Ensure the furling line is released then pull out the sail using the outhaul.

Ease the outhaul as your furl so the sail doesn’t flog but isn’t loaded up either. Credit: Theo Stocker
You shouldn’t need to control the furling line as there should be no pressure on the sail, even on a windy day.
If you intend to be reefed, however, don’t let it run unchecked. When the right amount of sail is out, make off the furling line. If you’re reefed, tension the outhaul to give the sail the correct shape (flatter in stronger winds and when close-hauled) then set the mainsheet and vang and away you sail.
- Release the backstay (if you have one)
- Put the boat on a starboard tack – with the wind slightly forward of the beam
- Release the mainsheet and vang
- When the right amount of sail is out, make off the furling line
- Tension the outhaul to give the sail a correct shape, then sheet in
To furl the sail, after letting off the backstay and putting her on a starboard tack with the wind slightly forward of the beam, let off the mainsheet and then ease the outhaul a little and start to furl.
Always look at the sail as you’re furling – you’ll be able to notice issues as they happen and not after you’ve wound an inch-thick clump of sail through a half-inch gap.

Having different coloured lines can make things simpler for your crew. Credit: Theo Stocker
If your sail has full-length vertical battens ensure the first batten is parallel with the mast when it enters, and if reefing, leave a batten just outside the mast groove.
Keeping too much tension on the outhaul will drag the foil aft in the mast, bending it and causing the sail to rub against the inside of the mast, creating friction.
Once you’ve taken the slack out of the sail, ease the outhaul and take in on the furling line again.
Try not to let the sail flog as this also bends the foil and causes more friction.
Repeat the ease-furl process until only the UV protection strip is showing.

Sail on starboard with wind forward of the beam for easy furling. Credit: Theo Stocker
If you have laminate sails, and they have been furled away wet, try to dry them at the first opportunity.
If you’re having problems furling using the lines, don’t be afraid to go to the mast with a winch handle and furl the sail at the mast.
Try it one day, it is remarkably easy.
If you’re having to do anything different, such as raising the boom or chanting a prayer to the god of furling fails, it’s worth looking at your system in detail for problems.
- Release the backstay
- Ease the outhaul a little
- Take in on the furling line
- Keep easing the outhaul and taking in on the furling line
- Furl the sail until the UV strip is showing at the mast
Problem solving
If furling the right way still isn’t working for you, there are a number of things to consider…, 1. understand your system.
First to check is to have a look inside your mast at which way your system should furl.
If your furling system has the option, put a winch handle in the furling mechanism at the mast and turn it the direction indicated to make sure the sail is going into the mast in the correct direction.
Clicking over the ratchet at the mast before it’s time to furl will ensure it always rolls in the right direction.
2. Assess your sails
The biggest cause of problems is the sail itself – how old it is and the material it is made from.
Stretch in the cloth makes baggy sails, which furling systems will happily munch on.
Furling mainsails are cut flatter than conventional slab-reefing sails as accommodating the belly of the sail is problematic.

An old or baggy sail may cause jams, as will creases from not enough halyard tension. Credit: Theo Stocker
Some older furling mains may have be made with an inappropriate, fully-bellied shape.
If your polyester sails have a deep belly, think about getting new ones as you’ll be fighting a losing battle.
As the belly folds, it doubles the thickness of the furl, causing unsightly and inefficient creases at best, and hideous sail jams or rips at worst.
3. Adjust halyard tension
Excess halyard tension can also cause the fabric to bunch up; vertical creases at the luff cause the sail to fold over itself.

Vertical creases at the luff reveal too much halyard tension, and potential for more snags. Credit: Theo Stocker
To resolve this, release the halyard until you have horizontal creases at the luff, then add just enough tension to remove them, though you may need to adjust this when underway.
4. Check the backstay
While the mast is bending, the foil inside it remains straight; the furled sail will bind at the apex of the mast’s bend.
If all of this fails, it’s worth calling a rigger to check the foil tension.
If this has gone slack, as you furl the foil will bend and rub against the mast.
5. Smooth it out
The next thing to look at is reducing friction.
As is often the case, the lines to your furling gear and outhaul are led through various fairleads and blocks across the deck and up the mast.

Move deck organisers to give slacker turning angles. Credit: Theo Stocker
Make sure all the angles they have to go through are a wide as possible – consider moving them if not – and all blocks and sheaves are running smoothly.
A good wash with fresh water and a squirt of dry lubricant can work wonders.
In-boom furling
Not a new concept, in-boom furling is an elegant solution, but brings its own challenges.
Unlike in-mast furling, in-boom systems can be retrofitted in place of conventional slab reefing.
For an in-boom furling system to work efficiently, however, it has to overcome a number of problems.

To start with, have a crew on deck to watch the sail as it furls to spot any issues. Credit: Advanced Rigging and Hydraulics
First of all, the sail has to be led from the boom to the mast, but there needs to be space for the bearings for the central mandrel and the boom’s gooseneck fitting, so the whole sail has to move aft along the boom.
To combat this, many in-boom systems have a protruding track on the trailing edge of the mast, while other units have the reefing mechanism at the aft end of the boom, or sometimes you’ll find a combination of both.
Whatever the system, there is usually a flexible feeder to guide the sail from the boom and feed it into the mast track.

The furling drum at the outboard end of the boom brings the main closer to the mast. Credit: Advanced Rigging and Hydraulics
Another issue with in-boom furling is the bolt rope, as Andy Cross from Crusader sails explains.
‘The sail has to use a bolt rope, and with it comes friction. Unlike a furling genoa that may only be raised and lowered once a season, the mainsail is nearly always used so the luff tape has to be reinforced.’
Any wear or damage to the bolt rope also requires a new bolt rope along the full luff of the sail, as any repairs would soon wear through and increase the friction.
The necessary extra reinforcement at the luff brings with it another problem: extra cloth thickness at the front end of the sail.

When reefing, stop when a batten is just above the mandrel, then take in on the furling line. Credit: Graham Snook/Yachting Monthly
As the sail rolls around the mandrel there is more sail material at the luff than across the rest of the sail.
The solution?
To slightly raise the aft end of the boom, allowing the extra sailcloth at the luff to roll at a rate that matches the leech.
The angle from the mast to the top of the boom has to be 87° to the mast, 3° above perpendicular.
The full-length battens in the mainsail help stabilise the sail as it furls and the batten pockets have been attached to the sail to match the mandrel angle.
It’s the thickness of cloth at the luff and the battens that make the correct boom angle the most important part of the system.

The necessary bulk of the boltrope makes the boom angle critical.
Get that right and your life suddenly becomes a whole lot easier.
It’s essential to mark the vang when the boom angle is correct.
Some owners choose to make a strop, running next to the vang, out of a low-stretch material like Dyneema, so the topping lift can be pulled taught and the strop prevents the boom raising higher than it should.
When marking or limiting the boom angle, it must be easy for any crew to see, by day or night.
How to get it right
1. prepare to set sail.
‘Before raising, lowering, or reefing the mainsail,’ explains Kim Petersen, Elvstrøm Denmark’s in-boom sail specialist, ‘get into the habit of always releasing the backstay tension – this will successfully straighten the mast and takes any flattening tension out of the sail – and then making sure the boom is at the correct angle – this is extremely important.’

Be careful with electric winches not to over-tighten halyards. Credit: Graham Snook
To raise the sail, after slackening the back stay and adjusting the boom level, point the boat into the wind, release the mainsheet and take up on the mainsail halyard, making sure that the furling line can run free as you hoist the mainsail.
Once set, increase the halyard tension until the horizontal creases at the luff have just gone.
2. Reducing sail power
If you don’t need full sail, only raise the sail until the nearest batten is at the mandrel.
Rather than being able to reef at any point, where the lower battens are fitted, the sailmaker will have reinforced the sail to take the clew loads.
Not reefing at these points means an area of unreinforced leech could be required to take a load it was not designed for.

Each batten represents a reefing point. Credit: Graham Snook
You’ll end up with fullness at the foot of the sail and a stretched leech, or a damaged sail.
If you need to flatten the sail, for better pointing or in stronger winds, take in on the furling line without adjusting the halyard tension.
This will give the same result as using a cunningham to tighten the luff.
Furling the main
When lowering the sail, release the backstay and set the boom at the correct angle.
It’s then best to take all the pressure off the sail by heading into the wind.
It doesn’t matter if the sail is flogging; the battens keep the sail rigid and support it as it furls.
If there is any pressure on the sail, this will cause it to furl unevenly.

With in-boom reefing you should still have a good sail shape even when deeply reefed. Credit: Graham Snook/Yachting Monthly
Unlike an in-mast furling system, where the sail is visible, on an in-boom system everything is happening on top of the boom, overhead and out of sight.
If you have a crew member spare and it’s safe, sending them to the mast to keep an eye on the sail as it furls can prevent damage, at least for the first few times using the system.
Pull in on the furling line, slowly and smoothly releasing the mainsail halyard, but keep a bit of tension on it.
Continues below…

The tools and spares you shouldn’t sail without
Give a thought to your inventory this winter to keep you cruising next season, says Rachael Sprot

Why you should regularly check your deck fittings
What’s really going on under your deck fittings? Ben Sutcliffe-Davies investigates the hidden weaknesses

Essential reefing tips for cruisers
Reefing: how, when and why do we do it? The answers may not be as straightforward as you think, says…
How to: replace a halyard
Whether you’re replacing an old halyard for new, or mousing the mast over winter, Rubicon 3’s Rachael Sprot explains how…
If you have too much tension the sail will want to roll away from the mast; if you’re seeing creases running from the bottom of the track to the boom at 45°, release the halyard a little more.
If the sail is rolling up toward the mast, you’ll need to increase the tension a little.
As the sail furls, the luff tape will naturally first roll aft, then move forward and repeat this – it’s all perfectly normal.
Once the sail is fully down, tuck the head into the boom if your system allows it, and add the sail cover.
Reefing underway
To reef when sailing, release the backstay and set the boom angle.
In rough weather, or when there are big seas, it’s best to take up on the boom’s topping lift to secure the boom and stop it rising and falling as the yacht goes over the wave crest.

Cover the sail once stowed to protect from UV. Credit: Advanced Rigging and Hydraulics
You’ll find it easier if you can bring the boat onto the wind and release the mainsheet to remove all drive from the mainsail; if the sail is flogging it’s depowered and can still be furled.
Next, take in on the furling line while slowly and smoothly easing the halyard as the sail furls.

Graham Snook is a marine photographer and journalist who has been involved in testing yachts and equipment for over 20 years. Credit: Graham Snook
Once you’ve reached a point where the batten is at the mandrel on top of the boom, make off the halyard and then furl the sail until the batten is under the mandrel.
Without reefing pennants to hold and support the clew of the sail, the loads are transferred to the batten and the cloth around it.
Because of this, it’s recommended that for in-boom reefing mainsails, a stronger stretch-resistant cloth like Dacron reinforced with Vectran or Dyneema or a tough cruising laminate cloth be used.
Whichever mainsail furling system you have or choose, spending a bit of time practising what works and what doesn’t on your system, at a time when it’s convenient to you, will pay dividends when you find you do need to reef.
Mainsail furling has had a bad reputation in the past, but used properly and with a little care, there’s no reason why it shouldn’t give you trouble-free sailing for years to come.
To raise the sail
- Release the backstay tension
- Make sure the boom is at the correct angle – use a strop or mark the vang if necessary
- Head up into the wind – it doesn’t matter if the main flogs as it goes up
- Release the mainsheet
- Take up on the mainsail halyard, but do not overtighten
To lower the sail
- Make sure the boom is at the correct angle
- Point the yacht into the wind
- Take in on the furling line as you ease the halyard at a steady rate
Home » Reefing a lug sail, New fast method, quicker Than ties and Tingles
Reefing a lug sail, New fast method, quicker Than ties and Tingles
This is a timesaving method for tying in the intermediate reefpoints in the body of the sail. It is faster to do and particularly to undo. And won’t rip the body of the sail if a main reefline lets go. The article is based on the simplified method of reefing racing yachts as an alternative to reefing ties or tingles.
RELATED LINK – All our Lug Rig Articles – over 20 directly useful articles on setting up and thinking about lug rigs.
The new fast reefing system for Lug sails is also cheap and simple
This method has been developed by the Goat Island Skiff Sailors on our Facebook group. It is a very simple system that requires a single knot and one snap hook to attach the clew of the sail to the outhaul.
We used fixed size loops that are presized rather than conventional adjustable or tied off reefing lines.
The main reefing eye at the luff has a fixed loop sized to drop over the front end of the boom. That is the front end done.
The main reefing eye on the leach (back edge of the sail has a fixed loop that has been carefully sized to bring it up to the same length as the foot of the sail. When it comes time to reef that loop is dropped into the same snap hook that holds the clew. Then the two loose ends of the loop are tied under the boom.
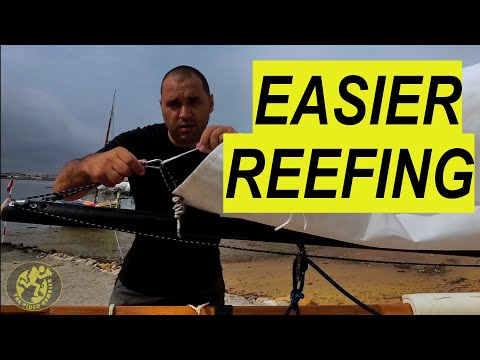
How long does it take to fully reef a lugsail – time it in real time
I don’t use the lazyjacks that Teo uses in his video above – not good for racing and I worry about the sail being high up or hard to drop in extreme conditions – I think they are great on bigger heavier boats with more stability.
At the same time I have to concede that the lazyjacks do make some manoeuvres simpler and faster. I drop the sail into the boat and rehoist. I’ve done this several times between club races. It takes about two minutes to put a reef in and rehoist the sail about a minute to take it out and rehoist. This is the 89sqf Oz Goose sail.
You have to practice to do it very quickly.
This is Teo doing a reef afloat. It takes him one minute – time it.
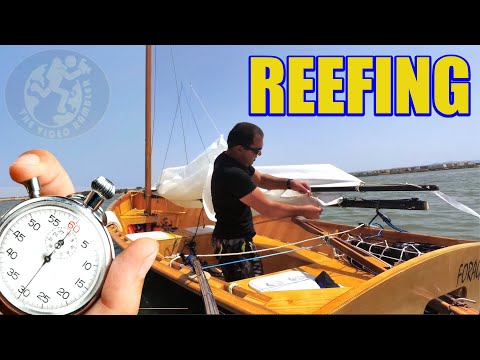
Is there a need to do anything More to tidy up the sail? Maybe Not.
It is quite possible just to reef the main lines at the edge of the sail and not worry at all about tying up the middle of the sail. That’s what the racing guys do. They don’t want to have to waste time tying in and untying middle reef points.
This photos shows my BETH sailing canoe with only the main reefing lines tied in … the middle part of the sail is just allowed to do what it wants.
That is … intermediate reef lines are far less necessary than people think.
However … if going a long long way in rough weather having a big bag at the bottom of the sail can carry inconvenient water or do something else that may not be fun. So then we have to talk about intermediate ties.
When racing my Oz Goose I never put in the intermediate ties. Makes it easier to rehoist or drop the sail.
Reefing a Dinghy or canoe is very different from reefing a yacht
Fairly regularly we see discussion about yacht type systems where the sail is supported by lazyjacks or a topping lift.
I don’t think this is generally a good idea on boats that depend on crew weight for stability. If the wind in completely crazy we don’t want to be standing up in the boat trying to clip or tie parts of the sail to get it under control. Not to mention reaching to leeward.
It is far better to get the sail down into the boat, sit on it and tie in the reefs to rehoist.
We have a new page on reefing developments from the Goat Island Skiff Group.
When you need to reef there is often some urgency. And having the sail thrashing around up in the air – and you crouching or standing to tie in the reefs is absurd.
Sometimes we see “single line reefing” attempted on small boat. This seldom works due to friction or fails to work because of the complication of the system.
Instead of individual reef ties – how about using one bungee!
One of the advantages of a balance lug sail is reasonably easy and efficient reefing. I put together a guide on how we do it on Storer Boats. it is a useful method to consider as it is faster than tying individual reef points. It will suit John Welsford’s SCAMP, several traditional Humber Canoe Yawls, Bolger Martha Jane, Pheonix 3, Piccup Pram and many others
We suggest having the normal major reefing lines at the front and the back of the sail as per normal.
Instead of individual lacing use the all in one solution below rather than individual ties or tingles. It is fast to put in and take out and won’t damage the sail if one of the reefing lines lets go. One knot to do up and one knot to undo.
The Drawing for Using continuous Shockcord (bungee) instead of Individual Ties
This diagram just shows the front end reefing because I want to make a point about having the line permanently there and just pulling on through the cleat.
Many boats are unhappy when the crew moves forward so having a cleat to pull in the major that can be reached from the middle of the boat is quite useful.
The Traditional method.
Step 1 – front main reef line.
Left Image above.
The sail is reefed normally by lashing down the luff and leach using the big eyelets on the edge of the sail. As small boats get less stable as you move forward in the boat having a reefing line tied off on the boom, through the front eye for the reef and to an eye or block on the sailthen back along the boom to a cleat. I would recommend either a CL217mk2 Clam cleat (it is a side entry cleat so you don’t need to thread it or a traditional horn cleat.
If this is tied in first and pulled very tight that is enough. I would probably recommend spectra for the rope so it doesn’t stretch at all.
Back Main Reef Line
Mid image above
The back end is more accessible from the body of the boat usually so can be tied in manually.
It is very important the sail is tied down to the boom as well as pulled out towards the end of the boom. If the reef is going into the front sail on the boat, don’t overflatten the sail. Depth in the foot of the front sail will help you keep going against waves, particularly upwind. Much, Much faster. It gives you power low down that won’t heel the boat too much and a touch more weather helm to stop the waves knocking the bow off the wind.
Basically you want to have a depth to chord (distance direct between the tack and clew of the sail) ratio of 1:10. So put a mark on the boom for the back of the sail and write “Reef 1” or “Reef 2” beside it. Guide marks like this can save a lot of time and reduce the risk of making an error.
As discussed above – it might not be necessary to do the lacing at all.
Reef Lacing – the major simplification
Right image above.
As there is some urgency usually attached to reefing and simpler system . For most boats the reef lines are the important item. But often when there is some chance that the sail will be unreefed a bit later or there is not time to snug everything down racing sailors won’t bother at all with the reef point lacing in the body of the sail. It depends on the boat but often the untidiness is not great.
Additionally, the traditional solution of an individual tie at each of the eyelets is slow and awkward to put in and remove. Also it is a rigid system. If one of the reefing lines comes undone all the load will go on the first sail tie and risks ripping the reef point eyelet out of the sail.
I recommend the same method used on racing yachts. They use a thin shock (bungee) cord that spirals around the boom and will stretch and not damage the sail if a reefing line comes undone or breaks. Also the number of eyelets is minimised.
(This is AFTER the front and rear main reef lines are set up and the reef is in but not tidied up)
Note that however you tidy up the sail – if the sail is loose footed, the intermediate ties go underneath the sail. If the sail is laced to the boom then the ties go underneath the boom.
- Bungee/shockcord is not large diameter. 4mm (next size up from 1/8″) is about perfect. Tie a 4″ (100mm) loop in one end with a bowline. Pull the knot tight tight as it needs to stay there permanently.
- Put the bight of the loop through the front reefing eye and stretch over the front of the boom.
- Grab the other end and go under the boom (if the sail is laced along the boom) or under the sail (if the sail is loose footed.
- Go through the first intermediate reefing eye.
- Go under the boom and sail again and through the next intermediate reefing eye … and so on.
- After going through the last intermediate eye go through the reef grommet/eyelet on the edge of the sail and then tie off the shockcord/bungee with a couple of half hitches.
It is also quicker than tying in several separate ties along the boom. Tying individual reef ties belongs on full crew square riggers doing Cape Horn!
To release:
- Untie the two half hitches at the back end.
- Pull some of the slack through untile only the tied in loop at the front is attached.
- Remove the loop from around the front of the boom
- For a lug rig, ease the downhaul
- Release the main reefing lines front and back
- Rehoist the sail.
- For lug rigs, retension downhaul
Note that with larger boats it is best to set up the main reefing lines before you go sailing. We recommend this with the forward end of the reef with small boats too as it keeps the crew in the bow for a much shorter time, whereas the aft end can be sorted out with a length of line in many boats rather than needing fittings on the boom.
See our Sailmaking Business – Shipping Worldwide
Click here to make an inquiry
2 thoughts on “Reefing a lug sail, New fast method, quicker Than ties and Tingles”
Great ideas. Cautionary note: I’m a doctor and met a woman patient who had a bunji cord snap while working on a backpack. The hook caught her eye and she made medical history. Wear goggles or a motorcycle helmet — something to protect yourself if you have any hooks at the end of the bungi cords — or use use non-stretching rope.
Good point Stephen,
In this case the tension is not so high and there are no hooks … all done with knots. And evein if it did break, it passes through so many intervening eyelets and under and over the boom that it will just slacken in place.
Leave a Comment Cancel reply
This site uses Akismet to reduce spam. Learn how your comment data is processed .
- New Sailboats
- Sailboats 21-30ft
- Sailboats 31-35ft
- Sailboats 36-40ft
- Sailboats Over 40ft
- Sailboats Under 21feet
- used_sailboats
- Apps and Computer Programs
- Communications
- Fishfinders
- Handheld Electronics
- Plotters MFDS Rradar
- Wind, Speed & Depth Instruments
- Anchoring Mooring
- Running Rigging
- Sails Canvas
- Standing Rigging
- Diesel Engines
- Off Grid Energy
- Cleaning Waxing
- DIY Projects
- Repair, Tools & Materials
- Spare Parts
- Tools & Gadgets
- Cabin Comfort
- Ventilation
- Footwear Apparel
- Foul Weather Gear
- Mailport & PS Advisor
- Inside Practical Sailor Blog
- Activate My Web Access
- Reset Password
- Pay My Bill
- Customer Service

- Free Newsletter
- Give a Gift
Cal 2-46: A Venerable Lapworth Design Brought Up to Date

Rhumb Lines: Show Highlights from Annapolis

Open Transom Pros and Cons

Mailport: Charley Morgan, Locker Safety, Fast Bottom Paint

Do-it-yourself Electrical System Survey and Inspection

Install a Standalone Sounder Without Drilling

The Tricked Out Tillerpilot

Resolving Common Steering Problems

Top-notch Wind Indicators

The Everlasting Multihull Trampoline

In Search of the Snag-free Clew

The Cruising Sailor’s Argument for High-tech Fibers

Breaking Point: What Can Go Wrong With Your Yanmar?

Rudder Mods for Low-speed Docking

Using Heat to Bend PVC Pipe

Mildew-resistant Caulks for Boats

Can We Trust Plastic Boat Parts?

Repairing Molded Plastics

Mailport: Marine plywood, fuel additives, through bolt options, winch handle holders

The Day Sailor’s First-Aid Kit

Choosing and Securing Seat Cushions

Cockpit Drains on Race Boats

Rhumb Lines: Livin’ the Wharf Rat Life

Resurrecting Slippery Boat Shoes

Shoe Goo’s Gift to Sailors

PS Advisor: Tank Monitor and Camera Mount Hacks

Marine Toilet Maintenance Tips

Learning to Live with Plastic Boat Bits

The Ultimate Guide to Caring for Clear Plastic

Preventing Mildew in Marine Fabrics

Gearing Up for Winter Sailing
- Sails, Rigging & Deck Gear
Taming the Main: Sail-Handling Systems for Bigger Mainsails
Dutchman, lazy jacks, and cover-combos state their case for replacing the extra crew member.

The mainsail continues to be both the heart of most sailplans, and the bane of many short-handed cruising sailors. In its modern bigger-than-ever context, the sail’s overpowering presence can be so daunting to a couple that they daysail their boat with only the jib unfurled. Others spend tens of thousands of dollars to automate mainsail handling—winding it up in a specially designed mast or boom. In addition to being a costly option, these in-spar and in-boom furling systems add more weight and more complexity to the boat’s sailplan, while at the same time, decreasing the efficiency of the sailplan itself. On larger boats, such trade-offs can make sense because the mainsail becomes so large and unwieldy. But for boats in the mid-range, 30 to 45 feet, there are less costly and more sailing-friendly alternatives to wrestling with an uncooperative mainsail.
Market analysis has shown that boatbuyers are indeed looking for bigger boats, and modern rigs that sport larger mainsails than ever before. This trend toward putting more sail area in the mainsail means that one jib can serve a larger wind range, which is most definitely a good thing. But the flip side of this bonus means that handling the larger, heavier mainsail becomes more of a chore, and there are several tasks that must be accomplished in a timely manner. Setting and dousing the sail are the most frequent rituals, but unanticipated reefing and the dreaded thunderstorm-induced fire drill seem to generate the most anxiety.
The best way to get a grip on the situation depends on the skill, number, and agility of the crew. Racing crews and young, fit cruisers lean toward the equivalent of manual “stick shift” transmission on a car—preferring the simplicity of a mainsail equipped only with a halyard, topping lift (or rigid vang support) and slab reefing with no other form of setting or flaking aid. This is the lightest, fastest, least complicated mainsail arrangement, and it maximizes performance when the sail is hoisted and the vessel and crew are happily underway. However, when it comes time to reef, or douse the sail, this configuration can take on the demeanor of a clothesline-hung bedsheet in a gale. Barring significant intervention from the crew, the breeze decides where the leech of the sail will go once the halyard is released, and mainsail reefing and flaking can become a substantial chore.
Lazy jacks, cover/lazy jack combos, and the innovative Dutchman systems have grown in popularity in recent years, offering a more practical, affordable advantage in the battle to tame the main. For a 35-foot boat, prices range from about $250 for a lazy jack kit, $700 for the Dutchman, to anywhere from $800 to $1,500 (not including sail costs) for a lazy jack/sailcover combo. A close comparison of each of these options will provide some valuable insight into taking the gymnastics out of handling a mainsail.

For centuries, sailors have appreciated the value of lazy jacks, a set of lines that act as a sail-gathering guide, catching and coaxing the mainsail into a stack on top of the boom. When the halyard is released, the sail falls in submission on top of the boom as if guided by an invisible hand—at least that how it’s supposed to work when all goes according to plan. And when lazy jacks are properly set up and a few simple guidelines are followed, they are as much a friend to a modern sailor as they were to the short-handed schoonermen who coasted New England. However, in other situations, lazy jacks can snag a batten tip of a sail being hoisted, or on a dark night, a loose lazy jack can even snag a spreader tip just before the crew jibes onto a new tack, resulting in a very different outlook toward the system. In short, this double set of lines is put to use infrequently during a sail, but is permanently carried along for the ride.

It’s essential that the crew develop a routine for setting and unsetting the “jacks” in order to minimize sail chafe and eliminate and chance that a spreader or any other protrusion is snagged. It’s also crucial to keep the boat head-to-wind or at least have the boom in line with the wind when hoisting sail, and—to a lesser extent—when dousing sail.
Cover/Lazy Jack Combos
Some sailmakers offer a mainsail cover that’s attached to both the boom or sail and a set of lazy jacks. When the halyard is released, not only does mainsail drop to the boom, but it ends up in a cozy hammock-like cover and is just a zipper pull away from being completely stowed. This cover/lazy jack combination goes by several names depending on the sailmaker who builds it. One of the early innovators was Doyle Sailmakers with its StackPack—a combo full-batten main, lazy jack, and Sunbrella sail cover. The lazy jacks are fastened 50- to 75-percent of the way up the spar, and the StackPack is sewn directly to the sail. North Sail’s QuickCover attaches to the boom track but functions like the StackPack. Mack Sail’s Mack Pack fastens to the boom at intervals. Other sailmakers offer slightly different renditions of the cover/lazy-jack combo. All take the sail cover as well as the lazy-jack line system along for the ride.
Naturally, in our world of “no free lunch,” there are always some strings attached, and in this case it’s the lazy jack lines themselves, along with the Sunbrella or other acrylic cover that’s part of the package. In some designs, the “jacks” are kept fairly taught and the cover is raised, while in other designs, the lazy jacks can be slacked and the cover is secured to the boom sides. Once a crew gets the feel for how these additions to the sailplan behave, they become less of an inconvenience.
The Dutchman System
In our testing, we found that the Dutchman system simplifies the lazy jack concept. However, it does mandate some additional sail work and minor rigging additions, but the cost-to-benefit seems a bargain. At the heart of the system are three or four light lines clamped to the topping lift that drop vertically through fairleads in the sail to small tabs along its foot, just above the boom. The mainsail is set up with a series of grommets that allow these lines to be laced through the sail, and when a mainsail has been properly trained to fold along its creases, it simply slides from full hoist to the boom.
The system’s simplicity and functional design utilizes monofilament lines (some owners prefer Dacron) that are all but invisible, and the topping lift that they are attached to is already present on many sailboats. Aboard boats with a rigid vang or high-tech hydraulic vang, a topping lift still can be easily rigged to provide attachment for the Dutchman lines. The best bet is to set up the topping lift to function like a conventional halyard rather than a permanently fixed line near the masthead. One advantage of an adjustable topping lift is that should a mainsail halyard shackle get jammed in the topping lift, you can usually free the shackle by slackening the topping lift.
Once the sail has been lowered, both lazy jacks and the Dutchman system add a bit of complication to snapping a sail cover in place. In the case of the Dutchman system, covering up usually involves a series of small secondary zippers that accommodate the vertical monofilament lines. The traditional lazy jack system may only need to be eased a little in order to put on a conventional sail cover. Unfortunately, lazy jacks can also complicate mainsail hoisting by trapping batten tips as the sail gently flogs during the hoisting process. Many sailors prefer to ease the lines and gather the tackle together just behind the spar, keeping it there until it’s time to douse or reef the sail. Care must be taken to ensure that the lazy jacks are stowed tightly. Many a newly painted mast has been dinged by the small blocks used in lazy jack tackle, hardware that can slap relentlessly against the mast when a breeze fills in and the lazy jacks have been poorly stowed.

Reefing lines were easy to use on all of the systems we tested. The most user-friendly systems took into consideration the stack height of the cars used on the mainsail track, and incorporated a block, pendant, and jam cleat tack rather than a tack hook to engage the reef point. The real challenge in many of these setups, however, was how a crew could cope with extreme conditions and the need to set a storm trysail. Once again, the Dutchman system, when set up with an adjustable topping lift, provided for the easiest transition to a storm trysail. All that had to be done, once the mainsail was lowered, was to slacken the topping lift and gather up the loose monofilament line—this cleared the area aft of the mast and allowed the storm trysail to be easily set.
Mainsails up to about 250 to 300 square feet are easy enough to handle that flaking aids are optional rather than essential. Over this size, and up to about 500 square feet, any of the three options mentioned can be as valuable as an extra crew member. However, we found that the Dutchman system did get our most enthusiastic nod of approval, even though all three systems certainly improved mainsail handling significantly. Our testing revealed that the single set of mainsail-penetrating lead lines of the Dutchman system provided a more positive guide for the mainsail, directing it into a neatly flaked stack on the boom with fewer strings attached.
The fact that each of these approaches allows a crew to use a well-cut conventional mainsail is a big plus. There’s no need to succumb to an overly flat, roachless, in-mast furling mainsail, or a furling boom as heavy as an extra crew member. There is a point however, where the sheer size of the mainsail makes a mast or boom furling system a preferred option, and in a future issue, we will take a fresh look at how mast and boom-furling systems stack up and what new features they offer.
- Mainsail Solutions
- Ups and Downs of Mainsail Systems
RELATED ARTICLES MORE FROM AUTHOR
11 comments.
My wife and I found that a post mast furler was the answer on our 48’ ketch. We were East Coast sailors from Maine to the Bahamas. When there were just the two of us we usually sailed jib and jigger. We sailed “Whimsy” for twenty yeaars and only the last three with the post mast furler. We sold her with my 80th birthday and my wife’s approaching disability. I wish we had installed it 15 years sooner.
A sailmaker recommended the Dutchman for my International Folkboat since I mostly sailed singlehanded, and I was pleased with the results. I was able to hoist, douse and reef the main with relative ease. It does require some changes to the sail cover, but it was totally worth it.
Main sail up and down is greatly improved with a more better system than traditional Sail Lugs. Install Track with Ball Bearing Cars and Main goes up quickly and down under control. Throw sail ties on and Cover when Safe!!!
We have a large full baton main with 20’ boom and 64’ mast on our ketch. Taming it was a priority for the two of us as scrambling across our wheelhouse roof grabbing at the flapping sail and swinging boom seemed really dangerous. We sewed our own Stack Pack system taking a mix of the best ideas from Sailrite’s DIY instructions, the Mac Pack and Stack Pack systems. If you are into sewing canvas work and really like planning and designing this is a great project where you end up with something better than you can buy. We sewed in custom straps so it can be totally rolled and stowed on the boom when on sails longer than a day or two to prevent chafe.
One item that really makes it work well for us is the 20’ long #5 zippers we got from Paskal in Australia. Very expensive to ship to the USA, but worth it. These zippers are twice the size of the #10 zips that you see on most canvas work and open completely like a jackets zipper. Advantages are the stainless pulls do not bind and salt does not affect the zippers operation. The best advantage is it zips closed starting from the mast running to the boom end so helps compact and stuff the sail as it closes, this is the opposite direction of all other zipper systems and a big reason it works well. We can open the sail cover fully while standing clipped in at the mast in about 15 seconds using the “laundry line” pully system attached to the zipper pull. When stowing also while at the mast, we get it about ¾ closed in the same 15 seconds before it jams on some sail folds sticking out that need a simple tuck in to get the zipper past. Still much easier, safer and quicker than before. And getting up on the wheelhouse roof is rarely if ever needed. If you have a very tall boom with hard access, I would consider the Paskal zipper installed this way. The stack pack also “automatically” holds and stows the three sets of slab reefing lines which used to be a spaghetti mess on the wheelhouse roof.
One other thing that really helps with taming our large main is that we have all halyards and slab reefing on the mast, old school style. With our set up I can jump the main up to within about 2 feet of the top in less than a minute before having to wrap the halyard on the dedicated self-tailing winch (mounted on the mast) to winch the last foot or two and do the final tensioning. By raising it fast, and having a clear view of the process, catching a baton end on the stack pack’s lazy jack lines is rarely a problem and easily fixed. I can do this solo (using the Pelagic autopilot remote fob for keeping the boat turned into the wind) with this very large full baton sail because I removed the halyard clutch from the mast that was adding too much friction. Friction is now only from the single sheave at the top of the mast (and the regular sail slugs). I feel sorry for all the more modern boats with all lines led back to the cockpit where you have to slowly grind up the majority of the main. Ditto for the one in-mast furling system I tried which seemed to be a delicate two person grinding operation to prevent binding the sail as it is wrapped up hidden inside the mast. Typically, you have to go to the mast to sort something out anyway, so why not consider doing everything at the mast if you have a good safe jackline tether system. Sheaves, blocks and clutches add a huge amount of friction (and expense). Experiment without them and see what you think.
Since I am a sewing fool, I also made large custom rope bags mounted on the mast just below the winches to store the halyard tails. They are mesh at the bottom for drainage, made of a stiff rubberized fabric and are about 8” diameter and 16” tall with a Sunbrella draw string top. With the top of the bag opened all the way I drop the halyard in as I jump the sail up. When the main is up and all the excess halyard is stuffed in the bag, pull the drawstring top closed. When you drop or reef the main the halyard automatically feeds out the smaller drawstring opening without any twists or snarls. And no pile of spaghetti at your feet to get tangled in. No coiling or flaking of the main halyard needed. I like this safe and very time efficient system so much I am rigging smaller rope bags for other reefing and furling lines tails around the boat. The key is keeping the bags diameter just small enough to not let the rope double back inside it and get snarled. For ½” halyard the 8” diameter seems about right.
Sometimes simple, fast, and easy is also safer.
In addition to the jacks/cover systems, I found the Tides marine sail track/slides system a HUGE help. As a senior, I could hand over hand haul my full batten main all the way up on my Cal ll-46. With ease. Then just a quick single crank for tension. To drop the sail, free the halyard and it would literally drop into the cover. Good enough till you anchored or docked. Then finish tucking in and zip! And you don’t even have to go up the mast to install it. Just slide over old track and fit the new slides on the mail.
Great tips and tricks in this thread. Reduction of friction with ball bearing mast head sheaves as well as ball bearing mast slide systems from manufacturing source you like best are massive improvements. I sail a 24.5 meter schooner mostly single handed. Hoisting and reefing are both easily accomplished with above systems with a simple set of lazy jacks. Just remember to tighten them well before lowering the main Leeward lazy can be slacked and taken fwd prior to hoisting with wind 20 to 40 degrees off the bow to keep any boom movement away from deck crew Have fun out there
We have a Dutchman system, which uses a topping lift halyard attached to a line looped through blocks. The line runs through the Dutchman clamps. We have been able to adjust the clamps position on the loop so that it is now “set it and forget it.” We do loosen the topping lift halyard (to a point we’ve marked on the halyard) once the main is raised so the topping lift isn’t constricting the boom/sail. When coming in, we tighten the halyard (to our other mark on the halyard) so that the Dutchman system is more taught and ready to do its job. The main drops and flakes itself pretty neatly. Also, some have mentioned issues with raising their main (jumping it at the mast, rather than cockpit pull, etc.). On our C320, we can pull the main up from the cockpit to within about two feet and then crank the cabin top winch from there. I’ve had two Dutchman systems in two different harbors, and one issue is that the monofilament line collects dust from the air. With enough dew, the water and dirt run down through the holes in our sail cover and then stain the mainsail at the point of the Dutchman grommets. I recently tried a new fix: I took some squares of an old blue T shirt (same color as sail cover) and wrapped them around the fishing line and into the holes to try to intercept the “mud.” We’ll see how it works.
Our 48′ ketch was equipped with lazy jacks when we bought her but I disliked them. They seemed to frequently be in the way or they were tapping (sometimes banging) against the mast when retracted. If left deployed, they could tap or smack against the main. I removed them and didn’t regret it.
During our 8-and-a-half year circumnavigation, I couldn’t count the number of times I tucked a reef in or shook one out but if I had a dollar for every time, I’d still be poor but I would have a lot of dollars. I got to the point where I could go up to the mast, tuck a reef in and return to the cockpit in just a few minutes, our old fashioned sail slugs notwithstanding. Very heavy weather took longer. Among those in our informal ‘fleet’ with in-mast furling, every single boat had problems with getting the sail jammed at one time or another. On my boat, I prefer to keep it as simple as possible.
Fair winds and calm seas.
In my personal experience, I have come to dislike the ubiquitous “Sail Pack”. I sail on a wide array of vessels and find them very problematic. I understand that if all the details are worked out they can become more stream lined but it is a rare instalation that is set up well and then maintained. My complaints are: Most systems are difficult to stow while sailing, requiring extra steps after the main is hoisted, leaving a messy bag flopping and beating about the foot of the sail. It chafes itself to death. The system hides the foot of the sail during reefing, leaving the crew guessing whether or not the reef is all the way in, over tensioned, or caught on a fold in the sail etc. They get in the way of all other maintenance and work. They add friction to the reefing system. They are often more difficult to close than just putting a sail cover on, so they are left unzipped and UV damage ensues. I recently sailed a 40 plut foot Sloop that has a new name brand sail pack installed by the loft. At the end of the sail it only took 3 experienced men 10 minutes to get the main stowed in the pack making me wonder where the labor savings was hiding. Somewhere under the sailpack no dought.
I like simple dependable systems and the 20 or more sail packs I have used were all more trouble than they were worth.
I realise you have said you intend to cover in-mast furling in a later edition. I have a 43ft boat with in-mast furling. The original was 34 sq m (366 sq ft) with negative roach and appalling shape after 12 years. I had this changed to a new vertically battened sail 41 sq m (440sq ft) with positive roach which is actually a fraction larger than a conventional fully horizontal battened sail for my model which would have been 38 sq m (410 sq ft). So i have a much better shape and control than the original and is 20% greater sail area than the original and in fact 9% larger area than a conventional horizontally battened sail. None of the complications of lazy-jacks/Dutch system etc and all managed from the cockpit with an electric winch. Has never, ever, jammed. What’s not to love?
My wife and I, now in our mid-to-late 50’s have sailed our 42′ sloop for >20 years. In the beginning it had a dutchman system that significantly simplified mainsail handling. About 5 years ago we installed a Leisure Furl in-boom furling system. We love it. It’s dramatically safer and will undoubtably extend our ability to manage the 370 sq ft main. We reef sooner and more often and neither of us have to even be on the high part of the deck (or steps on the base of the mast) to secure it! It was well worth the hefty cost which we coordinated with replacing the mainsail.
LEAVE A REPLY Cancel reply
Log in to leave a comment
- Privacy Policy
- Do Not Sell My Personal Information
- Online Account Activation
- Privacy Manager

The $tingy Sailor
Diy trailerable sailboat restoration and improvement without throwing your budget overboard.
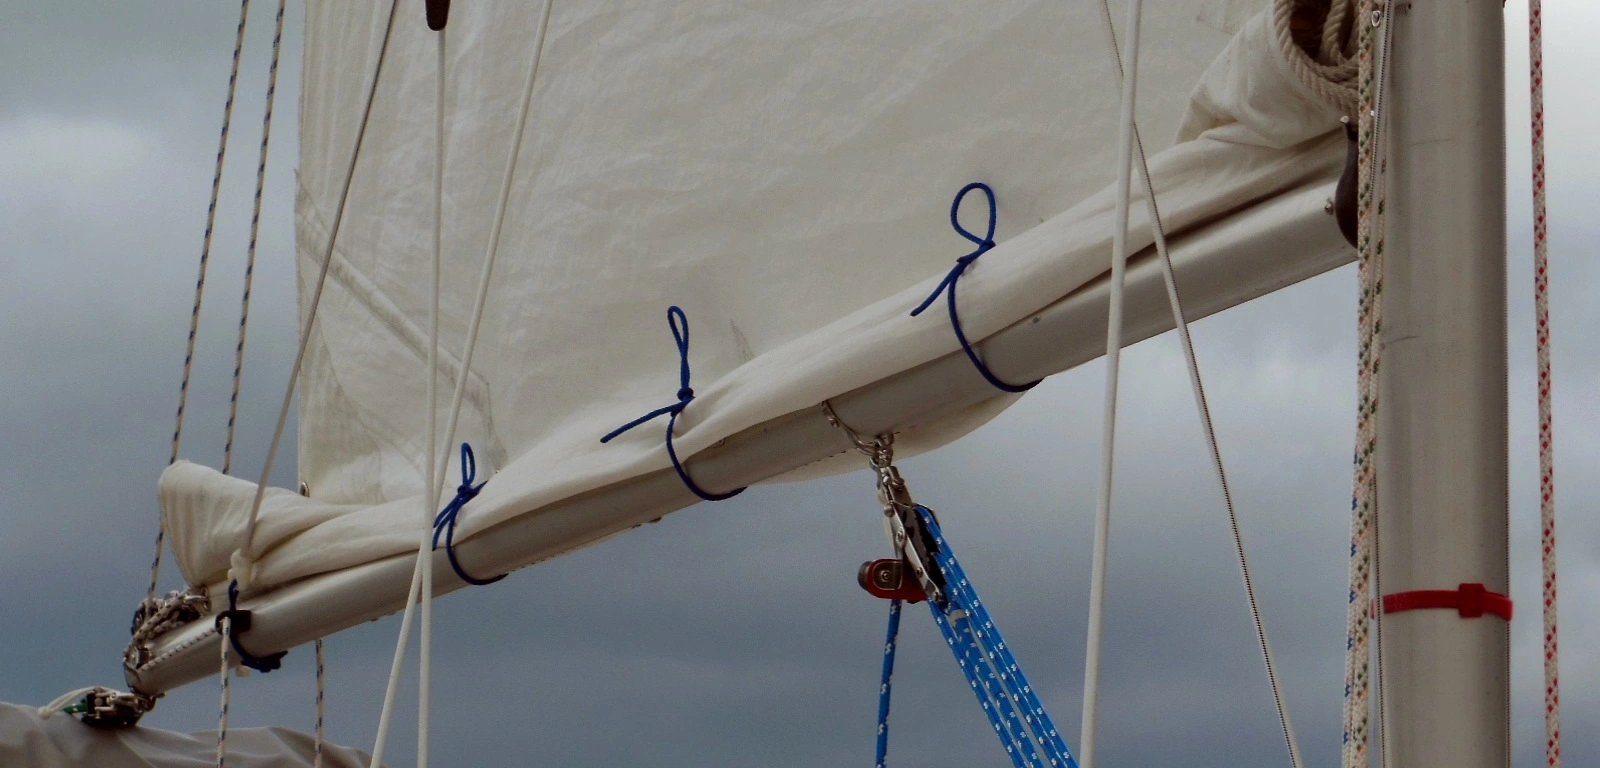
Single Line Jiffy Reefing Made Easy
Your ability to reef your mainsail is one of the most important sailing skills that you can learn. Your reefing rigging plays an important part in that. You can do it with just a few short lengths of rope but it will be more time consuming and difficult than it needs to be. That method is not very safe to use during the weather conditions when you’re most likely to need to reef. Having a system of reefing lines in place and ready to use at any time increases your ability to reef smoothly and efficiently (in a jiffy) when conditions warrant it, particularly if you sail single-handed.
Reefing systems for trailerable sailboats typically come in two types: single-line and double-line. Each type has its advantages and disadvantages. A single-line system has fewer lines to attend to, which can make it faster to use but it’s a little more complicated than a double-line system. A double-line system is a little bit simpler design but it can take more time to use. Opponents of single-line reefing will point out that a single-line system can’t pull both reef points of the sail evenly at the same time and they’re right. The luff cringle will pull tight while the leech cringle is just starting to pull down. But that doesn’t mean that it won’t still work.
Some people prefer the basic approach of double-line reefing, others prefer the speed of a single-line system. In my opinion, speed of controlling sail area is of the essence and why I prefer it. If you take the time to fully understand both types, you can choose which system is best for you. This post describes a single-line system similar to the kit sold by a certain online Catalina parts retailer. The main difference is that this system doesn’t use a hook in the luff cringle (grommet). A hook can accidentally fall out and it can chafe the mainsail. In this design, the line runs from one side of the boom to the other through the grommet on its way from the end of the boom forward through the mainsail, down the mast, and aft to the cockpit (optional).
Materials list
Here are the materials you need to complete this project:
- 45′ x 1/4″ New England Ropes Sta Set rope or equivalent, less if it will not be led aft to the cockpit
- (4) small regular eye straps & (8) #10 x 1/2″ stainless steel pan head tapping screws
- (1) small fairlead eye strap & (2) #10 x 1/2″ stainless steel pan head tapping screws
- (2) 29mm cheek blocks & (4) #10 x 1/2″ stainless steel pan head tapping screws
Installation instructions
The following steps describe where to lead the reefing line and how to install the hardware along the way. The pictures in this post show the line starting and ending on the starboard side, but either side will work, it’s your choice. Just start on the same side as where you want the line to end at a mast cleat or at the cockpit.
1. Position the mainsail on the boom where it should be after it has been reefed. This should be with both reef points (cringles) touching the top of the boom and the mainsail pulled flat between them. If you do this with the boom and mainsail removed from the sailboat, keep the mainsail luff aligned with the boom gooseneck at all times just as it would be when mounted to the mast.
2. Attach one eye strap to the boom slightly aft of where the mainsail leech meets the boom (opposite the cheek block in the picture below). Align the strap parallel to the boom and far enough aft so that the mainsail won’t bind up against the strap when you reef the sail. Attach one end of the reefing line to this strap with either a knot or a spliced eye.
3. Attach one cheek block to the boom on the opposite side of the boom from the eye strap. Align the block parallel to the boom and pointing aft. Reeve the reefing line through the aft cringle in the mainsail, then through this cheek block and forward along the side of the boom like in the picture below. When you reef the mainsail, the line should pull the cringle downward and aft without binding.

4. At the forward end of the boom, mount the other cheek block on the same side as the first cheek block. Align the block parallel to the boom and point it forward like in the picture below.

5. Mount the remaining three regular eye straps evenly spaced between the two cheek blocks. Alight them perpendicular to the boom and slightly below the boom centerline so that they straddle the reefing line when it’s tight and hold it up out of the way when it’s slack.
6. Lead the reefing line through the eye straps, through the forward cheek block, up and through the forward mainsail cringle, and then down to the opposite side of the boom.
7. Mount the fairlead eye strap on the side of the mast slightly below the boom when it’s at its normal height during a full hoist (for a C-22, the boom should be 39″ from the cabin roof to the top of the boom). In the picture below, the fairlead is mounted horizontally on the mast. I later rotated it counter-clockwise about 30 degrees to reduce friction on the line when it’s reefed.

When reefed, the line should pull the forward cringle straight down to the boom like in the picture below. The reefing line should then do the same job that the tack pin does when the mainsail is at full hoist .

Below the fairlead, you can tie the line to a jam cleat on the mast. However, that means somebody must go forward to the mast to do it. If that’s during heavy weather, it’s not safe. The alternative is to lead the line through a turning block at the mast step, to a deck organizer, and to a cleat at the cockpit, which is much safer.
How to reef
When you begin to suspect that the wind might pick up beyond what you or your boat are comfortable with, it’s time to reef the mainsail. If you have a single-line system, it’s easy to do and equally easy to undo, so do it early to be on the safe side. You can shake the reef out later if it turns out that you don’t need it. But if you fail to reef when you should, you could wind up regretting it.
First, point the boat into the wind and maintain that course until you are done reefing. This takes the pressure off of the mainsail so that you can give your full attention to safely reefing it faster and tighter. If you’re already in heavy weather, the sails will be flogging violently, which is another reason to do this at the dock during calmer weather. Also maintain sufficient forward motion (motoring, if necessary) so that the wind cannot blow the bow off course while you reef the mainsail. If you have a boom vang and it is tightened, slack it off.
Assuming you also have your main halyard led aft to the cockpit, simultaneously ease the halyard to lower the mainsail while you pull on the standing end of the reefing line. You want to do this simultaneously so that the boom doesn’t slide down the mast. To keep the first mainsail slugs from falling out of the mast, you need to either install mast gates to close the slot opening (recommended) or a jack line in the mainsail so that they can be held above the opening with a sail stop.
The boom should stay in position and the mainsail should stay relatively flat while the slack in the mainsail is gradually taken up by you pulling the reefing line. Keep pulling until the luff cringle is as low as it will go, then cleat off the halyard. At this point, the mainsail is about half reefed. The leech is only partly reefed but the line will be tight.
Now, since the boom is centered over the cockpit because you’re pointing into the wind, you can simply reach up to the boom and grab the reefing line anywhere along the length of the boom. Pull the line toward the mast with one hand while you simultaneously pull the standing end of the reefing line with your other hand. Continue hauling the reefing line this way until the leech cringle is as low as it will go. It should only take a few pulls and then you can cleat off the reefing line. Now the mainsail is fully reefed.
All that remains is to roll up and tie the slab of loose mainsail onto the boom. You should have short lengths of rope called gaskets or bunt lines already tied into the middle reef points for this. Tie them with a slip knot so that you can easily untie them. Reset the boom vang, if necessary. You can now resume sailing your original course with the mainsail depowered.
When it comes time to release (shake out) the reef, point back into the wind and reverse the process. First, untie the bunt lines. Uncleat both the main halyard and the reefing line and then ease out the reefing line while you hoist the head of the mainsail back to full height. The leech cringle won’t need any help coming loose. Cleat off the halyard and you’re done.
Would you like to be notified when I publish more posts like this? Enter your email address below to subscribe to this blog and receive notifications of new posts by email. You will also receive occasional newsletters with exclusive info and deals only for subscribers and the password to the Downloads page. It’s free and you can unsubscribe at any time but almost nobody does!
Share this:
12 thoughts on “ single line jiffy reefing made easy ”.
Great job – and explanation! Thanks!
Where did you get your cheek blocks? The cheapest I can find add up to more than your total cost for the project. Can you send me a list of suppliers? I like what you did. Great job and just what I need.
I bought the cheek blocks for this project from Nautos USA. I describe them and my other favorite suppliers in The 6 Best Sources for Sailboat Parts and Supplies .
Excellent. Putting pulley on the sail can reduce friction
If you want or need two reef positions, would you run a second single line system along the other side of the boom? Maybe on smaller trailer sailors, two reef points are not needed?
Here’s an idea for the less frequent sailor reading your blog who is unfamiliar with sailer/nautical terms. .. Maybe you could devise a ready-reference listing on a page for the terms (or link to another site with that info)? The first time you refer to a term in a given article, you could link to that term’s bookmark and have the description pop open in a new tab or window (with instructions to close it to return to the article)? You’d think “leech” and “luff” would be as second nature as “port” and “starboard” to me by now! LOL! Maybe that exrra mental processing will help me better remember the gist of the article…:-)
Thanks for another great write-up!
In my opinion, if the weather is bad enough for a C-22 that it needs two sets of reef points, it’s bad enough to not sail at all. The exception would be cruisers who make island passages offshore and might get caught in a really nasty blow but even then you could get by without them. If it were me, I’d opt for one reefing system for simplicity, either single-line or double-line and use reefing hooks to grab higher on the sail, if needed.
Your idea about glossary links is a good one even thought it means a bunch more work for me 😉 As a test, I edited this article and inserted a slew of links to the nautical terms glossary at Wikipedia. Try it out and let me know what you think.
Thanks! $tingy
Thanks! That makes a lot of sense. I’ve never had any reef points on my Venture 21 main sails, so your article fit a need as I dream about my project list!. It seems I see multiple reef points on ocassion on trailered boats, so maybe it is a sales tactic. Or perhaps the designers felt their boats could benefit from several smaller reefing adjustments…
The links to terms works perfectly…for those like me who need it! Nice resource to have in my bookmarks file, too!
Thanks for very helpful post! Any reason you place the cheek block near the mast on the boom? The Harken illustration of this setup shows it on the mast, to pull the sail down and forward. In your case are there any issues with the sail being pulled backward/aft by the reef line?
Either location will work but I prefer the block on the boom to keep the lead down the boom straight. It also makes the boom height less of a factor since it doesn’t need to align with the block. And it keeps the block from interfering with external halyards, lazy jacks, etc. I’ve not had any problems with not enough forward pull on the luff reef point. It’s harder to get the leech reef point down and tight.
Great explanation! Thank you. We have an O’Day Mariner, and the mainsheet halyard and topping lift are at the mast. We’re relatively novice sailors, and researching reefing methods. Can the single line reefing system still work with the standing end of the reefing line ending at the mast? I realize its not as safe (maybe we can find a way to move our halyard and topping lift to the cockpit), but am not sure from your description whether it is possible. Thanks.
Hey, Carolyn
Absolutely! The paragraph below the last photo sums it up.
Below the fairlead, you can tie the line to a jam cleat on the mast. However, that means somebody must go forward to the mast to do it. If that’s during heavy weather, it’s not safe. The alternative is to lead the line through a turning block at the mast step, to a deck organizer, and to a cleat at the cockpit, which is much safer.
Let me know if you have any more questions, $tingy
Jiffy reefing Great post
Leave a comment Cancel reply
This site uses Akismet to reduce spam. Learn how your comment data is processed .

- Already have a WordPress.com account? Log in now.
- Subscribe Subscribed
- Copy shortlink
- Report this content
- View post in Reader
- Manage subscriptions
- Collapse this bar
These technologies are helping to save our ocean

From underwater satellites to drones. Image: Unsplash/Sebastian Pena Lambarri
.chakra .wef-1c7l3mo{-webkit-transition:all 0.15s ease-out;transition:all 0.15s ease-out;cursor:pointer;-webkit-text-decoration:none;text-decoration:none;outline:none;color:inherit;}.chakra .wef-1c7l3mo:hover,.chakra .wef-1c7l3mo[data-hover]{-webkit-text-decoration:underline;text-decoration:underline;}.chakra .wef-1c7l3mo:focus,.chakra .wef-1c7l3mo[data-focus]{box-shadow:0 0 0 3px rgba(168,203,251,0.5);} Johnny Wood

.chakra .wef-9dduvl{margin-top:16px;margin-bottom:16px;line-height:1.388;font-size:1.25rem;}@media screen and (min-width:56.5rem){.chakra .wef-9dduvl{font-size:1.125rem;}} Explore and monitor how .chakra .wef-15eoq1r{margin-top:16px;margin-bottom:16px;line-height:1.388;font-size:1.25rem;color:#F7DB5E;}@media screen and (min-width:56.5rem){.chakra .wef-15eoq1r{font-size:1.125rem;}} Ocean is affecting economies, industries and global issues

.chakra .wef-1nk5u5d{margin-top:16px;margin-bottom:16px;line-height:1.388;color:#2846F8;font-size:1.25rem;}@media screen and (min-width:56.5rem){.chakra .wef-1nk5u5d{font-size:1.125rem;}} Get involved with our crowdsourced digital platform to deliver impact at scale
Stay up to date:.
- The ocean covers almost two-thirds of the planet's surface, but it is under threat from climate change, pollution and other threats.
- But a number of innovations are being developed to help preserve the health of these vital planetary support systems.
- The World Economic Forum’s Friends of Ocean Action initiative brings leaders together to fast-track solutions to the most pressing challenges facing our ocean.
The ocean is more than just water. Covering 70% of the planet’s surface, these vast marine expanses form a giant global carbon sink , help regulate our climate, generate more than half of the oxygen we breathe, give us food and medicines, provide jobs and economic benefits, help transport our goods and … the list is endless.
But the health of our ocean is declining due to the climate crisis, biodiversity loss, pollution and other threats .
This is where innovation comes in. A host of new technologies are being developed that could help preserve the health of these vital planetary support systems.
To that end, the World Economic Forum’s Friends of Ocean Action initiative brings together leaders to fast-track solutions to the most pressing challenges facing our ocean.
Here are a few of the many clever ideas working to protect ocean ecosystems, including a number of initiatives from the World Economic Forum’s Uplink platform .
Have you read?
Why the high seas treaty is a breakthrough for the ocean and the planet, we know plastic pollution is bad – but how exactly is it linked to climate change.
Ocean acidification is destroying oyster reefs – here's how that could affect the environment and the economy
Marine surveillance
Identifying problems and their scale is a key part of efforts to safeguard marine environments, and several innovations are being developed to harvest ocean data.
German company Planblue is developing an “underwater satellite” to scan and map the – largely uncharted – ocean floor, for example. The robot uses AI and machine learning to navigate and its advanced imaging will give a clear picture of the impact of climate change, biodiversity loss and pollution deep beneath the waves.
In Australia, an autonomous underwater drone system called Hydrus can dive to depths of 3,000 metres below the ocean surface. Using powerful lights, it locates and identifies new marine life and monitors coral reef systems to make better conservation decisions.
Meanwhile, conservationists from global alliance Ocean Census aim to discover 100,000 new marine species using remote underwater robots . High-resolution imaging and lasers will be used in conjunction with DNA-sequencing technology to analyze traces of DNA left in ocean waters by different inhabitants.
Underwater connected technologies
Expanding our knowledge of the world’s seas and marine habitats is a key part of efforts to tackle the impact of climate change.
That’s why scientists at the EU-funded TEUTA project are working with a Croatian robotics start-up to develop lightweight, low-cost acoustic devices and robotic solutions to establish underwater wireless networks that support an Internet of Underwater Things . A network beneath the waves makes communicating in the sea easier.
The underwater connected technologies platform would harvest real-time data to help monitor and protect the world’s underwater habitats while improving under-sea communications.
Data sources could range from electronically tagged marine life to sensor-equipped shipwrecks, as part of a system of remote sensors, measuring technology, detection systems and underwater observation cameras. Harvested data would be sent to a buoy at the surface, and relayed via the cloud to shore-based researchers .
Protecting marine life
Marine life needs protection from the impact of human activity both above and beneath the waves.
As many as 30,000 whales are injured or killed annually by “ship strikes” – collisions with fishing, cargo or other marine vessels – according to the World Cetacean Alliance, with dolphins and porpoises also in danger.
But technology can help. In California, Whale Safe has deployed an acoustic buoy that can detect the sounds of whale activity and transmit a warning signal to inform shipping to slow down.
Meanwhile, Canadian start-up Whale Seeker deploys AI-powered automated drones to take aerial and infrared images that detect the presence of whales and other sea mammals. As well as preventing fatal ship strikes, the technology monitors Arctic whale populations over large areas of the ocean to minimize negative impacts.
Another innovation – by Toyon Research Corporation in the US – uses infrared cameras mounted on ships or shore sites to monitor around the clock for whale blows as they surface for air . Data showing the number, location and timing of blows helps organizations like the National Ocean Atmospheric Administration estimate whale population sizes.
Below the waves, warming ocean waters can upset the balance of marine ecosystems. A trap that sits on the Atlantic Ocean floor is being trialled to capture and control numbers of predatory lionfish , an invasive species that is threatening native marine life in some areas.
Coral protection and restoration
A lethal combination of warming ocean temperature, acidification, overfishing, pollution and other factors is causing a decline in the world’s coral reefs.

Since 2009, there has been a global decline in coral with a 14% loss of coral worldwide , equivalent to almost all blooms on Australia’s coral reefs, according to the Reef Resilience Network.
Several Uplink conservation innovations aim to halt the decline and regenerate coral populations. In Hong Kong, ArchiREEF is using 3D-printed tiles made from terracotta clay to regenerate endangered local reefs . The hexagonal tiles mimic the shape of local brain coral species to attract marine life and encourage the growth of baby corals.
A separate initiative by Coastruction uses 3-D printing to move across a bed of dry sand mix and deposit water, which activates the binder and makes it solid . Layer upon layer is added, which in time develop into complex organic shapes that imitate those found in nature. Once live corals are introduced, the result is a living reef.
Our ocean covers 70% of the world’s surface and accounts for 80% of the planet’s biodiversity. We can't have a healthy future without a healthy ocean - but it's more vulnerable than ever because of climate change and pollution.
Tackling the grave threats to our ocean means working with leaders across sectors, from business to government to academia.
The World Economic Forum, in collaboration with the World Resources Institute, convenes the Friends of Ocean Action , a coalition of leaders working together to protect the seas. From a programme with the Indonesian government to cut plastic waste entering the sea to a global plan to track illegal fishing, the Friends are pushing for new solutions.
Climate change is an inextricable part of the threat to our oceans, with rising temperatures and acidification disrupting fragile ecosystems. The Forum runs a number of initiatives to support the shift to a low-carbon economy , including hosting the Alliance of CEO Climate Leaders, who have cut emissions in their companies by 9%.
Is your organization interested in working with the World Economic Forum? Find out more here .
Meanwhile, CHARM has invented a robot that helps farmed coral reefs grow 50 times faster, by removing the algae that restricts coral growth and feeding, and monitoring baby corals , which will be transplanted onto ocean reefs. Automating repetitive tasks halves labour-intensive coral farming costs, helping to make reef generation programmes more affordable.
As the project’s name suggests, the Plant a Million Corals Foundation aims to plant 1 million corals using “micro-fragmentation”, a technique that’s 20-40 times faster than nature . Corals are broken into pieces and, when placed in close proximity, the fragments fuse again, generating the same amount of coral in just one or two years that would take 25 years to grow naturally.
While no single innovation can safeguard the health of our ocean, the collective efforts of technologies aimed at understanding, protecting and restoring the world beneath the waves can make a difference.
Don't miss any update on this topic
Create a free account and access your personalized content collection with our latest publications and analyses.
License and Republishing
World Economic Forum articles may be republished in accordance with the Creative Commons Attribution-NonCommercial-NoDerivatives 4.0 International Public License, and in accordance with our Terms of Use.
The views expressed in this article are those of the author alone and not the World Economic Forum.
Related topics:
The agenda .chakra .wef-n7bacu{margin-top:16px;margin-bottom:16px;line-height:1.388;font-weight:400;} weekly.
A weekly update of the most important issues driving the global agenda
.chakra .wef-1dtnjt5{display:-webkit-box;display:-webkit-flex;display:-ms-flexbox;display:flex;-webkit-align-items:center;-webkit-box-align:center;-ms-flex-align:center;align-items:center;-webkit-flex-wrap:wrap;-ms-flex-wrap:wrap;flex-wrap:wrap;} More on Ocean .chakra .wef-17xejub{-webkit-flex:1;-ms-flex:1;flex:1;justify-self:stretch;-webkit-align-self:stretch;-ms-flex-item-align:stretch;align-self:stretch;} .chakra .wef-nr1rr4{display:-webkit-inline-box;display:-webkit-inline-flex;display:-ms-inline-flexbox;display:inline-flex;white-space:normal;vertical-align:middle;text-transform:uppercase;font-size:0.75rem;border-radius:0.25rem;font-weight:700;-webkit-align-items:center;-webkit-box-align:center;-ms-flex-align:center;align-items:center;line-height:1.2;-webkit-letter-spacing:1.25px;-moz-letter-spacing:1.25px;-ms-letter-spacing:1.25px;letter-spacing:1.25px;background:none;padding:0px;color:#B3B3B3;-webkit-box-decoration-break:clone;box-decoration-break:clone;-webkit-box-decoration-break:clone;}@media screen and (min-width:37.5rem){.chakra .wef-nr1rr4{font-size:0.875rem;}}@media screen and (min-width:56.5rem){.chakra .wef-nr1rr4{font-size:1rem;}} See all

Largest DNA database of marine microbes to track the impact of global warming on ocean health
Andrea Willige
February 26, 2024

How deep-sea technology could transform life above water
Mattie Rodrigue and Diva Amon
February 23, 2024

How marine permaculture could revolutionize ocean farming
Scott Spillias
February 15, 2024

The Atlantic Ocean is headed for a tipping point − once melting glaciers shut down the Gulf Stream, we would see extreme climate change within decades, study shows
René van Westen, Henk A. Dijkstra and Michael Kliphuis

5 unusual ways seaweed is being used to tackle the climate crisis
Tom Crowfoot
February 13, 2024

Brent E. Feldman
January 29, 2024
- Print Replica
- Election 2024
- Russia Attacks Ukraine
- Red Hill Water Crisis
- Crime in Hawaii
- America in Turmoil
- Traffic Map
- Photo Galleries
- Homeless in Hawaii
- Volcanic Ash
- Latest Sports News
- TV & Radio
- Sports Blogs
- Hawaii Prep World
- Hawaii Warrior World
- Letters to the Editor
- Submit a Letter to the Editor
- Arts & Entertainment
- State Legals
- Political Cartoons
- Classifieds
- Star Channels
- Hawaii Renovation
- Email Newsletters
- Corrections
- Special Sections
- Partner Content
- Partner Videos
- Web Push Notifications
- Mobile Apps
- Privacy Policy
- Terms of Service
- Activate Digital Account
- Forgot Password
- Customer Service
- Tuesday, March 5, 2024
- Today's Paper
Sailboat hits reef off Waikiki; all passengers safely returned to shore
- By Star-Advertiser staff
- March 3, 2024

Unlimited access to premium stories for as low as $12.95 /mo.

CINDY ELLEN RUSSELL / [email protected]
A 90-foot sailboat, called the Criterion, ran into a reef roughly 500 yards off Fort DeRussy in Waikiki Sunday afternoon with about 30 adults onboard. All the passengers were transported onto the vessel safely. Pictured is the sailboat listing in the waves about 500 yards from shore near Fort DeRussy in Waikiki.

A 90-foot sailboat, called the Criterion, ran into a reef roughly 500 yards off Fort DeRussy in Waikiki Sunday afternoon with about 30 adults onboard. All the passengers were transported onto the vessel safely. Pictured is the sailboat listing in the waves, as passenger boats passby in the background, about 500 yards from shore near Fort DeRussy in Waikiki.
A 90-foot sailboat, called the Criterion, ran into a reef Sunday afternoon roughly 500 yards offshore from Fort DeRussy in Waikiki with about 30 adults on board.
Honolulu Ocean Safety, the U.S. Coast Guard, the Honolulu Fire Department and the Department of Land and Natural Resources responded to the incident around 3:30 p.m.
Shayne Enright, spokesperson for the Honolulu Emergency Services Department, said in a statement that after the crash, “many of the boaters began to jump into the water as waves crashed into the sailboat. Two Ocean Safety jet ski crews with the assistance of Good Samaritans, ferried the group of adults from the vessel to another boat named the Trident.”
Enright said the Trident brought all of the adults to the Ala Wai Small Boat Harbor.
“The incident took a couple of hours from the 911 call to when all were safe onshore. No medical attention was required,” she said.
By participating in online discussions you acknowledge that you have agreed to the Terms of Service . An insightful discussion of ideas and viewpoints is encouraged, but comments must be civil and in good taste, with no personal attacks. If your comments are inappropriate, you may be banned from posting. Report comments if you believe they do not follow our guidelines .
Having trouble with comments? Learn more here .
Hawaii men’s volleyball team sweeps Sacred Heart
Asia’s richest man throws star-studded bash for son’s prenuptials.
Click here to see our full coverage of the coronavirus outbreak. Submit your coronavirus news tip.
Be the first to know
Looking back.

March 1959: President Dwight D. Eisenhower signs Hawaii statehood bill into law
Ukraine said it sank a $65 million warship that Russia planned to use for an antiaircraft missile system
- Ukraine said it destroyed another Russian ship in the Black Sea using sea drones.
- The Sergei Kotov patrol vessel, part of Russia's Black Sea Fleet, cost $65 million, Ukraine said.
- An intelligence official said Russia was planning to put an antiaircraft missile system on the ship.
Ukrainian military intelligence said a $65 million Russian warship was the latest to be sunk in the Black Sea.
The Main Directorate of Intelligence of the Ministry of Defense of Ukraine said Tuesday that the vessel, the Sergei Kotov, was destroyed overnight.
The ship was worth about $65 million, it said.
It added that a Ukrainian special unit attacked the Black Sea Fleet vessel in cooperation with Ukraine's navy and the Ministry of Digital Transformation.
An intelligence source told Ukraine's Kyiv Post that Magura V5 drones struck the ship while it was patrolling in the Kerch Strait and that it sank.
Andrii Yusov, a Ukrainian intelligence official, told Radio Free Europe that Russia was planning to put an antiaircraft missile system on the ship.
Ukraine shared footage of what's said to be the attack.
Ukrainian Defense Intelligence shared a video of the Russian Sergey Kotov patrol ship being destroyed. Glory to Ukrainian Heroes! https://t.co/3KPMpgxXD8 pic.twitter.com/4LGiEYQaEY — Anton Gerashchenko (@Gerashchenko_en) March 5, 2024
The hit, if confirmed, would be another victory for Ukraine in the Black Sea, despite it not having any warships of its own .
The Sergei Kotov is a patrol ship operating as part of Russia's Black Sea Fleet, according to The Kyiv Independent .
Ukraine has been targeting Russian ships since the start of Russia's full-scale invasion in February 2022 , damaging, destroying, or sinking many of them.
Ukraine has targeted Russian vessels with commando raids , missiles, and sea drones , including ones it developed itself .
In December, the UK's defense minister said : "Over the past 4 months 20% of Russia's Black Sea Fleet has been destroyed."
Russia has moved many of its vessels away from Sevastopol , its major Black Sea port in Crimea, to areas farther away from Ukraine.
Russia annexed the Crimean Peninsula in February 2014. Ukraine has repeatedly vowed to take it back and has launched long-range attacks on infrastructure there.

Watch: Video of Russian naval ship explosion shows a much-needed win for Ukraine
- Main content
VIDEO
COMMENTS
"It's made in New Zealand and a really top-notch system. "For jiffy reefing systems, the cheapest and most effective way to tame the main is The Dutchman. [The Dutchman uses a system of monofilament lines led from the foot of the sail, through bushings, upward to the leech. This keeps the sail in line with and on the boom when it is dropped.
Mainsail reefing systems must operate effciently to reduce sail under adverse conditions and provide proper sail shape when reefed. These systems are a must for both racers and cruisers. Typical Boat Length: Small Boat: 22' - 28' (6.7 - 8.5 m)
An efficient and effective mainsail reefing system will make any sailing boat - whether a small weekender, offshore racer or ocean cruiser - easier to handle, faster and safer. The most common choice for modern yachts is slab reefing, in which there are typically three reefs that are progressively pulled down to shorten sail as the wind increases.
Two separate reefing lines are used for each reef; one pulls down the leech of the sail and the other pulls down the luff. So if you've got three sets of reef points in your mainsail, that's six extra lines in the cockpit. Hmmm. You might want to think about a single line jiffy reefing system...
So it is always a risk that things can break when you decide to reef. Know Your Boat's System. And another point: know your boat. Practice reefing on a calm clear day when you have lots of time. Your first time reefing your boat should not be at midnight 25 miles out to sea with a freshening easterly. Know what reef systems your boat may have.
Most often, when sailors think of reefing, they're thinking of shortening the main first sail using a reefing system like Hook and Cringle. This is not the only option, but here are some considerations: Figure 1: With the headsail reefed by partially rolling it in, the deepest part of the sail's draft is usually left unrolled. ...
A reefed sail using a slab reefing system is illustrated in the photo shown. On this boat, the reefing line runs through the cringle at the sail's luff rather than using a horn. The position of the aft turning block on the boom is a little back from the cringle when the sail is reefed. This helps keep the sail taut for better trimming when ...
Reefing your mainsail. Ease the main-sheet. This will cause the mainsail to luff, stabilizing the boat by reducing heel and easing the tension on the mainsail making it easier to drop. Reduce Tension on the boom vang. This will allow the boom to move up or down dependent on where the reefing points are located on the mainsail.
Jan 30, 2013. Traditionally, all sailboat mainsails were reefed by simply pulling down the reefing lines through cringles in the luff and leech of the mainsail, then securing the reefing pennants—often permanently attached to the mainsail—to the boom to tidy the sail up. Then, in the late 1960s, the rolling boom was developed.
Reefing is a sailing term that refers to reducing the sail area in order to manage the sailboat in high winds. Reefing involves folding or rolling part of the sail and securing it to the boom or mast to decrease the surface area of the sail exposed to the wind.. This reduces the amount of force on the boat, making it more stable and easier to control.
The forward end of a slab reefing system consists of either reefing horns, a cunningham hook, or a luff-line on the boom. The sail will have fittings that must match the boat so they will hold the luff end secure: web loops, floppy rings, or press rings. Whatever system you have, it must be easy and fast to secure the reef point on the luff.
An overview of how the single line mainsail reefing system is setup and operates on a Pearson 31-2. We also show how to set a reef using the single-line system.
Head upwind to take load off the sail. Ease the jib halyard so the cringle in the reef point is near the deck. Attach the luff cringle to the reef hook or tie it to the base of the forestay. Move the sheets from the normal clew and tie them to the leech cringle, or use a second set of sheets if you have them.
Most sailboats have a roller furling system for the foresail and reduce the size of the sail to however small they like. Reefing a foresail requires easing out the sheet so that the sail loses the wind and the pressure is taken off. Then, you can pull in on the foresail reefing line until the sail is the desired size before cleating off.
Single Line Reefing - a Simple, Seaworthy System. Ease the kicking strap, or vang as it's also known, then; Ease the mainsheet; Head up towards the wind; Take up on the topping lift to support the end of the boom; Release the halyard and drop the main by enough to pull in the reef; Pull in the reef and secure the reefing line;
Slab (AKA 'Jiffy' Reefing) System. The slab-reefing method has stood the test of time and remains the most prevalent choice, with over 75% of yachts utilizing this system. Over the years, jiffy reefing lines have replaced the traditional reefing points stitched into the sail, offering a more convenient and efficient solution.
With single line reefing it isn't possible to unreeve the line and change how it is led while sailing, another disadvantage of the system. Over time the boom-end reefing pennants will often wriggle towards the gooseneck and there is nothing more demoralising than going through the effort of a reef only to find that the foot is as slack as a ...
Once the reef is set and the sail is properly secured you can resume sailing. P.S. Furling mainsails can be reefed too. Just follow the procedure for your sail and system. When & What to Reef. If the boat is heeling over and main is washing out, the first thing to do is roll the jib down, but smart seamanship requires looking at the conditions ...
As the sail furls, the luff tape will naturally first roll aft, then move forward and repeat this - it's all perfectly normal. Once the sail is fully down, tuck the head into the boom if your system allows it, and add the sail cover. Reefing underway. To reef when sailing, release the backstay and set the boom angle.
Additionally, the traditional solution of an individual tie at each of the eyelets is slow and awkward to put in and remove. Also it is a rigid system. If one of the reefing lines comes undone all the load will go on the first sail tie and risks ripping the reef point eyelet out of the sail. I recommend the same method used on racing yachts.
A few simple updates to a stock jiffy reefing system can make it much easier to reef a mainsail. We added a 4:1 reefing cunningham for the luff and a #6 winc...
Most systems are difficult to stow while sailing, requiring extra steps after the main is hoisted, leaving a messy bag flopping and beating about the foot of the sail. It chafes itself to death. The system hides the foot of the sail during reefing, leaving the crew guessing whether or not the reef is all the way in, over tensioned, or caught on ...
Reefing systems for trailerable sailboats typically come in two types: single-line and double-line. Each type has its advantages and disadvantages. A single-line system has fewer lines to attend to, which can make it faster to use but it's a little more complicated than a double-line system. A double-line system is a little bit simpler design ...
A sailboat called the Criterion ran into coral reef about 500 yards offshore at Fort DeRussy Beach in Waikiki. Thirty adults who were on board at the time were safely
HONOLULU (Island News) -- New details have been released about a 90-foot sailboat that ran aground in waters off Waikiki, Sunday afternoon. Honolulu Ocean Safety and the Department of Land and ...
Using powerful lights, it locates and identifies new marine life and monitors coral reef systems to make better conservation decisions. Meanwhile, conservationists from global alliance Ocean Census aim to discover 100,000 new marine species using remote underwater robots. High-resolution imaging and lasers will be used in conjunction with DNA ...
A 90-foot sailboat, called the Criterion, ran into a reef roughly 500 yards offshore Fort DeRussy in Waikiki this afternoon with about 30 adults onboard. Honolulu Ocean Safety, the U.S. Coast ...
Ukraine said it sank a $65 million warship that Russia planned to use for an antiaircraft missile system. Sinéad Baker. 2024-03-05T11:16:49Z An curved arrow pointing right. Share. The ...