- Forums New posts Unanswered threads Register Top Posts Email
- What's new New posts New Posts (legacy) Latest activity New media
- Media New media New comments
- Boat Info Downloads Weekly Quiz Topic FAQ 10000boatnames.com
- Classifieds Sell Your Boat Used Gear for Sale
- Parts General Marine Parts Hunter Beneteau Catalina MacGregor Oday
- Help Terms of Use Monday Mail Subscribe Monday Mail Unsubscribe

When should standing rigging be replaced?
- Thread starter Project_Mayhem
- Start date Nov 9, 2020
- Forums for All Owners
- Ask All Sailors
Project_Mayhem
I've read that standing rigging should be replaced anywhere from 10 all the way up to 20 years and also simply based on condition. My boat has been in fresh water all its life. To the best of my knowledge it hasn't had a trailer until last year so the mast was up through the winter. Most recent receipt was for lower stays 10 years ago. Overall condition is good with some kinks here and there. No signs of corrosion or stray strands anywhere. Would you replace this?

If you have (reasonable) evidence that the PO replaced only the worst sections, it's safe to assume that the rest of the rig is getting ancient and failure prone. 20 years is what we go by for fresh water usage, for a max time.... and matter of fact we are now replacing our 2004 complete rig. Be sure to replace the turn buckles also -- not much more $, and it's great to be sure of the integrity of the entire rig.

Standing rigging replacement. Just got home from my first sail with my 7 year grandson on my 47 year old boat. One of his first observations “Granddad that’s a pretty big pole. Is it going to fall down, cause that would hurt.” When and why do you change standing rigging. Easy answer “before it can fall down.” There is sailors knowledge based on observations and experiences that have formed the rules of thumb. 6-10 years for salt water exposed rigging and 15-25 years for fresh water rigging. Rough guides that depend on location of the boats sailing experience, how the boat has been used, and how the boat will be used. On a new to me boat I want to know the condition by inspection of the rigging and all the connections to the mast and hull. If I’m a day sailor with close proximity to repairs and my mast is easily fixed/taken down that is different than if I am planning an extended cruise isolated from repair resources and skilled help. Racing and heavy weather sailing tests the strength of the rigging. Replacement of the rigging components is more frequent and based on inspection. Kinks in wire is like chafe on a line. It requires more careful consideration of condition, usage, and inspection for signs of failure. Proper size and material components for the rig are further consideration. When I refitted my mast and rigging I had the help of a seasoned rigger. He advised that with the size of my mast, the manufacturer was known to have undersized the rigging. Based on my sailing plans he suggested we increase the wire and components one size. I base my decisions on my planned usage and condition of rig more than on a number of years. The reactive answer to your question is a probable Yes it is time. The resulting knowledge of “The Rigging” was new in 2021, is peace of mind and will serve a little should you decide to sell at a future date. Also there is a sense of confidence when that thunderstorm approachs that the rigging is new and solid. It should be one less worry about will we weather the storm. Now those 20 year old sails might be the next issue. Good luck.
Project_Mayhem said: Overall condition is good with some kinks here and there. Click to expand

Project_Mayhem said: ...I've read that the inner stays rarely snap. Does that mean that replacement time for those is longer? Click to expand

ontherocks83
On our old boat we had the Port Aft lower shroud fail while sailing. The mast stayed up, but it sounded like a gun shot and was scary as hell. On our new boat the PO could not remember when or provide receipts to how old the standing rigging was. When applying for insurance they either wanted proof that the rigging was under 10 years old or to have a rigger inspect it and report its condition. I ended up just replacing all of the standing rigging through rigginonly.com in Fairhaven Ma. They were awesome to deal with and the price was very reasonable. To be honest I feel much more comfortable knowing the age and condition of the rigging especially when the wind picks up. And realistically all of the rigging on a 25' boat should not be expensive at all.
ontherocks83 said: I ended up just replacing all of the standing rigging through rigginonly.com in Fairhaven Ma Click to expand
dlochner said: For Rigging Only . If you don't live nearby, call them and then send them the old rigging, they will duplicate it. Good service, good quality, nice people. Click to expand

I think another factor to consider is how much of the "life time" of the rigging was spent with the boat in the water and the mast up. A boat in the water is in constant motion and the rigging experiences constant micro shock loads even when sitting in the slip. A boat spending most of the last 10 years on a trailer with the mast in a cradle has only corrosion to consider. It will always be a judgment call. You can't eliminate all risk on a sailboat and how to make that call will be different bassed on an individual's risk tollerance.

Don't forget that this site will also replace your rigging. Just a FYI. dj

Step 1 - Hire a professional rigger with a good reputation to do a thorough survey of your standing AND running rigging. Let them know any of your concerns before they get started. Step 2 - Evaluate their recommendations and decide for yourself. I just had a full rigging inspection done and the evaluation split the recommendations into: - "Good" (inspected and no action required) - "Watch" (no immediate action required but inspect regularly and plan to replace in the near future). In one case my VHF antenna's protective cover had UV degraded to the point of compromise and at some point the rigger felt the freezing and thawing of moisture entering the antenna would cause it to fail. I opted to replace now. - "Action now" (potential for failure soon). One example here was my mainsail halyard whose splice had UV degraded to the point the strength was compromised. I opted to replace now. Two other side benefits - if I have a rig failure I have a half leg to stand on with insurance that I did my best to maintain my rigging, having had a recent full inspection by a rigging company and rectified all known problems. Also, piece of mind that I'm not ASSUMING my rig is fine, but I have photographic evidence and expert advice of that (they took 141 photos during the inspection). I bought the 2009 boat in 2018 with no record of any rigging inspection or maintenance, so I figured the time was right at 11 years in salt water for a beefy B&R rig. They also discovered during the inspection that all my bolts on my radar were backing out - some nearly ready to fall to the deck (they fixed on the spot) and found my radar wire seal had popped out of the mast (fixed that on the spot). Worth EVERY BIT of the $150 I spent on it.

I would think at the first notice of a few broken strands in more than two of the wires. When the rig is tuned the wires are stretched. Before re-tuning the rig the mast base, turnbuckles and stay fixtures should be inspect. A boat with sound supports should not require re-tuning in less than 5 years. Any requirement to re-tune the rig more often than that would point to wires been stretched beyond their tensile strength minimums. The most important determinant would be the boat's use; a boat used for racing or offshore cruising would require the wires to be inspected and replace more often. Boats used for coastal cruising, week ending or day sailing may go longer. I personally take stock of a pleasure boat's components and their age and will not load an older boat's rigging as much as I would a newer one. I have broken more than my share of components in newer boats while a lot less in older boats. I agree with a general average of 20 years for replacing the standing rigging.
This is some excellent information! I'm on Lake Michigan. I push the boat hard whenever conditions allow and am always a bit leery of its old rigging. I'll pull the standing rigging and as much hardware as reasonably possible (tangs, bolts, pins, turnbuckles, etc) and drop it off to a local rigger. I found some tests that some SBO folks had done many years ago on the O'Day 25's standing rigging. Their solidworks simulations revealed the rigging was on the lighter side. I'll also inquire about upgrading to one size up.
Benny17441 said: I would think at the first notice of a few broken strands in more than two of the wires. Click to expand

Timm R Oday25
When we brought our Oday 25 home ,I knew judging from the lack of care the previous owner shown the rigging might also be suspect. Every spring I replaced a set of shrouds . It was about $200 each spring. If there is a kink from a shroud or a stay ,it usually happens from stepping the mast .I've learned to not be in a hurry .
I'll agree that most of the kinks were created during stepping or prepping for storage
The reason it is a scheduled item is that a visual inspection prolly won't detect defects. Maybe dying or some other high tech test would. But you can't really detect corrosion down into the swage. I recently sailed on a boat that had rust around the wire/swage on all the shrouds. I think the owner needs to replace those but there's a Covid problem. The good news is that after a spirited sail, which was pretty physical, my hip didn't hurt. Every other muscle did but the hip was fine and I think I'm good to go.

David in Sandusky
It sounds to me that the question is when, not if you will go for new rigging. When I thought about it this way, it seemed easy to give ourselves 20 years of confidence for our Lake Erie boat, rather than take the risk of waiting. We are cruisers who sail around 500 nm per year, and are able to avoid frequent encounters with heavy weather by laying over if storms are in the offing.
David in Sandusky said: It sounds to me that the question is when, not if you will go for new rigging. Click to expand
- This site uses cookies to help personalise content, tailor your experience and to keep you logged in if you register. By continuing to use this site, you are consenting to our use of cookies. Accept Learn more…
Yachting World
- Digital Edition

Pip Hare explains when to check and replace your standing rigging
- October 1, 2020
To prepare my IMOCA 60 Medallia for the Vendée Globe race, I have completed a full change of all the standing rigging

If the mast is stepped, the only way to thoroughly inspect rig fittings at the masthead is to go up there... Photo: James Mitchell
This was a ‘no brainer’ decision as my rigging has been around the world once already and I would never take it into the Southern Ocean for a second time.
In some ways it is easier to estimate the life of synthetic rigging, as it comes with a recommended mileage or stated lifespan if it can be UV damaged. For those with stainless steel rigging the decision on when to replace can be a harder one.
The main difficulties boat owners face when assessing the condition of the rig is the inability to see the first signs of wear, partly due to the majority of our rigging being out of sight in the sky, and partly due to the nature of metal fatigue itself.

Professional rig checks often lead to last-minute repairs for transatlantic ARC sailors. Photo: James Mitchell
The fact is that metal fatigue is inevitable and cannot be avoided. The only thing that will vary is the time a component takes to fail. So how can we make a good assessment of when rigging should be replaced?
There are a number of factors that will affect the lifespan of your standing rigging, most notably the initial quality of the rigging used and the type and frequency of sailing that you do.
Rigging quality
The quality of both wire and rod rigging is important because in both the crack initiation and growth phases of the fatigue process can be accelerated by metal impurities or unseen manufacturing defects in the component itself. Using high quality wire rigging from a well known supplier is a bigger initial outlay but the grade of metal used and manufacturing process should prolong the life of your rigging.
Article continues below…

How to prepare your yacht for anything: Preempting chafe, rig and crew problems
This is Part 2 of Vicky Ellis’ guide to preparing your yacht for any eventuality. You can read Part 1…
Ocean damage – tales of chafe, jury rigs and a shark on the rudder in the ARC
Crossing the Atlantic is hard on your gear, as the reports of ocean damage during the annual Atlantic Rally for…
When buying a secondhand boat, find out when the rigging was last replaced and try to get a copy of the invoice detailing who the supplier was – if you’re not sure, ask a rigger to take a look at it.
How you sail
In crude terms, every time your boat is used it is advancing the process of metal fatigue through the application of cyclical loads, so a boat that is raced regularly and hard will be approaching the point at which rigging failure could occur faster than a boat which is cruised intermittently.
This doesn’t mean that lightly used boats will never have to consider changing their rigging; even a dormant boat will be experiencing load cycles in some form when the mast is up. Just the action of the wind on a mast is enough to load up the rigging and any stays left loose will move with wind and wave action.

It’s not unusual for rigging wires to fracture around the swage collar
To minimise the stress caused by these load cycles while sailing it’s important to tune your rig regularly so the rigging is always at optimum tension. This will help ensure that changes in load are less extreme.
If you are not confident to set up your own rig tensions then ask your rigger to help, and later be sure to check your rig throughout the season.
Regular rigging checks
There are a couple of ways to test for early signs of fatigue not picked up by the naked eye; they include dye and NDT (non-destructive testing).

Water can enter swage terminals leading to crevis corrosion. Photo: Rupert Holmes
Both these surveys need to be carried out with the rig down and it may be worth balancing the overall cost of carrying out the test against the additional cost of re-rigging the boat, especially bearing in mind that if any faults or impurities are discovered your insurance may then require you to change the rigging anyway.
Regular visual checks should pick up the first signs of crack growth. Look for rust on T-terminals and at swage ends, check for powdery corrosion where T-terminals insert into the mast and any signs of cracking in the same area.
Run your fingers up and down the last metre of wire above or below the swage, feeling for deformities; if the wire is not uniform the chances are that one of the individual wires has broken, even if you can’t see it, and the stay and its partner should be replaced immediately.

Visual checks for rust and powdery corrosion are your first line of defence. Photo: Rupert Holmes
Checking the head of T-terminals is a harder job as they are inside the mast itself. This will need to be done with the mast removed so a full ‘mast down’ survey carried out by a professional rigger should be scheduled at least every three years.
Picking up early signs of corrosion or replacing select components after a thorough inspection is a worthwhile exercise because it may extend the lifespan of your standing rigging.
Inevitably your insurance policy will play a big part in your decision making about whether to replace your rigging. There has been a general assumption within the sailing community that insurance companies require rigging to be replaced after ten years, but I’ve found this is not actually the case; it’s far less prescriptive than that.

A small crack has developed in this stemhead fitting just above the forestay clevis pin
The IPID (Insurance Product Information Document) with your policy should give you a clear indication of what is covered in the event of a dismasting and may also provide some food for thought on when you should replace.
Insurance companies do not stipulate a timeframe at which your standing rigging should be replaced, but they do stipulate that all parts of the boat should be regularly and appropriately checked and maintained.
In the event of a dismasting claim, the insurance company would expect to see evidence of rigging maintenance and checks carried out at appropriate intervals by a qualified person; DIY inspections will not be accepted.
It is also worth taking note that in most insurance policies a depreciation element will be applied. This normally constitutes a deduction of one third of the new value of a rig and would start to come into play when a rig approaches 10-12 years old.
Emotional cost
There’s a consequential impact of a dismasting which cannot be covered by an insurance claim, and that is the human and emotional cost. In my own sailing career I’ve had two failures of standing rigging components which I spotted while sailing and was able to jury rig for a safe return to port. I’ve also experienced a dismasting, and I can vouch that it’s not a pleasant experience.
As a regular racer I take the health of my rig very seriously, perform checks before every major race and take my rig down annually for a thorough inspection. But this is the schedule that is right for me and the miles I sail, and would be considered overkill for the average sailor. Only you can give a proper evaluation of how often and how hard your boat is used, but that makes you ultimately responsible for setting the maintenance and replacement schedule.
Metal fatigue

Wires can break, unseen, within swaged terminals
Crack initiation starts when the metal first gets put to work and is caused by the cyclical loading of metal components. In the case of standing rigging on a sailing boat, this is the loading and unloading of shrouds and stays. Think about the windward shrouds loading up, while the leeward side relaxes: this cyclical loading causes cell structures to develop within the metal, these cells gradually harden and then develop microscopic cracks.
The crack growth stage follows next and these microscopic cracks will develop into larger ones, which may eventually be visible to the naked eye on the surface of the metal component. The speed of the crack growth phase will alter depending on how often and how hard your rigging is put under load.
Ultimate failure is caused when a crack exceeds a size that results in the component no longer supporting load. Failure will be sudden.
First published in the September 2020 issue of Yachting World.
No products in the cart.
Sailing Ellidah is supported by our readers. Buying through our links may earn us an affiliate commission at no extra cost to you.
The Standing Rigging On A Sailboat Explained
The standing rigging on a sailboat is a system of stainless steel wires that holds the mast upright and supports the spars.
In this guide, I’ll explain the basics of a sailboat’s hardware and rigging, how it works, and why it is a fundamental and vital part of the vessel. We’ll look at the different parts of the rig, where they are located, and their function.
We will also peek at a couple of different types of rigs and their variations to determine their differences. In the end, I will explain some additional terms and answer some practical questions I often get asked.
But first off, it is essential to understand what standing rigging is and its purpose on a sailboat.
The purpose of the standing rigging
Like I said in the beginning, the standing rigging on a sailboat is a system of stainless steel wires that holds the mast upright and supports the spars. When sailing, the rig helps transfer wind forces from the sails to the boat’s structure. This is critical for maintaining the stability and performance of the vessel.
The rig can also consist of other materials, such as synthetic lines or steel rods, yet its purpose is the same. But more on that later.
Since the rig supports the mast, you’ll need to ensure that it is always in appropriate condition before taking your boat out to sea. Let me give you an example from a recent experience.
Dismasting horrors
I had a company inspect the entire rig on my sailboat while preparing for an Atlantic crossing. The rigger didn’t find any issues, but I decided to replace the rig anyway because of its unknown age. I wanted to do the job myself so I could learn how it is done correctly.
Not long after, we left Gibraltar and sailed through rough weather for eight days before arriving in Las Palmas. We were safe and sound and didn’t experience any issues. Unfortunately, several other boats arriving before us had suffered rig failures. They lost their masts and sails—a sorrowful sight but also a reminder of how vital the rigging is on a sailboat.
The most common types of rigging on a sailboat
The most commonly used rig type on modern sailing boats is the fore-and-aft Bermuda Sloop rig with one mast and just one headsail. Closely follows the Cutter rig and the Ketch rig. They all have a relatively simple rigging layout. Still, there are several variations and differences in how they are set up.
A sloop has a single mast, and the Ketch has one main mast and an additional shorter mizzen mast further aft. A Cutter rig is similar to the Bermuda Sloop with an additional cutter forestay, allowing it to fly two overlapping headsails.
You can learn more about the differences and the different types of sails they use in this guide. For now, we’ll focus on the Bermuda rig.
The difference between standing rigging and running rigging
Sometimes things can get confusing as some of our nautical terms are used for multiple items depending on the context. Let me clarify just briefly:
The rig or rigging on a sailboat is a common term for two parts:
- The standing rigging consists of wires supporting the mast on a sailboat and reinforcing the spars from the force of the sails when sailing.
- The running rigging consists of the halyards, sheets, and lines we use to hoist, lower, operate, and control the sails on a sailboat.
Check out my guide on running rigging here !
The difference between a fractional and a masthead rig
A Bermuda rig is split into two groups. The Masthead rig and the Fractional rig.
The Masthead rig has a forestay running from the bow to the top of the mast, and the spreaders point 90 degrees to the sides. A boat with a masthead rig typically carries a bigger overlapping headsail ( Genoa) and a smaller mainsail. Very typical on the Sloop, Ketch, and Cutter rigs.
A Fractional rig has forestays running from the bow to 1/4 – 1/8 from the top of the mast, and the spreaders are swept backward. A boat with a fractional rig also has the mast farther forward than a masthead rig, a bigger mainsail, and a smaller headsail, usually a Jib. Very typical on more performance-oriented sailboats.
There are exceptions in regards to the type of headsail, though. Many performance cruisers use a Genoa instead of a Jib , making the difference smaller.
Some people also fit an inner forestay, or a babystay, to allow flying a smaller staysail.
Explaining the parts and hardware of the standing rigging
The rigging on a sailing vessel relies on stays and shrouds in addition to many hardware parts to secure the mast properly. And we also have nautical terms for each of them. Since a system relies on every aspect of it to be in equally good condition, we want to familiarize ourselves with each part and understand its function.
Forestay and Backstay
The forestay is a wire that runs from the bow to the top of the mast. Some boats, like the Cutter rig, can have several additional inner forestays in different configurations.
The backstay is the wire that runs from the back of the boat to the top of the mast. Backstays have a tensioner, often hydraulic, to increase the tension when sailing upwind. Some rigs, like the Cutter, have running backstays and sometimes checkstays or runners, to support the rig.
The primary purpose of the forestay and backstay is to prevent the mast from moving fore and aft. The tensioner on the backstay also allows us to trim and tune the rig to get a better shape of the sails.
The shrouds are the wires or lines used on modern sailboats and yachts to support the mast from sideways motion.
There are usually four shrouds on each side of the vessel. They are connected to the side of the mast and run down to turnbuckles attached through toggles to the chainplates bolted on the deck.
- Cap shrouds run from the top of the mast to the deck, passing through the tips of the upper spreaders.
- Intermediate shrouds run from the lower part of the mast to the deck, passing through the lower set of spreaders.
- Lower shrouds are connected to the mast under the first spreader and run down to the deck – one fore and one aft on each side of the boat.
This configuration is called continuous rigging. We won’t go into the discontinuous rigging used on bigger boats in this guide, but if you are interested, you can read more about it here .
Shroud materials
Shrouds are usually made of 1 x 19 stainless steel wire. These wires are strong and relatively easy to install but are prone to stretch and corrosion to a certain degree. Another option is using stainless steel rods.
Rod rigging
Rod rigging has a stretch coefficient lower than wire but is more expensive and can be intricate to install. Alternatively, synthetic rigging is becoming more popular as it weighs less than wire and rods.
Synthetic rigging
Fibers like Dyneema and other aramids are lightweight and provide ultra-high tensile strength. However, they are expensive and much more vulnerable to chafing and UV damage than other options. In my opinion, they are best suited for racing and regatta-oriented sailboats.
Wire rigging
I recommend sticking to the classic 316-graded stainless steel wire rigging for cruising sailboats. It is also the most reasonable of the options. If you find yourself in trouble far from home, you are more likely to find replacement wire than another complex rigging type.
Relevant terms on sailboat rigging and hardware
The spreaders are the fins or wings that space the shrouds away from the mast. Most sailboats have at least one set, but some also have two or three. Once a vessel has more than three pairs of spreaders, we are probably talking about a big sailing yacht.
A turnbuckle is the fitting that connects the shrouds to the toggle and chainplate on the deck. These are adjustable, allowing you to tension the rig.
A chainplate is a metal plate bolted to a strong point on the deck or side of the hull. It is usually reinforced with a backing plate underneath to withstand the tension from the shrouds.
The term mast head should be distinct from the term masthead rigging. Out of context, the mast head is the top of the mast.
A toggle is a hardware fitting to connect the turnbuckles on the shrouds and the chainplate.
How tight should the standing rigging be?
It is essential to periodically check the tension of the standing rigging and make adjustments to ensure it is appropriately set. If the rig is too loose, it allows the mast to sway excessively, making the boat perform poorly.
You also risk applying a snatch load during a tack or a gybe which can damage the rig. On the other hand, if the standing rigging is too tight, it can strain the rig and the hull and lead to structural failure.
The standing rigging should be tightened enough to prevent the mast from bending sideways under any point of sail. If you can move the mast by pulling the cap shrouds by hand, the rigging is too loose and should be tensioned. Once the cap shrouds are tightened, follow up with the intermediates and finish with the lower shrouds. It is critical to tension the rig evenly on both sides.
The next you want to do is to take the boat out for a trip. Ensure that the mast isn’t bending over to the leeward side when you are sailing. A little movement in the leeward shrouds is normal, but they shouldn’t swing around. If the mast bends to the leeward side under load, the windward shrouds need to be tightened. Check the shrouds while sailing on both starboard and port tack.
Once the mast is in a column at any point of sail, your rigging should be tight and ready for action.
If you feel uncomfortable adjusting your rig, get a professional rigger to inspect and reset it.
How often should the standing rigging be replaced on a sailboat?
I asked the rigger who produced my new rig for Ellidah about how long I could expect my new rig to last, and he replied with the following:
The standing rigging should be replaced after 10 – 15 years, depending on how hard and often the boat has sailed. If it is well maintained and the vessel has sailed conservatively, it will probably last more than 20 years. However, corrosion or cracked strands indicate that the rig or parts are due for replacement regardless of age.
If you plan on doing extended offshore sailing and don’t know the age of your rig, I recommend replacing it even if it looks fine. This can be done without removing the mast from the boat while it is still in the water.
How much does it cost to replace the standing rigging?
The cost of replacing the standing rigging will vary greatly depending on the size of your boat and the location you get the job done. For my 41 feet sloop, I did most of the installation myself and paid approximately $4700 for the entire rig replacement.
Can Dyneema be used for standing rigging?
Dyneema is a durable synthetic fiber that can be used for standing rigging. Its low weight, and high tensile strength makes it especially popular amongst racers. Many cruisers also carry Dyneema onboard as spare parts for failing rigging.
How long does dyneema standing rigging last?
Dyneema rigging can outlast wire rigging if it doesn’t chafe on anything sharp. There are reports of Dyneema rigging lasting as long as 15 years, but manufacturers like Colligo claim their PVC shrink-wrapped lines should last 8 to 10 years. You can read more here .
Final words
Congratulations! By now, you should have a much better understanding of standing rigging on a sailboat. We’ve covered its purpose and its importance for performance and safety. While many types of rigs and variations exist, the hardware and concepts are often similar. Now it’s time to put your newfound knowledge into practice and set sail!
Or, if you’re not ready just yet, I recommend heading over to my following guide to learn more about running rigging on a sailboat.
Sharing is caring!
Skipper, Electrician and ROV Pilot
Robin is the founder and owner of Sailing Ellidah and has been living on his sailboat since 2019. He is currently on a journey to sail around the world and is passionate about writing his story and helpful content to inspire others who share his interest in sailing.
Very well written. Common sense layout with just enough photos and sketches. I enjoyed reading this article.
Thank you for the kind words.
Leave a Reply Cancel reply
Your email address will not be published. Required fields are marked *
Average Cost to Replace Standing Rigging (with Examples)
Upgrading or replacing the standing rigging on your sailboat is an essential maintenance task to ensure the safety and performance of your vessel. The cost of this project can vary depending on your boat's size and materials choice. In this article, we'll discuss the average cost to replace standing rigging, and provide examples for different boat sizes so you know what to expect for your own sailboat
For smaller boats under 30 feet, you can expect to pay anywhere from $2,000 to $5,000 to replace standing rigging. Medium-sized boats between 30 and 50 feet will require an investment of $5,000 to $10,000. The cost to replace standing rigging on a large sailboat can range from $10,000 to $20,000.
If you decide to replace your standing rigging, you have the option of doing it yourself or hiring a professional rigger. DIY replacements can save money, but keep in mind that working with rigging requires expertise and the right tools. If you're not confident in your abilities, it's worth considering the help of a professional.
- As a boat owner, you'll need to replace the standing rigging every 10 to 15 years, depending on the boat’s purpose and use.
- Offshore bluewater boats generally require more frequent replacements than coastal cruisers, which can stretch the interval to around 12 years.
- Different factors, such as size, materials, and labor, can impact the total cost of your rigging project.
- Take the time to assess your boat's rigging and determine whether a full replacement is necessary.
- Regularly inspect your standing rigging for any signs of wear and tear, including deformities or broken wires. This will help you catch potential issues early on and determine when it's time to invest in a replacement.

On this page:
Examples of average replacement costs, when to replace your standing rigging, understanding standing rigging, factors affecting replacement costs, tips to save on rigging replacement, diy vs. professional rigging replacement, maintenance tips to prolong rigging lifespan.
In this section, we'll give you an idea of the average cost to replace standing rigging for different sailboat sizes. Remember, these are just estimates, and actual costs may vary based on your specific situation.
Small sailboat (up to 30 feet)
A 25-foot sailboat may require replacement of the forestay, backstay, and upper shrouds, which could cost around $2,500 to $3,500, including the cost of the rigging and labor.
For small sailboats, the cost of replacing standing rigging can range from $2,000 to $5,000. Factors like the type and quality of rigging materials, labor costs, and the availability of specialized equipment in your area can all contribute to the final price. To keep costs low, you can consider purchasing rigging materials from reputable sources like riggingonly.com , where a Hunter 27 owner reported a total cost of $700 for their project in 2019.
Medium sailboat (30 to 50 feet)
A 40-foot sailboat may require replacement of the forestay, backstay, upper and lower shrouds, and the inner forestay, which could cost around $6,000 to $8,000, including the cost of the rigging and labor.
For medium-sized sailboats, the replacement cost for standing rigging will typically fall between $5,000 and $10,000. Similar to smaller boats, factors that influence the price include the choice of rigging materials, labor expenses, and the need for specialized tools. You may expect to pay an average amount within this range for your medium-sized sailboat.
Large sailboat (50 feet and above)
A 60-foot sailboat may require replacement of the forestay, backstay, upper and lower shrouds, inner forestay, and the staysail stay, which could cost around $15,000 to $20,000, including the cost of the rigging and labor.
The cost to replace standing rigging on a large sailboat can be substantially higher, ranging from $10,000 to $20,000. For a tailored quote, it's recommended to contact a local rigger or marine service provider to discuss your specific needs and receive an accurate estimate.

Knowing when to replace your standing rigging is essential for maintaining the safety and performance of your sailboat. There isn't a strict schedule for replacing standing rigging, but there are some general guidelines you can follow to ensure your rigging is in good working order.
Firstly, consider the age of your rigging . Industry standards suggest that the anticipated lifespan for stainless steel rigging is 10–12 years for wire and 15-20 years for rod. However, this does not mean that your rigging will automatically need replacement after this period. It's wise to inspect your standing rigging regularly, especially if you sail frequently or in challenging conditions.
When inspecting your rigging, look for signs of wear and tear, corrosion, and damage . Common issues to look out for include cracked or bent fittings, broken strands, rust spots, and discoloration. Keep in mind that some problems might not be visible while the mast is stepped, so a thorough inspection might require unstepping the mast.
The purpose and use of your boat can also influence the frequency of standing rigging replacement. For instance, offshore bluewater boats should consider replacing rigging every 10 years, while coastal cruisers might wait until 12 years. In any case, it's better to err on the side of caution and replace your standing rigging before it becomes a safety hazard.
Remember, even if your rigging appears to be in good condition, replacing it at recommended intervals may provide peace of mind, knowing that your boat is ready to handle whatever comes your way. Regular rigging inspections and timely replacements will ensure your sailboat stays safe and enjoyable for years to come.
Replacing standing rigging with mast up
When it comes to replacing standing rigging, there are two main approaches: mast up and mast down. Mast up replacement involves removing and replacing the rigging while the mast is still in place , while mast down replacement involves removing the mast and replacing the rigging on shore.
Mast up replacement can be more cost-effective than mast down replacement, as it requires less labor and time. However, it may not be feasible for all boats, as some boats may have limited access to the rigging while the mast is still in place. Additionally, mast up replacement may not allow for a full inspection of the mast and other components, which may be necessary if there are concerns about their condition.
Standing rigging refers to the system of wires and cables that support and stabilize a sailboat's mast . These wires, typically made of stainless steel, are essential for maintaining the structural integrity of your boat's mast and spars. In this section, we will briefly discuss the components of standing rigging and factors to consider when replacing it.
First, it's important to understand the different components that make up the standing rigging. The primary components are the shrouds and stays . Shrouds run from the mast to the sides of the boat, helping to support the mast laterally. Stays, on the other hand, run from the mast to the bow and stern, providing fore-and-aft support. These cables are attached to the boat using a variety of fittings such as turnbuckles, chainplates, and tangs.
When it comes time to replace your standing rigging, there are several factors to consider, including material, hardware, and labor . Stainless steel is the most common material used for standing rigging due to its strength and resistance to corrosion. However, alternative materials like synthetic rope (Dyneema) or rod rigging (Nitronic 50) may offer advantages in weight, flexibility, or durability.
In terms of hardware, you'll need to replace components like turnbuckles, chainplates, and tangs . These components play a critical role in maintaining the integrity of your standing rigging and should be carefully inspected for signs of wear or damage. It's also wise to consult with a professional rigger, as they can identify potential issues that may not be immediately apparent.
Finally, consider whether you want to tackle the replacement job yourself or hire a professional . While a DIY approach can save you money, it requires careful measurements, knowledge of rigging, and access to the right tools. On the other hand, hiring a professional rigger ensures the job is done correctly and can save you time.
Dyneema rigging cost
The cost of dyneema rigging can vary depending on the size of the boat and the length and diameter of the rigging required. As a rough estimate, dyneema rigging can cost anywhere from $10 to $20 per foot, with larger boats and thicker rigging costing more.
For example, if a 30-foot sailboat requires 50 feet of dyneema rigging for the forestay and backstay, the cost could range from $500 to $1,000. However, it is important to note that this is just an estimate, and the actual cost may vary depending on the specific requirements of the boat and the installation process.
It is always recommended to consult with a professional rigger or sailmaker to get an accurate estimate for dyneema rigging on your boat. They can assess your specific needs and provide a detailed quote based on the size of your boat, the type of rigging required, and the installation process.
Dyneema rigging is a popular choice for replacing standing rigging on sailboats because it is lightweight, strong, and has low stretch properties. The cost of dyneema rigging can vary depending on the size of the boat and the length and diameter of the rigging required. Generally, dyneema rigging is more expensive than traditional wire rigging, but it can offer significant benefits in terms of weight savings and performance.
When considering the average cost to replace standing rigging, several factors can influence the overall cost. In this section, we will discuss these factors, which include material type, boat size, rigging complexity, and labor costs.
Material type used in the standing rigging
Common materials include stainless steel, galvanized steel, and synthetic fibers . Stainless steel is often more expensive but offers greater strength and resistance to corrosion, while galvanized steel is cheaper but may require more maintenance. Synthetic fibers such as Dyneema offer weight savings and high strength but can be costly to replace. When selecting materials, consider your budget and the desired performance for your specific sailing needs.
Boat size impacts the amount of rigging needed
The size of your boat greatly impacts the amount of rigging needed and, consequently, the cost of replacement. Larger boats require more materials and often higher-strength parts, increasing the overall cost. Additionally, the complexity of rigging systems generally increases with boat size, making the replacement process more labor-intensive and time-consuming.
Rigging complexity of your boat
A boat's rigging system can vary in complexity depending on the type of vessel, number of sails, and various hardware components. Complex rigging systems are not only more expensive, but they may also require specialized skills to install and maintain. For example, boats with multiple masts, furling systems, and advanced tensioning systems can be more expensive to replace the standing rigging.
Labor costs affect the cost of replacing your standing rigging
If you opt to hire a professional rigger, be prepared to pay for their expertise and time. Labor rates can vary based on the rigger's experience, location, and project complexity. If you choose to tackle the project yourself, the cost will likely be lower, but keep in mind that proper rigging installation is essential to ensuring your boat's safety and performance.
Determine the necessity
Before you invest in rigging replacement, assess whether it's truly necessary. Rigging lifespan depends on factors such as sailing frequency, conditions, and proper tuning. If the leeward shroud is not in constant motion, it's likely that your metal rigging is still strong. Use a critical eye to inspect your rigging for signs of wear or corrosion. A well-maintained standing rigging system can have a longer lifespan, saving you money in the long run.
Get multiple quotes
To ensure you're getting the best deal, always get multiple quotes from professional riggers. This will help you compare costs and services to make an informed decision. Remember that the price of rigging replacement varies depending on the boat size. By getting multiple quotes, you increase your chances of finding the most cost-effective option for your needs.
Consider DIY options
If you have some experience with sailboat maintenance and feel confident in your abilities, consider replacing your standing rigging yourself. This can save you a significant amount of money compared to hiring a professional rigger. One SailNet Community user reported spending only $1,000 on wire and fittings for their 30-foot boat, with plans to perform the installation themselves. If you take proper measurements and are willing to go through the learning process, a DIY rigging replacement may be a cost-effective option for you. Remember to weigh the potential savings against the time and effort it takes to do the job yourself.
When considering replacing the standing rigging on your sailboat, you have two main options: doing it yourself (DIY) or hiring a professional rigger. Each method has its pros and cons, and the choice depends on your skills, budget, and personal preferences.
DIY rigging replacement
If you're confident in your abilities and have previous experience with rigging work, a DIY approach can be a more cost-effective option. For example, replacing the standing rigging on an H27 sailboat can cost around $700 in materials when done yourself. However, there are a few things to consider before embarking on this route.
First, be prepared to invest a significant amount of time in measuring, ordering, and installing the new rigging. This can be especially challenging if you're not familiar with the process or if you encounter complications like corroded mast bases or frozen pins.
Additionally, you should evaluate your ability to deal with unexpected issues that may arise during the project, such as hardware problems or chainplates that are failing. Finally, ensure that you have access to proper tools and advice from experienced sailors to avoid mistakes that could compromise your boat's safety.
Professional rigging replacement
Hiring a professional rigger can be more expensive than doing it yourself, but it comes with the benefit of expert knowledge and experience. One of the main advantages of hiring a professional is that they can efficiently handle any complications or unexpected issues that may arise during the project. They can also ensure proper measurements and installation, resulting in a safe and secure rigging system for your sailboat.
To extend the life of your standing rigging, it's important to incorporate proper maintenance into your boating routine. Here are a few tips to keep in mind:
Regular inspections : At least once each season, thoroughly inspect your standing rigging, including shrouds, forestays, and backstay. Pay attention to any signs of wear, corrosion, or damage. Make a habit of checking your rig before heading out on a sail, as catching issues early can save you from larger problems later.
Cleaning and polishing : Stainless steel rigging can be susceptible to corrosion, so it's important to perform routine cleaning and polishing to remove corrosives. Use a soft cloth and a suitable cleaner to gently scrub the rigging and fittings, removing dirt, grime, and salt buildup.
Proper tuning : Ensure your standing rigging is correctly tuned to evenly distribute the load and prevent unnecessary stress on the components. This not only improves your boat's performance but also reduces the risk of rigging failure. If you're unsure how to tune your rigging, consult a professional rigger or refer to your boat's manual for guidance.
Prevent chafe : Identifying and addressing chafe points is crucial for maintaining your rigging's longevity. Chafe can occur where the rigging rubs against other components, such as spreaders or sails. Use chafe protection products like anti-chafing tape and rigging protectors to safeguard these areas.
Avoid anaerobic corrosion : Stainless steel rigging can suffer from anaerobic corrosion if it's deprived of oxygen. To minimize this risk, keep your rigging taped off whenever possible, as this can reduce oxygen exposure and promote corrosion.
Leave a comment
You may also like, sailboat parts explained: illustrated guide (with diagrams).
When you first get into sailing, there are a lot of sailboat parts to learn. Scouting for a good guide to all the parts, I couldn't find any, so I wrote one myself.

How Much Does a Sailboat Mast Replacement Cost?

12 Surprising Advantages of a Gaff Rig (and Some Cons)

The Ultimate Guide to Sail Types and Rigs (with Pictures)

Guide to Understanding Sail Rig Types (with Pictures)
Own your first boat within a year on any budget.
A sailboat doesn't have to be expensive if you know what you're doing. If you want to learn how to make your sailing dream reality within a year, leave your email and I'll send you free updates . I don't like spam - I will only send helpful content.
Ready to Own Your First Boat?
Just tell us the best email address to send your tips to:
Standing Rigging on a Sailboat: Everything You Need to Know
by Emma Sullivan | Aug 14, 2023 | Sailboat Gear and Equipment
Short answer standing rigging on a sailboat:
Standing rigging on a sailboat refers to fixed lines and cables that support the mast and help control its movement. It includes components like shrouds, stays, and forestays. These essential elements ensure stability and proper sail trim while underway.
Understanding the Importance of Standing Rigging on a Sailboat
Sailboats are marvels of engineering and ingenuity, capable of harnessing the power of the wind to transport us across vast oceans and explore far-flung destinations. As sailors, we often focus on the majestic sails, sleek hull designs, and cutting-edge navigation technology that make these vessels so awe-inspiring. However, there is one crucial component that sometimes goes unnoticed but plays a vital role in keeping our sailboats safe and seaworthy – the standing rigging.
The standing rigging refers to the network of wires and cables that support the mast and allow it to bear the tremendous loads exerted by the sails. It acts as the backbone of a sailboat’s rig , providing stability, strength, and balance. Understanding its importance is crucial for anyone who sets foot on a vessel with dreams of cruising or competing.
Firstly, let’s examine why standing rigging is essential for sailboat safety. Imagine being out at sea when suddenly your mast collapses due to faulty rigging . This nightmare scenario can easily be avoided by regularly inspecting your boat’s standing rigging for signs of wear or fatigue. Frayed wires or corroded fittings could weaken the entire structure, making it susceptible to failure under heavy winds or rough seas . By ensuring your standing rigging is in good shape through routine maintenance and inspections by professionals, you can significantly reduce this risk and ensure your own safety onboard.
Moreover, properly tensioned standing rigging is vital for maintaining optimum sailing performance. The tension in each wire within the standing rig allows for efficient transfer of power from sails to keel through mast compression. If your standing rigging is too loose or too tight, it can negatively impact your sail trim and overall boat handling capabilities. A well-tuned rig will provide better control over sail shape adjustments necessary for different wind conditions while maximizing speed potential – something every sailor strives for!
Beyond safety and performance, understanding the importance of standing rigging requires recognizing its impact on the overall balance of your sailboat. The rigging plays a crucial role in maintaining the boat’s equilibrium by counteracting the forces exerted by the sails. Without proper tension and alignment of the standing rig, a sailboat may become unbalanced, resulting in compromised stability. This imbalance can make steering more challenging, increase the risk of broaching, or even lead to capsizing in extreme cases. Therefore, paying close attention to your standing rigging ensures that your boat remains stable and enjoyable to sail.
Lastly, it is worth mentioning that investing in high-quality materials and professional rigging services will prove cost-effective in the long run . While it may be tempting to cut corners or delay necessary upgrades or maintenance, neglecting your standing rigging will only result in more significant expenses down the line. Inadequate rig tension can lead to excessive wear on other components such as sails or mast fittings, increasing their replacement frequency and cost.
In conclusion, understanding and valuing the importance of standing rigging on a sailboat is essential for sailors of all levels. It directly impacts safety at sea, enhances sailing performance, maintains balance and stability, ultimately contributing to an enjoyable experience on board. So next time you set foot on a sailboat or contemplate owning one yourself, don’t forget to give due attention to this often overlooked but vital aspect – your boat’s standing rigging!
Step-by-Step Guide: How to Inspect and Maintain Standing Rigging on a Sailboat
Title: Cracking the Code: A Step-by-Step Guide to Inspecting and Maintaining Standing Rigging on a Sailboat
Introduction: Ahoy, fellow sailors! Whether you’re an experienced seafarer or a sailing enthusiast ready to cast off, understanding how to inspect and maintain your sailboat’s standing rigging is crucial for smooth voyages on the high seas. In this detailed guide, we will unravel the mysteries of standing rigging examination and upkeep, enabling you to confidently navigate through any sailing adventure. So hoist your mainsail, secure your halyards, and let’s dive into the world of rigging maintenance !
1. Understanding Standing Rigging: Before we embark on our inspection journey, let’s clarify what exactly constitutes standing rigging. Embracing technical jargon like professionals often do, this refers to those sturdy wire cables that provide support to the mast and keep everything in place as your vessel slices through the waves. These cables are under constant stress from wind pressure and oceanic forces; therefore, routine inspections are vital.
2. Assemble Your Inspection Arsenal: Essential tools at hand? Check! Embark upon your quest equipped with binoculars (to assess hard-to-reach areas), a multimeter (for electrical testing), tape measure (we love accuracy!), a notepad (to document findings), lubricant spray can (to combat rust), and some good ol’ elbow grease.
3. Visual Inspection Bonanza: Begin by examining every component of your standing rigging thoroughly. Start from bow to stern – nothing should elude your gaze! Look out for signs of fraying wires, corrosion spots – identified by those elusive green spots -, improperly tightened connections or turnbuckles hanging loose like unfortunate pirate hooks. Pay close attention when checking shrouds and stays around their terminal points.
4. Tension Testing Zen: Employing a multimeter capable of measuring tension is vital for this next step. Like tuning an instrument, each cable must be correctly tensioned to ensure optimal performance . Begin at the base of your mast, working your way up one stay or shroud after another, carefully noting the readings. Adjust tensions as needed, using the manufacturer’s guidelines as your North Star.
5. Get Into Detailing Mode: To maintain a seaworthy craft, meticulousness is key! Start by cleaning every inch of standing rigging with fresh water and mild soap to rid it of salt crystals and other corrosive agents that Mother Nature throws our way. Once dry, inspect terminals for any hidden corrosion potential. Remember to apply lubrication around all fittings where metal meets metal – preserving their longevity on this salty adventure.
6. Diving into DIY Replacements: Sometimes, despite our best efforts, some elements may need replacement eventually. Worn-out or damaged fittings demand immediate action! While there are professionals who can lend a helping hand, attempting minor repairs yourself allows you to save time and money in the long run. Just remember safety first – secure your vessel properly before venturing aloft!
7. Periodic Inspections are Pathway to Peace: As the seasons go by and maritime miles accumulate beneath your hull’s keel, remember that rigging inspections should become regular occurrences in your life as a sailor. Incorporating these tasks into your annual maintenance routine will keep you up-to-date on the health of your standing rigging and reduce unexpected surprises during those thrilling offshore adventures.
Conclusion: With this comprehensive guide in tow, inspecting and maintaining standing rigging on a sailboat will no longer bewilder even the most landlocked soul. Armed with knowledge and armed-still-with tools-of-the-trade in hand – embark upon every voyage knowing that smooth sailing is within reach! Remember comrades: vigilance coupled with clever maintenance ensures many marvelous voyages atop Neptune’s watery kingdom!
The Key Components of Standing Rigging on a Sailboat Explained
When it comes to sailing, understanding the key components of standing rigging is crucial. This system of cables and wires plays a vital role in keeping a sailboat’s mast upright and ensuring the safety of everyone on board. So, let’s dive into these essential elements to unravel their importance and how they work together seamlessly.
1. Mast: The mast, often referred to as the backbone of a sailboat, is a tall vertical structure that supports the sails. It provides stability and acts as an attachment point for various components of the standing rigging.
2. Shrouds: Shrouds are strong steel or synthetic cables that extend from the top of the mast down to its sides, creating lateral support. Usually arranged in pairs, they help prevent excessive side-to-side movement and maintain proper alignment while under sail or at anchor .
3. Forestay: Situated at the front of the mast, directly opposite to where you stand while steering, is the forestay. This forward-facing cable keeps the mast from tipping backward due to wind pressure against the sails when sailing upwind. It ensures that your sailboat remains balanced even in gusty conditions.
4. Backstay: The backstay is another essential component that counterbalances the force exerted by the forestay on your sailboat’s mast when sailing upwind or under heavy loads. Most commonly attached at or near the highest part of your boat ‘s stern (aft end), this cable prevents undue bending or breaking caused by fore-aft pressure.
5. Tangs and Turnbuckles: These small yet mighty components connect shrouds and stays to both the hull and mast with ease and allow for easy adjustment and fine-tuning of tensioning within your standing rigging system. Tangs are fittings attached directly to masts or other structural components using bolts or screws, while turnbuckles provide threaded connections allowing for precise adjustments.
6. Spreaders: Installed horizontally on either side of the mast, spreaders play a crucial role in maintaining the integrity and proper angle of shrouds. They prevent excessive bending or twisting forces by creating a wider stance for the shrouds, ensuring even stress distribution.
7. Standing Rigging Lifelines: These lines, typically made of stainless steel wires or synthetic materials like Dyneema, serve as an additional safety measure by helping to prevent crew members from falling overboard while working on deck. Strategically placed along the sides of the sailboat, they offer stability and support during maneuvering or rough seas.
Understanding these key components is vital not only for sailboat owners but also for anyone interested in sailing . Proper maintenance and routine inspections are essential to ensure optimal performance and mitigate any risks associated with deficiencies within your standing rigging system.
So next time you set sail or find yourself gazing out at a beautifully rigged sailboat, take a moment to appreciate the intricate balance and coordination that these key components provide. It’s truly a remarkable collaboration between technology, engineering, and Mother Nature herself – allowing us to glide through the waves with grace and elegance.
Common FAQs about Standing Rigging on a Sailboats Answered
Introduction: Standing rigging is an essential component of sailboats, playing a crucial role in supporting the mast and ensuring optimal performance on the water. However, many sailors are often perplexed by various aspects of standing rigging, leading to a multitude of frequently asked questions. In this comprehensive blog post, we aim to answer some of the most common FAQs about standing rigging on sailboats, providing detailed and professional insights while adding a touch of wit and cleverness.
1. What exactly is standing rigging? Ah, standing rigging – the unsung hero of every sailboat! Standing rigging refers to all the fixed elements that support the mast in an upright position. These elements typically comprise stainless steel wires called shrouds and stays along with associated fittings like turnbuckles and tangs. Think of it as the sturdy backbone that keeps your mast from taking an inconvenient swim!
2. When should I inspect my standing rigging? Regular inspections are crucial for maintaining a safe sailing experience. We recommend inspecting your standing rigging at least once a year or before embarking on any long voyage. Additionally, keep an eye out for any signs indicating potential problems such as excessive rust, wire deformation, or frayed cables. Remember: It’s better to be safe on land than sorry at sea !
3. How do I know when it’s time to replace my standing rigging? While rigorous inspections can highlight any potential issues, there are certain indicators that suggest your standing rigging might need replacement sooner than later:
a) Age: As a general rule of thumb, consider replacing your standing rigging after 10-15 years. b) Visible damage: If you spot visible signs of wear and tear like broken strands or corroded fittings, it’s time for new gear. c) Elongation: In some cases, constant strain can cause wire elongation over time – if this exceeds manufacturer recommendations or 5%, it’s replacement time. d) Performance decline: Have you noticed reduced boat performance or excessive mast movement? Outdated rigging may be the culprit.
4. Can I inspect and replace standing rigging myself? Inspecting your own standing rigging is indeed possible if you possess adequate knowledge and experience. However, replacing it yourself requires specific expertise, so unless you’re a seasoned sailor with professional background in rigging, we highly recommend entrusting this task to certified riggers who can ensure everything is done correctly. After all, your safety should never be compromised!
5. How much does standing rigging replacement cost? Ah, the golden question! While costs can vary depending on factors like the size of your boat, the material used for new rigging (stainless steel or synthetic fibers), and labor expenses – expect to invest anywhere from a few thousand to tens of thousands of dollars for a complete standing rigging replacement. Remember that proper maintenance upfront can help extend the lifespan of your rigging and save you some precious doubloons!
6. Can I switch from stainless steel to synthetic fibers for my standing rigging? Absolutely! Synthetic fiber alternatives like Dyneema® have gained popularity due to their lighter weight, high strength-to-weight ratio, and lower corrosion risk compared to stainless steel. These materials offer enhanced performance capabilities and are a valid consideration when upgrading or replacing your standing rigging system entirely.
7. What’s the typical lifespan of synthetic fiber standing rigging? While longevity depends on various factors such as usage patterns and environmental conditions, well-maintained synthetic fiber standing rigging systems generally last around 10-12 years before requiring replacement – comparable to their stainless steel counterparts.
Conclusion: Standing rigging on sailboats may seem mysterious at first glance, but by answering these common FAQs with informative yet witty explanations, we hope to shed light on this crucial sailing component while bringing a smile to our readers’ faces. Remember, understanding and properly maintaining your standing rigging will ensure safe and enjoyable voyages for years to come. So, stay rig-ready and sail on!
Upgrading Your Standing Rigging: What You Need to Know
In the world of sailing, upgrading your standing rigging is a vital decision that can greatly impact your vessel’s performance and overall safety. The standing rigging, which includes the various wires and cables that hold the mast upright, plays an essential role in ensuring stability and proper sail control. In this blog post, we will delve into everything you need to know about this crucial aspect of sailing.
Firstly, why should you consider upgrading your standing rigging? Over time, wear and tear can take a toll on this crucial component of your boat . Exposure to harsh weather conditions, continuous strain from strong winds or heavy sails, and even galvanic corrosion can all lead to the degradation of your rigging. As a responsible sailor, it is imperative to regularly assess the condition of your standing rigging and determine when an upgrade is necessary.
When it comes to upgrading your standing rigging, there are several key factors you need to consider. One essential aspect is choosing the right materials for your new rigging. Traditionally, stainless steel has been widely used due to its durability and strength. However, recent advancements in composite materials have opened up new possibilities for sailors. High-tech fibers like carbon or aramid offer impressive strength-to-weight ratios while being less susceptible to corrosion than steel.
It is important to consult with an experienced rigger or marine engineer who can guide you in selecting the most suitable material for your specific sailing activities and vessel type. They will take into account factors such as boat size, intended use (racing or cruising), budget constraints, and local climate conditions before recommending the best material for your standing rigging upgrade.
Another crucial consideration in upgrading your standing rigging is determining whether you want to switch from wire rope-based rigging to rod-based systems or composite products. Rods are known for their superior stiffness and excellent fatigue resistance but may require specialized equipment for assembly and maintenance. Composite systems typically combine carbon fiber or fiberglass with a resin matrix, offering versatility and customization options.
Furthermore, when planning to upgrade your standing rigging, it’s essential to conduct a thorough inspection of the mast and fittings. Any signs of wear and tear, cracks, or deformations in the mast or associated hardware should not be overlooked. Reinforcing these components may be necessary before installing new rigging to ensure optimal safety and performance .
During the installation process itself, meticulous attention to detail is crucial. Proper tensioning and alignment of the rigging are vital for achieving optimal sailing performance . Consulting with professionals in the field will ensure that you avoid common pitfalls such as over-tensioning or under-tensioning your rigging, which can potentially compromise its strength and longevity.
Upgrading your standing rigging not only ensures a safer sailing experience but also presents an opportunity to enhance your vessel’s performance capabilities. By optimizing sail control and reducing overall weight aloft, you can achieve faster speeds and improved maneuverability on the water.
In conclusion, upgrading your standing rigging is an investment that should never be taken lightly. It requires careful consideration of multiple factors such as materials, boat specifications, and local conditions. Seeking expert advice throughout this process will help you make informed decisions that align with your sailing goals while ensuring maximum safety and enjoyment on the open seas . So don’t hesitate – take charge of your vessel’s integrity today by embarking on an exhilarating upgrade journey!
Troubleshooting Common Issues with Standing Rigging on a Sailboat
Title: Navigating the High Seas of Standing Rigging: Deconstructing Common Sailboat Troubles
Introduction: Setting sail on a beautiful day, wind in your hair, and salt in the air – there’s nothing quite like the freedom of sailing. But as any experienced sailor knows, with great freedom comes great responsibility; one must always be prepared to tackle common issues that can arise with standing rigging on a sailboat. In this comprehensive guide, we’ll be your navigational chart through the murky waters of troubleshooting these problems.
1. The Tale of Loose Wires: Picture this: you’re out at sea, enjoying the blissful embrace of nature when suddenly you notice an unsettling amount of slack in your boat’s rigging wires. As panic sets in, take a deep breath and remember that loose wires are not an uncommon predicament. Before jumping ship into despair, consider inspecting your turnbuckles for any signs of wear or corrosion. Often, a simple tightening or lubing can solve the issue and restore equilibrium to your rigging system.
2. Strange Groans from Your Mast: As the wind howls through your sails, does it feel like someone is playing an eerie tune on your mast? Fear not! These disconcerting noises can typically be traced back to halyards rubbing against sheaves or pulleys. Be diligent about inspecting these components and ensuring they are properly aligned and lubricated.
3. The Mystery of Shaky Connections: Imagine cruising along peacefully when you notice unsettling vibrations emanating from various connections within your standing rigging system – another nuisance faced by many sailors. Remember to check bolts and fittings for tightness and wear regularly; sometimes a mere tightening can spare you from enduring an inconvenient wobble during every voyage.
4. Elusive Corrosion Castaways: While corrosion may seem like a mythical creature lurking under layers of saltwater incantations, it sadly isn’t. The corrosive effects of the marine environment can take their toll on your rigging, leading to weakened and compromised wires. To avoid this encroaching villain, regularly inspect your rigging for signs of corrosion, paying extra attention to any dissimilar metals in contact with each other. When identified early, you can tackle this issue head-on through diligent cleaning and application of protective coatings.
5. That Perplexing Sag: No one wants a saggy rig! If you notice an unacceptable amount of slack or downward curve in your wire stays or shrouds when under load, it’s time to put on your problem-solving hat. Begin by ensuring that all turnbuckles are suitably tensioned and that the mast rake is properly adjusted. A little fine-tuning may be all it takes to regain the tautness required for smooth sailing .
6. Stay Seals Against Abrasion: Do you find your stay seals battling against wear and tear? It might be time to beef up their defenses! Insulate vulnerable areas with appropriately sized rubber tubing or durable tape like self-amalgamating tape. This extra layer of protection will help prevent damage from chafing lines or abrasive surfaces.
Conclusion: As sailboat enthusiasts know, standing rigging issues can arise unexpectedly and interrupt even the most idyllic voyages at sea. By keeping these troubleshooting considerations in mind while setting sail , you’ll have a handy compass to lead you through the challenges that come with maintaining a well-maintained rig. So next time the wind whispers trouble into your ears while adrift on your beautiful vessel, fear not – armed with knowledge and wit, you’ll conquer those common issues with ease and go back to enjoying the sublime freedom provided by sailing adventures!
Recent Posts

- Sailboat Gear and Equipment
- Sailboat Lifestyle
- Sailboat Maintenance
- Sailboat Racing
- Sailboat Tips and Tricks
- Sailboat Types
- Sailing Adventures
- Sailing Destinations
- Sailing Safety
- Sailing Techniques

Replacing standing rigging
Quetzal’s rig gets a top to bottom refresh in preparation for a some big passages.

Standing rigging is not set it-and-forget-it equipment; it requires maintenance. All that shiny stainless steel wire and hardware look indestructible, but it wears out over time. As a boat is sailed, the rig gets stronger but also grows more brittle. The technical term for this is work hardening. Eventually brittleness wins, and the metal will break under load. Corrosion is also at play in your rig. Stainless steel is just steel that “stains less” but it still corrodes over time. Good materials and the correct application will extend the life of your rig, but it is still finite.
I recently partnered with SAILING Contributing Editor John Kretschmer to replace and update the rig on his Kaufman 47 Quetzal . John makes a living taking sailors on sail-training passages and sharing his insights gained on a lifetime of bluewater sailing experiences. Five thousand to 10,000 miles a year is average for John, and these passages take place in transitional weather and cover a lot of latitude. In other words, he sees a lot of heavy weather. More miles mean more load on the rig, and more wind means even more load. Quetzal spends a lot of time in the tropics, and tropical water is, on average, both saltier and warmer, two factors that increase corrosion.

The expected useable lifespan of a rig is five to seven years for any boat that is sailed hard. Quetzal ’s usage pushes it to the lower end of the range. More important than time duration, is the number of miles sailed, and about 30,000 miles is a good milestone.
Whenever I start working on a rig, I like to take stock of what is there and how it fits. You don’t want to redesign on the fly, but you also don’t want to duplicate anyone’s mistakes. Turnbuckles should be roughly centered, about halfway open. If any turnbuckle is almost bottomed out or very open, take note and adjust when you cut the new wire. As you take things apart, make sure the pins fit the holes. If you put a little pin in a big hole, it will fit, but the pin will point load the hole and potentially distort it into an egg shape.
On a more holistic scale, look at the rig overall. Check that the wire leads perfectly fair from the mast tang to the chainplate. The backstay and any forward wires should toggle both fore and aft as well as athwartships. If toggles are missing, note them and add them when you fabricate the new wire, shortening the wire to allow for their length. The shrouds, or side stays, don’t have toggles but need to lead well. Quetzal had a problem with its aft lowers, the mast tang held the shroud a little high. Each time the rig would load, the wire would deflect, and eventually, the stay parted. We corrected this by slightly bending the top terminal on the wire.
It’s also a good time to consider any changes or upgrades. For example, do you want to add a backstay adjuster? John sails Quetzal as a cutter, with a hank-on staysail. As much as he hates to admit it, handling a hank-on sail is a hassle. On this re-rig, we added a Selden furler on the staysail. It will take a minor recut of the staysail, but life is better with a furler.

Since Quetzal is a cutter, it requires running backstays to support the staysail. Without a runner, the staysail will cause the mast to pump in a seaway. Many years ago, we replaced John’s wire runners with Hampijian Dynex Dux, but this time opted to use Colligo Cheeky Tangs to attach the runners to the mast. These tangs provide a large smooth radius for the cordage and attach easily to the mast.
It is much easier to refit a rig with the mast pulled, but it can be done in place, one wire at a time. We pulled the mast so we could inspect everything and replace some electrical wiring. If there are any complicated parts on the mast, take photos. Spreader tips can be confusing when it comes time to reassemble. I pull each wire and tag it, because a pile of wire on the ground can get confusing. If you choose to replace the rig in place, one wire at a time, be sure to support the mast with spare halyards. Unless you have a lot of experience and are very comfortable working aloft, pulling the mast is the safe option.
With the entire rig apart, take the opportunity to clean things up. If you have access to a wire wheel and buffing wheel, you should polish each clevis pin, toggle and turnbuckle. They will look nice and will go back together that much easier.

Also in Technique
- Winch servicing
- Repairing delaminated core
- Splicing Dyneema
- DIY custom bug screens
- Anchoring and mooring a catamaran
- Co-owning a boat
- Installing a steering wheel
- Helming skills
- Captain your own charter
- Asymmetric spinnaker skills
Also from Bob Pingel
- How do I stop my mast from leaking?
- How should I rig a preventer?
- Tachometer troubles and lazy jack mounting questions
- Do I need to add running backstays?
- What’s with the sour smell on my boat?
- Why is there water in the bilge when I run the engine?
- How do I make sure my VHF works properly?
- Installing a boiler for cold-weather sailing
- How do I fix my hot water system?
The Logbook
The captain's notebook, first mate's journal, ports of call, the book locker, photography by laura, cruising lealea on youtube.
- BOAT OF THE YEAR
- Newsletters
- Sailboat Reviews
- Boating Safety
- Sailing Totem
- Charter Resources
- Destinations
- Galley Recipes
- Living Aboard
- Sails and Rigging
- Maintenance
- Best Marine Electronics & Technology
Standing Rigging Replacement
- By Ronnie Simpson
- Updated: April 24, 2018
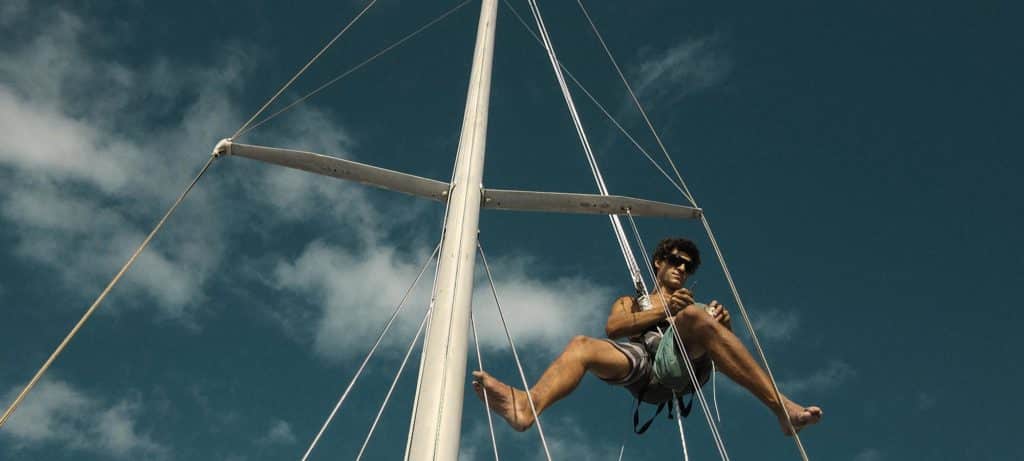
Reaching out of the channel in a moderate breeze, Quiver leaned on her big, overlapping genoa and accelerated up to hull speed. Surrounded by a fleet of vessels of similar speed, we had managed a clean and conservative start to our first Friday night beer-can race on my new-to-me cruising yacht. The headsail was eased and furled slightly before we reached the final red channel marker. As I turned up, the mainsail was trimmed in and the now-smaller jib sheeted home. Quiver powered up, heeled over and took off upwind. The Doug Peterson-designed 34-footer was clearly in her element when going uphill, and I looked forward to working our way through the fleet on the long port-tack beat toward Oahu’s Diamond Head .
Mere seconds after going hard on the wind, there was a loud bang. And then the headstay went slack. Without enough time to contemplate whether the mast was going to stay upright, I quickly evaluated the situation and decided to turn up into the wind instead of bearing away to a run. Once in irons, I handed off the helm and ran two spinnaker halyards forward to help secure the mast. Amazingly, we were still able to furl the jib. Motorsailing back to the dock with just a mainsail up, I played every possible scenario through in my head, unable to diagnose exactly what had happened or what had broken.
Back at the dock, there was ample daylight left to pull the headstay and furler down to investigate — much more easily done with the presence of a few friends. At first, nothing appeared to be broken at the bottom or the top, making it that much more confusing as to what had failed. Once I pulled the furler drum apart, however, I quickly found the smoking gun. The toggle at the bottom of the headstay, which connects to another toggle and effectively lives inside of the furler, was extremely corroded and had failed catastrophically. Fortunately for me and the boat, which I had purchased just five days earlier, the failed toggle could not fit through the furler’s aluminum foil; that was all that kept the headstay from physically separating and the boat potentially dismasting.
The entire experience was a shocker, to say the least. I had sailed the boat on a sea trial with the previous owner as part of the purchase. In 20 knots of trade-wind breeze, we sailed into the channel all powered up, with a reef in the main and a partial jib, with not a care in the world. Back at the dock, I had a friend help crank me aloft to complete a rig inspection, something that was very common for me to do in my years of working as a professional yacht rigger and as crew and preparateur on high-end racing yachts in the San Francisco Bay area. When all looked satisfactory up the rig, I bought the boat for $10,000 cash and sailed her back to Waikiki that day. Five short days and a couple more daysails later, the one rigging component that was out of sight during my visual inspection nearly brought the entire rig crashing down on my first Friday race with the boat.
Following the old handyman’s adage of “measure twice, cut once,” my helpers, Mike and Kristen, and I all took great care to get the measurements right before placing our order for new rigging.
After a trip to the chandlery and an afternoon work session with a friend, I had the blown-apart toggle replaced with a shiny new one, making the boat, in theory at least, perfectly sailable. Without fully knowing how old the standing rigging was, however, I decided that now was the time to fully rerig Quiver . I had planned on doing this before I did any serious sailing with the boat, but after our early mishap, this expensive yet basic maintenance project took on a new urgency. While rerigging the boat, I would also inspect the chainplates and make sure that all was structurally sound with them. I had dismasted a boat before, and as much fun as my time fixing that boat had been, I sincerely didn’t need to dismast another.
First things first: I needed to measure the rig for new stays, so I grabbed my mast-climbing gear and got right to work (see “Going Up,” at the end of this article).
As I headed aloft, I took a minimum of tools and cranked myself up the mast, taking the butt end of a 100-foot tape measure with me. With a helper at the bottom, I held the zero mark on the tape measure tightly against the center of the clevis pin at the top of each shroud (depending on how your stays are attached to the mast, look for the center of the load-bearing point at the top).
Standing on deck with the spool end of the tape measure, my helper pulled the tape tight and measured to the center of the clevis pin at deck level. Once he called out a measurement to me, we would take our respective ends of the tape off of the shrouds and then measure again. Once we were confident that we had it measured as accurately as possible — down to one-twentieth of an inch — we recorded the measurement and moved on to the next. In some cases where there were slight differences between port and starboard (only a couple tenths or a half inch) we just averaged the two sides and took that as our measurement for the new shrouds.

Following the old handyman’s adage of “measure twice, cut once,” my helpers, Mike and Kristen, and I all took great care to get the measurements right before placing our rigging order.
Getting boat parts and work done in Hawaii can often be a challenge because there are fewer marine facilities and resources in the islands than there are on the mainland, and everything is an expensive and slow ship or plane ride away. As a result, a bit of resourcefulness is always of benefit when cruising or living in a remote place. In my case, the resourcefulness was measuring the rig myself and ordering all of the parts from an outfit that I knew could fill the order in a timely fashion, give me great service and get me better deals on parts than I could achieve locally. I called up my old friend Logan at Rigworks in San Diego. He was pumped to get the opportunity to help out and got right back to me with an invoice, all done up with some good-guy pricing. Everything was in stock, and they could have my shiny new rigging to me in a week. Perfect.
Comparing apples to apples, it’s interesting to note that the rigging for my Peterson 34 was right at about double what it was for my Cal 27 and Cal 29, owing to the nature in which boats get exponentially more expensive as they get larger.
With the rigging on the way, I needed to have two chainplates made locally. The smallest chainplates on the boat, for the forward lower shrouds, needed replacing as the starboard one had a crack in it. My quickest and most convenient option ended up being a general machine shop located in an industrial zone in an alley in Honolulu. Ed Dang Machine Works custom ordered 316 stainless-steel stock and, using the originals as patterns, built two custom chainplates and backing plates for a reasonable price. Built in the afternoon on a Friday, they came out a bit off and had to be remade. The machinist fully owned up to his mistake, apologized for the inconvenience and remade the chainplates the same day, for the original price, which was greatly appreciated because I was on a mission to get Quiver back on the water on time and on budget.
Installing the new chainplates, backing plates and cover plates was straightforward and simple. I also made a point to pull a couple of other chainplates out for visual inspections. Like the headstay’s lower toggle failure that easily could have dismasted the boat, it’s usually the hidden part of a chainplate, where it passes through the deck, that poses the biggest potential risk. Corrosion can develop there because of a lack of oxygen, causing the metal to fail.
Once the new rigging arrived, it was merely a job of installing nine shrouds one by one and then tackling the hardest, the headstay, last.

Slacking off all four lower shrouds before going aloft, I cranked myself up to the first of the two sets of spreaders and locked off my block-and-tackle harness with a double slipknot. Carefully unpinning one shroud at a time, I tied a tag line through the marine eye fitting and slowly lowered each shroud down to my helper, who would then remove the old wire and tie on the new one. Pulling the new shroud into place and then untying it from the tag line, I could then pin each shroud to the mast.
Carefully unpinning one shroud at a time, I tied a tag line through the marine eye fitting and slowly lowered each shroud down to my helper, who would then remove the old wire and tie on the new one. Pulling the new shroud into place and then untying it from the tag line, I could then pin each shroud to the mast.
Installing the new shrouds with the rig up, in the slip, is a surprisingly easy job, especially when you have competent help and no major hiccups. With proper techniques and a thoroughly planned, safety-first approach, it is well within the scope of many cruising sailors to measure, remove, replace and potentially repair their own rigging.
A few weeks and a few thousand dollars after nearly dismasting, Quiver sailed out of the same channel, hung a left at the last red marker and turned hard on the wind again. The drama of headstay failure was over.
With the nine new shrouds in place, it was time to move on to the headstay, which would be by far the most difficult and laborious task. Tying an 1⁄8-inch Dyneema messenger line around a rigging component at the top of the headstay and then securing it to the masthead, I ensured that I could not drop the headstay while unpinning it, which was critical because the headstay weighs so much more than any other shroud due to the furling unit and its aluminum foil extrusion.

After unpinning and lowering the entire unit to the dock, we chopped off the swageless eye fitting at the top. There are methods of splicing an old headstay to a new one to help pull the new headstay in place, but with a foil that looked fairly large and easy to work with, we just pulled out the old wire and fed the new one up the foil, jiggling it around each time it got stuck at a joint between two sections. With the new headstay now in place, I measured it and used a hacksaw to cut it to the proper length. Next, I picked apart the strands and carefully installed a Hayn Hi-Mod swageless fitting, making sure to use anti-corrosion Tef-Gel where needed.
Once everything was ready, I went back aloft, pulled up the new headstay and pinned it back in place. It wasn’t exceptionally easy to pull the shroud up and install it while 50 feet in the air, but again, with a thoroughly planned, safety-first approach, it was quite a manageable task.
Though I still plan to pull the mast and give it a thorough overhaul before any long-distance cruising, Quiver now has brand-new standing rigging and a couple of new chainplates. A few weeks and a few thousand dollars after nearly dismasting my new vessel, I sailed Quiver out of the same channel, hung a left at the last red marker and turned hard on the wind again. The drama of headstay failure was replaced with the sheer pleasure of sailing a good and powerful 34-foot tiller boat upwind.

Over the next 19 hours, the breeze eventually went light, and died altogether a couple of times, but my thrown-together crew of four sailed to Lahaina, on the island of Maui, for Quiver ‘s maiden voyage with the upgraded rig.
Power-reaching into Lahaina at 0100 with a stiff offshore breeze, I had my first epic bit of night-sailing on the boat. I had sailed to Maui to attend my close friend “Uncle” Tony’s wedding. He had sailed his previous Kaufman 47 Knot Tide Down to New Zealand from Hawaii, alongside my old Cal 2-27 Mongo. The night before the wedding, Quiver served up a picture-perfect sunset whale-watching tour for the bride and groom and some of their close friends, complete with numerous humpback sightings. It was a fond new memory to add to my collection from the past.
While I still have many more projects to complete before taking off on my first long bluewater cruise aboard the 34-footer, the unfortunate gear failure just after purchasing Quiver turned into a valuable experience that signaled the beginning of another good old boat’s resurrection. Quiver was already in better nick than she had been in years, and the dream of voyaging to distant lands was well and truly back alive after months of boatlessness. After a ripping sail home to Oahu via the north shore of Molokai, Quiver had proved herself. Only one question still remained: Where on earth will you take me, boat?
Going Up: Ascending a Mast
Before working on any mast — unless it’s a crewed race boat with lots of muscle to haul me aloft — I much prefer to assemble my own rig-ascending setup as opposed to being dependent on a helper to help crank me up and down the spar. To do this, I use my bowman’s harness, which is essentially just a rock-climbing harness, and attach a block and tackle to it.
I use a 3-to-1 purchase, meaning that I need roughly four times as much rope as the mast is long. In the case of Quiver, that meant buying about 200 feet of 5⁄16-inch double-braid polyester line. A 4-to-1 purchase is also quite useful; it merely costs and weighs a bit more, along with the additional rope required. There are many other ways to ascend a mast, but for performing work aloft by one’s self or pulling rigging jobs on the side, the block and tackle attached to a harness or bosun’s chair is my preferred method. Once I reach the desired height, I use a double slipknot to secure myself in place.
Ronnie Simpson, a frequent CW contributor, is a sailor and writer living in Honolulu while he pursues a degree in integrated multimedia at Hawaii Pacific University. He is the co-founder of a wounded veterans sailing nonprofit .
- More: DIY Sailboat Projects , How To , repairs
- More How To

3 Clutch Sails For Peak Performance

It’s Time to Rethink Your Ditch Kit

8 Ways to Prevent Seasickness

How To De-Winterize Your Diesel Engine

Kirsten Neuschäfer Receives CCA Blue Water Medal

2024 Regata del Sol al Sol Registration Closing Soon

US Sailing Honors Bob Johnstone

Bitter End Expands Watersports Program
- Digital Edition
- Customer Service
- Privacy Policy
- Email Newsletters
- Cruising World
- Sailing World
- Salt Water Sportsman
- Sport Fishing
- Wakeboarding
- Welcome To The Seco South Online Store
- My Wishlist
- Login / Register
You have no items in your shopping cart.
- Select category
- Anchor Rodes
- Accessories
- Cable Assemblies
- Cable Railing Kits
- DIY Cable Trellis Kits
- Lifeline Kits
- Running Rigging
- Standing Rigging

- Anchor Rodes Hot!
- Trellis Kits Hot
- Sta-Lok Fittings (Mechanical Fittings)
- 316 - 1X19 Stain steel wire
- Hunter 35.5
- Beneteau First 235
Replacing your old worn out or damaged standing rigging is a crucial requirement to insure your safety and the safety of others. For over 40 years we have specialized in manufacturing standing rigging for all of the major sailboat manufacturers nationwide. In fact, we provided nearly all the OEM standing rigging packages to sailboat manufacturers including Hunter, Island Packet, Beneteau, Compac, Tartan, Irwin, Endeavour, Watkins, Precision and Caliber and many others.
We have an extensive library of all the standing rigging specifications for all these sailboat manufactures. Therefore, if you are in need of an entire standing rigging replacement or just need a stay or shroud replaced just give us a call or send us an email and we can provide you with a cost right away.
For the DIY rigger, we offer a full complement of 1×19 cable, swage fittings, swageless fittings and tools that will allow you build you rigging if you have the proper swaging equipment. We also offer open ended standing rigging packages. These packages include entire sets of standing rigging or just the stay or shroud that you need with a factory swage fitting installed for the upper end and a swageless Sta-Lok fitting supplied loose for you to install for the lower end.
Click here to see more standing rigging we have available for order over the phone.
Don't see your boat? Call us at 1-888-535-7326
Build your own:.

Select Your Model:

1 X 19 Stainless Steel Cable

STA-LOK Eye

STA-LOK Long Toggle Fork

STA-LOK Long Eye

Sta-Lok Insulator Terminal Terminal

STA-LOK Stay Connector

STA-LOK Toggle Fork

Sta-Lok Insulator Terminal & Eye

STA-LOK Fork

STA-LOK Stud

STA-LOK Wedge 1 x 19

STA-LOK Former

STA-LOK Wedge 7 Strand

STA-LOK Wedge Dyform

STA-LOK Long Stud
Seco south online store, quality products.
The Seco South store has been the go to source for quality marine and architectural products for more than 50 years. We have been a major supplier for many OEMs and individuals alike. Our products are crafted in the USA to the highest standards and are backed with our 100% customer satisfaction guaranty.

Build Your Own Custom Anchor Rode

7x7 Construction PVC-Coated Sailboat Lifeline Cable

DIY Cable Railing Kits

Green Wall Hub - Stainless Steel Cable Trellis Kit

Comparing box
Currency: GBP
- Worldwide Delivery
Mooring Warps and Mooring Lines
- LIROS 3 Strand Polyester Mooring Warps
- LIROS Braided Dockline Mooring Warps
- LIROS Classic Mooring Warps
- LIROS Green Wave 3 Strand Mooring Warps
- LIROS Handy Elastic Mooring Warps
- LIROS Moorex12 Mooring Warps
- LIROS Octoplait Polyester Mooring Warps
- LIROS Polypropylene Floating Mooring Warps
- LIROS Super Yacht Mooring Polyester Docklines
- Marlow Blue Ocean Dockline
Mooring Accessories
- Mooring Cleats and Fairleads
- Mooring Compensators
- Mooring Shackles
- Mooring Swivels
Mooring Strops
- LIROS 3 Strand Nylon Mooring Strops
- LIROS Anchorplait Nylon Mooring Strops
- Small Boat and RIB Mooring Strops
Mooring Bridles
- V shape Mooring Bridles
- Y shape Mooring Bridles
Mooring Strops with chain centre section
- 3 Strand / Chain / 3 Strand
- Anchorplait / Chain / Anchorplait
Bonomi Mooring Cleats
- Majoni Fenders
- Polyform Norway Fenders
- Dock Fenders
- Fender Ropes and Accessories
- Ocean Inflatable Fenders
Mooring Buoys
Max power bow thrusters.
- Coastline Bow Thruster Accessories
50 metre / 100 metre Rates - Mooring
Mooring information.
- Mooring Warps Size Guide
- Mooring Lines - LIROS Recommended Diameters
- Mooring Rope Selection Guide
- Mooring Warp Length and Configuration Guide
- How to estimate the length of a single line Mooring Strop
- Mooring Ropes - Break Load Chart
- Mooring Compensator Advisory
- Rope Cockling Information
- Fender Size Guide
- Majoni Fender Guide
- Polyform Norway Fender Inflation Guide
Custom Build Instructions
- More Article and Guides >
Anchor Warps Spliced to Chain
- LIROS 3 Strand Nylon Spliced to Chain
- LIROS 3 Strand Polyester Spliced to Chain
- LIROS Anchorplait Nylon Spliced to Chain
- LIROS Octoplait Polyester Spliced to Chain
Anchor Warps
- Leaded Anchor Warp
- LIROS 3 Strand Nylon Anchor Warps
- LIROS 3 Strand Polyester Anchor Warps
- LIROS Anchorplait Nylon Anchor Warps
- LIROS Octoplait Polyester Anchor Warps
- Aluminium Anchors
- Galvanised Anchors
- Stainless Steel Anchors
Calibrated Anchor Chain
- Cromox G6 Stainless Steel Chain
- G4 Calibrated Stainless Steel Anchor Chain
- Lofrans Grade 40
- MF DAMS Grade 70
- MF Grade 40
- Titan Grade 43
Clearance Chain
Anchoring accessories.
- Anchor Connectors
- Anchor Trip Hooks and Rings
- Anchoring Shackles
- Bow Rollers and Fittings
- Chain and Anchor Stoppers
- Chain Links and Markers
50 / 100 metre Rates - Anchoring
Chain snubbers.
- Chain Hooks, Grabs and Grippers
- Chain Snubbing Bridles
- Chain Snubbing Strops
Drogue Warps and Bridles
- Lewmar Windlasses
- Lofrans Windlasses
- Maxwell Windlasses
- Quick Windlasses
Windlass Accessories
- Coastline Windlass Accessories
- Lewmar Windlass Accessories
- Lofrans Windlass Accessories
- Lofrans Windlass Replacement Parts
- Maxwell Windlass Accessories
- Quick Windlass Accessories
Anchoring Information
- How To Choose A Main Anchor
- Anchoring System Assessment
- Anchor Chain and Rope Size Guide
- The Jimmy Green Guide to the Best Anchor Ropes
- What Size Anchor Do I Need?
- Anchor Size Guides
- Anchor Rope Break Load and Chain Compatibility Chart
- How to Choose Your Anchor Chain
- How to Establish the Correct Anchor Chain Calibration?
- Calibrated Anchor Chain - General Information
- Calibrated Anchor Chain Quality Control
- Calibrated Chain - Break Load and Weight Guide
- Galvanising - Managing Performance and Endurance expectation
- Can Galvanised Steel be used with Stainless Steel?
- Windlass Selection Guide
- More Articles and Guides
Stainless Steel Wire Rigging and Wire Rope
- 1x19 Wire Rigging
- 7x19 Flexible Wire Rigging
- Compacted Strand Wire Rigging
- Insulated 1x19 Wire Backstays
Wire Rigging Fittings
- Swaged Terminals
- Swageless Terminals
- Turnbuckles / Rigging screws
- Turnbuckle Components
- Backstay Insulators
- Wire Terminals
Rigging Accessories
- Backing Plates
- Backstay Adjuster and Fittings
- Backstay Blocks
- Pins, Rings and Nuts
- Rigging Chafe Protection
Fibre Rigging
- DynIce Dux Fibre Rigging
- LIROS D-Pro Static Rigging
- LIROS D-Pro-XTR Fibre Rigging
- Marlow Excel D12 MAX 78 Rigging
- Marlow M-Rig Max Rigging
Fibre Rigging Fittings
- Bluewave Rope Terminals
- Colligo Marine Terminals
Dinghy Rigging
- Dinghy Rigging Fittings
- Fibre Dinghy Rigging
- Stainless Steel Dinghy Rigging
Wind Indicators
Guard wires, guardrails and guardrail webbing.
- Guard Rail Fittings
- Guard Rails in Fibre and Webbing
- Guard Wire Accessories
- Guard Wires
Furling Systems
- Anti-torsion Stays
- Headsail Reefing Furlers
- Straight Luff Furlers
- Top Down Furlers
Furling Accessories
- Continuous Furling Line Accessories
- Furling Line Accessories
50 / 100 metre Rates - Wire and Fibre
Standing rigging assistance.
- More Articles and Guides >
- Cruising Halyards
- Performance Halyards
- Dinghy Halyards
Rigging Shackles
- Bronze Snap Shackles
- Captive and Key Pin Shackles
- hamma™ Snap Shackles
- Selden Snap Shackles
- Soft Shackles
- Standard Snap Shackles
- Tylaska End Fittings
- Wichard Snap Shackles
Lashing, Lacing and Lanyards
- LIROS 3 Strand Lashing, Lacing and Lanyards
- LIROS Braided Lashing, Lacing and Lanyards
- Cruising Sheets
- Performance Sheets
- Dinghy Sheets
- Continuous Sheets
- Tapered Sheets
Running Rigging Accessories
- Anti-Chafe Rope Protection
- Barton Sail Handling
- Lazy Jack Sail Handling
- Rodkickers, Boomstruts
- Sail Handling Accessories
- Slab Reefing
Shock Cord and Fittings
Control lines.
- Cruising Control Lines
- Performance Control Lines
- Dinghy Control Lines
- Continuous Control Lines
Classic Ropes
- 50 / 100 metres - Classic
- Classic Control Lines
- Classic Docklines
- Classic Halyards
- Classic Sheets
- LIROS Classic 3 Strand Polyester
50 / 100 metre Rates - Running Rigging
- 50 / 100 metres - Cruising Ropes
- 50 / 100 metres - Dinghy Ropes
- 50 / 100 metres - Lashing and Lanyards
- 50 / 100 metres - Performance Ropes
- LIROS Ropes
- Marlow Ropes
Running Rigging Resources
- Running Rigging Rope Fibres and Construction Explained
- How to Select a Suitable Halyard Rope
- How to select Sheets and Guys
- Dyneema Rope - Cruising and Racing Comparison
- Dinghy Rope Selection Guide
- Rope Measurement Information
- Running Rigging - LIROS Recommended Line Diameters
- Running Rigging Break Load Comparison Chart
- Colour Coding for Running Rigging
- Selecting the right type of block, plain, roller or ball bearing
- Replacing your Furling Line
- Recycling Rope
- Running Rigging Glossary
Custom Build Instructions for Sheets, Halyards, Control Lines
Low friction rings, plain bearing blocks.
- Barton Blocks
- Harken Element Blocks
- Seasure 25mm Blocks
- Selden Yacht Blocks
Wooden Blocks
Ball bearing blocks.
- Barton Ball Bearing Blocks
- Harken Ball Bearing Blocks
- Holt Dynamic Blocks
- Selden Ball Bearing Blocks
Ratchet Blocks
- Harken Ratchet Blocks
- Selden Ratchet Blocks
Roller Bearing Blocks
- Harken Black Magic Blocks
- Selden Roller Bearing Blocks
Clutches and Organisers
- Barton Clutches and Organisers
- Lewmar Clutches
- Spinlock Clutches and Organisers
Genoa Car Systems
- Barton Genoa Sheeting
- Harken Genoa Systems
- Lewmar HTX Genoa Systems
Traveller Systems
- Barton Traveller Systems
- Harken Traveller Systems
Deck Fittings
- Bungs and Hatches
- Bushes and Fairleads
- Deck Eyes, Straps and Hooks
- Pad Eyes, U Bolts and Eye Bolts
Rudder and Transom Fittings
- Pintles and Gudgeons
- Tiller Extensions and Joints
Stanchion Blocks and Fairleads
Snatch blocks.
- Barton K Cam Cleats
- Harken Ball Bearing Cam Cleats
- Holt Cam Cleats
- Selden Cam Cleats
- Spinlock PXR Cleats
Block and Tackle Purchase Systems
- Barton Winches, Snubbers and Winchers
- Coastline Electric Winch Accessories
- Harken Winches, Handles and Accessories
- Karver Winches
- Lewmar Winches, Handles and Accessories
- Winch Servicing and Accessories
Deck Hardware Support
- Blocks and Pulleys Selection Guide
- Barton High Load Eyes
- Dyneema Low Friction Rings Comparison
- Seldén Block Selection Guide
- Barton Track Selection Guide
- Barton Traveller Systems Selection Guide
- Harken Winch Selection Guide
- Karver Winch Comparison Chart
- Lewmar Winch Selection Guide - PDF
- Winch Servicing Guide
Sailing Flags
- Courtesy Flags
- Red Ensigns
- Blue Ensigns
- Flag Accessories
- Flag Staffs and Sockets
- Flag Making and Repair
- Signal Code Flags
- Galvanised Shackles
- Stainless Steel Shackles
- Titanium Shackles
- Webbing only
- Webbing Restraint Straps
- Webbing Sail Ties
- Webbing Soft Shackles
Hatches and Portlights
Sail care and repair.
- Sail Sewing
Maintenance
- Antifouling
- Fillers and Sealants
- Primers and Thinners
- PROtect Tape
Fixings and Fastenings
- Monel Rivets
- Screws, Bolts, Nuts and Washers
- U Bolts, Eye Bolts and Pad Eyes
Splicing Accessories
- Fids and Tools
- Knives and Scissors
General Chandlery
- Barrier Ropes
- Canvas Bags and Accessories
- Carabiners and Hooks
- Netting and Accessories
- Rope Ladders
Seago Boats and Tenders
Chandlery information, flag articles.
- Flag Size Guide
- Bending and Hoisting Methods for Sailing Flags
- Courtesy Flags Identification, Labelling and Stowage
- Courtesy Flag Map
- Flag Etiquette and Information
- Glossary of Flag Terms and Parts of a Flag
- Making and Repairing Flags
- Signal Code Message Definitions
Other Chandlery Articles
- Anchorplait Splicing Instructions
- Antifoul Coverage Information
- Hawk Wind Indicator Selection Guide
- Petersen Stainless - Upset Forging Information
- Speedy Stitcher Sewing Instructions
- Thimble Dimensions and Compatible Shackles
Jackstays and Jacklines
- Webbing Jackstays
- Stainless Steel Wire Jackstay Lifelines
- Fibre Jackstay Lifelines
- Jackstay and Lifeline Accessories
Safety Lines
Lifejackets.
- Children's Life Jackets
- Crewsaver Lifejackets
- Seago Lifejackets
- Spinlock Lifejackets
Buoyancy Aids
Life jackets accessories.
- Lifejacket Lights
- Lifejacket Rearming Kits
- Lifejacket Spray Hoods
Overboard Recovery
- Lifebuoy Accessories
- Purchase Systems
- Slings and Throwlines
Floating Rope
- LIROS Multifilament White Polypropylene
- LIROS Yellow Floating Safety Rope
- Danbuoy Accessories
- Jimmy Green Danbuoys
- Jonbuoy Danbuoys
- Seago Danbuoys
- Liferaft Accessories
- Seago Liferafts
Safety Accessories
- Fire Safety
- Grab Bag Contents
- Grab Bags and Polybottles
- Handheld VHF Radios
- Sea Anchors and Drogues
Safety Resources
- Guard Wires - Inspection and Replacement Guidance
- Guard Wire Stud Terminal Dimensions
- Webbing Jackstays Guidance
- Webbing Jackstays - Custom Build Instructions
- Danbuoy Selection Guide
- Danbuoy Instructions - 3 piece Telescopic - Offshore
- Liferaft Selection Guide
- Liferaft Servicing
- Man Overboard Equipment - World Sailing Compliance
- Marine Safety Information Links
- Safety Marine Equipment List for UK Pleasure Vessels
Sailing Clothing
- Sailing Jackets
- Sailing Trousers
- Thermal Layers
Leisure Wear
- Accessories
- Rain Jackets
- Sweatshirts
Sailing Footwear
- Dinghy Boots and Shoes
- Sailing Wellies
Leisure Footwear
- Walking Shoes
Sailing Accessories
- Sailing Bags and Holdalls
- Sailing Gloves
- Sailing Kneepads
Clothing Clearance
Clothing guide.
- What to wear Sailing
- Helly Hansen Mens Jacket and Pant Size Guide
- Helly Hansen Womens Sailing Jacket and Pant Size Guide
- Lazy Jacks Mens and Womens Size Charts
- Musto Men's and Women's Size Charts
- Old Guys Rule Size Guide
- Sailing Gloves Size Guides
- Weird Fish Clothing Size Charts
The Jimmy Green Clothing Store
Lower Fore St, Beer, East Devon, EX12 3EG
- Adria Bandiere
- Anchor Marine
- Anchor Right
- August Race
- Barton Marine
- Blue Performance
- Brierley Lifting
- Brook International
- Brookes & Adams
- Captain Currey
- Chaineries Limousines
- Coastline Technology
- Colligo Marine
- Cyclops Marine
- Douglas Marine
- Ecoworks Marine
- Exposure OLAS
- Fire Safety Stick
- Fortress Marine Anchors
- Hawk Marine Products
- Helly Hansen
- International
- Jimmy Green Marine
- Maillon Rapide
- Mantus Marine
- Marling Leek
- Meridian Zero
- MF Catenificio
- Ocean Fenders
- Ocean Safety
- Old Guys Rule
- Petersen Stainless
- Polyform Norway
- PSP Marine Tape
- Sidermarine
- Stewart Manufacturing Inc
- Team McLube
- Technical Marine Supplies
- Titan Marine (CMP)
- Ultramarine
- Waterline Design
- William Hackett
Clearance August Race Boat Cleaning Kit £26.00
Clearance LIROS Racer Dyneema £55.08
Clearance Folding Stock Anchor £123.25
Clearance LIROS Herkules £0.00
Clearance Barton Size 0 Ball Bearing Blocks - 5mm £10.13
Clearance Marlow Blue Ocean® Doublebraid £18.48
Mooring Clearance
Anchoring clearance, standing rigging clearance, running rigging clearance, deck hardware clearance, chandlery clearance, safety clearance, standing rigging.
The Jimmy Green Rigging Team are very experienced in making up Yacht Rigging with quick turn-around times as a matter of course.
Team Jimmy Green can produce anything from a single replacement stay to a complete standing rigging re-rig and are well versed in meeting delivery deadlines in the UK, the EU and for export worldwide.
Strict Quality Control Procedures and Accountability Systems ensure that only the best quality stainless steel wire and terminals are considered. Traceability is an important feature of the Jimmy Green assurance policy: Stainless Steel Wire - Quality Control and Care
Wiretechnik Roller Swaging Technology is available from 2.5mm up to 12mm diameter (up to 10mm on-site).
Cabco Talurit soft or hard (thimble) eye wire termination from 2mm up to 8mm diameter are available on site.
Both these brands are the marine industry-leading manufacturers for wire termination machines.
Jimmy Green Marine offer the full range of Sta-Lok, Petersen and Hamma Regatta swage terminals e.g. eye, forks, tees, strap toggles plus all manner of turnbuckle and backstay insulator options.
Jimmy Green Marine also offer the full range of Sta-Lok, Petersen Hi Mod and Bluewave DIY fittings, plus Norseman replacement cones manufactured by Tylaska Marine.
All this is available to purchase online.
Standing Rigging Re-Rig Quotes
Customers frequently ask for standing rigging replacement quotes or even ballpark figures for valuation purposes citing only the yacht type/model or design. Even if your yacht is a well-known one-design production yacht e.g. Westerly, Moody, Beneteau, there is still a good chance that the specification has been altered since the original build. If the owners' manual has been preserved, it may state the standard specification, but this may have been altered/upgraded for the first owner.
The Jimmy Green Rigging Team have built up a database of information from completed re-rigs over the years, but this is by no means comprehensive. There is a certain amount of information that can be gleaned from the world wide web, but this will still not go as far as individual yacht rig specifications.
It is therefore difficult to give an accurate answer without some basic information about the rig. The diameter of the wire and therefore the associated size of the terminals is fundamental to the cost. In terms of price, the other major factor will be whether you intend to replace the rigging screws/turnbuckles. Clearly the number and configuration of the stays is important, but it is much simpler to estimate their lengths and probable terminals. More specification considerations include e.g. split, adjustable and/or insulated backstays, forestay foibles caused by headsail furler fitting, linked rigging.
Jimmy Green Marine have made it possible to get an instant standing rigging re-rig quote online.
You need to know or give us the following information:
- The type of wire: KOS 1 x 19, Petersen Compact Strand or KOS flexible 7 x 19
- The diameter of the wire
- The approximate length for each stay
- The terminal at the top
- The bottom terminal (with or without rigging screw)
These CUSTOM BUILD INSTRUCTIONS will help you through the process.
For a rough guide, approximate lengths and an educated guess for the terminals will suffice. The decision on whether to replace the turnbuckles makes a big difference to the price.
The Jimmy Green Rigging Team are always on hand to help you through this process, by email or on the telephone.
If the measuring seems a daunting responsibility, send us the old rigging as a pattern. We will measure, ask any pertinent questions about the new rig and quote you before starting any work.
Standing Rigging Complete Replacement
A complete Re-Rig i.e. replacement of all your standing rigging may seem like too big a job to tackle yourself but it needn't be too difficult with help from the Jimmy Green Rigging Team.
A common-sense approach combined with careful notetaking (photos) at each stage will be enough to ensure success.
Team Jimmy Green have written a step by step guide: STANDING RIGGING - GUIDE TO TACKLING A COMPLETE RE-RIG
Stay Diameter
- 2.5mm (15) 2mm (10) 3mm (12) 4mm (13) 6mm (12) 7mm (9) 8mm (12) 9mm (1) 10mm (12) 14mm (8) 16mm (2)
Rope Diameter *
- 2.5mm (2) 3mm (5) 4 - 5 mm (1) 5 - 6 mm (1) 4mm (4) 5mm (4) 5-9mm (1) 6mm (4) 8mm (5) 9-11mm (1) 10mm (4) 11-13mm (1) 12mm (4)
Wire Fitting Size
- 2.5mm - 1/4 (1) 3mm (17) 3mm - 1/4 (20) 3mm - M6 (2) 4mm (32) 4mm - 1/4 (16) 4mm - 3/8 (3) 4mm - 5/16 (25) 4mm - M6 (2) 4mm - M8 (2) 4mm - Z (1) 5mm (32) 5mm - 090 (1) 5mm - 5/16 (22) 5mm - 110 (1) 5mm - 3/8 (22) 5mm - 7/16 (3) 5mm - M8 (2) 5mm - M10 (2) 5mm - Z (3) 6mm (37) 6mm - 3/8 (21) 6mm - 1/2 (9) 6mm - 7/16 (20) 6mm - M10 (2) 6mm - M12 (1) 6mm Dyform (1) 6mm - S (1) 7mm (36) 7mm - 7/16 (12) 7mm - 1/2 (22) 7mm - 110 (1) 7mm - 140 (1) 7mm Dyform (1) 7mm - M12 (1) 7mm - Z (3) 8mm (30) 8mm - 1/2 (29) 8mm - 5/8 (28) 8mm DS (2) 8mm - M12 (1) 8mm - M16 (1) 10mm (37) 10mm - 3/4 (9) 10mm - 5/8 (23) 10mm - M16 (1) 12mm (35) 12mm - 3/4 (21) 12mm - 7/8 (6) 12mm - E (1) 12mm - M20 (1) 14mm (24) 14mm - 7/8 (11) 14mm - M22 (1) 16mm (11) 16mm - 1 (6) 19mm (6) 19mm - 1 1/8 (3) 19mm - 1 1/4 (1) 22mm (4) 22mm - 1 1/4 (2) 26mm (3) 26mm - 1 3/8 (2) 1/4" (1) 5/16" (2) 3/8" (2) 7/16" (2) 1/2" (2) 5/8" (2) 3/4" (2) 7/8" (2) 1" (2) 12mm Dyform (1)
- APL (1) BSI (4) Barton Marine (3) Blue Wave (25) Colligo Marine (7) Crewsaver (1) Cyclops Marine (2) Felco (1) Grunt (1) Hamma (17) Hampidjan (12) Harken (8) Hawk Marine Products (5) Holt (10) Jimmy Green Marine (3) KOS (27) Karver (3) LIROS Ropes (22) Loctite (1) Loos (1) Marlow Ropes (12) Mast (1) Meridian Zero (1) Ocean Fenders (1) PSP Marine Tape (2) Petersen Stainless (44) Plastimo (19) Proboat (2) Profurl (15) Rutgerson (1) STA-LOK (69) Schaefer (2) Seasure (3) Seldén (27) Spinlock (2) Team McLube (1) Technical Marine Supplies (2) Tylaska (1) Wichard (7)
Purchase Type
- 50 metre Coil (5) 50 metre cut length (2) 100 metre Reel (12) Clearance (10) Custom Build (61) Set Lengths (3) Spliced Set Length (1)
4mm 1x19 Stainless Steel Wire Standing Rigging
3mm 1x7 compact strand stainless steel wire rigging, 6mm 1x19 stainless steel wire standing rigging, 6mm flexible 7x19 stainless steel wire rope, liros 6mm d-pro-xtr, liros 8mm d-pro-xtr, marlow 8mm excel d12 max 78, 12mm dynice dux, sta-lok stud, sta-lok open turnbuckle - toggle and blank, sta-lok open turnbuckle - toggle and sta-lok, sta-lok st turnbuckle - welded fork & fork.

- Lines & Rigging
Sailboat Standing Rigging

IMAGES
VIDEO
COMMENTS
Aug 14, 2015. It's one of the most important features on a sailboat, but many owners put standing rigging at the back of their minds when it comes time to do their pre-season safety checks. A prudent sailor should inspect his or her standing rig at least once each season and should know when the time comes to replace most or all of it.
The cost to replace standing rigging obviously varies from boat to boat. Give us a call, and we can give you a rough quote. With proper measurements (wire diameter, pin sizes, wire lengths), we can give you a very accurate price for the standing rigging itself, but there are often unforeseen complications during the job (bad spreaders, corroded ...
Good question. Yes, doing it yourself will theoretically save money. For an average 40-foot boat, Cockerill estimates about $100 per foot to re-rig with wire rigging ($4,000), as well as the round-trip cost to haul and launch the boat and unstep and step the rig (an additional $2,500 or so).
When and why do you change standing rigging. Easy answer "before it can fall down.". There is sailors knowledge based on observations and experiences that have formed the rules of thumb. 6-10 years for salt water exposed rigging and 15-25 years for fresh water rigging. Rough guides that depend on location of the boats sailing experience ...
This video is a guide to replacing your standing rigging leaving the mast in place. I did this by ascending and descending the mast solo 30 times, taking the...
Replacing the standing rigging on a sailing yacht, a complete re-rig, in other words, may seem daunting. Still, there is a procedure to follow that can make it a relatively straightforward process for anyone who is reasonably practical. The first decision is whether to tackle the job with the mast up or down.
Run your fingers up and down the last metre of wire above or below the swage, feeling for deformities; if the wire is not uniform the chances are that one of the individual wires has broken, even ...
Along with a watertight hull and robust steering gear, there's a third prerequisite for seaworthy sailboats: strong standing rigging. Before the round-Atlantic voyage we're now partway through, I worked hard to ensure our Valiant 40 Moon River was up to speed in the first two departments. But I dreaded the expense and difficulty of changing the rigging on her 55-foot mast for a couple of ...
1. Don't rush the job. Replacing standing rigging with mast-up rigging is a complex task that requires time, patience, and attention to detail. Don't rush the job, and don't cut corners to save time or money, as it can lead to serious problems down the line, such as rig failure or even injury. Always try to do the job right, even if it takes ...
The rig or rigging on a sailboat is a common term for two parts: The standing rigging consists of wires supporting the mast on a sailboat and reinforcing the spars from the force of the sails when sailing. The running rigging consists of the halyards, sheets, and lines we use to hoist, lower, operate, and control the sails on a sailboat.
Replacing your standing rigging might seem like a daunting task, until you watch this video and see how incredibly simple it is to do!Patreon: https://www.pa...
Small sailboat (up to 30 feet) A 25-foot sailboat may require replacement of the forestay, backstay, and upper shrouds, which could cost around $2,500 to $3,500, including the cost of the rigging and labor. For small sailboats, the cost of replacing standing rigging can range from $2,000 to $5,000.
The standing rigging refers to the network of wires and cables that support the mast and allow it to bear the tremendous loads exerted by the sails. It acts as the backbone of a sailboat's rig, providing stability, strength, and balance. Understanding its importance is crucial for anyone who sets foot on a vessel with dreams of cruising or ...
It is much easier to refit a rig with the mast pulled, but it can be done in place, one wire at a time. We pulled the mast so we could inspect everything and replace some electrical wiring. If there are any complicated parts on the mast, take photos. Spreader tips can be confusing when it comes time to reassemble.
Sailboat standing rigging maintenance, repair and replacement with photographs. Helpful information on re-rigging your boat by Chuck Rose. Home. The Logbook. ... While it is possible to replace the rig with the mast standing, it is much easier and safer to work with the mast on sawhorses at waist level. If you are preparing for cruising or a ...
The drama of headstay failure was replaced with the sheer pleasure of sailing a good and powerful 34-foot tiller boat upwind. New standing rigging inspires confidence that Quiver is ready for whatever the breeze dishes out. Ronnie Simpson.
The listed prices for standing rigging by model reflect the rigging shown in our diagrams. If your standing rigging does not match our diagram, or has been modified, then the quoted price is not applicable to your boat. Please call us at 1.888.535.7326 if you need a quote for standing rigging not listed on our site. Sort by:
Replacing your Standing Rigging with Jimmy Green Marine. The task of replacing the standing rigging on a sailing yacht may seem daunting but there is a procedure to follow that can make it a relatively straight forward process for anyone who is reasonably practical. The first decision is whether to tackle the job with the mast up or down.
Standing Rigging. The Jimmy Green Rigging Team are very experienced in making up Yacht Rigging with quick turn-around times as a matter of course. Team Jimmy Green can produce anything from a single replacement stay to a complete standing rigging re-rig and are well versed in meeting delivery deadlines in the UK, the EU and for export worldwide.
Standing rigging for your sailboat. Anything from shrouds and stays to lifelines: get it a Vela Sailing. Swaging, Cable, Dyform and much more. ... Hayn Rigging Replacement Parts; Hayn Standing Rigging Hardware; Helly Hansen . Helly Hansen Water Tech; Helly Hansen Footwear; ILCA . FJ Sailboat Parts; Laser Sailboat Class Legal Parts;