Service Locator
- Angler Endorsement
- Boat Towing Coverage
- Mechanical Breakdown
- Insurance Requirements in Mexico
- Agreed Hull Value
- Actual Cash Value
- Liability Only
- Insurance Payment Options
- Claims Information
- Towing Service Agreement
- Membership Plans
- Boat Show Tickets
- BoatUS Boats For Sale
- Membership Payment Options
- Consumer Affairs
- Boat Documentation Requirements
- Installation Instructions
- Shipping & Handling Information
- Contact Boat Lettering
- End User Agreement
- Frequently Asked Questions
- Vessel Documentation
- BoatUS Foundation
- Government Affairs
- Powercruisers
- Buying & Selling Advice
- Maintenance
- Tow Vehicles
- Make & Create
- Makeovers & Refitting
- Accessories
- Electronics
- Skills, Tips, Tools
- Spring Preparation
- Winterization
- Boaters’ Rights
- Environment & Clean Water
- Boat Safety
- Navigational Hazards
- Personal Safety
- Batteries & Onboard Power
- Motors, Engines, Propulsion
- Best Day on the Water
- Books & Movies
- Communication & Etiquette
- Contests & Sweepstakes
- Colleges & Tech Schools
- Food, Drink, Entertainment
- New To Boating
- Travel & Destinations
- Watersports
- Anchors & Anchoring
- Boat Handling

Boat Plumbing
Advertisement
Boat plumbing is a lot easier for the do-it yourselfer than plumbing at home, mainly because it doesn't involve rigid pipes running inside solid walls.

Here is an overview of a typical on-board water system.
Because water is heavy, tanks should be mounted low in the boat. Where space is available, it is a relatively simple matter to add extra tanks. Rigid polyethylene tanks are available in hundreds of shapes and sizes, or you might use a flexible bladder tank--essentially a water bag.
Water tanks typically have three threaded ports, one for the outlet and one for the vent hose, both 1/2-inch, and one for the fill hose, usually 1 1/2-inch. Threaded hose barbs allow for hose connections. The inlet is connected to an on-deck fill. (Be sure the deck-fill has an O-ring to seal out seawater when it is closed.) The vent line leads to a vent fitting high in the boat — above the tank at every expected angle of heel. Be aware that if the vent is not also higher than the fill, it will overflow when you are filling the tank. The outlet connection leads directly to a pump or, in a multi-tank installation, to a manifold or Y-valve.
Use Teflon tape or thread sealant on all threaded fittings, and don't overtighten fittings in plastic tanks. Secure hoses with stainless steel hose clamps.
Supply piping for a boat water system must be non-toxic, non-contaminating, taste-free, and FDA approved for drinking water. If the system is pressurized or will carry hot water, the piping needs to be suitable. The traditional choice for water system plumbing has long been clear PVC reinforced with polyester braid. This same type hose can be used for tank fill and vent connections.
In recent years semi-rigid polyethylene (PE) tubing, long used in RV plumbing, has surged in popularity for boat plumbing. It has much to recommend it. With quick-connect fittings, a PE tubing water delivery system assembles with the simplicity of Tinkertoys. The opaque or at least semitranslucent nature of the PE tubing discourages algae growth that can be a problem with clear hose. PE tubing also comes in colors — typically red for hot water and blue for cold — which looks nice and might make plumbing failures easier to trace. Because the tubing is less flexible than PVC hose and it must be cut to the correct lengths, a PE plumbing system will be slightly more demanding to install. However, the primary negative to PE plumbing is the cost of the fittings, which at this writing run $4 to $8 each. On the positive side, the tubing is actually cheaper than reinforced clear PVC hose.
Drain hoses connected to through-hull fittings should be stronger than clear vinyl hose. For this use, select reinforced rubber hose, sometimes called heater hose. This is the same type of hose used on engine plumbing, and it typically has about three times the burst strength of reinforced vinyl hose. Double clamp all hoses connected to through-hull fittings.
Water pumps on a boat can be either electric or manual. An electric pump pressurizes the entire water system. Most electric pumps have a pressure switch that activates when the pressure drops below a set value--usually around 30 or 40 PSI. Opening any tap on the boat releases pressure and causes the pump to kick on and run until it rebuilds the pressure to the cut-out setting. The pump cycles on and off until the tap is closed. The inlet of an electric pump connects directly to the tank outlet (or multitank valve), and the outlet supplies water to all faucets and appliances.
Manual pumps — hand or foot operated — supply a single spigot connected directly to the outlet side of the pump. A regulating valve is not required; water flow is controlled by the operation of the pump. The primary advantage of manual pumps is that they dramatically reduce water waste, a major concern for boats that spend long periods away from water supplies.
Accumulator
Some water systems include an accumulator. Large accumulators have pressurized bladders in them, but most small ones are just empty tanks teed into the line downstream of the pump. When the pump runs, it tries to fill the tank from the bottom, compressing the air trapped inside the tank. The pressure from the tank allows small amounts of water to be drawn without the necessity of the pump running, thus reducing pump cycling.
A marine water heater is simply a small, insulated tank downstream of the pump. You must have a pressurized water system to operate a water heater. The pump draws water from the storage tank(s) and fills the water heater tank. Inside the water heater is an electrical heating element and usually a coiled tube called a heat exchanger. When AC power is available, the electrical element (controlled by a thermostat) heats the water. Away from the dock, the hot engine coolant is routed through the coiled tube to heat the water in the tank when the engine is running.
Water heaters have four threaded ports. The tank inlet connects via a tee-connector to the outlet hose from the pump. A check valve is required in this line or in the heater to prevent hot water from migrating back toward the pump. The outlet connection supplies heated water to the hot side of all faucets, also using tee-connectors. The other two ports are for the heat exchanger connection, which varies depending on engine installation. Use only metal fittings to plumb a water heater, never plastic. If a pressure-release valve isn't integral, the heater will have a fifth port for this essential component.
Faucets are the ultimate terminus for water system lines. Manual pumps require simple spigots, but in a pressure water system, boat faucets differ from those found ashore only in styling and that they may be fitted with hose barbs. Mixer faucets require two connections, one from the cold side to the supply line from the pump and the other from the hot side to the water-heater outlet.
Shower connections are identical to faucet connections. The only difference is that rather than delivering the water through a spigot, the water is delivered through a pipe or hose to the shower head.
A nice owner addition to almost any boat is a deck shower, easily installed by simply teeing into cold- and hot-water supply lines.
Sink drains typically connect with reinforced rubber hose to a through-hull fitting. On a sailboat, sinks are best located near the centerline of the boat so heeling doesn't put them below the waterline. Because head sinks are often well outboard, they may be plumbed to drain into the bowl of the toilet to avoid the risk of flooding. There are collateral benefits of running fresh water through the head.
Shower pans too often drain into the bilge to be pumped overboard by the bilge pump. However, this arrangement eventually leads to unpleasant bilge odors, and it risks jamming the bilge pump with hair. Shower pans should be isolated from the bilge and include a discharge pump, either automatic or connected to a switch. The through-hull discharge outlet must always remain above the water.
Since few boats carry sufficient fresh water to allow washing the decks with it, washdown pumps are not connected into the freshwater system. Nevertheless, a washdown pump is a great convenience for hosing the deck and knocking mud off the anchor chain.
The inlet fitting of a washdown pump is connected to a submerged through-hull fitting, and the outlet side is connected to a deck-mounted faucet or male hose connector. A dedicated through-hull is not required; if you are installing a deckwash pump; use a Y- or tee-connector to tie into an existing inlet line. Use heavy-duty rubber suction hose, wire reinforced to keep the hose from collapsing. Debris will damage or destroy a washdown pump, so it is essential to have a strainer in the intake line.
Related Articles
The truth about ceramic coatings for boats.
Our editor investigates the marketing claims of consumer-grade ceramic coatings.
Fine-Tune Your Side Scan Fishfinder
Take your side-scanning fishfinder off auto mode, and you’ll be spotting your prey from afar in no time
DIY Boat Foam Decking
Closed-cell foam flooring helps make boating more comfortable. Here’s how to install it on your vessel
Click to explore related articles
Contributor, BoatUS Magazine
Don Casey has been one of the most consulted experts on boat care and upgrades for 30 years, and is one of the BoatUS Magazine's panel of experts. He and his wife cruise aboard their 30-footer part of the year in the eastern Caribbean. His books include Don Casey's Complete Illustrated Sailboat Maintenance Manual, and the recently updated This Old Boat, the bible for do-it-yourself boaters.
BoatUS Magazine Is A Benefit Of BoatUS Membership
Membership Benefits Include:
Subscription to the print version of BoatUS Magazine
4% back on purchases from West Marine stores or online at WestMarine.com
Discounts on fuel, transient slips, repairs and more at over 1,200 businesses
Deals on cruises, charters, car rentals, hotel stays and more…
All for only $25/year!
We use cookies to enhance your visit to our website and to improve your experience. By continuing to use our website, you’re agreeing to our cookie policy.
Please verify you are a human
Access to this page has been denied because we believe you are using automation tools to browse the website.
This may happen as a result of the following:
- Javascript is disabled or blocked by an extension (ad blockers for example)
- Your browser does not support cookies
Please make sure that Javascript and cookies are enabled on your browser and that you are not blocking them from loading.
Reference ID: 00f9e5c2-e780-11ee-b5d3-999bc05f4e86
Powered by PerimeterX , Inc.
- Forums New posts Unanswered threads Register Top Posts Email
- What's new New posts New Posts (legacy) Latest activity New media
- Media New media New comments
- Boat Info Downloads Weekly Quiz Topic FAQ 10000boatnames.com
- Classifieds Sell Your Boat Used Gear for Sale
- Parts General Marine Parts Hunter Beneteau Catalina MacGregor Oday
- Help Terms of Use Monday Mail Subscribe Monday Mail Unsubscribe
How to replace potable water tank
- Thread starter AlainC
- Start date Feb 4, 2015
- Hunter Owner Forums
- Mid-Size Boats
I need to replace the existing aluminum water tank on my 1989 Hunter 30. It was placed was the boat was under construction and therefore it seems to be a major job. The tank is a 40 Gallons tank. Assuming I don't want to remove all the wood around the side and top of the tank (I have a 17X20 opening hatch access at the center of the tank and the tank is 16" wide, 16" deep and its length fit the hull shape.) 1 Has anybody replaced a water tank on this type of boat? if so how did you do it and what did you replaced it with? 2 I am planning on cutting the existing aluminum tank so that I can take it out from under the V Berth. Is there an easy way to do that? Any particular safety caution I should take? 3 What type of construction would you replace the tank with ( hard Poly, aluminum or? flexible.) I am leaning towards a hard Poly tank. 4 If I go with a Poly tank any suggestions on how to secure it to the boat (I want to put it in the same place as the existing tank). I am planning on using a rectangular tank say 28L x 16W x 20H and would need to somehow secure it to the port and starboard sides. (Right now the aluminum tank fit the shape of the hull.) Thanks for any advice.

Wow, I replaced my tank in my 33.5 and it was a major job. I replaced it with a hard poly tank and I sized it so it fit through the companionway and then inside the remains of the galvanized tank after I had removed the top and baffle. Much bull work cutting up the top and removing the welded baffle. After that I foamed it into place. Best of luck to you

Had a similar experience on my H33.5. I posted about the experience in the following thread http://forums.hunter.sailboatowners.com/showthread.php?p=667884&highlight=tank I got the tank from Ronco Plastics http://ronco-plastics.net after I provided them a drawing of the tank.
Attachments
- Hunter 33.5 Water Tank.pdf 281.8 KB Views: 239
- Ninkasi Water Tank Ronco B557.pdf 247.9 KB Views: 452

We have a 1989 Hunter 30 with a plastic water tank. I will try to get some photos today. Ken
I have a similar problem in my Hunter 27, is putting a bladder in the existing tank an option? If so how much of a job? BF
pics Okay here are a couple of pics. In my case the tank is held in place with expanding foam and some strapping tape. I assume the strapping is to hold it in place while the foam sets up. I assume the "V" birth floor must have been removed for access. I also see that there is more storage forward of the water tank that I didn't know about. Ken

Give me a shout if you want to drive down and have a look for yourself. Ken
I just replaced my fresh water tank on my 1989 Hunter 30. I used the Ronco tank number B431. It was a little smaller ( about 35 gallon) but an easy fit. I removed the aft bulkhead under the v-berth and left the top of the v-berth in place. I had to cut some fiberglass tape and remove the closet to get this bulkhead out. With this bulkhead removed I was able remove the old tank and install the new one. Under the old tank is a 3/4 plywood deck that you can use to fasten lumber or hardware to help keep the new tank in place.
- This site uses cookies to help personalise content, tailor your experience and to keep you logged in if you register. By continuing to use this site, you are consenting to our use of cookies. Accept Learn more…
- BOAT OF THE YEAR
- Newsletters
- Sailboat Reviews
- Boating Safety
- Sailing Totem
- Charter Resources
- Destinations
- Galley Recipes
- Living Aboard
- Sails and Rigging
- Maintenance
- Best Marine Electronics & Technology
Maintaining Your Marine Water Tank System
- By Steve D'Antonio
- Updated: January 9, 2014
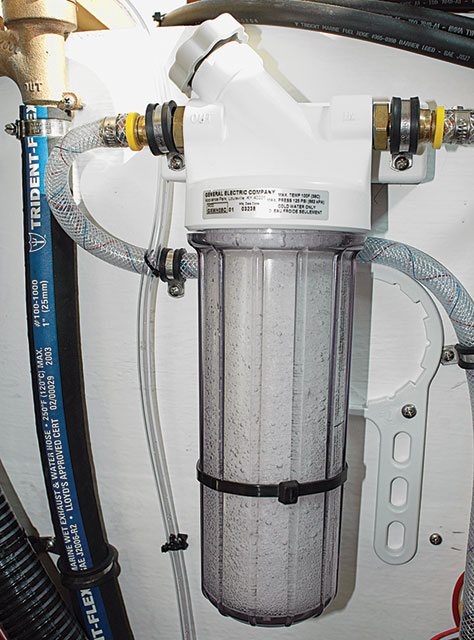
Water Filter
Clean water is not an onboard luxury: It’s a necessity. Drinking, bathing, cooking and cleaning all demand a high degree of purity in your potable water system. Begin the analysis of your system with your marine water tank. What is it made from? Has it ever been opened and inspected? Ideal potable water tank materials include 316L stainless steel; fiberglass that is coated with FDA-approved gelcoat; or epoxy and virgin linear polyethylene. Because of its susceptibility to both galvanic and poultice corrosion, aluminum, while used occasionally for water tanks (as well as integrally aboard aluminum vessels), is less than desirable in potable water applications.
Like all onboard tankage, water tanks should be equipped with inspection or cleaning ports. If your tank is so equipped and you’ve never peeked inside, now’s the time to determine if detritus has accumulated. Don a sanitary rubber glove and swab your finger across the inside of the tank. If it feels slimy or emits an odor, the tank’s interior needs to be scrubbed with detergent, rinsed and sanitized.
| |The bottom right hose in this image relies on steel wire reinforcement, which unfortunately is rusting. Seek other alternatives.|
Next, inspect your plumbing. All hoses , tubing and pipes should be rated for potable water use. If they’re not, there’s no telling what sorts of particles or compounds may be sloughing or leaching into your water supply. Hose, plastic tubing and plastic pipe (including fill and vent hoses) should all be emblazoned with at least one of the following designations: NSF61, FDA Approved or Potable Water Approved. Despite its widespread use, clear hose should be avoided due to its propensity to support algal growth. Conversely, opaque polyethylene, copper and PVC plumbing are well suited to potable water applications.
Anyone installing or working on potable water systems must strive to be as careful and hygienic as possible. Tank openings and plumbing ends must remain closed, taped over or otherwise covered unless they are actually being worked on at the time.
Filters can present a first, second and even third line of defense against potable water contamination. When filling tanks, running dockside water through a high-volume inline filter will ensure clean water is brought aboard. (Note: Dockside hoses are notorious for lacking a potable water approval rating.) However, filters containing activated charcoal should not be used for this purpose, as they will neutralize the chlorine contained in municipal water supplies, which will likely allow biological growth within the tank and plumbing. Also, liveaboard sailors who plan on leaving filters on the dock should make sure they have opaque canisters, as clear canisters are ideal breeding grounds for algae.
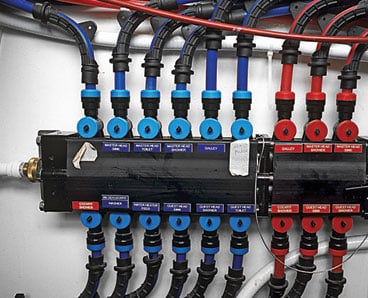
| |Proprietary potable-water plumbing systems like this one are not only reliable and compact, they are also specifically designed and suited for fresh drinking water.|
Onboard filters that service the entire boat can be installed immediately downstream of the vessel’s water supply pump, and in this case activated charcoal, along with a particulate filter, are an excellent option. These need not be specialized “marine” filters; household units work very well, and replacement elements are both readily available and inexpensive. Alternatively, you can opt to filter only the water that you intend to drink, cook or wash utensils with, using a “point of use” or under-counter unit. These low-volume specialized filters usually incorporate a carbon component and typically rely on a compact filter and dedicated countertop spigot.
Steve D’Antonio offers services for boat owners and buyers through Steve D’Antonio Marine Consulting ( www.stevedmarineconsulting.com ).
- More: boat maintenance , How To , monthly maintenance , ship's systems , systems
- More How To

3 Clutch Sails For Peak Performance

It’s Time to Rethink Your Ditch Kit

8 Ways to Prevent Seasickness

How To De-Winterize Your Diesel Engine

Kirsten Neuschäfer Receives CCA Blue Water Medal

2024 Regata del Sol al Sol Registration Closing Soon

US Sailing Honors Bob Johnstone

Bitter End Expands Watersports Program
- Digital Edition
- Customer Service
- Privacy Policy
- Email Newsletters
- Cruising World
- Sailing World
- Salt Water Sportsman
- Sport Fishing
- Wakeboarding
You have no items in your shopping cart.
- Marine Tanks /
Marine Fresh Water Tanks
Buy Marine Fresh Water Tanks for sale at the lowest prices online
about boat water tanks
Marine fresh water tanks are designed for storing potable water in boats and vessels equipped with plumbing such as yachts, sailboats, and deep sea fishing boats. These potable water tanks are manufactured by Ronco and Dura-Cast. They are rotationally-molded from BPA-free, food-grade polyethylene. This high-quality plastic meets ANSI NSF 61 requirements and is safe for potable water storage and use. Marine fresh water tanks offer a long service life and durable resistance to cracks, rust, and corrosion.
These boat water tanks are available for most boat makes and models and can be used as either a new or replacement water tank. Capacities range from 1 gallon to 202 gallons. Tank thickness is available from 0.1875 inches (3/16") to 0.375 inches (3/8"). Many tanks are rectangular in shape but custom-molded tanks are available for particular boat models and installation locations. Marine Tanks are offered with pre-installed fittings or as blank tanks with DIY custom fitting packages.
Browse our manufacturer specific Ronco Marine Fresh Water Tanks and Dura-Cast Marine Fresh Water Tanks .
- Customer Service / Cancellations / Returns
- Shipping Policy
- Privacy Policy
- Terms of Service
We Want Your Feedback
What do you think of our website? How can we improve it?
Better Sailing

Sailboat Water Tank Size
Similar to the gas tank, the water tank is also a vital component of your sailboat’s systems. A water tank can be used to hold wastewater, freshwater, and wash water. In other words, water tanks are your sailboat’s plumbing system and they supply water to the shower, galley, and even for electric toilets. Water tanks can be made of different materials like polyethylene, stainless steel, and plastic coated fabric. As for their position, they are usually safely situated somewhere inside the sailboat or they might also be portable. So, let’s see the characteristics and different uses for a water tank as well as its size.
General Info About Sailboat Water Tanks
Firstly, as we know water is heavy so it’s safer for water tanks to be situated low in the sailboat. But in case you want to add more water tanks, you’ll need to have a relatively large sailboat in order to provide some extra space. In the market, you can find many different sizes and shapes of rigid polyethylene tanks. A water tank normally has three threaded ports, one for the outlet, one for the vent hose, and one for the fill hose. Threaded hose barbs are used for hose connections. The inlet is connected to an on-deck fill and the vent line leads to a vent fitting high in the sailboat.
Keep in mind that if the vent is not higher than the fill, then it might overflow when you are filling the tank. Furthermore, remember that the outlet connection leads directly to a pump or to a manifold/Y-valve for a multi-tank installation. Finally, remember to secure hoses with stainless steel hose clamps.
Water Tank Position
Water tanks can be usually situated on each side of the sailboat or on its center in order to keep it balanced. When their location is on each side of the sailboat then they are connected together with a balance pipe of approximately 1-inch in diameter. This way both tanks are kept at the same level. Keep in mind that in case the balance pipe is small then it might take more time to fill in. This happens because the transfer of the water from one tank to the other is difficult to happen quickly enough. In fact, when the two tanks are situated at the same height then your sailboat has a balanced system that requires only a one-level indicator.
Water Tanks Materials
Different materials can be used to manufacture water tanks. These can be stainless steel, polyethylene, aluminum, and flexible fabric. When it comes to measuring the pros and cons of these materials, everyone has its own characteristics. For example, polyethylene water and waste tanks don’t usually retain odors, compared to tanks that are made out of stainless steel or aluminum. On the other hand, stainless steel tanks are less prone to rust or corrosion problems but their cost is relatively high than polyethylene tanks. As for their construction water tanks have baffles that prevent excessive movement of the water inside. However, the in-between spacing depends on their construction materials. For instance, a Tek-Tank polyethylene tank will have a baffle spacing of approximately 250mm and 350mm. But, a stainless steel water tank usually has fewer baffles with a spacing of 500mm.
Tank Fittings
The hose that is used in order to connect the fill point on the tank to the deck filler can be of two kinds. Either a green-tinted delivery hose or a clear braided hose. The vent pipe and feed have usually a very small diameter, around ½-inch. This diameter suits the best for pumps and deck fittings. As for the hose tails which are basically the fittings connecting to the hoses; they’re barbed so that the pipe won’t come off. Therefore, the hose is pushed into the hose tail and then tightened with a jubilee clip. You can also use thread sealant or Teflon tape on all threaded fittings. Moreover, remember not to overtighten fittings in plastic tanks.
Water Tank Size
Let’s now see some examples of water tank sizes on different types of sailboats:
- The Bavaria Cruiser 34 has a 39-gallon water tank capacity.
- The Hunter 32 Vision has a 50-gallon water tank capacity and the tank is located under the V-berth.
- The Catalina 310 has a 55-gallon water tank capacity
- The Beneteau Oceanis 51.1 has a 106-gallon water tank capacity, located under the berth in the forward cabin.
- The Sparkman & Stephens 52ft Yawl has 2 stainless steel water tanks installed beneath the saloon sole. Each one has a capacity of approximately 50 gallons.
- The Bavaria C45 has a 143-gallon water tank capacity.
- The Island Packet 38 has an aluminum 157-gallon water tank situated under the sole.
- The Amel 50 has a 160-gallon water tank capacity.
- The Hallberg-Rassy 64 has a 331-gallon water tank capacity.
The size of a water tank in a sailboat depends on different factors. Mainly, the model and type of your sailboat, its plumbing system as well as the tank’s materials, position, and construction . There is a wide range of sailboat water tanks available on the market for drinking water, wastewater, or where space is not enough, flexible water tanks. The most common materials are polyethylene, stainless steel, and aluminum. Moreover, there is a variety of shapes and capacities, ranging from 40 to 400 gallons . Keep in mind to drain water tanks of any waste or water when preparing your sailboat for off-season storage. Like this, you’ll prevent any unexpected damage by freezing temperatures. Last but not least, do not consider using any tank that is not easy to pump out.

Peter is the editor of Better Sailing. He has sailed for countless hours and has maintained his own boats and sailboats for years. After years of trial and error, he decided to start this website to share the knowledge.
Related Posts

Lagoon Catamaran Review: Are Lagoon Catamarans Good?

Best Inboard Boat Engine Brands

Are O’Day Sailboats Good? A Closer Look at a Classic Brand

Best Non Skid Boat Deck Paints
- Buyer's Guide
- Destinations
- Maintenance
- Sailing Info
Hit enter to search or ESC to close.
- New Sailboats
- Sailboats 21-30ft
- Sailboats 31-35ft
- Sailboats 36-40ft
- Sailboats Over 40ft
- Sailboats Under 21feet
- used_sailboats
- Apps and Computer Programs
- Communications
- Fishfinders
- Handheld Electronics
- Plotters MFDS Rradar
- Wind, Speed & Depth Instruments
- Anchoring Mooring
- Running Rigging
- Sails Canvas
- Standing Rigging
- Diesel Engines
- Off Grid Energy
- Cleaning Waxing
- DIY Projects
- Repair, Tools & Materials
- Spare Parts
- Tools & Gadgets
- Cabin Comfort
- Ventilation
- Footwear Apparel
- Foul Weather Gear
- Mailport & PS Advisor
- Inside Practical Sailor Blog
- Activate My Web Access
- Reset Password
- Pay My Bill
- Customer Service

- Free Newsletter
- Give a Gift
How to Sell Your Boat

Cal 2-46: A Venerable Lapworth Design Brought Up to Date

Rhumb Lines: Show Highlights from Annapolis

Open Transom Pros and Cons

Leaping Into Lithium

The Importance of Sea State in Weather Planning

Do-it-yourself Electrical System Survey and Inspection

Install a Standalone Sounder Without Drilling

When Should We Retire Dyneema Stays and Running Rigging?

Rethinking MOB Prevention

Top-notch Wind Indicators

The Everlasting Multihull Trampoline

How Dangerous is Your Shore Power?

DIY survey of boat solar and wind turbine systems

What’s Involved in Setting Up a Lithium Battery System?

The Scraper-only Approach to Bottom Paint Removal

Can You Recoat Dyneema?

Gonytia Hot Knife Proves its Mettle

Where Winches Dare to Go

The Day Sailor’s First-Aid Kit

Choosing and Securing Seat Cushions

Cockpit Drains on Race Boats

Rhumb Lines: Livin’ the Wharf Rat Life

Re-sealing the Seams on Waterproof Fabrics

Safer Sailing: Add Leg Loops to Your Harness

Waxing and Polishing Your Boat

Reducing Engine Room Noise

Tricks and Tips to Forming Do-it-yourself Rigging Terminals

Marine Toilet Maintenance Tips

Learning to Live with Plastic Boat Bits
- Boat Maintenance
Repairing Plastic Tanks
Reinforcement is key to long-term success..

Plastic holding tanks and water tanks have the advantage of not corroding, but they are hardly failure proof. Plastic holding tanks can crack and fail under extreme vacuum pressure if the vent is clogged. An errant drill or saw used to make adjacent repairs can puncture a tank. Or a poorly secured tank can be hurled across a cabin and crack.
The most common cause of cracks is from over-tightening fittings. Pipe threads are tapered, and the more they are twisted, the greater the expansion force they apply to the tank. Polyethylene tanks are relatively soft and the fittings are designed to seal dry and hand tight only. If needed, you can use a wrench, but no more than -turn after light hand tightening. No Teflon tape, paste, or adhesive sealant is recommended.
The most important step is to make certain the threads on the male fitting are clean and well-formed so that excessive tightening and sealants are not required. Often the cracks appear years later.
The challenge with repairing polyethylene (PE) is that nothing sticks to it. It has what chemists refer to as a low-energy surface. It does not pull materials to it; water beads up and even paint beads up if the surface is smooth and given time. If you mix epoxy in a polyethylene cup, you can pop out the cured leftovers out by flexing the cup-not much bond strength for the sailors go-to boat repair adhesive.
Manufacturers Advice
Tank manufacturers don’t recommend repairing PE. We talked to the factory engineers and we have worked with PE tanks in industry. Repairs are tricky and not always reliable. But sometimes a tank will need to be repaired immediately, and replacement isn’t an option. In those cases, a few manufacturers offered possible remedies. Keep in mind that these recommendations are for water and waste tanks; certified PE fuel and gasoline tanks can’t be repaired. Their suggestions included:
Drill a hole in the tank to install an access cap, or some other type of bulkhead fitting. Once you install the new bulkhead fitting, you can then close it.
For gouges that don’t fully penetrate the tank you can weld strips over the thin area, without melting clear through. Basically, you are filling a cosmetic gash.
For a fitting that is cracked by overtightening, you can cut a hole one size larger and either spin or weld in a new fitting if practical, or install a bolted bulkhead fitting.
Bulkhead Fittings
A bolted-in bulkhead fitting isn’t cheap, particularly in the larger sizes, but it offers a permanent fix. They are available in sizes from 1/4-inch through 6-inch pipe threads. These inlet/outlets are durable and occasionally come factory-supplied for chemical tanks. They cost between $35 and $200, depending size and materials, but they are a permanent fix. You do need to fit the inner ring inside the tank, so it better not be the biggest opening. Tightening the inside ring can be tricky to nearly impossible, depending on the location. Listed as thick-walled threaded PVC pipe fittings for water, they are available from McMaster/Carr and other industrial piping supply houses.
If you can’t access the inside, and the damaged area is on the top of the tank, you can use a Uniseal to open a new access hole that can later be plugged or used to attach a new fitting. Simply cut a true hole with a hole saw, clean it up, lube it with dish soap, and pop it in. Were not sure we trust them on the side of a tank, but for vents and fill lines, they are well proven on both potable water and waste tanks. They are available in many sizes, from -inch to 4-inch. Cost is about $6 for 1-inch and $10 for 2-inch (www.aussieglobe.com/uniseal1.htm).
Unfortunately most cracks can’t be resolved by simply adding a new hardware fitting. And what about holes in your PE kayak or one of your jerry cans for water? In search of a durable repair for polyethylene tanks and boats, we tracked down several products that showed promise.
What We Tested
We tested polyurethane sealants Sika 291 and Locktite PL S40. Both performed well in prior testing with polyethylene. We tried our hand at plastic welding, reported to be the preferred method for permanent repairs. We also tested several plastic-specific systems, including the Permatex Plastic Repair Kit, the Loctite plastic Bonding System, and 3Ms DP8005, an acrylic adhesive optimized for polyethylene.
How We Tested
We bonded 3-inch long by 2.5-inch wide strips of 0.1-inch thick high-density polyethylene (HPDE) in a butt seam, simulating a crack. Reinforcements and surface preparations varied according to the material. We generally followed manufacturers recommendation, and when this was not available, we relied on previous experience and past tests to guide us. We tested each bond by flexing the joined area several times to roughly 90 degrees. We then pulled apart each sample to failure on a test rig with a calibrated load cell. The force and failure mode were noted.
General Observations
Welding is considered the gold standard for PE tank repair, welding is the method by which many tanks are constructed and by which most fittings are installed. Fittings are actually installed using spin welding, in which the fitting is rapidly spun to create enough friction to melt the fitting to the tank. With conventional plastic welding, controlled heat is applied until the plastic softens, and then additional filler material is added to fill the gap and reinforce the area.
Welding. Before attempting this approach you need to take certain precautions. Although PE is low in toxicity, the fumes are strong-similar to that of poor-running diesel or a smoky candle, with similar chemistry. Provide adequate ventilation. Wear knit gloves; there are many ways to burn yourself, since hot metal looks just like cold metal. It can get tricky, working close to the long, hot nose of a welding tool in a tight spaces.
Drip Welding. Commonly used to repair rock gouges in snow skis, a polyethylene P-Tex candle (effectively just a strip of PE) is lit with a match and dripped into the gouge until overfull. The repair is then scraped off level with the metal edges and the ski is waxed. The problem with this approach is that the heat of the flame badly damages the PE polymer, and the resulting repair is brittle and weak. Every time we used this method on a tank repair, the repair would crack and pop-off when the tank flexed. We don’t recommend drip welding for tank repair.
Welding Irons. You can weld plastic with a heated screwdriver or a broad soldering iron, but a purpose-built plastic welding iron will result in a much better job. The welding tool is low power, about 85-200 watts, and will be less likely to overheat the plastic and melt a hole clear through- although this will occur if you are careless or if the tank is thin. We tried two different types for this test.
Thin Material. Welding anything thinner than a heavy jerry can is a fools errand. A jerry can is tough, but it is simply too easy to burn through a jerry can, and thus it is very difficult to get good fusion. When heated, the plastic melts and falls away from the crack. Adhesives work better with thin materials.
Support. It can be very helpful to support the work from behind, so that the plastic does not distort or fall through and make a bigger hole. Aluminum duct tape works well because it will not melt. Use long pieces, so that the adhesive on the back of the tape is far from the heated work area.
PE Welding Step-by-Step
The first step for all cracks is to drill a stop hole (3/16-inch is usually adequate) at each end of the crack to prevent it from spreading. If your hole is more than superficial, you’ll usually need a filler strip.
One source suggested trying a milk jug for filler, as it had been used by others. Although the milk jug approach might work in some cases, in our experience, the thin strips tend to fall down through the crack instead of building a bridge. The repeated heating required to lay down enough material often made the crack wider.
It was easier to work with the thicker strips that came with the supplied repair kits. We used these for our test.
Prep work. Clean and prepare the area around the crack with 60-grit sandpaper. If the hole or crack is very small, use the plastic welding iron to melt plastic around the hole and fill it in, being careful not to melt through the tank. Melt only a thin layer and work it into the crack.
Heating. Next, use the welding iron to soften the area around the repair to insure good adhesion, soften one side of the filler strips, and stick them on, apply 1-2 layers, building up until you match the thickness of the tank material, tapering for five tank thicknesses wide on every side (at least 5/8-inch past the crack).
Blending. Smooth the layers of plastic together, but do not linger too long in one area, or the heated plastic will begin to sag into the tank. Keep in mind that your aim is not a true fusion weld, as in steel welding when the filler and base material are well mixed. This simply does not work. If you tried to apply enough heat to fully liquefy the PE, it would shrink away from the crack, and fall into the tank before you finish. In addition, the melting points of the filler and the base material, even if both PE, are probably somewhat different.
Reinforcing. Incorporating reinforcing material makes the repair stronger and tougher. We recommend this for both adhesive and welded repair, but the materials are different. We tried using fiberglass cloth with melted polyethylene, but it was hard to keep in place during welding.
We settled on stainless steel mesh. This is included in welding kits, and you can also get small pieces in the plumbing department, sold as lint screens. Cut a piece about 1-inch wide and 1-inch longer than the crack. Soften the tank surface with the welding iron and then press the mesh into the plastic. Do not press too hard; wait for the plastic to get soft and it will settle right in.
If the surface is curved, cover a small area, let it harden, and then work the mesh into the plastic in stages, bit by bit, as if fitting a replacement plank or bending a steel hull plate. Once the mesh is set, lay filler material on top of it. Pre-soften one side of the filler material with the iron, press it onto the screen, and use the iron to melt and smooth it down. Cover the mesh with several layers of filler, continue building up to about 1/8-inch. There is an excellent how-to video by Polyvance, the makers of one of the tested kits.
Sanding. After the filler and tank cools, you can sand it smooth if you have added enough filler material. The sanding will leave it dull and fuzzy, but a light flaming with a torch, similar to how you prepped the area, will restore some of the gloss. If you need to match color, use strips of matching PE. The color worked well with our kayak repair, but for a tank repair you can skip these cosmetic steps.
Practice. It is possible to make things worse. If you watch enough YouTube repair videos, you will see people make small cracks into big holes by applying too much heat or using filler material with too high a melting point. We made the same mistakes during practice, before making the welds we used for testing. A 5-gallon bucket, a kids playhouse, or a food storage container makes for a good test bed. Try to find something similar in thickness to your tank.
Using Polyurethane Sealants
In PS December 2016, we studied the bond strength of a number of common sealants. Locktite PL S40 and Sika 291 demonstrated particular ability with polyethylene, with reliable shear strengths of over 100 PSI if the plastic is properly prepared. These sealants are durable in submerged environments; in fact, we’ve been testing some of these in repairs to pond liners for over 15 years. They have the advantage of considerable flexibility, moving with the tank.
Look for a sealant that is non-toxic. Sika 291 is National Sanitation Foundation approved for potable water tanks and approved by the U.S. Food and Drug Administration for incidental food contact. Many polyurethane sealants are FDA-approved for food contact and potable water tanks, but not all have applied. Same with epoxies; if properly measured, mixed, and fully cured, they are generally safe. When repairing cracks, the contact area will be very small.
The challenge is that the stress in the cracked area can easily exceed 2,000 PSI (the tensile strength of HDPE). This is greater than any of the structural adhesives we tested. The only way around this is to produce a fiber-reinforced repair that distributes the stress over a larger area, like this:
Clean. Scrub with soap and water and sand 50-80 grit about two inches beyond the repair in all directions.
Denaturing, or Heat Treating. Other than welding, in which heat is intrinsic, any adhesive bond to PE is aided by roughening the surface by sanding. This is followed by denaturing the surface with heat. Put simply, the application of a flame slightly scorches the surface, increasing porosity and changing the surface chemistry just enough to promote adhesion.
To do this, you play a propane torch across the surface of the repair area and the patch (if used) just enough to cause a slight blush or change in appearance, but not enough to melt it. When you do this properly the surface will no longer bead water, clear evidence that something has fundamentally changed.
Laminating. To further strengthen the repair, reinforce with cloth. Apply a thin coat of polyurethane sealant. Cover with 2-3 layers of overlapping patches of acrylic canvas (Sunbrella is good), saturating each with sealant. Cover the surface with sealant.
Note that lightly used fabric is best, with the water repellent treatments weathered away. New Sunbrella, for example, does not saturate and does not bond as well. Fiberglass cloth works, but we found that more flexible fabrics are a better match for the sealant.
Do not use alcohol to clean the surface-this stops polyurethane from curing and will prevent bonding. Water is the curing agent for polyurethanes, so humid but not wet conditions are best. Curing time for Locktite PL S40 and Sika 291 depends on thickness, temperature, and humidity; allow at least 5 days in warm humid weather for a full cure. In dry or cool conditions, loosely covering the repaired area with a tarp along with a bowl of water can help. A light misting of water can help.
Welded Repairs
Heat has long been used to make repairs, but our testers were curious as to how practical this was for the average do-it-yourselfer. Would the benefits of repair outweigh the risk of doing more harm?
Straight Welding
Requiring only some filler material and a welding tool, simple heat welding was the quickest approach. This will make a reliable repair of limited strength and toughness. It is easy, fast, but not as strong as other repairs we tested.
Bottom line: Save this for tiny repairs. For all others, add screen.
Welded with Mesh
Although more time consuming, the result of welding with stainless steel mesh is strong and permanent. We couldn’t break the repair, tear it or delaminate it, other than by flexing it until the wire fatigued.
Bottom line: This is our Best Choice in polyethylene repair.
PE Repair Kits
Repair kits have the advantage in that you can use them for various repairs and projects, and most include a welding tool that can simplify welded repairs.
Polyvance Professional KC Welder
We’ve used this one in an industrial setting to repair chemical tanks. Although more expensive than other tools available through discount retail stores, this 200-watt welder tool heats faster than the Harbor Freight tool we also used.
Bottom line: This is the Best Choice if you like good tools.
Harbor Freight Plastic Welding Kit
Although we harbor no illusion that this is a lifetime tool, it lived through our testing, a rigorous project that entailed more PE repairs than most sailors can expect to face in a lifetime. Used gently, it heated and spread the plastic repair material and surrounding area. At just 85 watts, Harbor Freight welding tool is considerably lower in power than commercial welders. This was occasionally frustrating for our testers, who were used to the speed and efficiency of professional tools.
It was difficult to achieve full fusion between the materials, and the operation was very slow when incorporating stainless steel mesh (the mesh conducts the heat away). On the other hand, the resulting repairs were strong, and the low power means you are less likely to melt a hole clear through the tank and really mess things up.
One caution : Dont press down hard with the tip. Ours bent when hot, although it still worked fine bent.
Bottom line: This is our Best Buy for a few small repairs.
Adhesives yielded some surprising results, with an epoxy adhesive-generally not recommended for PE-faring surprisingly well.
Permatex Plastic Tank Repair Kit
Available through local auto parts stores, this is a small epoxy/fiberglass kit intended to repair leaks on radiator caps, and the expansion tank. It is not recommended for PE, because like all epoxies, it is stiff and does not bond well to PE. Sure enough, it popped right off when we tentatively flexed the sample, before even getting to the shear test or 90-degree bend test. A complete failure.
Bottom Line: We don’t recommended this kit or standard laminating epoxies for polyethylene repair.
West Systems G-Flex Epoxy
After the glaring failures of all other epoxies, we didn’t expect much from G-flex. But we dutifully sanded and flamed the surface, laminated in a layer of glass cloth, and low and behold it was strong. It did not fail in flexing until the glass fatigued after being repeatedly forced, which will not happen in the real world. In shear testing the bond did not fail-the strip failed at the attachment bolts. That said, we would not trust it without the fiberglass reinforcement.
Bottom line: To our surprise, we are Recommending fiberglass reinforced G-Flex for polyethylene repairs.
Loctite Plastic Bonding System
A cyanoacrylate in the same category as Super Glue, Loctites bonding system is supplied with a special primer that increases bonding. Like Superglue, it has poor gap filling properties, making it a poor sealer. We tried using it to attach a PE strip over the crack, but we never achieved a watertight seal (there were visible gaps) and it pealed if flexed.
Bottom line: Not recommended.
3Ms product is an acrylic adhesive optimized for low energy plastics like PE, in optimum conditions it has a bond strength nearly 1/3 that of PE. However, that is not enough to hold a crack that has developed due to stress, and so it would normally be used to attach a patch. However, we have found it difficult to apply and clamp patches onto irregular geometries and a leak often resulted. Expensive, at $75 for a small single-use kit.
Bottom Line: Although very strong, repairing leaks is not its best application.
Sikas 291 is approved by the National Sanitation Foundation for potable water tanks and approved by the Food and Drug Administration for incidental food contact. It is also rated by the American Society for Testing and Materials for continuous immersion. Our lab and field-testing show reliable long-term and consistent bonding to polyethylene, if the surface is properly prepared. Like all polyurethanes, its messy to work with, but the process is simple and gap-filling properties are excellent. Though Sika 291 is not very strong on its own, by incorporating Sunbrella cloth, we were able to spread the load and prevent tearing, making the repair strong. It was the most flexible repair, recommending it for repairs where motion is unavoidable, but it was not as strong as reinforced G-Flex or reinforced welded repairs.
Bottom line: Recommended for making flexible repairs.

Loctite PL S40
Interestingly, this product is not recommended by the maker for continuous immersion. On the other hand, it passed the continuous immersion tests with flying colors and we have used it for fish pond repairs for as long as 15 years with no deterioration or loss of bonding. It is also not rated for potable water or food contact, presumably because Loctite never applied for that application. Test results were identical to Sika 291. Also available in black (PL S30).
Bottom line: Recommended for flexible repairs but not for potable water.
Conclusions
As often happens, there is no single right answer. If movement seems inevitable, the plastic is thin, and the damaged area is large, reinforced polyurethane is the recommended repair. If the crack is tight together and the plastic is relatively thick, welding reinforced with stainless steel mesh is a sturdy method that should stabilize the crack and last as long as the boat. Practice welding on a scrap first, because things can go badly wrong. Plastic-specific adhesives either pealed or did not reliably produce watertight repairs. As for that old sunburned jerry can, this is probably too much trouble for most, but the old kayak might be worth the effort. And in either case, you’re keeping more plastic out of the waste stream for a little longer.

Finding a repair that is strong, flexible, and easy to carry out required several rounds of trial and error. The most successful approaches combined welding or an adhesive with reinforcing material a reinforcing material. In the end, a combination of steel mesh and “welded” plastic filler yielded the best results.
1. The welded sample, without any reinforcement, snapped cleanly as strain was applied. This approach will work for tiny repairs, like a small drilled hole, but not long cracks.
2. G-flex held up to 177 pounds of load before the plastic failed.
3. The welded and filled sample survived bending and flexing and held more than 150 pounds before finally breaking.

Practice is more important when welding plastic with many other repairs, not because of the difficulty, but because overheating the repair area can lead to a bigger crack or hole.
- It is very important to heat treat the repair area to ensure a strong, consistent bond.
- Melting the filler material with the 85-watt Harbor Freight tool welder took longer that it would with the stronger (200 W) professional model.
- Heating the mesh stainless steel and the surrounding plastic helps the metal settle into the material.
- Stainless mesh makes for a much tougher repair.
- Repeated flexing caused some cracks to appear in the reinforced weld, but testers could not break the bond.
- What About Polyethylene Fuel Tank Repairs?
- Harbor Freight
- Mcmaster/Carr
- West System
RELATED ARTICLES MORE FROM AUTHOR
Leave a reply cancel reply.
Log in to leave a comment
Latest Videos

Island Packet 370: What You Should Know | Boat Review

How To Make Starlink Better On Your Boat | Interview

Catalina 380: What You Should Know | Boat Review
- Privacy Policy
- Do Not Sell My Personal Information
- Online Account Activation
- Privacy Manager
281-250-7383
Water tank replacement, water tank replacement in dickinson, galveston, clear lake and texas city, texas.
Water tank replacement for your boat is easy, convenient and affordable when you partner with the tank fabrication and replacement crew at Angel’s Marine, the complete watercraft repair specialists for the Dickinson, Galveston, Clear Lake and Texas City, Texas area. We are ready to help if your boat’s water tank is obsolete, damaged or leaking. Angel’s Marine has extensive experience in fabricating water, fuel and holding tanks. We can fabricate and replace your water tank no matter what size shape or configuration is needed.

Replacing Your Boat’s Water Tanks
Fresh water tanks are meant to store drinkable water, providing it through the plumbing system of a boat. Metal tanks for potable water, however, can fail after years of contact with a corrosive environment, especially if it is positioned in the bottom of a boat where it is exposed to moisture and seawater. Other reasons for aluminum water tank failure include design and manufacturing problems, and contact with copper components.
Replacing a damaged tank is advised over patching a tank since an inadequate repair can allow continued leaking and contamination of the water. The fabrication specialists at Angel’s Marine can manufacture a metal water tank replacement that cannot be punctured or permeated like plastic tanks can. Our team can design any water tank to fit the existing space perfectly to take advantage of valuable onboard space. We can add internal baffles to increase rigidity and prevent water from moving around excessively as well.
Need a New Water Tank for Your Watercraft?
Fuel tanks made from corrosive materials can become problematic as sea air can rust and make them vulnerable to leaking. If your original fuel tank is in poor condition, don’t take a chance that it won’t fail, because eventually it will. Let one of our expert fabrication technicians inspect your craft’s fuel tank today. We offer free consultation and an estimate for replacing your fuel tank. Our boat repair and marine fabrication center services Dickinson, Clear Lake, Galveston, League City, Sugar Land, Texas City, and Metro Houston, Texas.

Custom Fabrication of Water Tanks
In addition to expert custom fabrication of water tanks, we will install them during the water tank replacement process. We make sure there is enough air flow around the tank and clear any materials that absorb water away from the tank. Instead, we install the water tank with non-water absorbing fittings to prevent corrosion from happening. Our water tanks are fabricated with marine-grade aluminum alloy and welded in our shop. Every water tank is leak tested and inspected before replacing it.
Angel’s Marine Service Areas
Angel’s Marine provides complete repair, maintenance, restoration and customization services for boat owners in:
Specialists in Replacing Your Marine Water Tank in Dickinson, Galveston, Clear Lake and Texas City
We pick up and deliver boats, 2300 wyoming st dickinson, tx 77539.
Business Hours
Mon – Fri: 8:00 AM – 5:00 PM Sat – Sun: Closed
© 2024 Copyright. All Rights Reserved. Angel’s Marine. Privacy Policy
Design by Marketing Depot Inc.
JavaScript seems to be disabled in your browser. For the best experience on our site, be sure to turn on Javascript in your browser.
We ship worldwide
- Testimonial
- Create an Account
Boat Water Tanks
Did you know water weighs 8 pounds per gallon, or 1 kilogram per liter? In other words, water tanks are very heavy when full. For this reason, mount your boat water tanks low in your watercraft or RV. Great Lakes Skipper has rugged boat water tanks in a range of sizes, from 4 gallon on up, in materials like polyethylene and aluminum. We add thousands of boat parts and accessories to our huge inventory every month, so check back frequently for the latest and greatest discount deals on boat water tanks from Great Lakes Skipper.
Shop Products
Items 1 - 12 of 67
- You're currently reading page 1

- Privacy Policy
- Terms of Use
IMAGES
VIDEO
COMMENTS
However, with the nylon hose tees you'll also need six stainless steel hose clips at a cost of $1.99 each, bumping the total price tag for the "low-cost" solution up to $33.21. West Marine lists Whale's 15mm tubing at $1.49 per foot (blue), compared to food-grade reinforced 5/8in PVC hose at $1.79 per foot.
Fisheries Supply offers a full-range of marine-grade water tanks (fresh) from the top brands. Shop for boat water tanks, monitors, senders, treatments, and more. Need Help? Customer Service. Login ... Tank Tender Tank Tender - Replacement Panel Gauge Lens. SKU: 68123 | Item ID: T/T GL. Special Order Only. Sierra Fuel Tank Spacers. SKU: 158940 ...
Our marine water tanks are manufactured by industry leaders including Ronco and Todd. Marine freshwater tanks are durable and offer a long-life expectancy. They're available for most boat makes and models and can be used as either a new or replacement water tank. custom-molded tanks are available upon request and our marine water tank sizes ...
Here is an overview of a typical on-board water system. Tanks. Because water is heavy, tanks should be mounted low in the boat. Where space is available, it is a relatively simple matter to add extra tanks. Rigid polyethylene tanks are available in hundreds of shapes and sizes, or you might use a flexible bladder tank--essentially a water bag.
Step 1 — First, I had to cut a new access hole in the base of the V-berth in order to uncover the forward section of the tank (Figure 1). The tank has two full-width baffles, so I needed to cut two inspection ports in order to have enough access to the entire tank for preparation and coating (Figure 2). Advertisement.
West Marine offers rigid polyethylene and flexible nitrile and PVC bladder-style boat water tanks. When shopping for a freshwater tank, consider the shape and size of the space where it will be installed. Rigid freshwater storage tanks are made of polyethylene that is rated for storing potable water. These tanks meet or exceed US Coast Guard ...
National Tank Outlet's marine tanks are manufactured from high-quality polyethylene resin that is BPA free, FDA-approved for potable water, and ANSI NSF 61 compliant. Plastic marine tanks are made by manufacturers Ronco and Dura-Cast. The tanks are rotationally-molded with polyethylene resin to offer superior durability, service life, and ...
Mar 24, 2015. #2. Wow, I replaced my tank in my 33.5 and it was a major job. I replaced it with a hard poly tank and I sized it so it fit through the companionway and then inside the remains of the galvanized tank after I had removed the top and baffle. Much bull work cutting up the top and removing the welded baffle.
Sailboat Water Tank Repair, Chain Locker modification, and Head Maintenance! All DIY + Final Details of Sailboat Tour Valiant 40 - the Details with Blue wat...
Ideal potable water tank materials include 316L stainless steel; fiberglass that is coated with FDA-approved gelcoat; or epoxy and virgin linear polyethylene. Because of its susceptibility to both galvanic and poultice corrosion, aluminum, while used occasionally for water tanks (as well as integrally aboard aluminum vessels), is less than ...
These boat water tanks are available for most boat makes and models and can be used as either a new or replacement water tank. Capacities range from 1 gallon to 202 gallons. Tank thickness is available from 0.1875 inches (3/16") to 0.375 inches (3/8"). Many tanks are rectangular in shape but custom-molded tanks are available for particular boat ...
Replace housing with filter element removed. Activate pump and open faucets one at a time. Once all faucets run clear, empty the water tank and refill with tank and hose cleaner. Let stand several hours, then pump the tank dry, replace the water filter element, and refill the tank with clean water.
Water Tank Size. Let's now see some examples of water tank sizes on different types of sailboats: The Bavaria Cruiser 34 has a 39-gallon water tank capacity. The Hunter 32 Vision has a 50-gallon water tank capacity and the tank is located under the V-berth. The Catalina 310 has a 55-gallon water tank capacity.
Plastic holding tanks and water tanks have the advantage of not corroding, but they are hardly failure proof. Plastic holding tanks can crack and fail under extreme vacuum pressure if the vent is clogged. An errant drill or saw used to make adjacent repairs can puncture a tank. Or a poorly secured tank can be hurled across a cabin and crack.
This is a video how to install a boat holding tank. PVC pipe for marine holding tank systems is superior in every way to marine sanitation hose and much chea...
Water tank replacement for your boat is easy, convenient and affordable when you partner with the tank fabrication and replacement crew at Angel's Marine, the complete watercraft repair specialists for the Dickinson, Galveston, Clear Lake and Texas City, Texas area. We are ready to help if your boat's water tank is obsolete, damaged or leaking.
Older Island Packets had aluminium tanks. The main issue has been the holding tanks. The combination of salt water and ammonia rotted the holding tanks. To add to the pain, the holding tanks were placed in very difficult places to replace. Paying someone to replace them can cost $10,000-$20,000 depedning on the model.
Snead Island Boat Works has become the go-to yard for Island Packet Maintenance. We've replaced hundreds of Island Packet fuel, freshwater and holding tanks. Chainplate replacement is routine here: our carpentry staff completes these jobs with the expertise required to leave the boat looking untouched. Chainplate replacement; Holding tank ...
Ranger Marine Boat Water Tank B5397 | 9 Gallon 14 x 14 1/2 Inch Poly. GLS Stock #: 7101613-XIN3546GB805. $49.95. Add to Cart. Wishlist. MasterCraft Boat Water Tank 553052 | 9 Gallon White Polyethylene. GLS Stock #: 8403009-NV234. $62.95. Add to Cart.
Plastimo Flexible Fresh Water Tank. If you want to add more water storage on your boat and installing a rigid tank is not possible / practical, there is an alternative. The Plastimo Flexible Fresh Water Tank holds 52 gallons of water and must be used in a horizontal orientation. As long as.